User Guide
Page 3
...15 Charging the Battery 16 Turning Your Radio On and Off . 19 Adjusting the Volume 20 Factory Default Settings 27 Entering Programming Mode .....28 Cloning Radio Settings 32 Advanced Features 33 Troubleshooting 35 Use and Care 38 Frequencies and Bandwidths.....39 Spirit GT Series... Programming ... 45 Warranty 46 Reading the Display 20 Talking and Receiving 21 Basic Radio Operation 21 Signal Strength and Channel Busy Indicators............
...15 Charging the Battery 16 Turning Your Radio On and Off . 19 Adjusting the Volume 20 Factory Default Settings 27 Entering Programming Mode .....28 Cloning Radio Settings 32 Advanced Features 33 Troubleshooting 35 Use and Care 38 Frequencies and Bandwidths.....39 Spirit GT Series... Programming ... 45 Warranty 46 Reading the Display 20 Talking and Receiving 21 Basic Radio Operation 21 Signal Strength and Channel Busy Indicators............

User Guide
Page 22
Getting Started Reading the Display Signal Strength and Channel Busy Indicator Battery Meter Channel Interference Eliminator Code Indicator Programming Mode Scan (CLS1410 Only) 20 VibraCall® Alert Indicator Frequency and Interference Eliminator Code Keypad Lock Frequency Indicator Microphone Gain and VOX (CLS1410 only) Note: Do not hold the radio too close to decrease the volume. Adjusting the Volume Turn P clockwise to increase the volume, and counterclockwise to your ear when adjusting the volume.
Getting Started Reading the Display Signal Strength and Channel Busy Indicator Battery Meter Channel Interference Eliminator Code Indicator Programming Mode Scan (CLS1410 Only) 20 VibraCall® Alert Indicator Frequency and Interference Eliminator Code Keypad Lock Frequency Indicator Microphone Gain and VOX (CLS1410 only) Note: Do not hold the radio too close to decrease the volume. Adjusting the Volume Turn P clockwise to increase the volume, and counterclockwise to your ear when adjusting the volume.
User Guide
Page 28
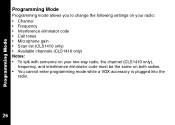
Programming Mode Programming Mode Programming mode allows you to change the following settings on your radio: • Channel • Frequency • Interference eliminator code • Call tones • Microphone gain • Scan list (CLS1410 only) • Available channels (CLS1410 only) Notes: • To talk with someone on your two-way radio, the channel (CLS1410 only), frequency, and interference eliminator code must be the same on both radios. • You cannot enter programming mode while a VOX accessory is plugged into the radio. 26
Programming Mode Programming Mode Programming mode allows you to change the following settings on your radio: • Channel • Frequency • Interference eliminator code • Call tones • Microphone gain • Scan list (CLS1410 only) • Available channels (CLS1410 only) Notes: • To talk with someone on your two-way radio, the channel (CLS1410 only), frequency, and interference eliminator code must be the same on both radios. • You cannot enter programming mode while a VOX accessory is plugged into the radio. 26

User Guide
Page 29
Factory Default Settings Your radio is programmed at the factory to the following settings: Programming Mode Frequency Channel 1 CLS1110 2 CLS1410 2 2 8 3 Not available 5 4 6 Code 1 Call Tone/ VibraCall® Off (0) VOX Not available Off (0) Microphone Gain 2 (medium sensitivity) To restore the factory settings, turn the radio on while holding Push to Talk and S for 3 seconds. 27
Factory Default Settings Your radio is programmed at the factory to the following settings: Programming Mode Frequency Channel 1 CLS1110 2 CLS1410 2 2 8 3 Not available 5 4 6 Code 1 Call Tone/ VibraCall® Off (0) VOX Not available Off (0) Microphone Gain 2 (medium sensitivity) To restore the factory settings, turn the radio on while holding Push to Talk and S for 3 seconds. 27
User Guide
Page 30
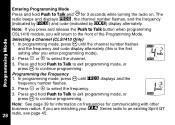
... Only) 1. Note: See page 39 for information on frequencies for 3 seconds while turning the radio on. In programming mode, press S until l displays and the frequency number flashes. 2. In programming mode, press S until the channel number flashes and the frequency and code display alternately (this is the first setting... after you are matching your _ Series radio to an existing Spirit GT 28 radio, see page 45. If you enter programming mode). 2. The radio beeps and displays k, the channel number flashes, and the frequency (indicated by l) and code (indicated by y) display alternately...
... Only) 1. Note: See page 39 for information on frequencies for 3 seconds while turning the radio on. In programming mode, press S until l displays and the frequency number flashes. 2. In programming mode, press S until the channel number flashes and the frequency and code display alternately (this is the first setting... after you are matching your _ Series radio to an existing Spirit GT 28 radio, see page 45. If you enter programming mode). 2. The radio beeps and displays k, the channel number flashes, and the frequency (indicated by l) and code (indicated by y) display alternately...
User Guide
Page 31
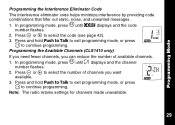
... you can reduce the number of available channels. 1. Note: The radio retains settings for channels made unavailable. 29 Programming Mode Programming the Interference Eliminator Code The interference eliminator code helps minimize interference by providing code combinations that filter out static, noise...1. Press and hold Push to Talk to exit programming mode, or press S to select the code (see page 42). 3. In programming mode, press S until y displays and the code number flashes. 2. Press [ or ] to continue programming. In programming mode, press S until = displays and the channel...
... you can reduce the number of available channels. 1. Note: The radio retains settings for channels made unavailable. 29 Programming Mode Programming the Interference Eliminator Code The interference eliminator code helps minimize interference by providing code combinations that filter out static, noise...1. Press and hold Push to Talk to exit programming mode, or press S to select the code (see page 42). 3. In programming mode, press S until y displays and the code number flashes. 2. Press [ or ] to continue programming. In programming mode, press S until = displays and the channel...

User Guide
Page 32
... transmit your group so you can change this setting to choose a distinctive call tone. Press and hold Push to Talk to exit programming mode, or press S to hear and select the call tone. The VibraCall® feature is an additional call tone option that you are about to ... them that makes the CLS1410 radio vibrate briefly when it receives if you have not transmitted or received in your call tone, press B on . Programming Mode Programming Call Tones and VibraCall® (CLS1410 only) Your radio can transmit call tones to other radios in the last 30 seconds. Your radio is on...
... transmit your group so you can change this setting to choose a distinctive call tone. Press and hold Push to Talk to exit programming mode, or press S to hear and select the call tone. The VibraCall® feature is an additional call tone option that you are about to ... them that makes the CLS1410 radio vibrate briefly when it receives if you have not transmitted or received in your call tone, press B on . Programming Mode Programming Call Tones and VibraCall® (CLS1410 only) Your radio can transmit call tones to other radios in the last 30 seconds. Your radio is on...

User Guide
Page 33
... hearing unwanted transmissions, you want to remove from the scan list. 3. Press T to display either Y to include the channel or n to skip channels. 1. display. 2. In programming mode, press S until g and ? Press and hold Push to Talk to exit programming mode, or press S to select the sensitivity level: 3 = High sensitivity, for quiet environments...
... hearing unwanted transmissions, you want to remove from the scan list. 3. Press T to display either Y to include the channel or n to skip channels. 1. display. 2. In programming mode, press S until g and ? Press and hold Push to Talk to exit programming mode, or press S to select the sensitivity level: 3 = High sensitivity, for quiet environments...

User Guide
Page 34
... cloning LEDs was successful, P or Pass or "F" for cloning, but only the first channel is paired with the pocket containing the source radio. To exit programming mode on the source radio.
... cloning LEDs was successful, P or Pass or "F" for cloning, but only the first channel is paired with the pocket containing the source radio. To exit programming mode on the source radio.
User Guide
Page 47
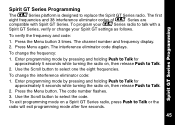
..._Series radio to Talk. 2. The channel number and frequency display. 2. To change the frequency: 1. To verify the frequency and code: 1. Enter programming mode by pressing and holding Push to Talk for approximately 5 seconds while turning the radio on a Spirit GT Series radio, press Push to select... one the eight frequencies. Enter programming mode by pressing and holding Push to Talk for approximately 5 seconds while turning the radio on, then release Push to talk with Spirit...
..._Series radio to Talk. 2. The channel number and frequency display. 2. To change the frequency: 1. To verify the frequency and code: 1. Enter programming mode by pressing and holding Push to Talk for approximately 5 seconds while turning the radio on a Spirit GT Series radio, press Push to select... one the eight frequencies. Enter programming mode by pressing and holding Push to Talk for approximately 5 seconds while turning the radio on, then release Push to talk with Spirit...

User Guide
Page 57
... Reference To enter programming mode, press and hold Push to change the code. The radio beeps and displays k, the channel number flashes, and the frequency (indicated by l) and code (...
... Reference To enter programming mode, press and hold Push to change the code. The radio beeps and displays k, the channel number flashes, and the frequency (indicated by l) and code (...
User Guide
Page 58
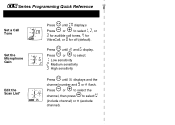
Press [ or ] to select the channel, then press T to select: 1 Low sensitivity 2 Medium sensitivity 3 High sensitivity Press S until h displays and the channel number and Y or n flash. Press [ or ] to select Y (include channel) or n (exclude channel). _Series Programming Quick Reference Set a Call Tone Set the Microphone Gain Edit the Scan List* Press S until g and ? Press S until E display.s Press [ or ] to select1, 2, or 3 for audible call tones, 4 for VibraCall, or 0 for off (default). display.
Press [ or ] to select the channel, then press T to select: 1 Low sensitivity 2 Medium sensitivity 3 High sensitivity Press S until h displays and the channel number and Y or n flash. Press [ or ] to select Y (include channel) or n (exclude channel). _Series Programming Quick Reference Set a Call Tone Set the Microphone Gain Edit the Scan List* Press S until g and ? Press S until E display.s Press [ or ] to select1, 2, or 3 for audible call tones, 4 for VibraCall, or 0 for off (default). display.


