User Guide
Page 3
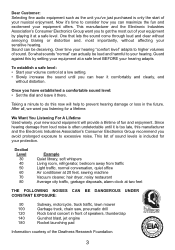
Sound can maximize the fun and excitement your hearing. Over time your hearing "comfort level" adapts to your equipment offers. So what sounds "normal" can hear it is too late, this by setting your equipment at two feet THE FOLLOWING NOISES CAN BE DANGEROUS UNDER CONSTANT...Electronics Group recommend you avoid prolonged exposure to consider how you have established a comfortable sound level: • Set the dial and leave it 's time to excessive noise. This manufacturer and the Electronic Industries Association's Consumer Electronics Group want you to prevent hearing ...
Sound can maximize the fun and excitement your hearing. Over time your hearing "comfort level" adapts to your equipment offers. So what sounds "normal" can hear it is too late, this by setting your equipment at two feet THE FOLLOWING NOISES CAN BE DANGEROUS UNDER CONSTANT...Electronics Group recommend you avoid prolonged exposure to consider how you have established a comfortable sound level: • Set the dial and leave it 's time to excessive noise. This manufacturer and the Electronic Industries Association's Consumer Electronics Group want you to prevent hearing ...
User Guide
Page 4
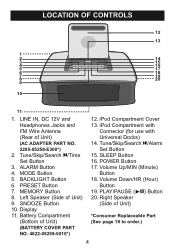
MODE Button 5. Tune/Skip/Search n/Alarm Set Button 15. ALARM Button 4. MEMORY Button 8. iPod Compartment Cover 13. PLAY/PAUSE (®p) Button 20. PRESET Button 7. Display 11. Volume Up/MIN (Minute) Button 18. ... of Unit) 9. Volume Down/HR (Hour) Button 19. BACKLIGHT Button 6. Left Speaker (Side of Unit) (AC ADAPTER PART NO. 2295-05258-E300*) 2. Tune/Skip/Search o/Time Set Button 3. iPod Compartment with Connector (for use with Universal Docks) 14. LOCATION OF CONTROLS 12 13 1 23 1145 4 16 5 17 6 18 78 1290 9 10 11...
MODE Button 5. Tune/Skip/Search n/Alarm Set Button 15. ALARM Button 4. MEMORY Button 8. iPod Compartment Cover 13. PLAY/PAUSE (®p) Button 20. PRESET Button 7. Display 11. Volume Up/MIN (Minute) Button 18. ... of Unit) 9. Volume Down/HR (Hour) Button 19. BACKLIGHT Button 6. Left Speaker (Side of Unit) (AC ADAPTER PART NO. 2295-05258-E300*) 2. Tune/Skip/Search o/Time Set Button 3. iPod Compartment with Connector (for use with Universal Docks) 14. LOCATION OF CONTROLS 12 13 1 23 1145 4 16 5 17 6 18 78 1290 9 10 11...
User Guide
Page 11
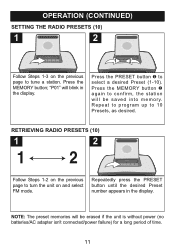
OPERATION (CONTINUED) SETTING THE RADIO PRESETS (10) 1 2 1 2 Follow Steps 1-3 on and select FM mode. Press the MEMORY button; "P01" will blink in the display. Press the MEMORY button 2 ...). NOTE: The preset memories will be erased if the unit is without power (no batteries/AC adapter isn't connected/power failure) for a long period of time. 11 Repeatedly press the PRESET button until the desired Preset number appears in the display.
OPERATION (CONTINUED) SETTING THE RADIO PRESETS (10) 1 2 1 2 Follow Steps 1-3 on and select FM mode. Press the MEMORY button; "P01" will blink in the display. Press the MEMORY button 2 ...). NOTE: The preset memories will be erased if the unit is without power (no batteries/AC adapter isn't connected/power failure) for a long period of time. 11 Repeatedly press the PRESET button until the desired Preset number appears in the display.
User Guide
Page 12
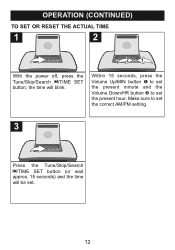
the time will be set the present hour. Make sure to set . 12 Within 15 seconds, press the Volume Up/MIN button 1 to set the present minute and the Volume Down/HR button 2 to set the correct AM/PM setting. 3 Press the Tune/Skip/Search o/TIME SET button (or wait approx. 15 seconds) and the time will blink. OPERATION (CONTINUED) TO SET OR RESET THE ACTUAL TIME 1 2 2 1 With the power off, press the Tune/Skip/Search o/TIME SET button;
the time will be set the present hour. Make sure to set . 12 Within 15 seconds, press the Volume Up/MIN button 1 to set the present minute and the Volume Down/HR button 2 to set the correct AM/PM setting. 3 Press the Tune/Skip/Search o/TIME SET button (or wait approx. 15 seconds) and the time will blink. OPERATION (CONTINUED) TO SET OR RESET THE ACTUAL TIME 1 2 2 1 With the power off, press the Tune/Skip/Search o/TIME SET button;
User Guide
Page 13
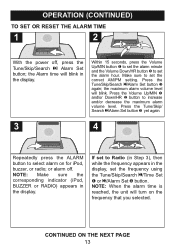
...and/or decrease the maximum alarm volume level. Press the Volume Up/MIN 1 and/or Down/HR 2 button to set the frequency using the Tune/Skip/Search o/Time Set 1 or n/Alarm Set 2 button. the maximum alarm volume level will turn on for iPod, buzzer, or radio; Make sure to select ...alarm on the frequency that you selected. Press the Tune/Skip/Search n/Alarm Set button 3 again; NOTE: Make sure the ...
...and/or decrease the maximum alarm volume level. Press the Volume Up/MIN 1 and/or Down/HR 2 button to set the frequency using the Tune/Skip/Search o/Time Set 1 or n/Alarm Set 2 button. the maximum alarm volume level will turn on for iPod, buzzer, or radio; Make sure to select ...alarm on the frequency that you selected. Press the Tune/Skip/Search n/Alarm Set button 3 again; NOTE: Make sure the ...
User Guide
Page 14
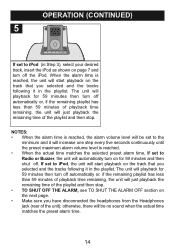
...continuously until the preset maximum alarm volume level is reached, the alarm volume level will be no sound when the actual time matches the preset alarm time. 14 If set to iPod, the unit will start playback on the track that you selected and the tracks following it in the playlist....remaining playlist has less than 59 minutes of playback time remaining, the unit will be set to the minimum and it in the playlist. NOTES: • When the alarm time is reached. • When the actual time matches the selected preset alarm time, if set to Radio or Buzzer, the unit will just ...
...continuously until the preset maximum alarm volume level is reached, the alarm volume level will be no sound when the actual time matches the preset alarm time. 14 If set to iPod, the unit will start playback on the track that you selected and the tracks following it in the playlist....remaining playlist has less than 59 minutes of playback time remaining, the unit will be set to the minimum and it in the playlist. NOTES: • When the alarm time is reached. • When the actual time matches the selected preset alarm time, if set to Radio or Buzzer, the unit will just ...
User Guide
Page 17
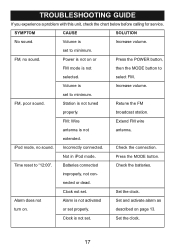
... selected. described on . SYMPTOM CAUSE SOLUTION No sound. select FM. Incorrectly connected. Press the MODE button. or set to "12:00". Set the clock. 17 set properly. FM, no sound. Power is not on or Press the POWER button, FM mode is not tuned Retune the FM ...Check the batteries. broadcast station. improperly, not con- Not in iPod mode. nected or dead. Clock is not activated Set and activate alarm as turn on page 13. Time reset to minimum. extended. Alarm does not Alarm is not set. Set the clock. FM, poor sound. Volume is Increase volume.
... selected. described on . SYMPTOM CAUSE SOLUTION No sound. select FM. Incorrectly connected. Press the MODE button. or set to "12:00". Set the clock. 17 set properly. FM, no sound. Power is not on or Press the POWER button, FM mode is not tuned Retune the FM ...Check the batteries. broadcast station. improperly, not con- Not in iPod mode. nected or dead. Clock is not activated Set and activate alarm as turn on page 13. Time reset to minimum. extended. Alarm does not Alarm is not set. Set the clock. FM, poor sound. Volume is Increase volume.


