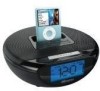

User Guide
Page 1
Downloaded from www.Manualslib.com manuals search engine
Downloaded from www.Manualslib.com manuals search engine
User Guide
Page 2
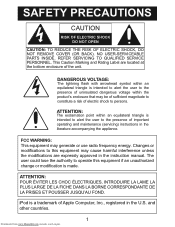
...an equilateral triangle is intended to alert the user to persons. This Caution Marking and Rating Label are expressly approved in the instruction manual. ATTENTION: POUR ÉVITER LES CHOC ÉLECTRIQUES, INTRODUIRE LA LAME LA PLUS LARGE DE LA FICHE DANS LA BORNE ...at the bottom enclosure of important operating and maintenance (servicing) instructions in the U.S. and other countries. 1 Downloaded from www.Manualslib.com manuals search engine FCC WARNING: This equipment may generate or use radio frequency energy. SAFETY PRECAUTIONS CAUTION RISK OF ELECTRIC SHOCK DO NOT OPEN ...
...an equilateral triangle is intended to alert the user to persons. This Caution Marking and Rating Label are expressly approved in the instruction manual. ATTENTION: POUR ÉVITER LES CHOC ÉLECTRIQUES, INTRODUIRE LA LAME LA PLUS LARGE DE LA FICHE DANS LA BORNE ...at the bottom enclosure of important operating and maintenance (servicing) instructions in the U.S. and other countries. 1 Downloaded from www.Manualslib.com manuals search engine FCC WARNING: This equipment may generate or use radio frequency energy. SAFETY PRECAUTIONS CAUTION RISK OF ELECTRIC SHOCK DO NOT OPEN ...
User Guide
Page 3
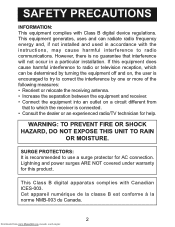
... receiving antenna. • Increase the separation between the equipment and receiver. • Connect the equipment into an outlet on a circuit different from www.Manualslib.com manuals search engine
... receiving antenna. • Increase the separation between the equipment and receiver. • Connect the equipment into an outlet on a circuit different from www.Manualslib.com manuals search engine
User Guide
Page 4
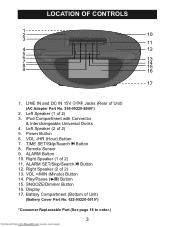
... 10. Right Speaker (2 of Unit) (Battery Cover Part No. 622-05220-0010*) *Consumer Replaceable Part (See page 18 to order.) 3 Downloaded from www.Manualslib.com manuals search engine Play/Pause (®p) Button 15. TIME SET/Skip/Search o Button 8. VOL +/MIN (Minute) Button 14. Battery Compartment (Bottom of 2) 13. Right Speaker (1 of...
... 10. Right Speaker (2 of Unit) (Battery Cover Part No. 622-05220-0010*) *Consumer Replaceable Part (See page 18 to order.) 3 Downloaded from www.Manualslib.com manuals search engine Play/Pause (®p) Button 15. TIME SET/Skip/Search o Button 8. VOL +/MIN (Minute) Button 14. Battery Compartment (Bottom of 2) 13. Right Speaker (1 of...
User Guide
Page 5
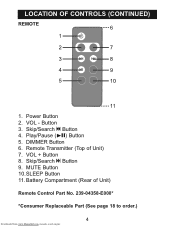
Button 3. Skip/Search n Button 9. DIMMER Button 6. VOL + Button 8. Play/Pause (®p) Button 5. Skip/Search o Button 4. MUTE Button 10.SLEEP Button 11. Remote Transmitter (Top of Unit) Remote Control Part No. 239-04358-E000* *Consumer Replaceable Part (See page 18 to order.) 4 Downloaded from www.Manualslib.com manuals search engine LOCATION OF CONTROLS (CONTINUED) REMOTE 6 1 2 7 3 8 4 9 5 10 11 1. Battery Compartment (Rear of Unit) 7. Power Button 2. VOL -
Button 3. Skip/Search n Button 9. DIMMER Button 6. VOL + Button 8. Play/Pause (®p) Button 5. Skip/Search o Button 4. MUTE Button 10.SLEEP Button 11. Remote Transmitter (Top of Unit) Remote Control Part No. 239-04358-E000* *Consumer Replaceable Part (See page 18 to order.) 4 Downloaded from www.Manualslib.com manuals search engine LOCATION OF CONTROLS (CONTINUED) REMOTE 6 1 2 7 3 8 4 9 5 10 11 1. Battery Compartment (Rear of Unit) 7. Power Button 2. VOL -
User Guide
Page 6
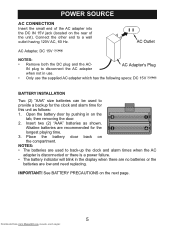
... for the longest playing time. 3. Insert two (2) "AAA" batteries as follows: 1. Place the battery door back on the next page. 5 Downloaded from www.Manualslib.com manuals search engine IMPORTANT! Connect the other end to disconnect the AC adapter when not in on the rear of the unit). IN plug to a wall...
... for the longest playing time. 3. Insert two (2) "AAA" batteries as follows: 1. Place the battery door back on the next page. 5 Downloaded from www.Manualslib.com manuals search engine IMPORTANT! Connect the other end to disconnect the AC adapter when not in on the rear of the unit). IN plug to a wall...
User Guide
Page 7
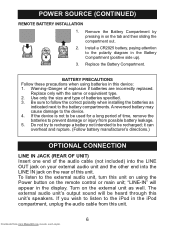
... to prevent damage or injury from this device: 1. If you wish to listen to the polarity diagram in this unit. 6 Downloaded from www.Manualslib.com manuals search engine BATTERY PRECAUTIONS Follow these precautions when using the Power button on the tab and then sliding the compartment out. 2. If the device is...
... to prevent damage or injury from this device: 1. If you wish to listen to the polarity diagram in this unit. 6 Downloaded from www.Manualslib.com manuals search engine BATTERY PRECAUTIONS Follow these precautions when using the Power button on the tab and then sliding the compartment out. 2. If the device is...
User Guide
Page 8
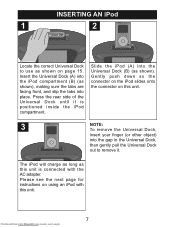
... it . Insert the Universal Dock (A) into the iPod compartment (B) (as shown). The iPod will charge as long as this unit. 7 Downloaded from www.Manualslib.com manuals search engine INSERTING AN iPod 1 2 (A) (B) (A) (B) Locate the correct Universal Dock to use as shown on this unit. 3 NOTE: To remove the Universal Dock, insert your...
... it . Insert the Universal Dock (A) into the iPod compartment (B) (as shown). The iPod will charge as long as this unit. 7 Downloaded from www.Manualslib.com manuals search engine INSERTING AN iPod 1 2 (A) (B) (A) (B) Locate the correct Universal Dock to use as shown on this unit. 3 NOTE: To remove the Universal Dock, insert your...
User Guide
Page 9
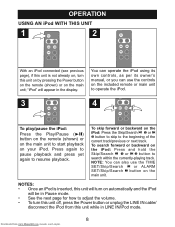
... 1 2 With an iPod connected (see previous page), if this unit is inserted, this unit while in LINE IN/iPod mode. 8 Downloaded from www.Manualslib.com manuals search engine To search forward or backward on the main unit.
... 1 2 With an iPod connected (see previous page), if this unit is inserted, this unit while in LINE IN/iPod mode. 8 Downloaded from www.Manualslib.com manuals search engine To search forward or backward on the main unit.
User Guide
Page 10
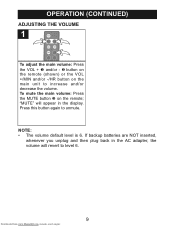
... and then plug back in the display. "MUTE" will appear in the AC adapter, the volume will revert to level 6. 9 Downloaded from www.Manualslib.com manuals search engine NOTE: • The volume default level is 6. To mute the main volume: Press the MUTE button 3 on the main unit to unmute.
... and then plug back in the display. "MUTE" will appear in the AC adapter, the volume will revert to level 6. 9 Downloaded from www.Manualslib.com manuals search engine NOTE: • The volume default level is 6. To mute the main volume: Press the MUTE button 3 on the main unit to unmute.
User Guide
Page 11
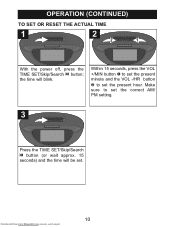
OPERATION (CONTINUED) TO SET OR RESET THE ACTUAL TIME 1 2 2 1 With the power off, press the TIME SET/Skip/Search o button; the time will be set the present hour. Make sure to set the correct AM/ PM setting. 3 Press the TIME SET/Skip/Search o button (or wait approx. 15 seconds) and the time will blink. 2 1 Within 15 seconds, press the VOL +/MIN button 1 to set the present minute and the VOL -/HR button 2 to set . 2 1 Downloaded from www.Manualslib.com manuals search engine 10
OPERATION (CONTINUED) TO SET OR RESET THE ACTUAL TIME 1 2 2 1 With the power off, press the TIME SET/Skip/Search o button; the time will be set the present hour. Make sure to set the correct AM/ PM setting. 3 Press the TIME SET/Skip/Search o button (or wait approx. 15 seconds) and the time will blink. 2 1 Within 15 seconds, press the VOL +/MIN button 1 to set the present minute and the VOL -/HR button 2 to set . 2 1 Downloaded from www.Manualslib.com manuals search engine 10
User Guide
Page 12
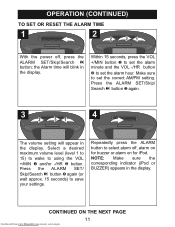
... 3 again (or wait approx. 15 seconds) to using the VOL +/MIN 1 and/or -/HR 2 button. CONTINUED ON THE NEXT PAGE Downloaded from www.Manualslib.com manuals search engine 11 Select a desired maximum volume level (level 1 to 15) to wake to save your settings. Within 15 seconds, press the VOL +/MIN button...
... 3 again (or wait approx. 15 seconds) to using the VOL +/MIN 1 and/or -/HR 2 button. CONTINUED ON THE NEXT PAGE Downloaded from www.Manualslib.com manuals search engine 11 Select a desired maximum volume level (level 1 to 15) to wake to save your settings. Within 15 seconds, press the VOL +/MIN button...
User Guide
Page 13
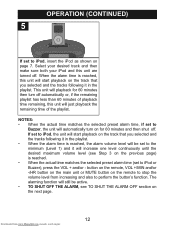
..., VOL +/MIN and/or -/HR button on the main unit or MUTE button on the remote to stop the volume level from www.Manualslib.com manuals search engine 12 The alarming function will playback for 60 minutes and then shut off . OPERATION (CONTINUED) 5 If set to perform the button's function. When...
..., VOL +/MIN and/or -/HR button on the main unit or MUTE button on the remote to stop the volume level from www.Manualslib.com manuals search engine 12 The alarming function will playback for 60 minutes and then shut off . OPERATION (CONTINUED) 5 If set to perform the button's function. When...
User Guide
Page 14
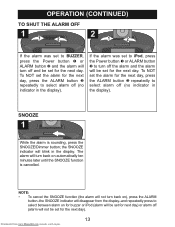
... on automatically ten minutes later until the SNOOZE function is sounding, press the SNOOZE/Dimmer button; the SNOOZE indicator will disappear from www.Manualslib.com manuals search engine 13
... on automatically ten minutes later until the SNOOZE function is sounding, press the SNOOZE/Dimmer button; the SNOOZE indicator will disappear from www.Manualslib.com manuals search engine 13
User Guide
Page 15
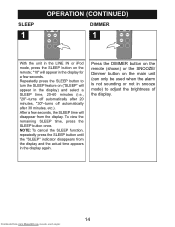
... automatically after 30 minutes, etc.). NOTE: To cancel the SLEEP function, repeatedly press the SLEEP button until the "SLEEP" indicator disappears from www.Manualslib.com manuals search engine 14 Repeatedly press the SLEEP button to adjust the brightness of the display. To view the remaining SLEEP time, press the SLEEP button...
... automatically after 30 minutes, etc.). NOTE: To cancel the SLEEP function, repeatedly press the SLEEP button until the "SLEEP" indicator disappears from www.Manualslib.com manuals search engine 14 Repeatedly press the SLEEP button to adjust the brightness of the display. To view the remaining SLEEP time, press the SLEEP button...
User Guide
Page 16
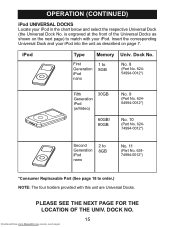
... four holders provided with your iPod in the chart below and select the respective Universal Dock (the Universal Dock No. Downloaded from www.Manualslib.com manuals search engine 15
... four holders provided with your iPod in the chart below and select the respective Universal Dock (the Universal Dock No. Downloaded from www.Manualslib.com manuals search engine 15
User Guide
Page 17
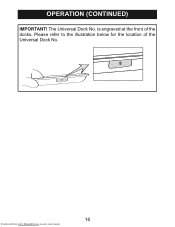
is engraved at the front of the Universal Dock No. 8 8 Downloaded from www.Manualslib.com manuals search engine 16 The Universal Dock No. Please refer to the illustration below for the location of the docks. OPERATION (CONTINUED) IMPORTANT!
is engraved at the front of the Universal Dock No. 8 8 Downloaded from www.Manualslib.com manuals search engine 16 The Universal Dock No. Please refer to the illustration below for the location of the docks. OPERATION (CONTINUED) IMPORTANT!
User Guide
Page 18
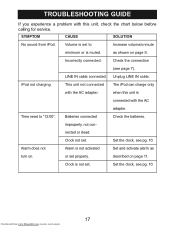
... the clock, see page 7). or set . Unplug LINE IN cable. iPod not charging. described on page 9. SYMPTOM CAUSE SOLUTION No sound from www.Manualslib.com manuals search engine 17 Time reset to Increase volume/unmute minimum or is not set properly. improperly, not con- Clock is muted. Check the connection (see...
... the clock, see page 7). or set . Unplug LINE IN cable. iPod not charging. described on page 9. SYMPTOM CAUSE SOLUTION No sound from www.Manualslib.com manuals search engine 17 Time reset to Increase volume/unmute minimum or is not set properly. improperly, not con- Clock is muted. Check the connection (see...
User Guide
Page 19
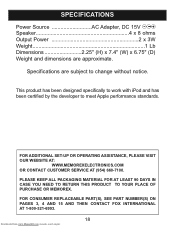
PLEASE KEEP ALL PACKAGING MATERIAL FOR AT LEAST 90 DAYS IN CASE YOU NEED TO RETURN THIS PRODUCT TO YOUR PLACE OF PURCHASE OR MEMOREX. FOR ADDITIONAL SET-UP OR OPERATING ASSISTANCE, PLEASE VISIT OUR WEBSITE AT: WWW.MEMOREXELECTRONICS.COM OR CONTACT CUSTOMER SERVICE AT (954) 660...-7100. Downloaded from www.Manualslib.com manuals search engine 18 FOR CONSUMER REPLACEABLE PART(S), SEE PART NUMBER(S) ON PAGES 3, 4 AND 15 AND THEN CONTACT FOX INTERNATIONAL AT 1-800-321-6993....
PLEASE KEEP ALL PACKAGING MATERIAL FOR AT LEAST 90 DAYS IN CASE YOU NEED TO RETURN THIS PRODUCT TO YOUR PLACE OF PURCHASE OR MEMOREX. FOR ADDITIONAL SET-UP OR OPERATING ASSISTANCE, PLEASE VISIT OUR WEBSITE AT: WWW.MEMOREXELECTRONICS.COM OR CONTACT CUSTOMER SERVICE AT (954) 660...-7100. Downloaded from www.Manualslib.com manuals search engine 18 FOR CONSUMER REPLACEABLE PART(S), SEE PART NUMBER(S) ON PAGES 3, 4 AND 15 AND THEN CONTACT FOX INTERNATIONAL AT 1-800-321-6993....

User Guide
Page 20
Memcorp, Inc. Weston, FL Printed in Hong Kong Visit our website at www.memorexelectronics.com Downloaded from www.Manualslib.com manuals search engine 201-05220-E010
Memcorp, Inc. Weston, FL Printed in Hong Kong Visit our website at www.memorexelectronics.com Downloaded from www.Manualslib.com manuals search engine 201-05220-E010

