
Manual
Page 1
... are expressly approved in the instruction manual. and other countries. 1 NO USER-SERVICEABLE PARTS INSIDE. ATTENTION: The exclamation point within an equilateral triangle is made. iPod is intended to alert the user to beam. REFER SERVICING TO QUALIFIED SERVICE PERSONNEL. (This Caution Marking with Rating Label is located at the bottom...
... are expressly approved in the instruction manual. and other countries. 1 NO USER-SERVICEABLE PARTS INSIDE. ATTENTION: The exclamation point within an equilateral triangle is made. iPod is intended to alert the user to beam. REFER SERVICING TO QUALIFIED SERVICE PERSONNEL. (This Caution Marking with Rating Label is located at the bottom...
Manual
Page 6
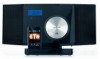
.... STOP/BAND (X) Button 15. PLAY/PAUSE (®p)/Mem Up Button 18. CD Indicator 11. Tune/Skip/Search o/n Buttons 16. CD Compartment (Under CD Door) 23. Stand 6 REPEAT/Mem Down Button 2. iPod Dock with Connector, Dock Adapter & Interchangeable Docks 14. Right Speaker 21. Remote Sensor 24. VOLUME Up/Down Buttons 3. FUNCTION Button 7. RADIO Indicator...22 12 23 13 24 1. LCD Display 9. Left Speaker 13. Clock Set/Memory Button 19. STANDBY/Power button 4. Headphones Jack 5. EQ Button 6. SLEEP Button 8. CD OPEN/CLOSE Button 17. iPod/AUX Button 20. CD Door 22.
.... STOP/BAND (X) Button 15. PLAY/PAUSE (®p)/Mem Up Button 18. CD Indicator 11. Tune/Skip/Search o/n Buttons 16. CD Compartment (Under CD Door) 23. Stand 6 REPEAT/Mem Down Button 2. iPod Dock with Connector, Dock Adapter & Interchangeable Docks 14. Right Speaker 21. Remote Sensor 24. VOLUME Up/Down Buttons 3. FUNCTION Button 7. RADIO Indicator...22 12 23 13 24 1. LCD Display 9. Left Speaker 13. Clock Set/Memory Button 19. STANDBY/Power button 4. Headphones Jack 5. EQ Button 6. SLEEP Button 8. CD OPEN/CLOSE Button 17. iPod/AUX Button 20. CD Door 22.
Manual
Page 8
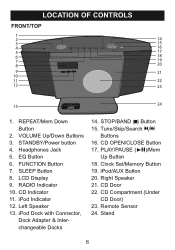
... (See page Button 33 to order.) 22. STOP/BAND (X) Button 22 12. DISPLAY Button 5. CHAPTER Up/Down Buttons 9 10 21 11. MENU Up Button 16. CD OPEN/CLOSE Button 15. Tune/Skip/Search n Button 19. PLAY/PAUSE in the same way as the buttons on (®p)/Mem Up Button the main...
... (See page Button 33 to order.) 22. STOP/BAND (X) Button 22 12. DISPLAY Button 5. CHAPTER Up/Down Buttons 9 10 21 11. MENU Up Button 16. CD OPEN/CLOSE Button 15. Tune/Skip/Search n Button 19. PLAY/PAUSE in the same way as the buttons on (®p)/Mem Up Button the main...
Manual
Page 11
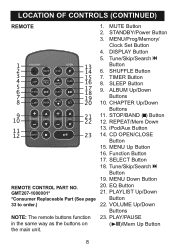
...and the sound will be unplugged when not listening to the external audio unit. the iPod indicator will be heard through the extrernal unit's speakers. NOTE: It is inserted in the display. Press the iPod/AUX button to this unit as well. The external audio unit's output sound will appear...unit on using the STANDBY/Power button, and turn this unit's speakers. Play this jack. HEADPHONES JACK For private listening, connect 3.5mm (32 ohm) stereo headphones (not included) to select AUX IN mode; AUX OUT JACK (REAR OF UNIT) Insert one end of the audio cable (not included) into...
...and the sound will be unplugged when not listening to the external audio unit. the iPod indicator will be heard through the extrernal unit's speakers. NOTE: It is inserted in the display. Press the iPod/AUX button to this unit as well. The external audio unit's output sound will appear...unit on using the STANDBY/Power button, and turn this unit's speakers. Play this jack. HEADPHONES JACK For private listening, connect 3.5mm (32 ohm) stereo headphones (not included) to select AUX IN mode; AUX OUT JACK (REAR OF UNIT) Insert one end of the audio cable (not included) into...
Manual
Page 14
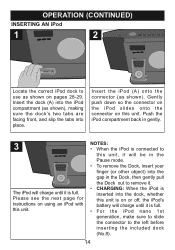
...'s two tabs are facing front, and slip the tabs into the dock, whether this unit, it will charge until it is full. • For the iPod nano 1st generation, make sure to slide the connector to the left before inserting the included dock (No.8). 14 Gently push down so the connector... connected to this unit is on this unit. Please see the next page for instructions on pages 28-29. Push the iPod compartment back in gently. 3 The iPod will be in the Pause mode. • To remove the Dock, insert your finger (or other object) into the gap in the Dock, then...
...'s two tabs are facing front, and slip the tabs into the dock, whether this unit, it will charge until it is full. • For the iPod nano 1st generation, make sure to slide the connector to the left before inserting the included dock (No.8). 14 Gently push down so the connector... connected to this unit is on this unit. Please see the next page for instructions on pages 28-29. Push the iPod compartment back in gently. 3 The iPod will be in the Pause mode. • To remove the Dock, insert your finger (or other object) into the gap in the Dock, then...
Manual
Page 15
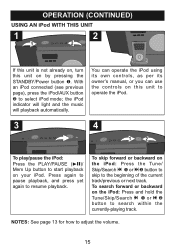
...pressing the STANDBY/Power button 1. Press again to pause playback, and press yet again to select iPod mode; With an iPod connected (see previous page), press the iPod/AUX button 2 to resume playback. OPERATION (CONTINUED) USING AN iPod WITH THIS UNIT 1 1 2 2 If this unit is not already on, turn this unit... to operate the iPod. 3 4 1 2 To play/pause the iPod: Press the PLAY/PAUSE (®p)/ Mem Up button to start playback on the iPod: Press the Tune/ Skip/Search o 1 or n 2 button to skip to the beginning of the ...
...pressing the STANDBY/Power button 1. Press again to pause playback, and press yet again to select iPod mode; With an iPod connected (see previous page), press the iPod/AUX button 2 to resume playback. OPERATION (CONTINUED) USING AN iPod WITH THIS UNIT 1 1 2 2 If this unit is not already on, turn this unit... to operate the iPod. 3 4 1 2 To play/pause the iPod: Press the PLAY/PAUSE (®p)/ Mem Up button to start playback on the iPod: Press the Tune/ Skip/Search o 1 or n 2 button to skip to the beginning of the ...
Manual
Page 16
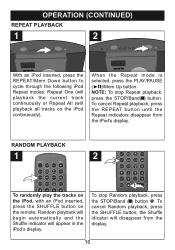
...PLAY/PAUSE (®p)/Mem Up button. the Shuffle idicator will disappear from the iPod's display. RANDOM PLAYBACK 1 F 2 F 2 To randomly play the tracks on the iPod, with an iPod inserted, press the SHUFFLE button on the iPod continuously). To cancel Random playback, press the SHUFFLE button; OPERATION (CONTINUED)... or Repeat All (will playback all tracks on the remote; Random playback will begin automatically and the Shuffle indicator will appear in the iPod's display. 1 To stop Repeat playback, press the STOP/Band(X) button. NOTE: To stop Random playback, press the STOP/Band ...
...PLAY/PAUSE (®p)/Mem Up button. the Shuffle idicator will disappear from the iPod's display. RANDOM PLAYBACK 1 F 2 F 2 To randomly play the tracks on the iPod, with an iPod inserted, press the SHUFFLE button on the iPod continuously). To cancel Random playback, press the SHUFFLE button; OPERATION (CONTINUED)... or Repeat All (will playback all tracks on the remote; Random playback will begin automatically and the Shuffle indicator will appear in the iPod's display. 1 To stop Repeat playback, press the STOP/Band(X) button. NOTE: To stop Random playback, press the STOP/Band ...
Manual
Page 17
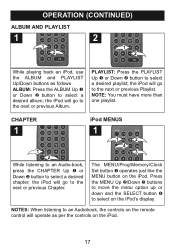
...the next or previous Album. OPERATION (CONTINUED) ALBUM AND PLAYLIST 1 2 1 2 1 2 While playing back an iPod, use the ALBUM and PLAYLIST Up/Down buttons as per the controls on the iPod. 17 iPod MENUS 1 1 2F 4 3 The MENU/Prog/Memory/Clock Set button 1 operates just like the MENU button on the... iPod's display. the iPod will go to select on the iPod. the iPod will operate as follows ALBUM: Press the ALBUM Up 1 or Down 2 button to the next or previous Chapter. PLAYLIST: Press ...
...the next or previous Album. OPERATION (CONTINUED) ALBUM AND PLAYLIST 1 2 1 2 1 2 While playing back an iPod, use the ALBUM and PLAYLIST Up/Down buttons as per the controls on the iPod. 17 iPod MENUS 1 1 2F 4 3 The MENU/Prog/Memory/Clock Set button 1 operates just like the MENU button on the... iPod's display. the iPod will go to select on the iPod. the iPod will operate as follows ALBUM: Press the ALBUM Up 1 or Down 2 button to the next or previous Chapter. PLAYLIST: Press ...
Manual
Page 26
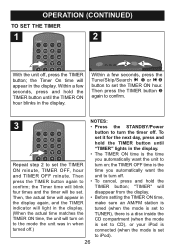
..., make sure an AM/FM station is tuned (when the mode is set to TUNER), there is a disc inside the CD compartment (when the mode is set to CD), or your iPod is connected (when the mode is the time you automatically want the unit to turn on to set the TIMER ON... seconds, press and hold the TIMER button until the TIMER ON hour blinks in when turned off.) NOTES: • Press the STANDBY/Power button to iPod). 26 the TIMER OFF time is set it for the next day, press and hold the TIMER button until "TIMER" lights in the display.
..., make sure an AM/FM station is tuned (when the mode is set to TUNER), there is a disc inside the CD compartment (when the mode is set to CD), or your iPod is connected (when the mode is the time you automatically want the unit to turn on to set the TIMER ON... seconds, press and hold the TIMER button until the TIMER ON hour blinks in when turned off.) NOTES: • Press the STANDBY/Power button to iPod). 26 the TIMER OFF time is set it for the next day, press and hold the TIMER button until "TIMER" lights in the display.
Manual
Page 28
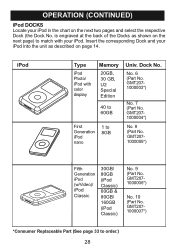
... the unit as shown on the next page) to match with color display Memory 20GB, 30 GB, U2 Special Edition 40 to 60GB First Generation iPod nano 1 to order.) 28 Dock No. GMT2071000004*) No. 8 (Part No. is engraved at the back of the Docks as described on the next two ...pages and select the respective Dock (the Dock No. iPod Type iPod Photo/ iPod with your iPod in the chart on page 14. No. 6 (Part No. GMT2071000006*) No. 10 (Part No. GMT2071000003*) No. 7 (Part No. GMT2071000005*) Fifth Generation...
... the unit as shown on the next page) to match with color display Memory 20GB, 30 GB, U2 Special Edition 40 to 60GB First Generation iPod nano 1 to order.) 28 Dock No. GMT2071000004*) No. 8 (Part No. is engraved at the back of the Docks as described on the next two ...pages and select the respective Dock (the Dock No. iPod Type iPod Photo/ iPod with your iPod in the chart on page 14. No. 6 (Part No. GMT2071000006*) No. 10 (Part No. GMT2071000003*) No. 7 (Part No. GMT2071000005*) Fifth Generation...
Manual
Page 29
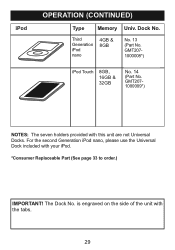
iPod OPERATION (CONTINUED) Type Memory Univ. Dock No. Third Generation iPod nano 4GB & 8GB No. 13 (Part No. GMT2071000009*) NOTES: The seven holders provided with the tabs. 29 GMT2071000008*) iPod Touch 8GB, 16GB & 32GB No. 14 (Part No. The Dock No. is engraved on the side of the unit with this unit are not Universal Docks. For the second Generation iPod nano, please use the Universal Dock included with your iPod. *Consumer Replaceable Part (See page 33 to order.) IMPORTANT!
iPod OPERATION (CONTINUED) Type Memory Univ. Dock No. Third Generation iPod nano 4GB & 8GB No. 13 (Part No. GMT2071000009*) NOTES: The seven holders provided with the tabs. 29 GMT2071000008*) iPod Touch 8GB, 16GB & 32GB No. 14 (Part No. The Dock No. is engraved on the side of the unit with this unit are not Universal Docks. For the second Generation iPod nano, please use the Universal Dock included with your iPod. *Consumer Replaceable Part (See page 33 to order.) IMPORTANT!

Manual
Page 30
Volume is not activated Set and activate timer as turn on. AM/FM, poor sound. iPod mode, no sound. improperly, not con- Clock not set properly. Timer does not Timer is Increase volume. described on , then press AM or FM mode ... the connection. FM: Wire Extend FM wire antenna is not tuned Retune the AM or FM properly. Set the clock. Station is not antenna. Press iPod/AUX button. nected or dead. or set . set to selected. reception is not pos- SYMPTOM CAUSE SOLUTION No sound. set to "12:00". AM: Unit...
Volume is not activated Set and activate timer as turn on. AM/FM, poor sound. iPod mode, no sound. improperly, not con- Clock not set properly. Timer does not Timer is Increase volume. described on , then press AM or FM mode ... the connection. FM: Wire Extend FM wire antenna is not tuned Retune the AM or FM properly. Set the clock. Station is not antenna. Press iPod/AUX button. nected or dead. or set . set to selected. reception is not pos- SYMPTOM CAUSE SOLUTION No sound. set to "12:00". AM: Unit...


