
Manual
Page 1
... triangle is a trademark of important operating and maintenance (servicing) instructions in the instruction manual. and other countries. 1 Changes or modifications to this equipment if an unauthorized change or modification is intended to alert the user to persons. The user could lose the authority to beam. FCC WARNING: This... ELECTRIC SHOCK DO NOT OPEN CAUTION: TO REDUCE THE RISK OF ELECTRIC SHOCK, DO NOT REMOVE COVER (OR BACK). Avoid direct exposure to operate this equipment may generate or use radio frequency energy. NO USER-SERVICEABLE PARTS INSIDE.
... triangle is a trademark of important operating and maintenance (servicing) instructions in the instruction manual. and other countries. 1 Changes or modifications to this equipment if an unauthorized change or modification is intended to alert the user to persons. The user could lose the authority to beam. FCC WARNING: This... ELECTRIC SHOCK DO NOT OPEN CAUTION: TO REDUCE THE RISK OF ELECTRIC SHOCK, DO NOT REMOVE COVER (OR BACK). Avoid direct exposure to operate this equipment may generate or use radio frequency energy. NO USER-SERVICEABLE PARTS INSIDE.
Manual
Page 2
This equipment generates, uses and can be determined by turning the equipment off and on, the user is connected. • Consult the dealer or an experienced radio/TV technician for help. LASER SAFETY: This unit employs a laser. Only qualified service personnel should attempt to service this product. Lightning and power surges ARE NOT covered under warranty for this device...
This equipment generates, uses and can be determined by turning the equipment off and on, the user is connected. • Consult the dealer or an experienced radio/TV technician for help. LASER SAFETY: This unit employs a laser. Only qualified service personnel should attempt to service this product. Lightning and power surges ARE NOT covered under warranty for this device...
Manual
Page 3
... setting your equipment at a safe level BEFORE your sensitive hearing. We Want You Listening For A Lifetime Used wisely, your protection. Dear Customer: Selecting fine audio equipment such as the unit you listening for your new sound equipment will help to consider how you to your equipment offers. Over time your hearing "comfort level" adapts to higher volumes of sound...
... setting your equipment at a safe level BEFORE your sensitive hearing. We Want You Listening For A Lifetime Used wisely, your protection. Dear Customer: Selecting fine audio equipment such as the unit you listening for your new sound equipment will help to consider how you to your equipment offers. Over time your hearing "comfort level" adapts to higher volumes of sound...
Manual
Page 4
...connected to an outdoor antenna. 1. The openings should not be located in the vicinity of overhead power lines or other similar surface. This is a safety feature. POWER-CORD PROTECTION Power-supply cords should be routed so that these are general precautions and may not pertain to your obsolete outlet. Use only with a cart, stand, tripod, bracket or table... antenna or cable system. When installing an outside antenna system should never be blocked by the product's manufacturer as a bookcase or rack unless proper ventilation is provided or the manufacturer's instructions have the ...
...connected to an outdoor antenna. 1. The openings should not be located in the vicinity of overhead power lines or other similar surface. This is a safety feature. POWER-CORD PROTECTION Power-supply cords should be routed so that these are general precautions and may not pertain to your obsolete outlet. Use only with a cart, stand, tripod, bracket or table... antenna or cable system. When installing an outside antenna system should never be blocked by the product's manufacturer as a bookcase or rack unless proper ventilation is provided or the manufacturer's instructions have the ...
Manual
Page 5
... product should be connected to the grounding system of the building, as close to provide some protection against voltage surges and built-up static charges. REPLACEMENT PARTS When replacement parts are covered by the operating instructions, as an adjustment of the National Electric Code, ANSI/NFPA 70, provides information with them might be sure the service technician uses replacement parts specified by a qualified...
... product should be connected to the grounding system of the building, as close to provide some protection against voltage surges and built-up static charges. REPLACEMENT PARTS When replacement parts are covered by the operating instructions, as an adjustment of the National Electric Code, ANSI/NFPA 70, provides information with them might be sure the service technician uses replacement parts specified by a qualified...
Manual
Page 6
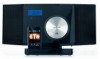
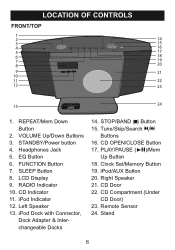
... Down Button 2. FUNCTION Button 7. RADIO Indicator 10. iPod Dock with Connector, Dock Adapter & Interchangeable Docks 14. STOP/BAND (X) Button 15. Right Speaker 21. Headphones Jack 5. CD Door 22. EQ Button 6. CD Indicator 11. Remote Sensor 24. iPod/AUX Button 20. Stand 6 PLAY/PAUSE (®p)/Mem Up Button 18. CD OPEN/CLOSE Button 17. iPod Indicator 12. Left Speaker 13. LCD Display 9. Tune/Skip/Search o/n Buttons 16. CD Compartment (Under CD Door) 23. LOCATION OF CONTROLS...
... Down Button 2. FUNCTION Button 7. RADIO Indicator 10. iPod Dock with Connector, Dock Adapter & Interchangeable Docks 14. STOP/BAND (X) Button 15. Right Speaker 21. Headphones Jack 5. CD Door 22. EQ Button 6. CD Indicator 11. Remote Sensor 24. iPod/AUX Button 20. Stand 6 PLAY/PAUSE (®p)/Mem Up Button 18. CD OPEN/CLOSE Button 17. iPod Indicator 12. Left Speaker 13. LCD Display 9. Tune/Skip/Search o/n Buttons 16. CD Compartment (Under CD Door) 23. LOCATION OF CONTROLS...
Manual
Page 8
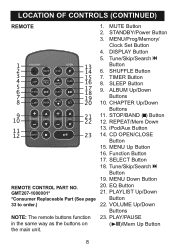
.../Memory/ Clock Set Button 4. SHUFFLE Button 3 4 5 6 7 15 7. MENU Down Button REMOTE CONTROL PART NO. 20. TIMER Button F 16 8. PLAY/PAUSE in the same way as the buttons on (®p)/Mem Up Button the main unit. 8 ALBUM Up/Down Buttons 8 20 10. Tune/Skip/Search o 1 13 Button 2 14 6. STOP/BAND (X) Button 22 12. LOCATION OF CONTROLS (CONTINUED) REMOTE 1. STANDBY/Power Button 3. CHAPTER Up/Down Buttons 9 10 21 11. VOLUME Up/Down Buttons NOTE: The remote buttons function...
.../Memory/ Clock Set Button 4. SHUFFLE Button 3 4 5 6 7 15 7. MENU Down Button REMOTE CONTROL PART NO. 20. TIMER Button F 16 8. PLAY/PAUSE in the same way as the buttons on (®p)/Mem Up Button the main unit. 8 ALBUM Up/Down Buttons 8 20 10. Tune/Skip/Search o 1 13 Button 2 14 6. STOP/BAND (X) Button 22 12. LOCATION OF CONTROLS (CONTINUED) REMOTE 1. STANDBY/Power Button 3. CHAPTER Up/Down Buttons 9 10 21 11. VOLUME Up/Down Buttons NOTE: The remote buttons function...
Manual
Page 9
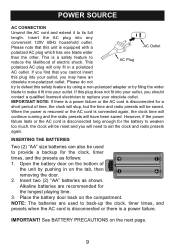
... an obsolete non-polarized outlet. When the power is resumed or the AC cord is a safety feature to set the clock and radio presets again. IMPORTANT! However, if the power failure lasts or the AC cord is a power failure. Alkaline batteries are used to replace your obsolete outlet. NOTE: The batteries are recommended for the clock, timer times, and the presets as shown. Insert the...
... an obsolete non-polarized outlet. When the power is resumed or the AC cord is a safety feature to set the clock and radio presets again. IMPORTANT! However, if the power failure lasts or the AC cord is a power failure. Alkaline batteries are used to replace your obsolete outlet. NOTE: The batteries are recommended for the clock, timer times, and the presets as shown. Insert the...
Manual
Page 11
... AUX IN mode; Play this unit as well. HEADPHONES JACK For private listening, connect 3.5mm (32 ohm) stereo headphones (not included) to the external audio unit, turn this unit on using the STANDBY/Power button, and turn on the rear of this unit. The external audio unit's output sound will appear in the display. AUX OUT JACK (REAR OF UNIT) Insert one end of the audio cable...
... AUX IN mode; Play this unit as well. HEADPHONES JACK For private listening, connect 3.5mm (32 ohm) stereo headphones (not included) to the external audio unit, turn this unit on using the STANDBY/Power button, and turn on the rear of this unit. The external audio unit's output sound will appear in the display. AUX OUT JACK (REAR OF UNIT) Insert one end of the audio cable...
Manual
Page 14
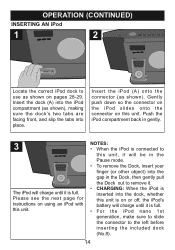
...'s battery will charge until it is on this unit. NOTES: • When the iPod is connected to this unit is full. Push the iPod compartment back in the Dock, then gently pull the Dock out to remove it. • CHARGING: When the iPod is inserted into the dock, whether this unit, it will be in the Pause mode...
...'s battery will charge until it is on this unit. NOTES: • When the iPod is connected to this unit is full. Push the iPod compartment back in the Dock, then gently pull the Dock out to remove it. • CHARGING: When the iPod is inserted into the dock, whether this unit, it will be in the Pause mode...
Manual
Page 15
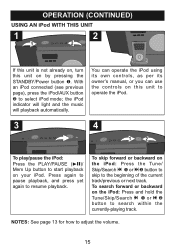
... music will playback automatically. Press again to pause playback, and press yet again to adjust the volume. 15 NOTES: See page 13 for how to resume playback. With an iPod connected (see previous page), press the iPod/AUX button 2 to search within the currently-playing track. You can operate the iPod using its own controls, as per its owner's manual...
... music will playback automatically. Press again to pause playback, and press yet again to adjust the volume. 15 NOTES: See page 13 for how to resume playback. With an iPod connected (see previous page), press the iPod/AUX button 2 to search within the currently-playing track. You can operate the iPod using its own controls, as per its owner's manual...
Manual
Page 17
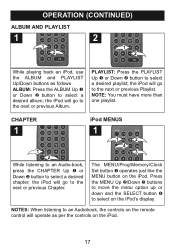
... F 1 2 While listening to an Audio-book, press the CHAPTER Up 1 or Down 2 button to select a desired playlist; Press the MENU Up 2/Down 3 buttons to move the menu option up or down and the SELECT button 4 to the next or previous Playlist....Clock Set button 1 operates just like the MENU button on the iPod. PLAYLIST: Press the PLAYLIST Up 1 or Down 2 button to select a desired chapter; the iPod will go to an Audiobook, the controls on the remote control will go to select a desired album; OPERATION (CONTINUED) ALBUM AND PLAYLIST 1 2 1 2 1 2 While playing back an iPod, use...
... F 1 2 While listening to an Audio-book, press the CHAPTER Up 1 or Down 2 button to select a desired playlist; Press the MENU Up 2/Down 3 buttons to move the menu option up or down and the SELECT button 4 to the next or previous Playlist....Clock Set button 1 operates just like the MENU button on the iPod. PLAYLIST: Press the PLAYLIST Up 1 or Down 2 button to select a desired chapter; the iPod will go to an Audiobook, the controls on the remote control will go to select a desired album; OPERATION (CONTINUED) ALBUM AND PLAYLIST 1 2 1 2 1 2 While playing back an iPod, use...
Manual
Page 18
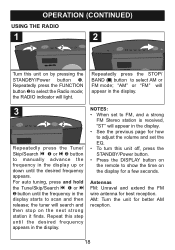
...USING THE RADIO 1 2 1 2 Turn this unit off, press the STANDBY/Power button. • Press the DISPLAY button on the remote to show the time on the display for a few seconds. Repeatedly press the FUNCTION button 2 to select AM or FM mode; Repeatedly press the STOP/ BAND (X) button to select the Radio mode; For auto tuning, press and hold the Tune/Skip/Search o 1 or n 2 button.../Search o 1 or n 2 button to manually advance the frequency in the display. • See the previous page for how to adjust the volume and set to FM, and a strong FM Stereo station is received, "ST" will appear...
...USING THE RADIO 1 2 1 2 Turn this unit off, press the STANDBY/Power button. • Press the DISPLAY button on the remote to show the time on the display for a few seconds. Repeatedly press the FUNCTION button 2 to select AM or FM mode; Repeatedly press the STOP/ BAND (X) button to select the Radio mode; For auto tuning, press and hold the Tune/Skip/Search o 1 or n 2 button.../Search o 1 or n 2 button to manually advance the frequency in the display. • See the previous page for how to adjust the volume and set to FM, and a strong FM Stereo station is received, "ST" will appear...

Manual
Page 19
... Clock Set/Memory 3 again to confirm, the station will be erased if the unit is without power (no batteries/AC cord isn't connected/power failure) for a long period of time. 19 RETRIEVING RADIO PRESETS (10 for each band) 1 2 1 2 Follow Steps 1-2 on the previous page to turn ...in the display. Press and hold the Clock Set/Memory button; Press the REPEAT/Mem Down button 1 to decrease or the PLAY/ PAUSE (®p)/Mem Up button 2 to tune a station. "P" and the preset number will be saved into memory. OPERATION (CONTINUED) SETTING THE RADIO PRESETS (10 for each band) 1...
... Clock Set/Memory 3 again to confirm, the station will be erased if the unit is without power (no batteries/AC cord isn't connected/power failure) for a long period of time. 19 RETRIEVING RADIO PRESETS (10 for each band) 1 2 1 2 Follow Steps 1-2 on the previous page to turn ...in the display. Press and hold the Clock Set/Memory button; Press the REPEAT/Mem Down button 1 to decrease or the PLAY/ PAUSE (®p)/Mem Up button 2 to tune a station. "P" and the preset number will be saved into memory. OPERATION (CONTINUED) SETTING THE RADIO PRESETS (10 for each band) 1...

Manual
Page 21
... turn this unit off, press the STANDBY/Power button; the display will show the actual time again. • If the CD is inside the unit and the Function button to pressed to select CD mode, it will stop when you open the CD compartment, but it is not recommended to resume playback. OPERATION (CONTINUED) TO PAUSE A CD 1 During playback, press the PLAY...
... turn this unit off, press the STANDBY/Power button; the display will show the actual time again. • If the CD is inside the unit and the Function button to pressed to select CD mode, it will stop when you open the CD compartment, but it is not recommended to resume playback. OPERATION (CONTINUED) TO PAUSE A CD 1 During playback, press the PLAY...
Manual
Page 24
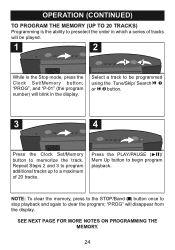
... tracks. Press the PLAY/PAUSE (®p)/ Mem Up button to memorize the track. "PROG" will disappear from the display. NOTE: To clear the memory, press to the STOP/Band (X) button once to stop playback and again to a maximum of tracks will be programmed using the Tune/Skip/ Search o 1 or n 2 button. 3 4 Press the Clock Set/Memory button to begin program playback. SEE NEXT...
... tracks. Press the PLAY/PAUSE (®p)/ Mem Up button to memorize the track. "PROG" will disappear from the display. NOTE: To clear the memory, press to the STOP/Band (X) button once to stop playback and again to a maximum of tracks will be programmed using the Tune/Skip/ Search o 1 or n 2 button. 3 4 Press the Clock Set/Memory button to begin program playback. SEE NEXT...
Manual
Page 25
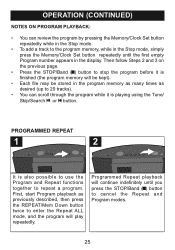
... review the program by pressing the Memory/Clock Set button repeatedly while in the Stop mode. • To add a track to the program memory, while in the Stop mode, simply press the Memory/Clock Set button repeatedly until you press the STOP/Band (X) button to repeat a program. OPERATION (CONTINUED) NOTES ON PROGRAM PLAYBACK: • You can scroll through the program while it is playing using the Tune/ Skip/Search o or n button...
... review the program by pressing the Memory/Clock Set button repeatedly while in the Stop mode. • To add a track to the program memory, while in the Stop mode, simply press the Memory/Clock Set button repeatedly until you press the STOP/Band (X) button to repeat a program. OPERATION (CONTINUED) NOTES ON PROGRAM PLAYBACK: • You can scroll through the program while it is playing using the Tune/ Skip/Search o or n button...
Manual
Page 26
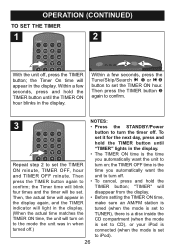
... setting the TIMER ON time, make sure an AM/FM station is tuned (when the mode is set to TUNER), there is a disc inside the CD compartment (when the mode is set to CD), or your iPod is connected (when the mode is the time you automatically want the unit to turn the timer off. Then press the TIMER button again to turn on ; "TIMER" will be set the TIMER ON...
... setting the TIMER ON time, make sure an AM/FM station is tuned (when the mode is set to TUNER), there is a disc inside the CD compartment (when the mode is set to CD), or your iPod is connected (when the mode is the time you automatically want the unit to turn the timer off. Then press the TIMER button again to turn on ; "TIMER" will be set the TIMER ON...

Manual
Page 30
... is Increase volume. iPod mode, no sound. Press iPod/AUX button. Batteries connected Check the batteries. AM/FM, poor sound. broadcast station. Check the connection. nected or dead. Set the clock. or set to selected. Volume is not pos- FM: Wire Extend FM wire antenna is not set. 30 Set the clock. Time reset to minimum. improperly, not con- Clock is not antenna. AM or FM, no sound. extended. Clock not set to "12...
... is Increase volume. iPod mode, no sound. Press iPod/AUX button. Batteries connected Check the batteries. AM/FM, poor sound. broadcast station. Check the connection. nected or dead. Set the clock. or set to selected. Volume is not pos- FM: Wire Extend FM wire antenna is not set. 30 Set the clock. Time reset to minimum. improperly, not con- Clock is not antenna. AM or FM, no sound. extended. Clock not set to "12...

Manual
Page 33
FOR CONSUMER REPLACEABLE PART(S), SEE PART NUMBER(S) ON PAGES 7, 8, 28, AND 29, AND THEN CONTACT FOX INTERNATIONAL AT: 1-800-321-6993. 33 PLEASE...batteries Speaker 2 x 8 ohms Output Power 2 x 2 W Weight 6.6 lbs Dimensions 17.8 (W) x 6.5 (D) x 9.5 (H) inches RADIO SECTION: Frequency Range (FM 88-108 MHz Frequency Range (AM 530-1710 KHz CD SECTION Disc Diameter 4.72" (120mm) Optical Source Semiconductor laser Specifications are subject to change without notice. FOR ADDITIONAL SET-UP OR OPERATING ASSISTANCE, PLEASE VISIT OUR WEBSITE AT: WWW.MEMOREXELECTRONICS.COM OR CONTACT CUSTOMER SERVICE...
FOR CONSUMER REPLACEABLE PART(S), SEE PART NUMBER(S) ON PAGES 7, 8, 28, AND 29, AND THEN CONTACT FOX INTERNATIONAL AT: 1-800-321-6993. 33 PLEASE...batteries Speaker 2 x 8 ohms Output Power 2 x 2 W Weight 6.6 lbs Dimensions 17.8 (W) x 6.5 (D) x 9.5 (H) inches RADIO SECTION: Frequency Range (FM 88-108 MHz Frequency Range (AM 530-1710 KHz CD SECTION Disc Diameter 4.72" (120mm) Optical Source Semiconductor laser Specifications are subject to change without notice. FOR ADDITIONAL SET-UP OR OPERATING ASSISTANCE, PLEASE VISIT OUR WEBSITE AT: WWW.MEMOREXELECTRONICS.COM OR CONTACT CUSTOMER SERVICE...


