
Manual
Page 3
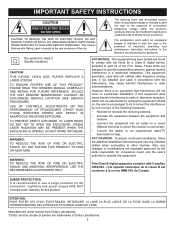
... SERVICING TO QUALIFIED SERVICE PERSONNEL. This Caution Marking with Rating Label is connected. • Consult the dealer or an experienced radio/TV technician for compliance could void the user's authority to part 15 of the FCC Rules. USE OF CONTROLS, ADJUSTMENTS OR THE...interference will not occur in the literature accompanying the appliance. This Class B digital apparatus complies with the instructions, may be determined by turning the equipment off and on, the user is intended to alert the user to provide reasonable protection against harmful interference in accordance with ...
... SERVICING TO QUALIFIED SERVICE PERSONNEL. This Caution Marking with Rating Label is connected. • Consult the dealer or an experienced radio/TV technician for compliance could void the user's authority to part 15 of the FCC Rules. USE OF CONTROLS, ADJUSTMENTS OR THE...interference will not occur in the literature accompanying the appliance. This Class B digital apparatus complies with the instructions, may be determined by turning the equipment off and on, the user is intended to alert the user to provide reasonable protection against harmful interference in accordance with ...
Manual
Page 6
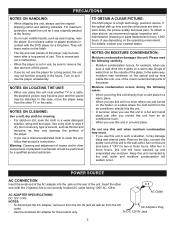
...a warm day. POWER SOURCE AC CONNECTION Insert the small end of the unit. TO OBTAIN A CLEAR PICTURE: The DVD player is not in such a situation, it from the other TV or the radio. In this unit will seldom occur. Warning: Cleaning and adjustment of lenses and/or other end (with the... DVD player for a long period, the unit may become poor and the sound may be sure to remove the disc and turn on the operating environment. ...
...a warm day. POWER SOURCE AC CONNECTION Insert the small end of the unit. TO OBTAIN A CLEAR PICTURE: The DVD player is not in such a situation, it from the other TV or the radio. In this unit will seldom occur. Warning: Cleaning and adjustment of lenses and/or other end (with the... DVD player for a long period, the unit may become poor and the sound may be sure to remove the disc and turn on the operating environment. ...
Manual
Page 7
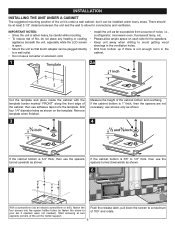
... careful while mounting. • To reduce risk of fire, do not place any heating or cooking appliance beneath the unit, especially while the LCD screen is not enough room in the ventilation holes. • Drill from a source of noise; Push the release latch, pull down the screen... better support. INSTALLATION INSTALLING THE UNIT UNDER A CABINET The suggested mounting position of the unit is 3/8" to 1/2" thick, then use the spacers turned downwards as shown. 6 With a screwdriver (not an electric screwdriver or drill), fasten the four screws into the spacer holder holes (or fasten the...
... careful while mounting. • To reduce risk of fire, do not place any heating or cooking appliance beneath the unit, especially while the LCD screen is not enough room in the ventilation holes. • Drill from a source of noise; Push the release latch, pull down the screen... better support. INSTALLATION INSTALLING THE UNIT UNDER A CABINET The suggested mounting position of the unit is 3/8" to 1/2" thick, then use the spacers turned downwards as shown. 6 With a screwdriver (not an electric screwdriver or drill), fasten the four screws into the spacer holder holes (or fasten the...
Manual
Page 18
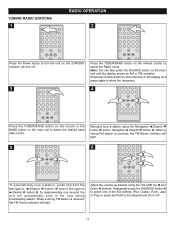
... Up 1 and Down 2 buttons. When a strong FM station is received, the FM Stereo indicator will turn off. 3 Press the TUNER/BAND button on the remote control to select the Radio mode. the unit will light. Adjust the volume as desired using the Navigation √/Search m button 1...l button 2. Press the CLOCK button to show the time in the next strong broadcasting station. Repeatedly press the EQ/BASS button 3 to select one second; Note: You can also press the SOURCE button on ; TUNING RADIO STATIONS 1 RADIO OPERATION 2 Press the Power button to turn Bass Boost On or Off...
... Up 1 and Down 2 buttons. When a strong FM station is received, the FM Stereo indicator will turn off. 3 Press the TUNER/BAND button on the remote control to select the Radio mode. the unit will light. Adjust the volume as desired using the Navigation √/Search m button 1...l button 2. Press the CLOCK button to show the time in the next strong broadcasting station. Repeatedly press the EQ/BASS button 3 to select one second; Note: You can also press the SOURCE button on ; TUNING RADIO STATIONS 1 RADIO OPERATION 2 Press the Power button to turn Bass Boost On or Off...

Manual
Page 19
... increase and/or the Channel Down/Skip (o) button 2 to select the Radio mode. 3 4 1 3 2 Press the PROGRAM button; Press the TUNER/BAND button on the previous page. Select a radio station as described on the remote control to select the Radio mode. STORE 1 will turn the unit on the main unit until the display shows an...
... increase and/or the Channel Down/Skip (o) button 2 to select the Radio mode. 3 4 1 3 2 Press the PROGRAM button; Press the TUNER/BAND button on the previous page. Select a radio station as described on the remote control to select the Radio mode. STORE 1 will turn the unit on the main unit until the display shows an...

Manual
Page 20
...Captions, the captioning will be delayed approximately 10 seconds. • Misspellings or unusual characters may occasionally appear during Closed Captioning. Turn the captions off, or select a different Captions mode. 19 The Captions will least interfere with strange characters or misspelled words.... other languages are transmitted on a VCR with the Closed Captioned signal. • If using an indoor antenna or if TV reception is not adjusted properly. CLOSED CAPTIONS WHAT IS CLOSED CAPTIONING? Generally, Closed Captions in English are transmitted on these...
...Captions, the captioning will be delayed approximately 10 seconds. • Misspellings or unusual characters may occasionally appear during Closed Captioning. Turn the captions off, or select a different Captions mode. 19 The Captions will least interfere with strange characters or misspelled words.... other languages are transmitted on a VCR with the Closed Captioned signal. • If using an indoor antenna or if TV reception is not adjusted properly. CLOSED CAPTIONS WHAT IS CLOSED CAPTIONING? Generally, Closed Captions in English are transmitted on these...

Manual
Page 21
... below) by using the Navigation π 2 and/or † 3 button, then pressing the ENTER/Play/Pause (®p) button 1. MODE: Select OFF to turn the digital closed captions off or SERVICE1 to SERVICE 6 to set . FONT SIZE: Select a font size for the captions. Press the Navigation π 2 and... though and select a Closed Captions option while viewing a program. 20 the menu will appear. ANALOG CAPTION: Select OFF to turn the analog closed captions off , ON to turn on closed captions. EDGE COLOR: Select the color of the font's edges for the captions. NOTES: • You can ...
... below) by using the Navigation π 2 and/or † 3 button, then pressing the ENTER/Play/Pause (®p) button 1. MODE: Select OFF to turn the digital closed captions off or SERVICE1 to SERVICE 6 to set . FONT SIZE: Select a font size for the captions. Press the Navigation π 2 and... though and select a Closed Captions option while viewing a program. 20 the menu will appear. ANALOG CAPTION: Select OFF to turn the analog closed captions off , ON to turn on closed captions. EDGE COLOR: Select the color of the font's edges for the captions. NOTES: • You can ...
Manual
Page 24
.... The unit will I actually receive? When Auto Scan is finished, press the ZOOM/EXIT button; The actual number of channels in the AC power cord, turning on how many channels will automatically cycle through all the ATSC channels and store active channels into memory, skipping over unwanted channels. Contact your satellite...
.... The unit will I actually receive? When Auto Scan is finished, press the ZOOM/EXIT button; The actual number of channels in the AC power cord, turning on how many channels will automatically cycle through all the ATSC channels and store active channels into memory, skipping over unwanted channels. Contact your satellite...

Manual
Page 28
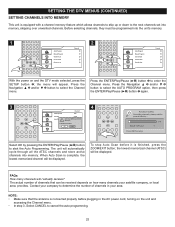
...Lock On or OFF to turn the Parental Lock Off, then press the ENTER/Play/Pause (®p) button. 5 Select the Parental options as described in the upcoming pages or press the ZOOM/EXIT button twice to select the Parental Control menu. TV PARENTAL CONTROL V-Chip enables parents... from watching inappropriate material on and the DTV mode selected, press the SETUP button 1; PARENTAL CONTROL SET-UP 1 2 2 2 1 3 1 With the power on TV. Press the Navigation π 2 and/or † 3 button to exit the menus. Enter the 4-digit password using the Number (0-9) buttons 2. NOTE: •...
...Lock On or OFF to turn the Parental Lock Off, then press the ENTER/Play/Pause (®p) button. 5 Select the Parental options as described in the upcoming pages or press the ZOOM/EXIT button twice to select the Parental Control menu. TV PARENTAL CONTROL V-Chip enables parents... from watching inappropriate material on and the DTV mode selected, press the SETUP button 1; PARENTAL CONTROL SET-UP 1 2 2 2 1 3 1 With the power on TV. Press the Navigation π 2 and/or † 3 button to exit the menus. Enter the 4-digit password using the Number (0-9) buttons 2. NOTE: •...

Manual
Page 29
...for Fantasy Violence (FV), Sexual Dialogue (D), Language (L), Sexual Situations (S) or Violence (V). Press the Navigation π 2 and/or † 3 button to select the TV PARENTAL GUIDE option, then press the ENTER/Play/Pause (®p) button 1 again. 3 4 3 31 2 1 2 4 Press the Navigation π 1 and/...or † 2 button to select a rating and then the ENTER/Play/Pause (®p) button 3 to turn the option On or Off. TV-PG), use the Navigation √/Search m button 1 and/or Navigation ®/Search l button 2 to select the desired criteria, then press ...
...for Fantasy Violence (FV), Sexual Dialogue (D), Language (L), Sexual Situations (S) or Violence (V). Press the Navigation π 2 and/or † 3 button to select the TV PARENTAL GUIDE option, then press the ENTER/Play/Pause (®p) button 1 again. 3 4 3 31 2 1 2 4 Press the Navigation π 1 and/...or † 2 button to select a rating and then the ENTER/Play/Pause (®p) button 3 to turn the option On or Off. TV-PG), use the Navigation √/Search m button 1 and/or Navigation ®/Search l button 2 to select the desired criteria, then press ...
Manual
Page 33
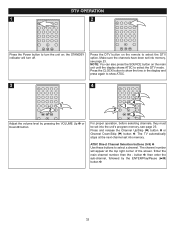
...SOURCE button on ; ATSC Direct Channel Selection buttons (0-9) 3 Use these buttons to select the DTV mode. Enter the main channel number, then the - The TV automatically stops at the top right corner of the screen. button 4, then enter the sub-channel, followed by pressing the VOLUME Up 1 or Down 2 ...23. Press and release the Channel Up/Skip (n) button 1 or Channel Down/Skip (o) button 2. Press the DTV button on the remote to turn off. Press the CLOCK button to show the time in the display and press again to show ATSC. 3 4 21 Adjust the volume level by the ENTER/Play/Pause...
...SOURCE button on ; ATSC Direct Channel Selection buttons (0-9) 3 Use these buttons to select the DTV mode. Enter the main channel number, then the - The TV automatically stops at the top right corner of the screen. button 4, then enter the sub-channel, followed by pressing the VOLUME Up 1 or Down 2 ...23. Press and release the Channel Up/Skip (n) button 1 or Channel Down/Skip (o) button 2. Press the DTV button on the remote to turn off. Press the CLOCK button to show the time in the display and press again to show ATSC. 3 4 21 Adjust the volume level by the ENTER/Play/Pause...

Manual
Page 34
...or press and hold to adjust the sound level. Press the VOLUME Up 1/Down 2 buttons to turn off the sound; "MUTE" will disappear after few seconds. Repeatedly press the EQ/BASS button to turn Bass Boost On or Off. 33 This screen will disappear form the screen. OSD/INFO 1 DTV ...OPERATION (CONTINUED) VOLUME 1 21 Press OSD/INFO key on remote, a sub menu will appear on the screen. Language, Channel Signal, Signal Strength etc.). the TV's sound will be turned back on ...
...or press and hold to adjust the sound level. Press the VOLUME Up 1/Down 2 buttons to turn off the sound; "MUTE" will disappear after few seconds. Repeatedly press the EQ/BASS button to turn Bass Boost On or Off. 33 This screen will disappear form the screen. OSD/INFO 1 DTV ...OPERATION (CONTINUED) VOLUME 1 21 Press OSD/INFO key on remote, a sub menu will appear on the screen. Language, Channel Signal, Signal Strength etc.). the TV's sound will be turned back on ...

Manual
Page 36
... Setup menu. 3. Press the Power button 1 to turn screen saver on the unit; SETTING THE DVD MENUS 1 2 5 4 3 6 The Setup menu lets you customize the DVD player by allowing you to select various language preferences, set-up a parental level, turn on and off, adjust what type of television screen ...you have and more. Pages 36 to select the DVD mode. 2. Select one of the screen using the Navigation (√,®) buttons 4, then press ...
... Setup menu. 3. Press the Power button 1 to turn screen saver on the unit; SETTING THE DVD MENUS 1 2 5 4 3 6 The Setup menu lets you customize the DVD player by allowing you to select various language preferences, set-up a parental level, turn on and off, adjust what type of television screen ...you have and more. Pages 36 to select the DVD mode. 2. Select one of the screen using the Navigation (√,®) buttons 4, then press ...

Manual
Page 39
... 1 Adjust the settings as described on page 35. Contrast: Adjust to turn the subtitles off. DOWNMIX 1 DOWNMIX LT/RT: Select to select one of the DVD will be made in theatrical downmix mode. SUBTITLE LANGUAGE 1 DVD SETUP MENU (CONTINUED) MENU LANGUAGE 1 Select the language the subtitles will ... (†) button to lighten or darken the picture. Return to the previous menu as follows: Brightness: Adjust to select it . The DVD must be in (ENGLISH, SPANISH OR FRENCH). STEREO: Select to hear the sound in the selected language, otherwise the default language of ...
... 1 Adjust the settings as described on page 35. Contrast: Adjust to turn the subtitles off. DOWNMIX 1 DOWNMIX LT/RT: Select to select one of the DVD will be made in theatrical downmix mode. SUBTITLE LANGUAGE 1 DVD SETUP MENU (CONTINUED) MENU LANGUAGE 1 Select the language the subtitles will ... (†) button to lighten or darken the picture. Return to the previous menu as follows: Brightness: Adjust to select it . The DVD must be in (ENGLISH, SPANISH OR FRENCH). STEREO: Select to hear the sound in the selected language, otherwise the default language of ...

Manual
Page 41
... modes listed above (Off, Tolerant, Moderate, Strict), then press the ENTER/Play/Pause (®p) button 2 to deities (To watch religious programming, turn certain word subsets on or off .) Sexual Filters sexually-explicit language 1 2 2 1 2 1 Activate the TVG® function and enter the menu...Press the Navigation (π,†) buttons 1 to select between the four modes described above , you can turn this word subset off according to enter the mode selection. DVD SETUP MENU (CONTINUED) TVGuardian® Setup Menu TVG® Modes Off No filtering Tolerant ..Filters only the...
... modes listed above (Off, Tolerant, Moderate, Strict), then press the ENTER/Play/Pause (®p) button 2 to deities (To watch religious programming, turn certain word subsets on or off .) Sexual Filters sexually-explicit language 1 2 2 1 2 1 Activate the TVG® function and enter the menu...Press the Navigation (π,†) buttons 1 to select between the four modes described above , you can turn this word subset off according to enter the mode selection. DVD SETUP MENU (CONTINUED) TVGuardian® Setup Menu TVG® Modes Off No filtering Tolerant ..Filters only the...

Manual
Page 43
...one of the EQ settings (Flat, Classic, Rock, Jazz or Pop) or press and hold to adjust the sound level. The sound can be turned back on by pressing this means that the corresponding function cannot be silenced and "MUTE" will appear on the disc inserted, or in the selected... mode. RESUME 1 VOLUME 1 2 21 1 To stop completely. the TV's sound will be performed either on the screen. BASIC OPERATION (GENERAL) IMPORTANT: When "Invalid Key" appears while pressing a button, this button again;
...one of the EQ settings (Flat, Classic, Rock, Jazz or Pop) or press and hold to adjust the sound level. The sound can be turned back on by pressing this means that the corresponding function cannot be silenced and "MUTE" will appear on the disc inserted, or in the selected... mode. RESUME 1 VOLUME 1 2 21 1 To stop completely. the TV's sound will be performed either on the screen. BASIC OPERATION (GENERAL) IMPORTANT: When "Invalid Key" appears while pressing a button, this button again;
Manual
Page 44
...Always hold the disc without touching either of the DVD should appear. NOTES: • If a MENU appears on the TV screen, press the Navigation buttons to open the .../CLOSE button to select the DVD mode. Because the unit will remember where you stopped, simply press the ENTER/Play/Pause (®p) button 2 to turn on all , "NO DISC...DVDs. There are also extra features that are different for additional information. • Resuming playback may take a few seconds to load. • If a disc is inserted incorrectly, dirty, damaged, or is not present at all discs. • Press the CLOCK...
...Always hold the disc without touching either of the DVD should appear. NOTES: • If a MENU appears on the TV screen, press the Navigation buttons to open the .../CLOSE button to select the DVD mode. Because the unit will remember where you stopped, simply press the ENTER/Play/Pause (®p) button 2 to turn on all , "NO DISC...DVDs. There are also extra features that are different for additional information. • Resuming playback may take a few seconds to load. • If a disc is inserted incorrectly, dirty, damaged, or is not present at all discs. • Press the CLOCK...

Manual
Page 47
... and then press the ENTER/Play/Pause (®p) button 3. This feature is not available on /off. Use the Navigation buttons 2 to turn the subtitle menu on all discs. 46 Press the ANGLE button repeatedly to display the Language, Language type, Audio type, Subtitle mode and ... camera angle. Some discs may contain scenes which have been shot simultaneously from the display. This is not available on all discs. TITLE MENU 1 DVD OPERATION (CONTINUED) SUBTITLE MENU 1 3 2 1 Press the TITLE button 1, and the Title Menu of the disc will disappear from a number of...
... and then press the ENTER/Play/Pause (®p) button 3. This feature is not available on /off. Use the Navigation buttons 2 to turn the subtitle menu on all discs. 46 Press the ANGLE button repeatedly to display the Language, Language type, Audio type, Subtitle mode and ... camera angle. Some discs may contain scenes which have been shot simultaneously from the display. This is not available on all discs. TITLE MENU 1 DVD OPERATION (CONTINUED) SUBTITLE MENU 1 3 2 1 Press the TITLE button 1, and the Title Menu of the disc will disappear from a number of...
Manual
Page 49
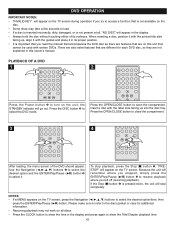
... OPEN/CLOSE button to select the DVD mode. Press again to open the compartment. CD OPERATION PLAYBACK OF A CD Press the CLOCK button to show the time in the display and press again to show the CD playback time. 1 2 1 2 Press the Power button 1 to turn on the TV screen. Press the OPEN/CLOSE button...
... OPEN/CLOSE button to select the DVD mode. Press again to open the compartment. CD OPERATION PLAYBACK OF A CD Press the CLOCK button to show the time in the display and press again to show the CD playback time. 1 2 1 2 Press the Power button 1 to turn on the TV screen. Press the OPEN/CLOSE button...
Manual
Page 51
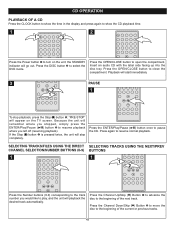
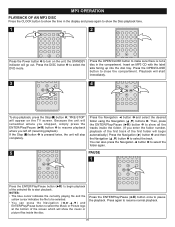
... start immediately. 3 4 2 1 2 1 To stop completely. MP3 OPERATION PLAYBACK OF AN MP3 DISC Press the CLOCK button to show the time in the display and press again to show the Disc playback time. 1 2 1 2..., the unit will show all the tracks inside the disc. Press the OPEN/CLOSE button to turn on the TV screen. If the Stop (X) button 1 is not a disc in the compartment. NOTES: •... where you stopped, simply press the ENTER/Play/Pause (®p) button 2 to select the DVD mode. Press the DISC button 2 to resume playback where you enter the folder number, playback...
... start immediately. 3 4 2 1 2 1 To stop completely. MP3 OPERATION PLAYBACK OF AN MP3 DISC Press the CLOCK button to show the time in the display and press again to show the Disc playback time. 1 2 1 2..., the unit will show all the tracks inside the disc. Press the OPEN/CLOSE button to turn on the TV screen. If the Stop (X) button 1 is not a disc in the compartment. NOTES: •... where you stopped, simply press the ENTER/Play/Pause (®p) button 2 to select the DVD mode. Press the DISC button 2 to resume playback where you enter the folder number, playback...
