
User Guide
Page 3
... RISK OF ELECTRIC SHOCK, DO NOT REMOVE COVER (OR BACK). NO USER-SERVICEABLE PARTS INSIDE. TO ENSURE PROPER USE OF THIS PRODUCT, PLEASE READ THIS OWNER'S MANUAL CAREFULLY AND RETAIN FOR FUTURE REFERENCE. DO NOT STARE INTO BEAM. WARNING: TO REDUCE THE RISK OF FIRE OR ELECTRIC SHOCK, AND ANNOYING INTERFERENCE, USE...
... RISK OF ELECTRIC SHOCK, DO NOT REMOVE COVER (OR BACK). NO USER-SERVICEABLE PARTS INSIDE. TO ENSURE PROPER USE OF THIS PRODUCT, PLEASE READ THIS OWNER'S MANUAL CAREFULLY AND RETAIN FOR FUTURE REFERENCE. DO NOT STARE INTO BEAM. WARNING: TO REDUCE THE RISK OF FIRE OR ELECTRIC SHOCK, AND ANNOYING INTERFERENCE, USE...
User Guide
Page 11
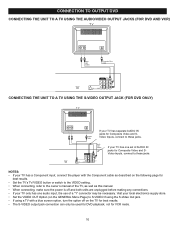
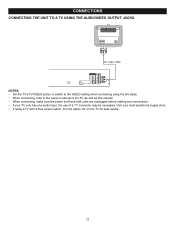
...the following page for best results. • Set the TV's TV/VIDEO button or switch to the VIDEO setting. • When connecting, refer to the owner's manual of the TV, as well as described on the TV for best results. • The S-VIDEO output jack connection can only be necessary. If your... one set of a "Y" connector may be used for DVD playback, not for VCR mode. 10 CONNECTION TO OUTPUT DVD CONNECTING THE UNIT TO A TV USING THE AUDIO/VIDEO OUTPUT JACKS (FOR DVD AND VCR) CONNECTING THE UNIT TO A TV USING THE S-VIDEO OUTPUT JACK (FOR DVD ONLY) If your TV has separate AUDIO IN jacks...
...the following page for best results. • Set the TV's TV/VIDEO button or switch to the VIDEO setting. • When connecting, refer to the owner's manual of the TV, as well as described on the TV for best results. • The S-VIDEO output jack connection can only be necessary. If your... one set of a "Y" connector may be used for DVD playback, not for VCR mode. 10 CONNECTION TO OUTPUT DVD CONNECTING THE UNIT TO A TV USING THE AUDIO/VIDEO OUTPUT JACKS (FOR DVD AND VCR) CONNECTING THE UNIT TO A TV USING THE S-VIDEO OUTPUT JACK (FOR DVD ONLY) If your TV has separate AUDIO IN jacks...
User Guide
Page 12
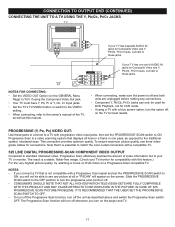
.../VIDEO button or switch to the VIDEO setting. • When connecting, refer to the owner's manual of the TV, as well as this feature.) For the very highest picture quality, try watching a movie on DVD-Video on the TV for best results. This connection provides optimum quality. Progressive Scan is ... jacks. The result is not compatible with a Progressive Scan signal and set the PROGRESSIVE SCAN switch to ON, you will not be used for DVD Playback, not for VCR mode. • If using a TV with a blue screen option, turn the option off whenever you connect a TV that displays all or...
.../VIDEO button or switch to the VIDEO setting. • When connecting, refer to the owner's manual of the TV, as well as this feature.) For the very highest picture quality, try watching a movie on DVD-Video on the TV for best results. This connection provides optimum quality. Progressive Scan is ... jacks. The result is not compatible with a Progressive Scan signal and set the PROGRESSIVE SCAN switch to ON, you will not be used for DVD Playback, not for VCR mode. • If using a TV with a blue screen option, turn the option off whenever you connect a TV that displays all or...
User Guide
Page 13
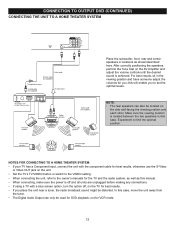
NOTE: • The rear speakers can only be used for DVD playback, not for VCR mode. 12 Experiment to the owner's manuals for the TV and the audio system, as well as shown/described here. Make sure the viewing position is located between the two speakers in ... located on the side wall facing the viewing position and each other. CONNECTION TO OUTPUT DVD (CONTINUED) CONNECTING THE UNIT TO A HOME THEATER SYSTEM Place the subwoofer, front, rear and center speakers in locations as this manual. • When connecting, make sure the power is off and all units are unplugged before...
NOTE: • The rear speakers can only be used for DVD playback, not for VCR mode. 12 Experiment to the owner's manuals for the TV and the audio system, as well as shown/described here. Make sure the viewing position is located between the two speakers in ... located on the side wall facing the viewing position and each other. CONNECTION TO OUTPUT DVD (CONTINUED) CONNECTING THE UNIT TO A HOME THEATER SYSTEM Place the subwoofer, front, rear and center speakers in locations as this manual. • When connecting, make sure the power is off and all units are unplugged before...
User Guide
Page 14
... THE UNIT TO A TV USING THE AUDIO/VIDEO OUTPUT JACKS NOTES: • Set the TV's TV/VIDEO button or switch to the owner's manual of the TV, as well as this manual. • When connecting, make sure the power is off , on the TV for best results. 13 Visit your local electronics supply...
... THE UNIT TO A TV USING THE AUDIO/VIDEO OUTPUT JACKS NOTES: • Set the TV's TV/VIDEO button or switch to the owner's manual of the TV, as well as this manual. • When connecting, make sure the power is off , on the TV for best results. 13 Visit your local electronics supply...
User Guide
Page 15
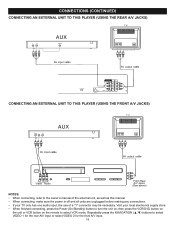
Repeatedly press the NAVIGATION (π,†) buttons to the owner's manual of a "Y" connector may be necessary. CONNECTIONS (CONTINUED) CONNECTING AN EXTERNAL UNIT TO THIS PLAYER...input. 14 Visit your TV only has one audio input, the use of the external unit, as well as this manual. • When connecting, make sure the power is off and all units are unplugged before making any connections. &#...store. • When finished connecting, press the Power (On/Standby) button to select VCR mode. then press the VCR/DVD button on the unit or VCR button on the remote to turn the unit on;
Repeatedly press the NAVIGATION (π,†) buttons to the owner's manual of a "Y" connector may be necessary. CONNECTIONS (CONTINUED) CONNECTING AN EXTERNAL UNIT TO THIS PLAYER...input. 14 Visit your TV only has one audio input, the use of the external unit, as well as this manual. • When connecting, make sure the power is off and all units are unplugged before making any connections. &#...store. • When finished connecting, press the Power (On/Standby) button to select VCR mode. then press the VCR/DVD button on the unit or VCR button on the remote to turn the unit on;
User Guide
Page 16
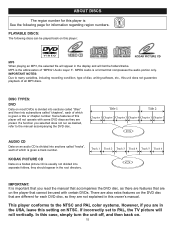
...type of disc, writing software, etc., this unit does not guarantee playback of which is given a title or chapter number. DISC TYPES: DVD Data on most DVDs is divided into sections called "titles" and then into sections called "chapters", each of all MP3 discs. Some features of "MPEG1 Audio ...player that cannot be played back on this player: KODAK PICTURE CD MP3 When playing an MP3, the selected file will appear in this owner's manual. PLAYABLE DISCS: The following page for information regarding region numbers. ABOUT DISCS The region number for this player is: See the following ...
...type of disc, writing software, etc., this unit does not guarantee playback of which is given a title or chapter number. DISC TYPES: DVD Data on most DVDs is divided into sections called "titles" and then into sections called "chapters", each of all MP3 discs. Some features of "MPEG1 Audio ...player that cannot be played back on this player: KODAK PICTURE CD MP3 When playing an MP3, the selected file will appear in this owner's manual. PLAYABLE DISCS: The following page for information regarding region numbers. ABOUT DISCS The region number for this player is: See the following ...
User Guide
Page 38
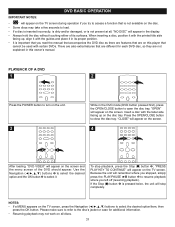
... in this player that are on this owner's manual. Please make sure to refer to resume playback where you left off (resuming playback). Insert a disc with the label side facing up , align it with certain DVDs. Press the OPEN/CLOSE button to select it in the DVD mode (DVD button pressed first), press the OPEN...
... in this player that are on this owner's manual. Please make sure to refer to resume playback where you left off (resuming playback). Insert a disc with the label side facing up , align it with certain DVDs. Press the OPEN/CLOSE button to select it in the DVD mode (DVD button pressed first), press the OPEN...
