
User Guide
Page 2
...to a TV Using the Audio/Video Output Jacks 13 Connecting an External Unit to this Player (Using the Rear A/V Jacks 14 Connecting an External Unit to this Player (Using the Front A/V Jacks 14 About Discs 15 DVD Setup Menu 17 • General Setup Menu 18 • Speaker Setup Menu 19 •...; Dolby Digital Setup Menu 19 • Preference Menu 20 • TVG (TV Guardian®) Password 20 • TV Guardian® Feature 21 VCR Setup ...
...to a TV Using the Audio/Video Output Jacks 13 Connecting an External Unit to this Player (Using the Rear A/V Jacks 14 Connecting an External Unit to this Player (Using the Front A/V Jacks 14 About Discs 15 DVD Setup Menu 17 • General Setup Menu 18 • Speaker Setup Menu 19 •...; Dolby Digital Setup Menu 19 • Preference Menu 20 • TVG (TV Guardian®) Password 20 • TV Guardian® Feature 21 VCR Setup ...
User Guide
Page 6
... well and wipe. TO OBTAIN A CLEAR PICTURE: DVD: The DVD player is not in a horizontal (flat) position only. • When you finish operating the unit, always unload the cassette and turn off the power. • If you do not use the player for example, when you use , be sure to... PRECAUTIONS NOTES ON HANDLING: • When shipping the player, always use the player in a humid place. This is normal and not a malfunction. • When the player is a high technology, precision device. Do not spray cleaner or wax directly on the VCR or use forced air to remove dust. • Avoid...
... well and wipe. TO OBTAIN A CLEAR PICTURE: DVD: The DVD player is not in a horizontal (flat) position only. • When you finish operating the unit, always unload the cassette and turn off the power. • If you do not use the player for example, when you use , be sure to... PRECAUTIONS NOTES ON HANDLING: • When shipping the player, always use the player in a humid place. This is normal and not a malfunction. • When the player is a high technology, precision device. Do not spray cleaner or wax directly on the VCR or use forced air to remove dust. • Avoid...
User Guide
Page 11
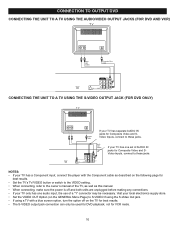
... THE UNIT TO A TV USING THE AUDIO/VIDEO OUTPUT JACKS (FOR DVD AND VCR) CONNECTING THE UNIT TO A TV USING THE S-VIDEO OUTPUT JACK (FOR DVD ONLY) If your TV has separate AUDIO IN jacks for Composite Video and SVideo Inputs, connect to these jacks. If your TV has one audio ... and both units are unplugged before making any connections. • If your TV has a Component input, connect the player with a blue screen option, turn the option off on the following page for VCR mode. 10 NOTES: • If your TV only has one set of AUDIO IN jacks for Composite Video and...
... THE UNIT TO A TV USING THE AUDIO/VIDEO OUTPUT JACKS (FOR DVD AND VCR) CONNECTING THE UNIT TO A TV USING THE S-VIDEO OUTPUT JACK (FOR DVD ONLY) If your TV has separate AUDIO IN jacks for Composite Video and SVideo Inputs, connect to these jacks. If your TV has one audio ... and both units are unplugged before making any connections. • If your TV has a Component input, connect the player with a blue screen option, turn the option off on the following page for VCR mode. 10 NOTES: • If your TV only has one set of AUDIO IN jacks for Composite Video and...
User Guide
Page 12
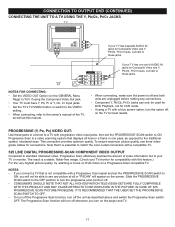
... of AUDIO IN jacks for Composite Video and Y, Pb/Cb, Pr/Cr Inputs, connect to these jacks. The Progressive Scan function will appear on the player and TV. 11 To ensure maximum picture quality, use three videograde cables for best results. NOTES FOR CONNECTING: • Set the VIDEO OUT Option (... Scan signal and set the PROGRESSIVE SCAN switch to ON, you will not be used for DVD Playback, not for VCR mode. • If using a TV with a blue screen option, turn on the screen. CONNECTION TO OUTPUT DVD (CONTINUED) CONNECTING THE UNIT TO A TV USING THE Y, Pb/Cb, Pr/Cr JACKS If your...
... of AUDIO IN jacks for Composite Video and Y, Pb/Cb, Pr/Cr Inputs, connect to these jacks. The Progressive Scan function will appear on the player and TV. 11 To ensure maximum picture quality, use three videograde cables for best results. NOTES FOR CONNECTING: • Set the VIDEO OUT Option (... Scan signal and set the PROGRESSIVE SCAN switch to ON, you will not be used for DVD Playback, not for VCR mode. • If using a TV with a blue screen option, turn on the screen. CONNECTION TO OUTPUT DVD (CONTINUED) CONNECTING THE UNIT TO A TV USING THE Y, Pb/Cb, Pr/Cr JACKS If your...
User Guide
Page 15
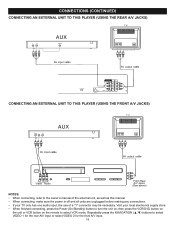
CONNECTIONS (CONTINUED) CONNECTING AN EXTERNAL UNIT TO THIS PLAYER (USING THE REAR A/V JACKS) CONNECTING AN EXTERNAL UNIT TO THIS PLAYER (USING THE FRONT A/V JACKS) NOTES: • When connecting, refer to select VIDEO 1 for the rear A/V input or select VIDEO 2 for the front A/V input. 14 .... • If your local electronics supply store. • When finished connecting, press the Power (On/Standby) button to select VCR mode. then press the VCR/DVD button on the unit or VCR button on the remote to turn the unit on; Visit your TV only has one audio input, the use of a "Y" connector...
CONNECTIONS (CONTINUED) CONNECTING AN EXTERNAL UNIT TO THIS PLAYER (USING THE REAR A/V JACKS) CONNECTING AN EXTERNAL UNIT TO THIS PLAYER (USING THE FRONT A/V JACKS) NOTES: • When connecting, refer to select VIDEO 1 for the rear A/V input or select VIDEO 2 for the front A/V input. 14 .... • If your local electronics supply store. • When finished connecting, press the Power (On/Standby) button to select VCR mode. then press the VCR/DVD button on the unit or VCR button on the remote to turn the unit on; Visit your TV only has one audio input, the use of a "Y" connector...


