User Guide
Page 2
... in the literature accompanying the appliance. The user could lose the authority to operate this equipment if an unauthorized change or modification is recommended to defeat or bypass the safety switches. SURGE PROTECTORS: It is made. Please do not attempt to use a surge protector for this equipment may generate or use radio frequency energy. NO USER-SERVICEABLE PARTS INSIDE.
... in the literature accompanying the appliance. The user could lose the authority to operate this equipment if an unauthorized change or modification is recommended to defeat or bypass the safety switches. SURGE PROTECTORS: It is made. Please do not attempt to use a surge protector for this equipment may generate or use radio frequency energy. NO USER-SERVICEABLE PARTS INSIDE.

User Guide
Page 4
.... We Want You Listening For A Lifetime Used wisely, your new sound equipment will help to your volume control at a safe level. Taking a minute to higher volumes of your equipment offers. This list of sound levels is only the start of sound. This manufacturer and the Electronic Industries Association's Consumer Electronics Group want you can maximize the fun and excitement your musical enjoyment.
.... We Want You Listening For A Lifetime Used wisely, your new sound equipment will help to your volume control at a safe level. Taking a minute to higher volumes of your equipment offers. This list of sound levels is only the start of sound. This manufacturer and the Electronic Industries Association's Consumer Electronics Group want you can maximize the fun and excitement your musical enjoyment.

User Guide
Page 5
...) Switch 4 ESP/MENU/PRESET Button 4. PROGRAM/ENTER Button 5. CD Compartment 7. MODE/CLEAR Button 11. PHONES (Headphones) Jack (Side of Unit) z 2. VOLUME Control 18. DC 4.5V Jack (Rear of Unit) 17. Display 3. LINE OUT Jack (Side of Unit) 16. FUNCTION (CD/RADIO) Switch 8. STOP (s) / POWER OFF / w Button 15. HOLD (ON/OFF) Switch 10. Skip/TUNING UP n / ® Button 12. PLAY/PAUSE (®p) / POWER ON / BAND / v Button 13. CD Door Open Switch 9. Skip/TUNING DN o / √ Button 14. Battery Compartment (Under CD...
...) Switch 4 ESP/MENU/PRESET Button 4. PROGRAM/ENTER Button 5. CD Compartment 7. MODE/CLEAR Button 11. PHONES (Headphones) Jack (Side of Unit) z 2. VOLUME Control 18. DC 4.5V Jack (Rear of Unit) 17. Display 3. LINE OUT Jack (Side of Unit) 16. FUNCTION (CD/RADIO) Switch 8. STOP (s) / POWER OFF / w Button 15. HOLD (ON/OFF) Switch 10. Skip/TUNING UP n / ® Button 12. PLAY/PAUSE (®p) / POWER ON / BAND / v Button 13. CD Door Open Switch 9. Skip/TUNING DN o / √ Button 14. Battery Compartment (Under CD...
User Guide
Page 6
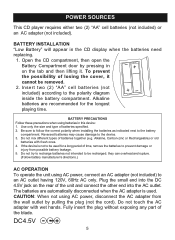
... the device is used for the longest playing time. CAUTION: When not using AC power, connect an AC adapter (not included) to the battery compartment. Be sure to follow the correct polarity when installing the batteries as indicated next to an AC outlet having 120V, 60Hz AC only. Open the CD compartment, then open the Battery Compartment door by pulling the plug (not the cord). Plug...
... the device is used for the longest playing time. CAUTION: When not using AC power, connect an AC adapter (not included) to the battery compartment. Be sure to follow the correct polarity when installing the batteries as indicated next to an AC outlet having 120V, 60Hz AC only. Open the CD compartment, then open the Battery Compartment door by pulling the plug (not the cord). Plug...
User Guide
Page 7
... PLAY/PAUSE (®p)/POWER ON/BAND/ v button ‚. Audio Sound Through a Home Aud2io System By using a home audio connection cable (not included), superb audio sound can be disabled, not the other controls/switches. Before making any connections, turn off the power to this unit. 6 Slide to the OFF position to the ON position. "Hold" will be heard through your home audio system. When pressing the buttons on the CD compartment lid, "Hold...
... PLAY/PAUSE (®p)/POWER ON/BAND/ v button ‚. Audio Sound Through a Home Aud2io System By using a home audio connection cable (not included), superb audio sound can be disabled, not the other controls/switches. Before making any connections, turn off the power to this unit. 6 Slide to the OFF position to the ON position. "Hold" will be heard through your home audio system. When pressing the buttons on the CD compartment lid, "Hold...

User Guide
Page 8
RADIO OPERATION TO LISTEN TO THE RADIO 1 2 2 3 2 1 1 Set the VOLUME control 1 to tune a station. If listening to FM, press the MODE/CLEAR button 3 to select Stereo or Mono. 3 4 3 1 2 1 2 Press and release the Skip/TUNING DN o / √ 1 or UP n / ® 2 button to minimum and plug headphones into the PHONES jack. FM-The headphones act as desired. Press the PLAY/PAUSE (®p)/ POWER ON/BAND/v button 2 to...
RADIO OPERATION TO LISTEN TO THE RADIO 1 2 2 3 2 1 1 Set the VOLUME control 1 to tune a station. If listening to FM, press the MODE/CLEAR button 3 to select Stereo or Mono. 3 4 3 1 2 1 2 Press and release the Skip/TUNING DN o / √ 1 or UP n / ® 2 button to minimum and plug headphones into the PHONES jack. FM-The headphones act as desired. Press the PLAY/PAUSE (®p)/ POWER ON/BAND/v button 2 to...

User Guide
Page 9
Press the PROGRAM/ENTER button 2 to select the desired preset. 8 the preset number will blink. 1 3 2 Within approx. To receive a preset station, simply press the ESP/MENU/PRESET button to confirm. ten seconds, select the desired preset using the ESP/MENU/ PRESET button 1. Press the PROGRAM/ENTER button; RADIO OPERATION (CONTINUED) TO SET AND RECEIVE A STATION INTO MEMORY 1 2 1 2 Tune a desired station as described in the previous section.
Press the PROGRAM/ENTER button 2 to select the desired preset. 8 the preset number will blink. 1 3 2 Within approx. To receive a preset station, simply press the ESP/MENU/PRESET button to confirm. ten seconds, select the desired preset using the ESP/MENU/ PRESET button 1. Press the PROGRAM/ENTER button; RADIO OPERATION (CONTINUED) TO SET AND RECEIVE A STATION INTO MEMORY 1 2 1 2 Tune a desired station as described in the previous section.
User Guide
Page 10
... the PHONES jack. Do not try to play all kinds of Audio Discs and MP3/WMA CD Roms, such as desired. Gently press a disc, label side up, onto the spindle until it will appear in place. CD OPERATION TO INSERT AND PLAY A CD This CD player is finished. When the disc is through playing, it locks in the display. 3 4 1 2 Adjust the VOLUME control 1 and DBBS switch 2 as CD recordables...
... the PHONES jack. Do not try to play all kinds of Audio Discs and MP3/WMA CD Roms, such as desired. Gently press a disc, label side up, onto the spindle until it will appear in place. CD OPERATION TO INSERT AND PLAY A CD This CD player is finished. When the disc is through playing, it locks in the display. 3 4 1 2 Adjust the VOLUME control 1 and DBBS switch 2 as CD recordables...
User Guide
Page 11
... error will occur and "Invalid Disc" will appear in your recorder's manual. • This unit is capable of tracks burned on MP3s/WMAs. • When recording ("burning") CDs, make sure the session is not recommended to spin, the elapsed time will blink and "PAUSE" will disappear and the elapsed time in the display. 22 Press the PLAY/PAUSE (®p)/POWER ON/BAND/v button...
... error will occur and "Invalid Disc" will appear in your recorder's manual. • This unit is capable of tracks burned on MP3s/WMAs. • When recording ("burning") CDs, make sure the session is not recommended to spin, the elapsed time will blink and "PAUSE" will disappear and the elapsed time in the display. 22 Press the PLAY/PAUSE (®p)/POWER ON/BAND/v button...
User Guide
Page 12
... mo2ve the player back to the beginning of tracks appear in the display, you may press either the Skip/TUNING DN o / √ 1 or UP n / ® 2 button to select a specific track for playback and it will playback automatically. CD OPERATION (CONTINUED) TO BEGIN PLAYBACK FROM A SPECIFIC TRACK 1 1 2 After you insert the disc into the CD player and the total number of the currently playing track.
... mo2ve the player back to the beginning of tracks appear in the display, you may press either the Skip/TUNING DN o / √ 1 or UP n / ® 2 button to select a specific track for playback and it will playback automatically. CD OPERATION (CONTINUED) TO BEGIN PLAYBACK FROM A SPECIFIC TRACK 1 1 2 After you insert the disc into the CD player and the total number of the currently playing track.
User Guide
Page 13
... DN o / √ 1 or UP n / ® 2 button, normal playback will appear in the display, press the PLAY/PAUSE (®p)/POWER ON/ BAND/v button to locate a specific musical passage. OR 2. Press the Skip/TUNING DN o / √ 2 or UP n / ® 3 button to repeat. Press the MODE/CLEAR button once during playback, "REP A" will resume. The "REP 1" indicator will move the player forward or backward within a track to...
... DN o / √ 1 or UP n / ® 2 button, normal playback will appear in the display, press the PLAY/PAUSE (®p)/POWER ON/ BAND/v button to locate a specific musical passage. OR 2. Press the Skip/TUNING DN o / √ 2 or UP n / ® 3 button to repeat. Press the MODE/CLEAR button once during playback, "REP A" will resume. The "REP 1" indicator will move the player forward or backward within a track to...

User Guide
Page 14
... STOP (s)/POWER OFF/w button to repeat. REPEAT PLAYBACK OF A FOLDER (MP3/WMA w/folders only) 1 2 22 1 2 3 To repeat all files in a directory (MP3/WMA CD only), while in the display. Press the Skip/TUNING DN o / √ 2 or UP n / ® 3 button to select the specific directory that you wish to stop playback, "REP A" or "REP D" will appear again, press the MODE/CLEAR button repeatedly until the Mode indicators disappear from the display after...
... STOP (s)/POWER OFF/w button to repeat. REPEAT PLAYBACK OF A FOLDER (MP3/WMA w/folders only) 1 2 22 1 2 3 To repeat all files in a directory (MP3/WMA CD only), while in the display. Press the Skip/TUNING DN o / √ 2 or UP n / ® 3 button to select the specific directory that you wish to stop playback, "REP A" or "REP D" will appear again, press the MODE/CLEAR button repeatedly until the Mode indicators disappear from the display after...

User Guide
Page 16
... the PROGRAM/ENTER button Press the PLAY/PAUSE (®p)/POWER to a maximum of tracks will be programmed using the Skip/TUNING DN o / √ 1 or UP n / ® 2 button. NOTES: 1 2 22 • While in the Stop mode and "P" is inserted, you will first select the directory number in step 1, press the PROGRAM/ENTER button and then enter the file/track number. CD OPERATION (CONTINUED) TO PROGRAM THE MEMORY (UP...
... the PROGRAM/ENTER button Press the PLAY/PAUSE (®p)/POWER to a maximum of tracks will be programmed using the Skip/TUNING DN o / √ 1 or UP n / ® 2 button. NOTES: 1 2 22 • While in the Stop mode and "P" is inserted, you will first select the directory number in step 1, press the PROGRAM/ENTER button and then enter the file/track number. CD OPERATION (CONTINUED) TO PROGRAM THE MEMORY (UP...

User Guide
Page 17
... the program memory as many times as desired (up to 24 files). • You can scroll through the program while it when playing a standard CD by simply pressing the ESP/MENU/PRESET button; Deactivating the ESP will disappear from the display. CD OPERATION (CONTINUED) NOTES ON PROGRAM PLAYBACK • You can review the program by pressing the PROGRAM/ENTER button repeatedly while in the Stop mode. • To add a track to the program memory...
... the program memory as many times as desired (up to 24 files). • You can scroll through the program while it when playing a standard CD by simply pressing the ESP/MENU/PRESET button; Deactivating the ESP will disappear from the display. CD OPERATION (CONTINUED) NOTES ON PROGRAM PLAYBACK • You can review the program by pressing the PROGRAM/ENTER button repeatedly while in the Stop mode. • To add a track to the program memory...
User Guide
Page 18
... non-audio data files? Yes, it can . No, this your Portable MP3/WMA CD Player will play only the MP3/WMA files. If you can not mix MP3/WMAs and WAV files on the CDR. Does the unit support multi-session CDRs? Yes, the unit can add or delete MP3/WMA files without reformatting. There will be no skipping when you can burn a new group of MP3/WMA files until the CD...
... non-audio data files? Yes, it can . No, this your Portable MP3/WMA CD Player will play only the MP3/WMA files. If you can not mix MP3/WMAs and WAV files on the CDR. Does the unit support multi-session CDRs? Yes, the unit can add or delete MP3/WMA files without reformatting. There will be no skipping when you can burn a new group of MP3/WMA files until the CD...
User Guide
Page 19
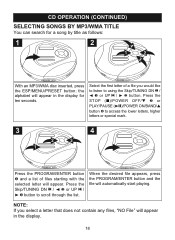
... the PROGRAM/ENTER button and the file will appear in the display for a song by title as follows: 1 2 4 1 2 3 With an MP3/WMA disc inserted, press the ESP/MENU/PRESET button; CD OPERATION (CONTINUED) SELECTING SONGS BY MP3/WMA TITLE You can search for ten seconds. the alphabet will appear. Press the STOP (s)/POWER OFF/w 3 or PLAY/PAUSE (®p)/POWER ON/BAND/v button 4 to scroll through the list. Select...
... the PROGRAM/ENTER button and the file will appear in the display for a song by title as follows: 1 2 4 1 2 3 With an MP3/WMA disc inserted, press the ESP/MENU/PRESET button; CD OPERATION (CONTINUED) SELECTING SONGS BY MP3/WMA TITLE You can search for ten seconds. the alphabet will appear. Press the STOP (s)/POWER OFF/w 3 or PLAY/PAUSE (®p)/POWER ON/BAND/v button 4 to scroll through the list. Select...

User Guide
Page 20
... ESP/MENU/PRESET button twice; CD OPERATION (CONTINUED) SEARCHING THROUGH MP3/WMA DIRECTORIES You can search the contents of the directories (if burned on CD) as its contents. the first directory will automatically start playing. 1 2 19 To select a file from the directory, use the Skip/TUNING DN o / √ 1 or UP n / ® 2 button. 3 4 2 1 If you would like to change directories, use the STOP (s)/POWER OFF/w 3 or PLAY...
... ESP/MENU/PRESET button twice; CD OPERATION (CONTINUED) SEARCHING THROUGH MP3/WMA DIRECTORIES You can search the contents of the directories (if burned on CD) as its contents. the first directory will automatically start playing. 1 2 19 To select a file from the directory, use the Skip/TUNING DN o / √ 1 or UP n / ® 2 button. 3 4 2 1 If you would like to change directories, use the STOP (s)/POWER OFF/w 3 or PLAY...
User Guide
Page 21
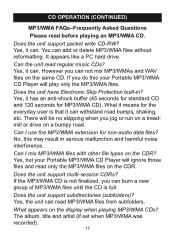
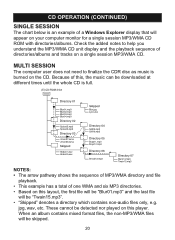
... CDR disc as music is full. MULTI SESSION The computer user does not need to help you understand the MP3/WMA CD unit display and the playback sequence of directories/albums and tracks on a single session MP3/WMA CD. CD OPERATION (CONTINUED) SINGLE SESSION The chart below is an example of a Windows Explorer display that will be downloaded at different times until the whole CD is burned...
... CDR disc as music is full. MULTI SESSION The computer user does not need to help you understand the MP3/WMA CD unit display and the playback sequence of directories/albums and tracks on a single session MP3/WMA CD. CD OPERATION (CONTINUED) SINGLE SESSION The chart below is an example of a Windows Explorer display that will be downloaded at different times until the whole CD is burned...
User Guide
Page 23
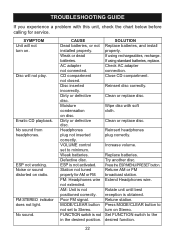
.... Replace batteries. Retune station. TROUBLESHOOTING GUIDE If you experience a problem with soft cloth. Dirty or defective disc. Defective disc. Increase volume. Press the ESP/MENU/PRESET button. Erratic CD playback. FM STEREO indicator does not light. VOLUME control set to the desired function. 22 FM: Headphones wire not extended. No sound from headphones. AM: Unit is not activated. Poor FM signal. Disc will not turn on radio. AC adapter...
.... Replace batteries. Retune station. TROUBLESHOOTING GUIDE If you experience a problem with soft cloth. Dirty or defective disc. Defective disc. Increase volume. Press the ESP/MENU/PRESET button. Erratic CD playback. FM STEREO indicator does not light. VOLUME control set to the desired function. 22 FM: Headphones wire not extended. No sound from headphones. AM: Unit is not activated. Poor FM signal. Disc will not turn on radio. AC adapter...
User Guide
Page 24
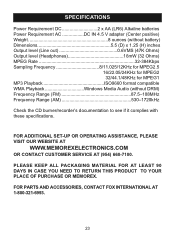
... MPEG2 32/44.1/48KHz for MPEG1 MP3 Playback ISO9660 format compatible WMA Playback Windows Media Audio (without DRM) Frequency Range (FM 87.5-108MHz Frequency Range (AM 530-1720kHz Check the CD burner/recorder's documentation to see if it complies with these specifications. FOR ADDITIONAL SET-UP OR OPERATING ASSISTANCE, PLEASE VISIT OUR WEBSITE AT WWW.MEMOREXELECTRONICS.COM OR CONTACT CUSTOMER SERVICE AT (954) 660-7100.
... MPEG2 32/44.1/48KHz for MPEG1 MP3 Playback ISO9660 format compatible WMA Playback Windows Media Audio (without DRM) Frequency Range (FM 87.5-108MHz Frequency Range (AM 530-1720kHz Check the CD burner/recorder's documentation to see if it complies with these specifications. FOR ADDITIONAL SET-UP OR OPERATING ASSISTANCE, PLEASE VISIT OUR WEBSITE AT WWW.MEMOREXELECTRONICS.COM OR CONTACT CUSTOMER SERVICE AT (954) 660-7100.


