
User Guide
Page 2
... Canada. 1 It may generate or use in damage or sound distortion. • Avoid spilling any motorized vehicle. You should exercise extreme caution or discontinue use radio frequency energy. Changes or modifications to direct sunlight, excessive dust, sand, moisture, rain or mechanical shock; The user could lose the authority to play your headset at a high volume while walking, especially...
... Canada. 1 It may generate or use in damage or sound distortion. • Avoid spilling any motorized vehicle. You should exercise extreme caution or discontinue use radio frequency energy. Changes or modifications to direct sunlight, excessive dust, sand, moisture, rain or mechanical shock; The user could lose the authority to play your headset at a high volume while walking, especially...

User Guide
Page 3
... not installed and used with class B FCC limits. 2 FCC DECLARATION This device complies with the limits for a Class B digital device, pursuant to radio communications. Operation is connected. • Consult the dealer or an experienced radio/TV technician for compliance could void the user's authority to provide reasonable protection against harmful interference in accordance with the instructions, may cause undesired operation. Shield cable must...
... not installed and used with class B FCC limits. 2 FCC DECLARATION This device complies with the limits for a Class B digital device, pursuant to radio communications. Operation is connected. • Consult the dealer or an experienced radio/TV technician for compliance could void the user's authority to provide reasonable protection against harmful interference in accordance with the instructions, may cause undesired operation. Shield cable must...

User Guide
Page 4
...time your hearing "comfort level" adapts to your hearing. So what sounds "normal" can hear it is often undetectable until you avoid prolonged exposure to do this by playing it at a safe level BEFORE your hearing adapts. To establish a safe level: • Start your volume control at a low setting. • Slowly increase the sound... lifetime of sound. Once you have established a comfortable sound level: • Set the dial and leave it 's time to consider how you to prevent hearing damage or loss in the future. Now it there. Dear Customer: Selecting fine audio equipment such ...
...time your hearing "comfort level" adapts to your hearing. So what sounds "normal" can hear it is often undetectable until you avoid prolonged exposure to do this by playing it at a safe level BEFORE your hearing adapts. To establish a safe level: • Start your volume control at a low setting. • Slowly increase the sound... lifetime of sound. Once you have established a comfortable sound level: • Set the dial and leave it 's time to consider how you to prevent hearing damage or loss in the future. Now it there. Dear Customer: Selecting fine audio equipment such ...

User Guide
Page 7
... the Open button, then lifting the top cover FULL 50% EMPTY up to remove it locks in Figure 3, making sure to update the index. several seconds to follow the correct polarity when installing the battery as shown in place). If the device is recommended for a long period of battery specified. 2. Figure 1 2. this device: 1. BATTERY PRECAUTIONS Follow these precautions when using a battery in this updating time...
... the Open button, then lifting the top cover FULL 50% EMPTY up to remove it locks in Figure 3, making sure to update the index. several seconds to follow the correct polarity when installing the battery as shown in place). If the device is recommended for a long period of battery specified. 2. Figure 1 2. this device: 1. BATTERY PRECAUTIONS Follow these precautions when using a battery in this updating time...

User Guide
Page 9
... audio player without installing the CD software when the USB cable is connected. For Windows 98SE, if you are connecting your player to your computer for the first time, please follow these instructions: Procedure to install the driver. Do not install the software when using a Macintosh. Then click on the Windows 98 firmware icon. INSTALL "DIGITAL AUDIO PLAYER" SOFTWARE TO INSTALL THE "DIGITAL AUDIO PLAYER" CD SOFTWARE For Windows ME, Windows2000 or Windows XP: Windows will not be activated without driver installation. Insert the Installation...
... audio player without installing the CD software when the USB cable is connected. For Windows 98SE, if you are connecting your player to your computer for the first time, please follow these instructions: Procedure to install the driver. Do not install the software when using a Macintosh. Then click on the Windows 98 firmware icon. INSTALL "DIGITAL AUDIO PLAYER" SOFTWARE TO INSTALL THE "DIGITAL AUDIO PLAYER" CD SOFTWARE For Windows ME, Windows2000 or Windows XP: Windows will not be activated without driver installation. Insert the Installation...

User Guide
Page 12
Once you have installed Windows Media Player 10, you can transfer MP3 files, WMA files, WMA files with DRM 9 or DRM 10 to download the corresponding Windows Media Player for use with Windows XP only. Insert the Installation CD-Rom into the CD Drive, then the installation screen will begin. 3. Installation will appear. For Windows 98SE, please visit www.Microsoft.com to your computer. Read the License Agreement, then click I ACCEPT...
Once you have installed Windows Media Player 10, you can transfer MP3 files, WMA files, WMA files with DRM 9 or DRM 10 to download the corresponding Windows Media Player for use with Windows XP only. Insert the Installation CD-Rom into the CD Drive, then the installation screen will begin. 3. Installation will appear. For Windows 98SE, please visit www.Microsoft.com to your computer. Read the License Agreement, then click I ACCEPT...

User Guide
Page 15
... songs to convert music that you can easily copy them to the USB port on page 17. 14 "Removable Disk" will automatically pop-up on an audio CD into the "Removable Disk" window. For Windows ME, Windows 2000, Windows 98 or Windows XP (without Windows Media Player 10), transfer music files as described on your computer screen. 3. DOWNLOADING AND TRANSFERRING FILES TRANSFERRING FILES You can download digital music files from the Internet or use Windows Media Player 10 to the player through the "Sync...
... songs to convert music that you can easily copy them to the USB port on page 17. 14 "Removable Disk" will automatically pop-up on an audio CD into the "Removable Disk" window. For Windows ME, Windows 2000, Windows 98 or Windows XP (without Windows Media Player 10), transfer music files as described on your computer screen. 3. DOWNLOADING AND TRANSFERRING FILES TRANSFERRING FILES You can download digital music files from the Internet or use Windows Media Player 10 to the player through the "Sync...

User Guide
Page 16
... of the cable to the USB port on your digital audio player. 3. Turn on your desktop. 5. DOWNLOADING AND TRANSFERRING FILES (CONT.) TRANSFERRING AUDIO FILES TO YOUR DIGITAL AUDIO PLAYER USING A MACINTOSH COMPUTER Make sure to use the keyboard shortcuts by dragging it to the Trash icon or Control-click its icon and choose Eject from the File menu or select Eject from the File drop-down menu located at the top of your screen.
... of the cable to the USB port on your digital audio player. 3. Turn on your desktop. 5. DOWNLOADING AND TRANSFERRING FILES (CONT.) TRANSFERRING AUDIO FILES TO YOUR DIGITAL AUDIO PLAYER USING A MACINTOSH COMPUTER Make sure to use the keyboard shortcuts by dragging it to the Trash icon or Control-click its icon and choose Eject from the File menu or select Eject from the File drop-down menu located at the top of your screen.

User Guide
Page 17
... Windows 98SE, Windows ME and Windows 2000, please use the Windows Media Player 9 to convert music on an audio CD into the "Removable Disk" window. 6. the Option setting menu will appear. When finished, click "OK" to the desired location on your computer. 4. connect the player to your computer. When the files are ripped; DOWNLOADING AND TRANSFERRING FILES (CONT.) For Windows XP, you can also utilize the previously installed Windows Media Player 10 software to convert music...
... Windows 98SE, Windows ME and Windows 2000, please use the Windows Media Player 9 to convert music on an audio CD into the "Removable Disk" window. 6. the Option setting menu will appear. When finished, click "OK" to the desired location on your computer. 4. connect the player to your computer. When the files are ripped; DOWNLOADING AND TRANSFERRING FILES (CONT.) For Windows XP, you can also utilize the previously installed Windows Media Player 10 software to convert music...
User Guide
Page 18
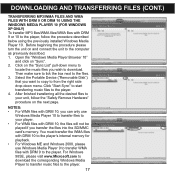
... the player's internal memory for playback. • For Windows ME and Windows 2000, please use Windows Media Player 10 to transfer files to your unit, follow the procedure described below using the previously installed Windows Media Player 10. Before beginning the procedure please turn the unit on the "Sync List" pull-down menu. For Windows 98SE, please visit www.Microsoft.com to download the corresponding Windows Media Player to transfer music files to the player. 4. DOWNLOADING AND TRANSFERRING FILES (CONT.) TRANSFERRING MP3/WMA FILES...
... the player's internal memory for playback. • For Windows ME and Windows 2000, please use Windows Media Player 10 to transfer files to your unit, follow the procedure described below using the previously installed Windows Media Player 10. Before beginning the procedure please turn the unit on the "Sync List" pull-down menu. For Windows 98SE, please visit www.Microsoft.com to download the corresponding Windows Media Player to transfer music files to the player. 4. DOWNLOADING AND TRANSFERRING FILES (CONT.) TRANSFERRING MP3/WMA FILES...
User Guide
Page 20
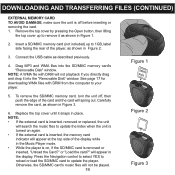
...: A WMA file with DRM from the computer to update the player. will not playback if you directly drag and drop it snaps in the display. DOWNLOADING AND TRANSFERRING FILES (CONTINUED) EXTERNAL MEMORY CARD TO AVOID DAMAGE, make sure the unit is removed or inserted, "Unload the Card?" Connect the USB cable as shown in Figure 2. 3. Replace the top cover until it into the SD/MMC memory card's "Removable Disk" window.
...: A WMA file with DRM from the computer to update the player. will not playback if you directly drag and drop it snaps in the display. DOWNLOADING AND TRANSFERRING FILES (CONTINUED) EXTERNAL MEMORY CARD TO AVOID DAMAGE, make sure the unit is removed or inserted, "Unload the Card?" Connect the USB cable as shown in Figure 2. 3. Replace the top cover until it into the SD/MMC memory card's "Removable Disk" window.

User Guide
Page 21
... display temporarily followed by pressing the Power On/Off/ Stop button; Press and hold the MENU/Lock button until the unit turns off after it counts up from one to update the player's library or the music files depending on the player, the "Memorex" start screen will turn on the number of songs that you do not want the track changed by accidentally pressing a button. the Memorex start screen will appear in the display. no buttons...
... display temporarily followed by pressing the Power On/Off/ Stop button; Press and hold the MENU/Lock button until the unit turns off after it counts up from one to update the player's library or the music files depending on the player, the "Memorex" start screen will turn on the number of songs that you do not want the track changed by accidentally pressing a button. the Memorex start screen will appear in the display. no buttons...

User Guide
Page 22
... for FM. Press the VOLUME +/- OPERATION (CONTINUED) TO LISTEN TO THE FM RADIO 1 2 1 2 Turn the unit on by pushing the Navigation control towards √/m or ®/l. Press the Menu/Lock button 1; the FM Tuner will appear in the display. Then Preset 1 will appear in . 3 41 1 2 1 Select a station by pressing the Power On/Off/Stop button; the Memorex start screen will appear. When a station is broadcasting in stereo...
... for FM. Press the VOLUME +/- OPERATION (CONTINUED) TO LISTEN TO THE FM RADIO 1 2 1 2 Turn the unit on by pushing the Navigation control towards √/m or ®/l. Press the Menu/Lock button 1; the FM Tuner will appear in the display. Then Preset 1 will appear in . 3 41 1 2 1 Select a station by pressing the Power On/Off/Stop button; the Memorex start screen will appear. When a station is broadcasting in stereo...

User Guide
Page 25
... turning the power off , when the unit is in the FM mode, press the MENU/Lock button ‚; Select "Play Now" by pressing the Power On/Off/Stop button; NOTE: • See pages 8-17 for information on uploading MP3, WMA and WAV files to increase or decrease the volume. Press the VOLUME +/buttons 2 to this unit. 1 NOTE (AUTO RESUME): Each time you enter the Music Player mode...
... turning the power off , when the unit is in the FM mode, press the MENU/Lock button ‚; Select "Play Now" by pressing the Power On/Off/Stop button; NOTE: • See pages 8-17 for information on uploading MP3, WMA and WAV files to increase or decrease the volume. Press the VOLUME +/buttons 2 to this unit. 1 NOTE (AUTO RESUME): Each time you enter the Music Player mode...

User Guide
Page 26
... appear; Press the Play/Pause ®p button again to pause the file momentarily, press the Play/Pause ®p button; OPERATION (CONTINUED) TO PAUSE PLAYBACK 1 2 During playback, if you wish to resume playback; select the desired album by pushing the Navigation control towards v or w then press the Navigation control. TO SELECT/BROWSE THROUGH THE FILES 1 1 2 2 Press the MENU/Lock button 1; the Main menu will appear in the...
... appear; Press the Play/Pause ®p button again to pause the file momentarily, press the Play/Pause ®p button; OPERATION (CONTINUED) TO PAUSE PLAYBACK 1 2 During playback, if you wish to resume playback; select the desired album by pushing the Navigation control towards v or w then press the Navigation control. TO SELECT/BROWSE THROUGH THE FILES 1 1 2 2 Press the MENU/Lock button 1; the Main menu will appear in the...

User Guide
Page 29
...;/m twice to exit the menus. Normal: Normal playback Repeat One: Repeats the current track Repeat All: Repeats all of the display. Scroll to the Music Player menu. 28 the Main menu will appear at the top of the files Shuffle: Randomly plays the files once and then stops Shuffle Repeat: Randomly plays all the files repeatedly Push the Navigation control towards v or w 2, then press the Navigation control 2. OPERATION (CONTINUED) SETTING THE PLAY MODE 1 2 1 2 Press the MENU/Lock button 1;
...;/m twice to exit the menus. Normal: Normal playback Repeat One: Repeats the current track Repeat All: Repeats all of the display. Scroll to the Music Player menu. 28 the Main menu will appear at the top of the files Shuffle: Randomly plays the files once and then stops Shuffle Repeat: Randomly plays all the files repeatedly Push the Navigation control towards v or w 2, then press the Navigation control 2. OPERATION (CONTINUED) SETTING THE PLAY MODE 1 2 1 2 Press the MENU/Lock button 1;

User Guide
Page 36
... compatible. button to download methods. Volume + button. Win98 Driver isn't installed Install Win98 driver and/or see or computer is not turned Press Power On/Off/Stop on pages 14-17. No sound. No files are not Insert headphones. SYMPTOM Unit will not turn the unit on . TROUBLESHOOTING GUIDE If you experience a problem with DRM. 35 The MP3 or WMA files Download uncorrupted are corrupted. The player is Make sure player is set...
... compatible. button to download methods. Volume + button. Win98 Driver isn't installed Install Win98 driver and/or see or computer is not turned Press Power On/Off/Stop on pages 14-17. No sound. No files are not Insert headphones. SYMPTOM Unit will not turn the unit on . TROUBLESHOOTING GUIDE If you experience a problem with DRM. 35 The MP3 or WMA files Download uncorrupted are corrupted. The player is Make sure player is set...

User Guide
Page 37
described on page 20. pages 37-38. CAUSE SOLUTION The Lock feature is Deactivate Lock feature as activated. Unit needs to be reset Reset unit and/or or firmware needs to be update firmware, see updated. pages 37-38. 36 Unit acting erratically. Unit needs to be reset Reset unit and/or or firmware needs to be update firmware, see updated. TROUBLESHOOTING GUIDE (CONTINUED) SYMPTOM No buttons work.
described on page 20. pages 37-38. CAUSE SOLUTION The Lock feature is Deactivate Lock feature as activated. Unit needs to be reset Reset unit and/or or firmware needs to be update firmware, see updated. pages 37-38. 36 Unit acting erratically. Unit needs to be reset Reset unit and/or or firmware needs to be update firmware, see updated. TROUBLESHOOTING GUIDE (CONTINUED) SYMPTOM No buttons work.

User Guide
Page 38
...-down menu, then click "Start" to connect the player and the computer. 2. Use the USB cable to format the unit (see figure above). At the "Format" window, select "FAT 32" from the file system pull-down menu; Then, click OK to do so by technical support personnel. 1. Double click on My Computer, then 236MB right click "Removable Disk" and left click on "Format". 3. NOTE: Make sure...
...-down menu, then click "Start" to connect the player and the computer. 2. Use the USB cable to format the unit (see figure above). At the "Format" window, select "FAT 32" from the file system pull-down menu; Then, click OK to do so by technical support personnel. 1. Double click on My Computer, then 236MB right click "Removable Disk" and left click on "Format". 3. NOTE: Make sure...

User Guide
Page 39
... folder to install the software to your digital audio device. Unzip the file, then double click setup.exe in the unit. 38 RESETTING THE UNIT To reset the unit, open the top cover, remove the battery for a few seconds and then replace it. Radio Presets, Play mode, Equalizer, Contrast, Power Savings, etc.) will cause the player to the computer using the supplied USB cable and the installation screen will reset the unit but all the default settings (i.e. Download the updated firmware...
... folder to install the software to your digital audio device. Unzip the file, then double click setup.exe in the unit. 38 RESETTING THE UNIT To reset the unit, open the top cover, remove the battery for a few seconds and then replace it. Radio Presets, Play mode, Equalizer, Contrast, Power Savings, etc.) will cause the player to the computer using the supplied USB cable and the installation screen will reset the unit but all the default settings (i.e. Download the updated firmware...


