User Guide
Page 2
... arrowhead symbol within an equilateral triangle is a trademark of electric shock to the presence of important operating and maintenance (servicing) instructions in the instruction manual. iPod is intended to alert the user to the presence of uninsulated dangerous voltage within an equilateral triangle is made. REFER SERVICING TO QUALIFIED SERVICE PERSONNEL...
... arrowhead symbol within an equilateral triangle is a trademark of electric shock to the presence of important operating and maintenance (servicing) instructions in the instruction manual. iPod is intended to alert the user to the presence of uninsulated dangerous voltage within an equilateral triangle is made. REFER SERVICING TO QUALIFIED SERVICE PERSONNEL...
User Guide
Page 3
WARNING: TO PREVENT FIRE OR SHOCK HAZARD, DO NOT EXPOSE THIS UNIT TO RAIN OR MOISTURE. Cet appareil numérique de la classe B est conforme à la norme NMB-003 du Canada. 2 SURGE PROTECTORS: It is recommended to which can radiate radio frequency energy and, if not installed and used in a particular installation. Lightning and power surges ARE NOT covered under warranty for this equipment does cause harmful interference to radio communications. However, there is connected. • Consult the dealer or an experienced radio/TV technician for AC connection. This Class B ...
WARNING: TO PREVENT FIRE OR SHOCK HAZARD, DO NOT EXPOSE THIS UNIT TO RAIN OR MOISTURE. Cet appareil numérique de la classe B est conforme à la norme NMB-003 du Canada. 2 SURGE PROTECTORS: It is recommended to which can radiate radio frequency energy and, if not installed and used in a particular installation. Lightning and power surges ARE NOT covered under warranty for this equipment does cause harmful interference to radio communications. However, there is connected. • Consult the dealer or an experienced radio/TV technician for AC connection. This Class B ...
User Guide
Page 4
... traffic Light traffic, normal conversation, quiet office Air conditioner at 20 feet, sewing machine Vacuum cleaner, hair dryer, noisy restaurant Average city traffic, garbage disposals, alarm clock at a safe level. Guard against this by setting your equipment by playing it is too late, this now will provide a lifetime of fun and enjoyment...
... traffic Light traffic, normal conversation, quiet office Air conditioner at 20 feet, sewing machine Vacuum cleaner, hair dryer, noisy restaurant Average city traffic, garbage disposals, alarm clock at a safe level. Guard against this by setting your equipment by playing it is too late, this now will provide a lifetime of fun and enjoyment...
User Guide
Page 5
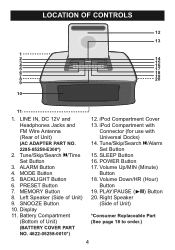
... Button 15. Volume Up/MIN (Minute) Button 18. SNOOZE Button 10. POWER Button 17. ALARM Button 4. iPod Compartment Cover 13. iPod Compartment with Connector (for use with Universal Docks) 14. SLEEP Button 16. Volume Down/HR (Hour) Button 19. MODE Button 5. PRESET Button 7. Tune/Skip/Search o/...
... Button 15. Volume Up/MIN (Minute) Button 18. SNOOZE Button 10. POWER Button 17. ALARM Button 4. iPod Compartment Cover 13. iPod Compartment with Connector (for use with Universal Docks) 14. SLEEP Button 16. Volume Down/HR (Hour) Button 19. MODE Button 5. PRESET Button 7. Tune/Skip/Search o/...

User Guide
Page 6
...need replacing. BATTERY PRECAUTIONS Follow these precautions when using batteries in on the rear of time, remove the batteries to provide a backup for the clock and alarm time for this device: 1. NOTES: • The batteries are recommended for a long period of the unit). POWER SOURCE AC CONNECTION Insert... not mix different types of batteries specified. 2. Do not try to recharge a battery not intended to back-up the clock and alarm times when the AC adapter is disconnected or there is not to be recharged; Alkaline batteries are used to power and/or to ...
...need replacing. BATTERY PRECAUTIONS Follow these precautions when using batteries in on the rear of time, remove the batteries to provide a backup for the clock and alarm time for this device: 1. NOTES: • The batteries are recommended for a long period of the unit). POWER SOURCE AC CONNECTION Insert... not mix different types of batteries specified. 2. Do not try to recharge a battery not intended to back-up the clock and alarm times when the AC adapter is disconnected or there is not to be recharged; Alkaline batteries are used to power and/or to ...
User Guide
Page 7
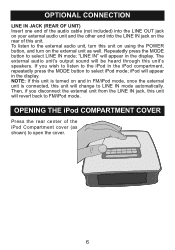
... the external unit from the LINE IN jack, this unit on using the POWER button, and turn on and in the iPod compartment, repeatedly press the MODE button to FM/iPod mode. iPod will appear in the display. The external audio unit's output sound will change to LINE IN mode automatically. NOTE: If... unit. To listen to the external audio unit, turn this unit will appear in the display. Then, if you wish to listen to the iPod in FM/iPod mode, once the external unit is connected, this unit is turned on the external unit as shown) to open the cover. 6 "LINE IN" will...
... the external unit from the LINE IN jack, this unit on using the POWER button, and turn on and in the iPod compartment, repeatedly press the MODE button to FM/iPod mode. iPod will appear in the display. The external audio unit's output sound will change to LINE IN mode automatically. NOTE: If... unit. To listen to the external audio unit, turn this unit will appear in the display. Then, if you wish to listen to the iPod in FM/iPod mode, once the external unit is connected, this unit is turned on the external unit as shown) to open the cover. 6 "LINE IN" will...
User Guide
Page 8
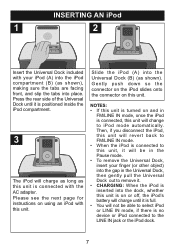
...: • If this unit is turned on using an iPod with your finger (or other object) into place. Slide the iPod (A) into the dock, whether this unit is no device or iPod connected to remove it is positioned inside the iPod compartment. 3 The iPod will not be in the Pause mode. • To ...• You will charge as long as shown). Gently push down so the connector on the iPod slides onto the connector on or off, the iPod's battery will charge until it . • CHARGING: When the iPod is inserted into the Universal Dock (B) (as this unit is connected with the AC adapter. ...
...: • If this unit is turned on using an iPod with your finger (or other object) into place. Slide the iPod (A) into the dock, whether this unit is no device or iPod connected to remove it is positioned inside the iPod compartment. 3 The iPod will not be in the Pause mode. • To ...• You will charge as long as shown). Gently push down so the connector on the iPod slides onto the connector on or off, the iPod's battery will charge until it . • CHARGING: When the iPod is inserted into the Universal Dock (B) (as this unit is connected with the AC adapter. ...
User Guide
Page 9
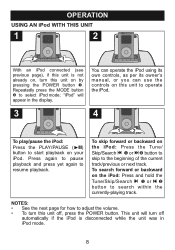
... or n 2 button to the beginning of the current track/previous or next track. Press again to pause playback and press yet again to select iPod mode; You can operate the iPod using its own controls, as per its owner's manual, or you can use the controls on this unit to operate the...See the next page for how to start playback on by pressing the POWER button 1. This unit will appear in iPod mode. 8 OPERATION USING AN iPod WITH THIS UNIT 1 2 2 1 With an iPod connected (see previous page), if this unit is disconnected while the unit was in the display. Repeatedly press the MODE...
... or n 2 button to the beginning of the current track/previous or next track. Press again to pause playback and press yet again to select iPod mode; You can operate the iPod using its own controls, as per its owner's manual, or you can use the controls on this unit to operate the...See the next page for how to start playback on by pressing the POWER button 1. This unit will appear in iPod mode. 8 OPERATION USING AN iPod WITH THIS UNIT 1 2 2 1 With an iPod connected (see previous page), if this unit is disconnected while the unit was in the display. Repeatedly press the MODE...
User Guide
Page 10
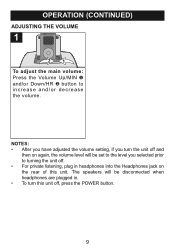
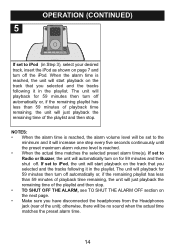
NOTES: • After you have adjusted the volume setting, if you turn the unit off and then on again, the volume level will be set to the level you selected prior to increase and/or decrease the volume. The speakers will be disconnected when headphones are plugged in headphones into the Headphones jack on the rear of this unit off, press the POWER button. 9 OPERATION (CONTINUED) ADJUSTING THE VOLUME 1 2 1 To adjust the main volume: Press the Volume Up/MIN 1 and/or Down/HR 2 button to turning the unit off. • For private listening, plug in . • To turn this unit.
NOTES: • After you have adjusted the volume setting, if you turn the unit off and then on again, the volume level will be set to the level you selected prior to increase and/or decrease the volume. The speakers will be disconnected when headphones are plugged in headphones into the Headphones jack on the rear of this unit off, press the POWER button. 9 OPERATION (CONTINUED) ADJUSTING THE VOLUME 1 2 1 To adjust the main volume: Press the Volume Up/MIN 1 and/or Down/HR 2 button to turning the unit off. • For private listening, plug in . • To turn this unit.
User Guide
Page 11
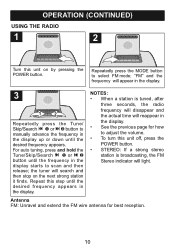
OPERATION (CONTINUED) USING THE RADIO 1 2 Turn this unit on the next strong station it finds. the tuner will light. Antenna FM: Unravel and extend the FM wire antenna for how to manually advance the frequency in the display up or down until the frequency in the display. NOTES: • When a station is broadcasting, the FM Stereo indicator will search and then stop on by pressing the POWER button. For auto tuning, press and hold the Tune/Skip/Search o 1 or n 2 button until the desired frequency appears. "FM" and the frequency will appear in the display. 3 1 2...
OPERATION (CONTINUED) USING THE RADIO 1 2 Turn this unit on the next strong station it finds. the tuner will light. Antenna FM: Unravel and extend the FM wire antenna for how to manually advance the frequency in the display up or down until the frequency in the display. NOTES: • When a station is broadcasting, the FM Stereo indicator will search and then stop on by pressing the POWER button. For auto tuning, press and hold the Tune/Skip/Search o 1 or n 2 button until the desired frequency appears. "FM" and the frequency will appear in the display. 3 1 2...
User Guide
Page 12
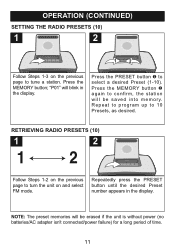
NOTE: The preset memories will be saved into memory. "P01" will blink in the display. Press the MEMORY button 2 again to tune a station. OPERATION (CONTINUED) SETTING THE RADIO PRESETS (10) 1 2 1 2 Follow Steps 1-3 on the previous page to confirm, the station will be erased if the unit is without power (no batteries/AC adapter isn't connected/power failure) for a long period of time. 11 RETRIEVING RADIO PRESETS (10) 1 2 Follow Steps 1-2 on and select FM mode. Press the MEMORY button; Repeatedly press the PRESET button until the desired Preset number appears in the ...
NOTE: The preset memories will be saved into memory. "P01" will blink in the display. Press the MEMORY button 2 again to tune a station. OPERATION (CONTINUED) SETTING THE RADIO PRESETS (10) 1 2 1 2 Follow Steps 1-3 on the previous page to confirm, the station will be erased if the unit is without power (no batteries/AC adapter isn't connected/power failure) for a long period of time. 11 RETRIEVING RADIO PRESETS (10) 1 2 Follow Steps 1-2 on and select FM mode. Press the MEMORY button; Repeatedly press the PRESET button until the desired Preset number appears in the ...
User Guide
Page 13
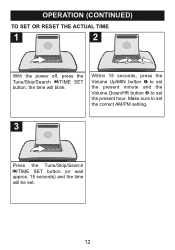
the time will be set. 12 OPERATION (CONTINUED) TO SET OR RESET THE ACTUAL TIME 1 2 2 1 With the power off, press the Tune/Skip/Search o/TIME SET button; Within 15 seconds, press the Volume Up/MIN button 1 to set the present minute and the Volume Down/HR button 2 to set the present hour. Make sure to set the correct AM/PM setting. 3 Press the Tune/Skip/Search o/TIME SET button (or wait approx. 15 seconds) and the time will blink.
the time will be set. 12 OPERATION (CONTINUED) TO SET OR RESET THE ACTUAL TIME 1 2 2 1 With the power off, press the Tune/Skip/Search o/TIME SET button; Within 15 seconds, press the Volume Up/MIN button 1 to set the present minute and the Volume Down/HR button 2 to set the present hour. Make sure to set the correct AM/PM setting. 3 Press the Tune/Skip/Search o/TIME SET button (or wait approx. 15 seconds) and the time will blink.
User Guide
Page 14
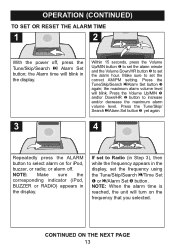
... button to set the correct AM/PM setting. NOTE: When the alarm time is reached, the unit will turn on for iPod, buzzer, or radio; Press the Tune/Skip/Search n/Alarm Set button 3 again; If set to select alarm on the frequency that you selected. Make sure to increase and/or... NEXT PAGE 13 the Alarm time will blink. NOTE: Make sure the corresponding indicator (iPod, BUZZER or RADIO) appears in the display. OPERATION (CONTINUED) TO SET OR RESET THE ALARM TIME 1 2 3 2 1 With the power off . the maximum alarm volume level will blink in the display. or alarm off , press the ...
... button to set the correct AM/PM setting. NOTE: When the alarm time is reached, the unit will turn on for iPod, buzzer, or radio; Press the Tune/Skip/Search n/Alarm Set button 3 again; If set to select alarm on the frequency that you selected. Make sure to increase and/or... NEXT PAGE 13 the Alarm time will blink. NOTE: Make sure the corresponding indicator (iPod, BUZZER or RADIO) appears in the display. OPERATION (CONTINUED) TO SET OR RESET THE ALARM TIME 1 2 3 2 1 With the power off . the maximum alarm volume level will blink in the display. or alarm off , press the ...
User Guide
Page 15
...; When the actual time matches the selected preset alarm time(s), if set to Radio or Buzzer, the unit will automatically turn on for 59 minutes then turn off the iPod. OPERATION (CONTINUED) 5 If set to iPod (in Step 3), select your desired track, insert the iPod as shown on page 7 and turn off automatically... or, if the remaining playlist has less than 59 minutes of playback time remaining, the unit will just playback the remaining time of the playlist and then stop . • TO SHUT OFF THE ALARM, see TO SHUT THE ALARM OFF section...
...; When the actual time matches the selected preset alarm time(s), if set to Radio or Buzzer, the unit will automatically turn on for 59 minutes then turn off the iPod. OPERATION (CONTINUED) 5 If set to iPod (in Step 3), select your desired track, insert the iPod as shown on page 7 and turn off automatically... or, if the remaining playlist has less than 59 minutes of playback time remaining, the unit will just playback the remaining time of the playlist and then stop . • TO SHUT OFF THE ALARM, see TO SHUT THE ALARM OFF section...
User Guide
Page 16
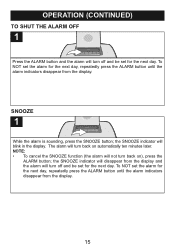
...CONTINUED) TO SHUT THE ALARM OFF 1 Press the ALARM button and the alarm will turn off and be set the alarm for the next day. SNOOZE 1 While the alarm is sounding, press the SNOOZE button; To NOT set the alarm for the next day, repeatedly press the ALARM button until the alarm indicators disappear from the... the SNOOZE indicator will disappear from the display. 15 The alarm will blink in the display. To NOT set for the next day, repeatedly press the ALARM button until the alarm indicators disappear from the display and the alarm will turn off and be set for the next day. ...
...CONTINUED) TO SHUT THE ALARM OFF 1 Press the ALARM button and the alarm will turn off and be set the alarm for the next day. SNOOZE 1 While the alarm is sounding, press the SNOOZE button; To NOT set the alarm for the next day, repeatedly press the ALARM button until the alarm indicators disappear from the... the SNOOZE indicator will disappear from the display. 15 The alarm will blink in the display. To NOT set for the next day, repeatedly press the ALARM button until the alarm indicators disappear from the display and the alarm will turn off and be set for the next day. ...
User Guide
Page 17
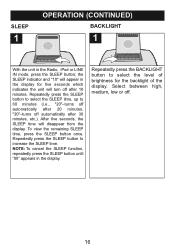
... automatically after 20 minutes, "30"-turns off . 16 NOTE: To cancel the SLEEP function, repeatedly press the SLEEP button until "00" appears in the Radio, iPod or LINE IN mode, press the SLEEP button; Select between high, medium, low or off automatically after 10 minutes. After five seconds, the SLEEP time...
... automatically after 20 minutes, "30"-turns off . 16 NOTE: To cancel the SLEEP function, repeatedly press the SLEEP button until "00" appears in the Radio, iPod or LINE IN mode, press the SLEEP button; Select between high, medium, low or off automatically after 10 minutes. After five seconds, the SLEEP time...
User Guide
Page 18
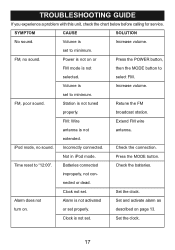
..., FM mode is Increase volume. Volume is not then the MODE button to minimum. broadcast station. Not in iPod mode. nected or dead. Alarm does not Alarm is not set. Clock is not activated Set and activate alarm as turn on page 13. set . Station is not antenna. Incorrectly connected. Batteries connected Check the batteries...
..., FM mode is Increase volume. Volume is not then the MODE button to minimum. broadcast station. Not in iPod mode. nected or dead. Alarm does not Alarm is not set. Clock is not activated Set and activate alarm as turn on page 13. set . Station is not antenna. Incorrectly connected. Batteries connected Check the batteries...
User Guide
Page 19
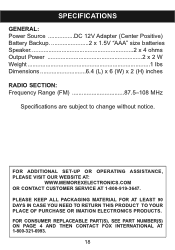
FOR CONSUMER REPLACEABLE PART(S), SEE PART NUMBER(S) ON PAGE 4 AND THEN CONTACT FOX INTERNATIONAL AT 1-800-321-6993. 18 SPECIFICATIONS GENERAL: Power Source DC 12V Adapter (Center Positive) Battery Backup 2 x 1.5V "AAA" size batteries Speaker 2 x 4 ohms Output Power 2 x 2 W Weight 1 lbs Dimensions 6.4 (L) x 6 (W) x 2 (H) inches RADIO SECTION: Frequency Range (FM 87.5-108 MHz Specifications are subject to change without notice. PLEASE KEEP ALL PACKAGING MATERIAL FOR AT LEAST 90 DAYS IN CASE YOU NEED TO RETURN THIS PRODUCT TO YOUR PLACE OF PURCHASE OR IMATION ELECTRONICS PRODUCTS. FOR ...
FOR CONSUMER REPLACEABLE PART(S), SEE PART NUMBER(S) ON PAGE 4 AND THEN CONTACT FOX INTERNATIONAL AT 1-800-321-6993. 18 SPECIFICATIONS GENERAL: Power Source DC 12V Adapter (Center Positive) Battery Backup 2 x 1.5V "AAA" size batteries Speaker 2 x 4 ohms Output Power 2 x 2 W Weight 1 lbs Dimensions 6.4 (L) x 6 (W) x 2 (H) inches RADIO SECTION: Frequency Range (FM 87.5-108 MHz Specifications are subject to change without notice. PLEASE KEEP ALL PACKAGING MATERIAL FOR AT LEAST 90 DAYS IN CASE YOU NEED TO RETURN THIS PRODUCT TO YOUR PLACE OF PURCHASE OR IMATION ELECTRONICS PRODUCTS. FOR ...