
User Guide
Page 6
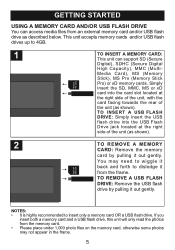
... you insert both a memory card and a USB flash drive, this unit will only read the photos from the memory card. • Please place under 1,000 photo files on the memory card, otherwise some photos may need to wiggle it back and forth to dislodge it out gently. TO REMOVE A USB FLASH... it out gently. GETTING STARTED USING A MEMORY CARD AND/OR USB FLASH DRIVE You can support SD (Secure Digital), SDHC (Secure Digital High Capacity), MMC (Multi- You may not appear in the frame. 5 TO INSERT A USB FLASH DRIVE: Simply insert the USB flash drive into the card slot located at ...
... you insert both a memory card and a USB flash drive, this unit will only read the photos from the memory card. • Please place under 1,000 photo files on the memory card, otherwise some photos may need to wiggle it back and forth to dislodge it out gently. TO REMOVE A USB FLASH... it out gently. GETTING STARTED USING A MEMORY CARD AND/OR USB FLASH DRIVE You can support SD (Secure Digital), SDHC (Secure Digital High Capacity), MMC (Multi- You may not appear in the frame. 5 TO INSERT A USB FLASH DRIVE: Simply insert the USB flash drive into the card slot located at ...
User Guide
Page 9
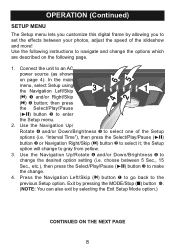
... enter the Setup menu. 2. Exit by pressing the MODE/Stop (I) button 6. (NOTE: You can also exit by allowing you customize this digital frame by selecting the Exit Setup Mode option.) CONTINUED ON THE NEXT PAGE 8 the Setup option will change the desired option setting (i.e. Use the ...Navigation Up/Rotate 4 and/or Down/Brightness 5 to change to make the change the options which are described on page 4). choose between your photos, adjust the speed of the Setup options (i.e. then press the Select/Play/Pause (®p) button 3 to select one of the slideshow and...
... enter the Setup menu. 2. Exit by pressing the MODE/Stop (I) button 6. (NOTE: You can also exit by allowing you customize this digital frame by selecting the Exit Setup Mode option.) CONTINUED ON THE NEXT PAGE 8 the Setup option will change the desired option setting (i.e. Use the ...Navigation Up/Rotate 4 and/or Down/Brightness 5 to change to make the change the options which are described on page 4). choose between your photos, adjust the speed of the Setup options (i.e. then press the Select/Play/Pause (®p) button 3 to select one of the slideshow and...
User Guide
Page 10
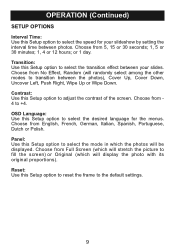
... display the photo with its original proportions). Reset: Use this Setup option to adjust the contrast of the screen. Choose from 5, 15 or 30 seconds; 1, 5 or 30 minutes; 1, 4 or 12 hours; Choose from 4 to +4. Contrast: Use this Setup option to reset the frame to the default settings. ...9 OSD Language: Use this Setup option to select the desired language for your slides. Choose from No Effect, Random (will randomly select among the other modes to transition between your slideshow by setting the interval time between photos. or 1 ...
... display the photo with its original proportions). Reset: Use this Setup option to adjust the contrast of the screen. Choose from 5, 15 or 30 seconds; 1, 5 or 30 minutes; 1, 4 or 12 hours; Choose from 4 to +4. Contrast: Use this Setup option to reset the frame to the default settings. ...9 OSD Language: Use this Setup option to select the desired language for your slides. Choose from No Effect, Random (will randomly select among the other modes to transition between your slideshow by setting the interval time between photos. or 1 ...
User Guide
Page 11
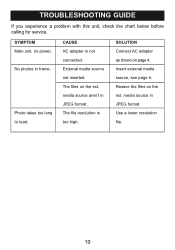
Photo takes too long to load. External media source not inserted. The file resolution is not connected. media source in frame. TROUBLESHOOTING GUIDE If you experience a problem with this unit, check the chart below before calling for service. Use a lower resolution file. 10 The files on page 4. Insert external media source, see page 5. SYMPTOM Main unit, no power. SOLUTION Connect AC adapter as shown on the ext. No photos in JPEG format. CAUSE AC adapter is too high. Resave the files on the ext. media source aren't in JPEG format.
Photo takes too long to load. External media source not inserted. The file resolution is not connected. media source in frame. TROUBLESHOOTING GUIDE If you experience a problem with this unit, check the chart below before calling for service. Use a lower resolution file. 10 The files on page 4. Insert external media source, see page 5. SYMPTOM Main unit, no power. SOLUTION Connect AC adapter as shown on the ext. No photos in JPEG format. CAUSE AC adapter is too high. Resave the files on the ext. media source aren't in JPEG format.


