

User Guide
Page 2
... of important operating and maintenance (servicing) instructions in the instruction manual. SAFETY PRECAUTIONS CAUTION RISK OF ELECTRIC SHOCK DO NOT OPEN CAUTION: TO REDUCE THE RISK OF ELECTRIC SHOCK, DO NOT REMOVE COVER (OR BACK). NO USERSERVICEABLE PARTS INSIDE. The user could lose the authority to the presence of electric shock to this equipment if an unauthorized change or modi...
... of important operating and maintenance (servicing) instructions in the instruction manual. SAFETY PRECAUTIONS CAUTION RISK OF ELECTRIC SHOCK DO NOT OPEN CAUTION: TO REDUCE THE RISK OF ELECTRIC SHOCK, DO NOT REMOVE COVER (OR BACK). NO USERSERVICEABLE PARTS INSIDE. The user could lose the authority to the presence of electric shock to this equipment if an unauthorized change or modi...
User Guide
Page 3
... to which the receiver is connected. • Consult the dealer or an experienced radio/TV technician for help. Lightning and power surges ARE NOT covered under warranty for AC connection. Cet appareil numérique...digital device regulations. SURGE PROTECTORS: It is encouraged to try to correct the interference by turning the equipment off and on, the user is recommended to use a surge protector for this equipment does cause harmful interference to radio or television reception, which can radiate radio frequency energy and, if not installed and used in a particular installation...
... to which the receiver is connected. • Consult the dealer or an experienced radio/TV technician for help. Lightning and power surges ARE NOT covered under warranty for AC connection. Cet appareil numérique...digital device regulations. SURGE PROTECTORS: It is encouraged to try to correct the interference by turning the equipment off and on, the user is recommended to use a surge protector for this equipment does cause harmful interference to radio or television reception, which can radiate radio frequency energy and, if not installed and used in a particular installation...
User Guide
Page 4
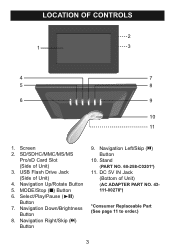
Navigation Left/Skip (o) Button 10. USB Flash Drive Jack (Side of Unit) 3. Screen 2. SD/SDHC/MMC/MS/MS Pro/xD Card Slot (Side of Unit) 4. Select/Play/Pause (®p) Button 7. Navigation Right/Skip (n) Button 9. LOCATION OF CONTROLS 2 1 3 4 7 5 8 6 9 10 11 1. Navigation Up/Rotate Button 5. DC 5V IN Jack (Bottom of Unit) (AC ADAPTER PART NO. 43111-00278*) *Consumer Replaceable Part (See page 11 to order.) 3 Stand (PART NO. 60-258-C0201*) 11. Navigation Down/Brightness Button 8. MODE/Stop (I) Button 6.
Navigation Left/Skip (o) Button 10. USB Flash Drive Jack (Side of Unit) 3. Screen 2. SD/SDHC/MMC/MS/MS Pro/xD Card Slot (Side of Unit) 4. Select/Play/Pause (®p) Button 7. Navigation Right/Skip (n) Button 9. LOCATION OF CONTROLS 2 1 3 4 7 5 8 6 9 10 11 1. Navigation Up/Rotate Button 5. DC 5V IN Jack (Bottom of Unit) (AC ADAPTER PART NO. 43111-00278*) *Consumer Replaceable Part (See page 11 to order.) 3 Stand (PART NO. 60-258-C0201*) 11. Navigation Down/Brightness Button 8. MODE/Stop (I) Button 6.
User Guide
Page 5
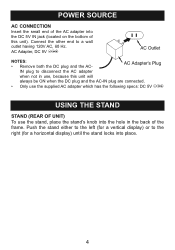
... connected. • Only use the supplied AC adapter which has the following specs: DC 5V Z USING THE STAND STAND (REAR OF UNIT) To use the stand, place the stand's knob into place. 4 AC Adapter, DC 5V Z NOTES: • Remove both the DC plug and the AC- Push the stand either to the left (for a vertical display) or to a wall outlet having 120V AC, 60 Hz. POWER...
... connected. • Only use the supplied AC adapter which has the following specs: DC 5V Z USING THE STAND STAND (REAR OF UNIT) To use the stand, place the stand's knob into place. 4 AC Adapter, DC 5V Z NOTES: • Remove both the DC plug and the AC- Push the stand either to the left (for a vertical display) or to a wall outlet having 120V AC, 60 Hz. POWER...
User Guide
Page 6
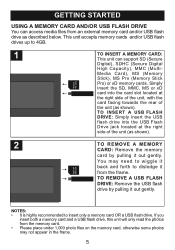
... both a memory card and a USB flash drive, this unit will only read the photos from the memory card. • Please place under 1,000 photo files on the memory card, otherwise some photos may need to wiggle it back and forth to dislodge it from an external memory card and/or USB flash drive as described below. TO REMOVE A USB FLASH DRIVE: Remove the USB flash drive by pulling it out gently. TO INSERT A USB FLASH DRIVE: Simply insert the USB flash drive into the card slot...
... both a memory card and a USB flash drive, this unit will only read the photos from the memory card. • Please place under 1,000 photo files on the memory card, otherwise some photos may need to wiggle it back and forth to dislodge it from an external memory card and/or USB flash drive as described below. TO REMOVE A USB FLASH DRIVE: Remove the USB flash drive by pulling it out gently. TO INSERT A USB FLASH DRIVE: Simply insert the USB flash drive into the card slot...
User Guide
Page 7
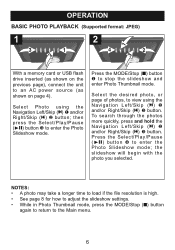
... MODE/Stop (I ) button again to return to view using the Navigation Left/Skip (o) 1 and/or Right/Skip (n) 2 button; To search through the photos more quickly, press and hold the Navigation Left/Skip (o) 2 and/or Right/Skip (n) 3 button. OPERATION BASIC PHOTO PLAYBACK (Supported format: JPEG) 1 2 3 1 4 2 2 1 3 With a memory card or USB flash drive inserted (as shown on the previous page), connect the unit to enter the Photo Slideshow mode. then press the Select/Play/Pause (®p) button...
... MODE/Stop (I ) button again to return to view using the Navigation Left/Skip (o) 1 and/or Right/Skip (n) 2 button; To search through the photos more quickly, press and hold the Navigation Left/Skip (o) 2 and/or Right/Skip (n) 3 button. OPERATION BASIC PHOTO PLAYBACK (Supported format: JPEG) 1 2 3 1 4 2 2 1 3 With a memory card or USB flash drive inserted (as shown on the previous page), connect the unit to enter the Photo Slideshow mode. then press the Select/Play/Pause (®p) button...
User Guide
Page 8
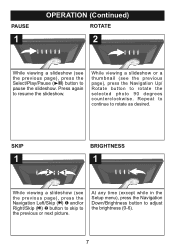
.... While viewing a slideshow or a thumbnail (see the previous page), press the Select/Play/Pause (®p) button to pause the slideshow. Repeat to continue to the previous or next picture. SKIP 1 2 1 BRIGHTNESS 1 While viewing a slideshow (see the previous page), press the Navigation Left/Skip (o) 1 and/or Right/Skip (n) 2 button to skip to rotate as desired. At any time (except while in the Setup menu), press...
.... While viewing a slideshow or a thumbnail (see the previous page), press the Select/Play/Pause (®p) button to pause the slideshow. Repeat to continue to the previous or next picture. SKIP 1 2 1 BRIGHTNESS 1 While viewing a slideshow (see the previous page), press the Navigation Left/Skip (o) 1 and/or Right/Skip (n) 2 button to skip to rotate as desired. At any time (except while in the Setup menu), press...
User Guide
Page 9
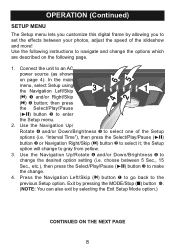
then press the Select/Play/Pause (®p) button 3 to select it; "Interval Time"), then press the Select/Play/Pause (®p) button 3 or Navigation Right/Skip (n) button 2 to enter the Setup menu. 2. Use the Navigation Up/Rotate 4 and/or Down/Brightness 5 to make the change the desired option setting (i.e. choose between your photos, adjust the speed of the Setup options (i.e. Use the following instructions to an AC power source (as...
then press the Select/Play/Pause (®p) button 3 to select it; "Interval Time"), then press the Select/Play/Pause (®p) button 3 or Navigation Right/Skip (n) button 2 to enter the Setup menu. 2. Use the Navigation Up/Rotate 4 and/or Down/Brightness 5 to make the change the desired option setting (i.e. choose between your photos, adjust the speed of the Setup options (i.e. Use the following instructions to an AC power source (as...
User Guide
Page 10
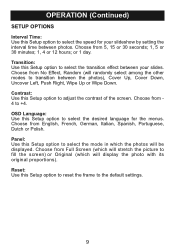
... slideshow by setting the interval time between the photos), Cover Up, Cover Down, Uncover Left, Push Right, Wipe Up or Wipe Down. Transition: Use this Setup option to reset the frame to adjust the contrast of the screen. Choose from Full Screen (which will stretch the picture to select the mode in which will be displayed. Reset: Use this Setup option to +4. or 1 day. Contrast: Use this Setup...
... slideshow by setting the interval time between the photos), Cover Up, Cover Down, Uncover Left, Push Right, Wipe Up or Wipe Down. Transition: Use this Setup option to reset the frame to adjust the contrast of the screen. Choose from Full Screen (which will stretch the picture to select the mode in which will be displayed. Reset: Use this Setup option to +4. or 1 day. Contrast: Use this Setup...
User Guide
Page 11
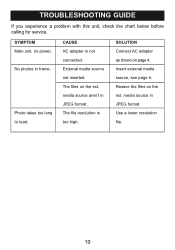
CAUSE AC adapter is too high. The file resolution is not connected. Use a lower resolution file. 10 External media source not inserted. SOLUTION Connect AC adapter as shown on the ext. Resave the files on page 4. Photo takes too long to load. media source aren't in frame. Insert external media source, see page 5. SYMPTOM Main unit, no power. No photos in JPEG format. The files on the ext. media source in JPEG format. TROUBLESHOOTING GUIDE If you experience a problem with this unit, check the chart below before calling for service.
CAUSE AC adapter is too high. The file resolution is not connected. Use a lower resolution file. 10 External media source not inserted. SOLUTION Connect AC adapter as shown on the ext. Resave the files on page 4. Photo takes too long to load. media source aren't in frame. Insert external media source, see page 5. SYMPTOM Main unit, no power. No photos in JPEG format. The files on the ext. media source in JPEG format. TROUBLESHOOTING GUIDE If you experience a problem with this unit, check the chart below before calling for service.

User Guide
Page 12
... AT LEAST 90 DAYS IN CASE YOU NEED TO RETURN THIS PRODUCT TO YOUR PLACE OF PURCHASE OR IMATION ELECTRONICS PRODUCTS. For customers calling within Canada call 1-800-919-3647. SPECIFICATIONS GENERAL: Power Source AC Adapter, DC 5V Z Weight 1Lb Dimensions 5" (H) x 7.9" (W) x 4.75" (D) Weight and dimensions are subject to change without notice. LCD Display Size 7" (measured diagonally) Resolution 480 x 234...
... AT LEAST 90 DAYS IN CASE YOU NEED TO RETURN THIS PRODUCT TO YOUR PLACE OF PURCHASE OR IMATION ELECTRONICS PRODUCTS. For customers calling within Canada call 1-800-919-3647. SPECIFICATIONS GENERAL: Power Source AC Adapter, DC 5V Z Weight 1Lb Dimensions 5" (H) x 7.9" (W) x 4.75" (D) Weight and dimensions are subject to change without notice. LCD Display Size 7" (measured diagonally) Resolution 480 x 234...


