
User Guide
Page 1
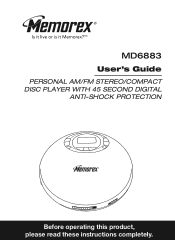
MD6883 User's Guide PERSONAL AM/FM STEREO/COMPACT DISC PLAYER WITH 45 SECOND DIGITAL ANTI-SHOCK PROTECTION Before operating this product, please read these instructions completely.
MD6883 User's Guide PERSONAL AM/FM STEREO/COMPACT DISC PLAYER WITH 45 SECOND DIGITAL ANTI-SHOCK PROTECTION Before operating this product, please read these instructions completely.
User Guide
Page 2
...fications are defeated. Lightning and power surges ARE NOT covered under warranty for AC connection. This laser Compact Disc Player is open and interlock failed or defeated. Changes or modifications to this product. 1 NO USER-SERVICEABLE PARTS INSIDE. SAFETY PRECAUTIONS CAUTION RISK OF ELECTRIC SHOCK DO NOT OPEN CAUTION: TO REDUCE THE RISK OF ELECTRIC SHOCK, DO NOT REMOVE COVER (OR BACK...
...fications are defeated. Lightning and power surges ARE NOT covered under warranty for AC connection. This laser Compact Disc Player is open and interlock failed or defeated. Changes or modifications to this product. 1 NO USER-SERVICEABLE PARTS INSIDE. SAFETY PRECAUTIONS CAUTION RISK OF ELECTRIC SHOCK DO NOT OPEN CAUTION: TO REDUCE THE RISK OF ELECTRIC SHOCK, DO NOT REMOVE COVER (OR BACK...
User Guide
Page 3
... user is connected. • Consult the dealer or an experienced radio/TV technician for a Class B digital device, pursuant to Part 15 of other stereo equipment that radiates too much heat. • Places lacking ventilation or dusty places. • Places subject to constant vibration. • Humid or moist places. 2 This equipment generates, uses and can be determined by turning...
... user is connected. • Consult the dealer or an experienced radio/TV technician for a Class B digital device, pursuant to Part 15 of other stereo equipment that radiates too much heat. • Places lacking ventilation or dusty places. • Places subject to constant vibration. • Humid or moist places. 2 This equipment generates, uses and can be determined by turning...
User Guide
Page 4
..., noisy restaurant Average city traffic, garbage disposals, alarm clock at a safe level BEFORE your new sound equipment will help to higher volumes of sound. So what sounds "normal" can be loud and harmful to excessive noise. Once you have established a comfortable sound level: • Set the dial and leave it 's time to consider how you can hear it is...
..., noisy restaurant Average city traffic, garbage disposals, alarm clock at a safe level BEFORE your new sound equipment will help to higher volumes of sound. So what sounds "normal" can be loud and harmful to excessive noise. Once you have established a comfortable sound level: • Set the dial and leave it 's time to consider how you can hear it is...
User Guide
Page 5
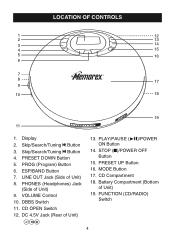
... n Button 3. VOLUME Control 10. CD OPEN Switch 12. STOP (I)/POWER OFF Button 15. DC 4.5V Jack (Rear of Unit) 19. Battery Compartment (Bottom of Unit) z 13. LINE OUT Jack (Side of Unit) 9. Display 2. ESP/BAND Button 7. DBBS Switch 11. PLAY/PAUSE (®p)/POWER ON Button 14. PRESET UP Button 16. PRESET DOWN Button 5. PROG (Program) Button 6. LOCATION OF CONTROLS 1 12 2 13 3 14 4 15 5 16 6 7 8 17 9 10 18 19 11 1. PHONES (Headphones) Jack (Side of Unit) 8. FUNCTION (CD/RADIO) Switch 4 Skip/Search/Tuning o Button 4. CD Compartment 18. MODE...
... n Button 3. VOLUME Control 10. CD OPEN Switch 12. STOP (I)/POWER OFF Button 15. DC 4.5V Jack (Rear of Unit) 19. Battery Compartment (Bottom of Unit) z 13. LINE OUT Jack (Side of Unit) 9. Display 2. ESP/BAND Button 7. DBBS Switch 11. PLAY/PAUSE (®p)/POWER ON Button 14. PRESET UP Button 16. PRESET DOWN Button 5. PROG (Program) Button 6. LOCATION OF CONTROLS 1 12 2 13 3 14 4 15 5 16 6 7 8 17 9 10 18 19 11 1. PHONES (Headphones) Jack (Side of Unit) 8. FUNCTION (CD/RADIO) Switch 4 Skip/Search/Tuning o Button 4. CD Compartment 18. MODE...
User Guide
Page 6
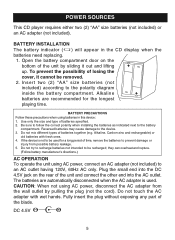
... rupture. (Follow battery manufacturer's directions.) AC OPERATION To operate the unit using AC power, connect an AC adapter (not included) to be removed. 2. The batteries are recommended for a long period of time, remove the batteries to the polarity diagram inside the battery compartment. CAUTION: When not using batteries in the CD display when the batteries need replacing. 1. DC 4.5V - + 5 Be sure to follow the correct polarity when installing the batteries as indicated...
... rupture. (Follow battery manufacturer's directions.) AC OPERATION To operate the unit using AC power, connect an AC adapter (not included) to be removed. 2. The batteries are recommended for a long period of time, remove the batteries to the polarity diagram inside the battery compartment. CAUTION: When not using batteries in the CD display when the batteries need replacing. 1. DC 4.5V - + 5 Be sure to follow the correct polarity when installing the batteries as indicated...
User Guide
Page 7
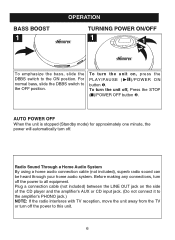
.... 6 AUTO POWER OFF 1 When the unit is stopped (Standby mode) for approximately one minute, the power will automatically turn the unit off . Radio Sound Through a Home Audio System By using a home audio connection cable (not included), superb radio sound can be heard through your home audio system. To turn off , Press the STOP (I)/POWER OFF button 2. BASS BOOST 1 OPERATION TURNING POWER ON/OFF 1 1 2 To emphasize the bass, slide the DBBS switch to all equipment. Plug a connection cable (not included) between the LINE OUT jack...
.... 6 AUTO POWER OFF 1 When the unit is stopped (Standby mode) for approximately one minute, the power will automatically turn the unit off . Radio Sound Through a Home Audio System By using a home audio connection cable (not included), superb radio sound can be heard through your home audio system. To turn off , Press the STOP (I)/POWER OFF button 2. BASS BOOST 1 OPERATION TURNING POWER ON/OFF 1 1 2 To emphasize the bass, slide the DBBS switch to all equipment. Plug a connection cable (not included) between the LINE OUT jack...
User Guide
Page 8
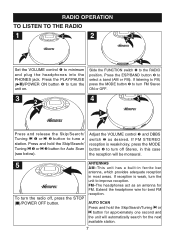
... MODE button 3 to improve reception. 1 FM-The headphones act as desired. Extend the headphone wire for Auto Scan (see below). RADIO OPERATION TO LISTEN TO THE RADIO 1 2 2 23 1 1 Set the VOLUME control 1 to tune a station. Press the PLAY/PAUSE (®p)/POWER ON button 2 to turn FM Stereo ON or OFF. 1 32 1 4 3 1 2 1 1 1 2 Press and release the Skip/Search/ Tuning o 1 or n 2 button to minimum and plug the headphones into the PHONES jack. Press and hold...
... MODE button 3 to improve reception. 1 FM-The headphones act as desired. Extend the headphone wire for Auto Scan (see below). RADIO OPERATION TO LISTEN TO THE RADIO 1 2 2 23 1 1 Set the VOLUME control 1 to tune a station. Press the PLAY/PAUSE (®p)/POWER ON button 2 to turn FM Stereo ON or OFF. 1 32 1 4 3 1 2 1 1 1 2 Press and release the Skip/Search/ Tuning o 1 or n 2 button to minimum and plug the headphones into the PHONES jack. Press and hold...
User Guide
Page 9
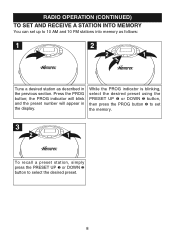
RADIO OPERATION (CONTINUED) TO SET AND RECEIVE A STATION INTO MEMORY You can set the memory. 3 2 1 2 1 2 2 1 To recall a preset station, simply press the PRESET UP 1 or DOWN 2 button to 10 AM and 10 FM stations into memory as follows: 1 2 2 1 3 Tune a desired station as described in the display. 1 While the PROG indicator is blinking, select the desired preset using the PRESET UP 1 or DOWN 2 button, then press the PROG button 3 to...
RADIO OPERATION (CONTINUED) TO SET AND RECEIVE A STATION INTO MEMORY You can set the memory. 3 2 1 2 1 2 2 1 To recall a preset station, simply press the PRESET UP 1 or DOWN 2 button to 10 AM and 10 FM stations into memory as follows: 1 2 2 1 3 Tune a desired station as described in the display. 1 While the PROG indicator is blinking, select the desired preset using the PRESET UP 1 or DOWN 2 button, then press the PROG button 3 to...

User Guide
Page 10
... the FUNCTION switch 2 to start playback. Press the PLAY/PAUSE (®p)/POWER ON button to the CD position. the total number of tracks will blink. Press once again to resume playback. 3 4 3 4 3 2 1 1 1 2 Adjust the VOLUME control 1 and When the disc is on the disc, press and hold the Skip/Search/Tuning 3 or 4 button. Press the STOP (I )/POWER forward or backward through the tracks OFF button to the right. CD OPERATION TO PLAY A CD (Standard, CD-R and CD-RW) 1 2 1 1 1 2 Open the CD...
... the FUNCTION switch 2 to start playback. Press the PLAY/PAUSE (®p)/POWER ON button to the CD position. the total number of tracks will blink. Press once again to resume playback. 3 4 3 4 3 2 1 1 1 2 Adjust the VOLUME control 1 and When the disc is on the disc, press and hold the Skip/Search/Tuning 3 or 4 button. Press the STOP (I )/POWER forward or backward through the tracks OFF button to the right. CD OPERATION TO PLAY A CD (Standard, CD-R and CD-RW) 1 2 1 1 1 2 Open the CD...
User Guide
Page 11
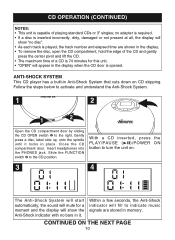
... 3 the PHONES jack. CD OPERATION (CONTINUED) NOTES: • This unit is played, the track number and elapsed time are stored in memory. no disc". • As each track is capable of playing standard CDs or 3" singles; Follow the steps below to activate and understand the Anti-Shock System. 1 2 1 2 Open the CD compartment door by sliding the CD OPEN switch 1 to the CD position. ANTI-SHOCK SYSTEM This CD player has a built-in Anti-Shock System that...
... 3 the PHONES jack. CD OPERATION (CONTINUED) NOTES: • This unit is played, the track number and elapsed time are stored in memory. no disc". • As each track is capable of playing standard CDs or 3" singles; Follow the steps below to activate and understand the Anti-Shock System. 1 2 1 2 Open the CD compartment door by sliding the CD OPEN switch 1 to the CD position. ANTI-SHOCK SYSTEM This CD player has a built-in Anti-Shock System that...
User Guide
Page 12
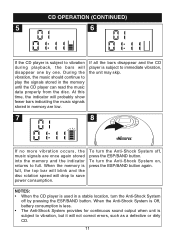
.../BAND button again. CD OPERATION (CONTINUED) 5 6 If the CD player is subject to vibration during playback, the bars will disappear one . To turn the Anti-Shock System off by one by pressing the ESP/BAND battery consumption is less. Whe2n the Anti-S3hock System is Off, • The Anti-Shock System provides for continuous sound output when unit is subject to save power consumption. At this time...
.../BAND button again. CD OPERATION (CONTINUED) 5 6 If the CD player is subject to vibration during playback, the bars will disappear one . To turn the Anti-Shock System off by one by pressing the ESP/BAND battery consumption is less. Whe2n the Anti-S3hock System is Off, • The Anti-Shock System provides for continuous sound output when unit is subject to save power consumption. At this time...
User Guide
Page 13
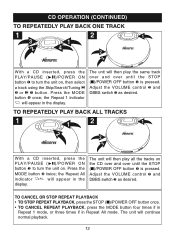
... Repeat 1 mode, or three times if in the display. Press the MODE button 2 twice; Press the MODE button 4 once; The unit will aALpLpear in the display. Adjust the VOLUME control 2 and2 DBBS switch 3 as desired. 1 1 2 TO CANCEL OR STOP REPEAT PLAYBACK 4• TO STOP REPEAT PLAYBACK, press the S3TOP (I )/POWER OF4F button 1 is pressed. CD OPERATION (CONTINUED) TO REPEATEDLY PLAY BACK ONE TRACK 1 2 1 3 1 2 4 2 3 With a CD inserted, press the PLAY/PAUSE (®p)/POWER ON button 1 to turn the unit on, then select a track using...
... Repeat 1 mode, or three times if in the display. Press the MODE button 2 twice; Press the MODE button 4 once; The unit will aALpLpear in the display. Adjust the VOLUME control 2 and2 DBBS switch 3 as desired. 1 1 2 TO CANCEL OR STOP REPEAT PLAYBACK 4• TO STOP REPEAT PLAYBACK, press the S3TOP (I )/POWER OF4F button 1 is pressed. CD OPERATION (CONTINUED) TO REPEATEDLY PLAY BACK ONE TRACK 1 2 1 3 1 2 4 2 3 With a CD inserted, press the PLAY/PAUSE (®p)/POWER ON button 1 to turn the unit on, then select a track using...
User Guide
Page 14
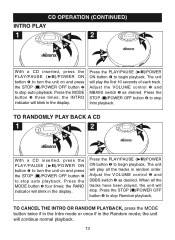
... VOLUME control 2 and DBBS switch 3 as desired. Press the MODE button 3 three times; Press the STOP (I)/POWER OFF button 4 to stop Random playback. 1 TO CANCEL THE INTRO OR RANDOM PLAYBACK, press the MODE button twice if in the Intro mode or once if in random order. TO RANDO1MLY PLAY BACK A CD 1 1 2 1 4 2 3 2 3 With a CD inserted, press the PLAY/PAUSE (®p)/POWER ON button 1 to turn the unit on and press the STOP (I)/POWER OFF button 2 to stop auto playback. CD OPERATION...
... VOLUME control 2 and DBBS switch 3 as desired. Press the MODE button 3 three times; Press the STOP (I)/POWER OFF button 4 to stop Random playback. 1 TO CANCEL THE INTRO OR RANDOM PLAYBACK, press the MODE button twice if in the Intro mode or once if in random order. TO RANDO1MLY PLAY BACK A CD 1 1 2 1 4 2 3 2 3 With a CD inserted, press the PLAY/PAUSE (®p)/POWER ON button 1 to turn the unit on and press the STOP (I)/POWER OFF button 2 to stop auto playback. CD OPERATION...
User Guide
Page 15
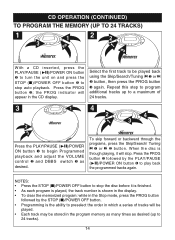
...;p)/POWER ON button 1 to begin Programmed playback and adjust the VOLUME control 2 and DBBS switch 3 as desired (up to a maximum of tracks will be played. • Each track may be played back using the Skip/Search/Tuning o 1 or n 2 button, then press the PROG button 3 again. Select the first track to 24 tracks). 14 Press the PROG button 3 followed by the STOP (I )/POWER OFF button 2 to play back the programmed tracks again. Repeat this step to program additional tracks...
...;p)/POWER ON button 1 to begin Programmed playback and adjust the VOLUME control 2 and DBBS switch 3 as desired (up to a maximum of tracks will be played. • Each track may be played back using the Skip/Search/Tuning o 1 or n 2 button, then press the PROG button 3 again. Select the first track to 24 tracks). 14 Press the PROG button 3 followed by the STOP (I )/POWER OFF button 2 to play back the programmed tracks again. Repeat this step to program additional tracks...
User Guide
Page 16
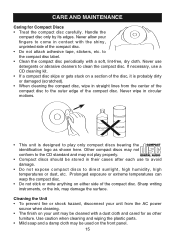
..., use a CD cleaning kit. • If a compact disc skips or gets stuck on your unit may not play only compact discs bearing the identification logo as other furniture. Sharp writing instruments, or the ink, may be stored in straight lines from the AC power source when cleaning. • The finish on a section of the disc, it is designed to clean the compact disc. Other compact discs may...
..., use a CD cleaning kit. • If a compact disc skips or gets stuck on your unit may not play only compact discs bearing the identification logo as other furniture. Sharp writing instruments, or the ink, may be stored in straight lines from the AC power source when cleaning. • The finish on a section of the disc, it is designed to clean the compact disc. Other compact discs may...
User Guide
Page 17
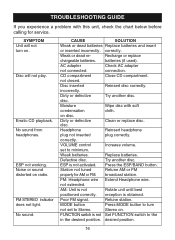
... disc. ESP not working. Noise or sound distorted on . Dirty or defective disc. Poor FM signal. No sound. Weak or dead re- not extended. MODE button Press MODE button to minimum. AC adapter Check AC adapter not connected. correctly. VOLUME control Increase volume. Press the ESP/BAND button. Disc inserted Reinsert disc correctly. set to the in the desired position. Defective disc. Stereo on radio. AM: Unit is not Set FUNCTION switch to Stereo. Erratic CD playback. Clean or replace disc...
... disc. ESP not working. Noise or sound distorted on . Dirty or defective disc. Poor FM signal. No sound. Weak or dead re- not extended. MODE button Press MODE button to minimum. AC adapter Check AC adapter not connected. correctly. VOLUME control Increase volume. Press the ESP/BAND button. Disc inserted Reinsert disc correctly. set to the in the desired position. Defective disc. Stereo on radio. AM: Unit is not Set FUNCTION switch to Stereo. Erratic CD playback. Clean or replace disc...
User Guide
Page 18
... PRODUCT TO YOUR PLACE OF PURCHASE OR MEMOREX. SPECIFICATIONS Power requirements 2 x LR6 "AA" alkaline battery DC in 4.5V adapter (center positive) Frequency Range (FM 87.5 ~ 108 MHz Frequency Range (AM 530 ~ 1720 KHz D/A conversion 1-bit DAC eight times oversampling Frequency response 20~20,000Hz (+1,-3 dB) Anti-shock 45 second buffer Output level Line output: 0.6 Vms (47K ohms) Headphones: 16mW (32 ohms) FOR ADDITIONAL SET-UP OR OPERATING...
... PRODUCT TO YOUR PLACE OF PURCHASE OR MEMOREX. SPECIFICATIONS Power requirements 2 x LR6 "AA" alkaline battery DC in 4.5V adapter (center positive) Frequency Range (FM 87.5 ~ 108 MHz Frequency Range (AM 530 ~ 1720 KHz D/A conversion 1-bit DAC eight times oversampling Frequency response 20~20,000Hz (+1,-3 dB) Anti-shock 45 second buffer Output level Line output: 0.6 Vms (47K ohms) Headphones: 16mW (32 ohms) FOR ADDITIONAL SET-UP OR OPERATING...


