
User Guide
Page 1
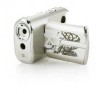
Video Camera Digital Let's Make Memories User Guide Please read these instructions completely, before operating this product. memorexelectronics.com MCC215
Video Camera Digital Let's Make Memories User Guide Please read these instructions completely, before operating this product. memorexelectronics.com MCC215
User Guide
Page 2
...; Changing the TV System 29 • Default Setting 30 Connecting the Unit to a TV 31 Computer Connection 32 Software Installation 33 • Supported Operating Systems........33 • Installing the PC Camera Driver .....33 • Installing PhotoImpression and VideoImpression 34 Downloading and Transferring Files 35 Using PhotoImpression 36 Using VideoImpression 37 Using the Unit as a PC Cam 38 Safely Removing the Hardware .......40 Troubleshooting Guide 41 Formatting the Unit 43 Resetting the Unit 44 Specifications 45...
...; Changing the TV System 29 • Default Setting 30 Connecting the Unit to a TV 31 Computer Connection 32 Software Installation 33 • Supported Operating Systems........33 • Installing the PC Camera Driver .....33 • Installing PhotoImpression and VideoImpression 34 Downloading and Transferring Files 35 Using PhotoImpression 36 Using VideoImpression 37 Using the Unit as a PC Cam 38 Safely Removing the Hardware .......40 Troubleshooting Guide 41 Formatting the Unit 43 Resetting the Unit 44 Specifications 45...
User Guide
Page 3
... installation. If this equipment does cause harmful interference to radio or television reception, which the receiver is connected. • Consult the dealer or an experienced radio/TV technician for a Class B digital device, pursuant to Part 15 of the FCC Rules. This equipment generates, uses ... user could lose the authority to operate this equipment may cause harmful interference unless the modifications are designed to correct the interference by turning the equipment off and on a circuit different from that interference will not occur in the instruction manual. Changes ...
... installation. If this equipment does cause harmful interference to radio or television reception, which the receiver is connected. • Consult the dealer or an experienced radio/TV technician for a Class B digital device, pursuant to Part 15 of the FCC Rules. This equipment generates, uses ... user could lose the authority to operate this equipment may cause harmful interference unless the modifications are designed to correct the interference by turning the equipment off and on a circuit different from that interference will not occur in the instruction manual. Changes ...

User Guide
Page 4
... memory to be deleted. SAFETY PRECAUTIONS Be sure to observe the following precautions when using the unit: • This unit works best when used in dimly-lit areas will vary. • Never attempt your local authorized service center. • Physical damage and malfunction of data by transferring to a personal computer. • In an environment with electrostatic discharge, the user...
... memory to be deleted. SAFETY PRECAUTIONS Be sure to observe the following precautions when using the unit: • This unit works best when used in dimly-lit areas will vary. • Never attempt your local authorized service center. • Physical damage and malfunction of data by transferring to a personal computer. • In an environment with electrostatic discharge, the user...
User Guide
Page 17
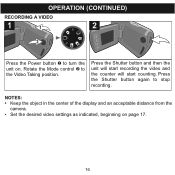
OPERATION (CONTINUED) RECORDING A VIDEO 1 1 2 SET 2 SET V P Press the Power button 1 to turn the unit on page 17. 16 Press the Shutter button and then the unit will start recording the video and the counter will start counting. Press the Shutter button again to the Video Taking position. NOTES: • Keep the object in the center of the display and an acceptable distance from the camera. • Set the desired video settings as indicated, beginning on . Rotate the Mode control 2 to stop recording.
OPERATION (CONTINUED) RECORDING A VIDEO 1 1 2 SET 2 SET V P Press the Power button 1 to turn the unit on page 17. 16 Press the Shutter button and then the unit will start recording the video and the counter will start counting. Press the Shutter button again to the Video Taking position. NOTES: • Keep the object in the center of the display and an acceptable distance from the camera. • Set the desired video settings as indicated, beginning on . Rotate the Mode control 2 to stop recording.
User Guide
Page 18
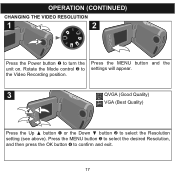
Rotate the Mode control 2 to confirm and exit. 17 Press the MENU button 3 to select the desired Resolution, and then press the OK button 4 to the Video Recording position. Press the MENU button and the settings will appear. 3 41 23 QVGA (Good Quality) VGA (Best Quality) Press the Up π button 1 or the Down † button 2 to turn the unit on. OPERATION (CONTINUED) CHANGING THE VIDEO RESOLUTION 1 1 2 SET 2 SET V P Press the Power button 1 to select the Resolution setting (see above).
Rotate the Mode control 2 to confirm and exit. 17 Press the MENU button 3 to select the desired Resolution, and then press the OK button 4 to the Video Recording position. Press the MENU button and the settings will appear. 3 41 23 QVGA (Good Quality) VGA (Best Quality) Press the Up π button 1 or the Down † button 2 to turn the unit on. OPERATION (CONTINUED) CHANGING THE VIDEO RESOLUTION 1 1 2 SET 2 SET V P Press the Power button 1 to select the Resolution setting (see above).

User Guide
Page 19
Press the MENU button and the settings will appear. 3 Auto Adjusts White balance 41 Under Sunlight Under Cloudy Skies 23 Under Tungsten Under Fluorescent Lights Press the Up π button 1 or the Down † button 2 to confirm and exit. 18 Press the MENU button 3 to select the desired White Balance, and then press the OK button 4 to select the White Balance setting (see above). Rotate the Mode control 2 to turn the unit on. OPERATION (CONTINUED) CHANGING THE WHITE BALANCE 1 1 2 SET 2 SET V P Press the Power button 1 to the Video Recording position.
Press the MENU button and the settings will appear. 3 Auto Adjusts White balance 41 Under Sunlight Under Cloudy Skies 23 Under Tungsten Under Fluorescent Lights Press the Up π button 1 or the Down † button 2 to confirm and exit. 18 Press the MENU button 3 to select the desired White Balance, and then press the OK button 4 to select the White Balance setting (see above). Rotate the Mode control 2 to turn the unit on. OPERATION (CONTINUED) CHANGING THE WHITE BALANCE 1 1 2 SET 2 SET V P Press the Power button 1 to the Video Recording position.
User Guide
Page 20
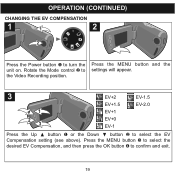
the Video Recording position. 3 41 EV+2 EV+1.5 EV+1 EV-1.5 EV-2.0 23 EV+0 EV-1 Press the Up π button 1 or the Down † button 2 to confirm and exit. 19 Press the MENU button 3 to select the desired EV Compensation, and then press the OK button 4 to select the EV Compensation setting (see above). Rotate the Mode control 2 to turn the Press the MENU button and the unit on. OPERATION (CONTINUED) CHANGING THE EV COMPENSATION 1 1 2 SET 2 SET V P Press the Power button 1 to settings will appear.
the Video Recording position. 3 41 EV+2 EV+1.5 EV+1 EV-1.5 EV-2.0 23 EV+0 EV-1 Press the Up π button 1 or the Down † button 2 to confirm and exit. 19 Press the MENU button 3 to select the desired EV Compensation, and then press the OK button 4 to select the EV Compensation setting (see above). Rotate the Mode control 2 to turn the Press the MENU button and the unit on. OPERATION (CONTINUED) CHANGING THE EV COMPENSATION 1 1 2 SET 2 SET V P Press the Power button 1 to settings will appear.
User Guide
Page 21
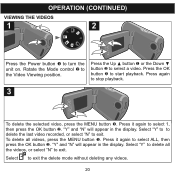
OPERATION (CONTINUED) VIEWING THE VIDEOS 1 1 2 SET V 2 P SET 31 2 Press the Power button 1 to select a video. Press the Up π button 1 or the Down † button 2 to turn the unit on. Select "Y" to to delete the last video recorded, or select "N" to stop playback. 3 2 1 To delete the selected video, press the MENU button 1. "Y" and "N" will appear in the display. To delete all the videos, or select "N" to exit. "Y" and "N" will appear in the display. Press again...
OPERATION (CONTINUED) VIEWING THE VIDEOS 1 1 2 SET V 2 P SET 31 2 Press the Power button 1 to select a video. Press the Up π button 1 or the Down † button 2 to turn the unit on. Select "Y" to to delete the last video recorded, or select "N" to stop playback. 3 2 1 To delete the selected video, press the MENU button 1. "Y" and "N" will appear in the display. To delete all the videos, or select "N" to exit. "Y" and "N" will appear in the display. Press again...
User Guide
Page 22
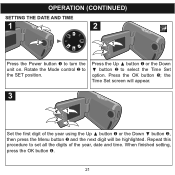
... † button 2 to set all the digits of the year using the Up π button 1 or the Down † button 2, then press the Menu button 3 and the next digit will appear. 3 41 23 Set the first digit of the year, date and time. When finished setting, press the OK button 4. 21 OPERATION (CONTINUED) SETTING THE DATE AND TIME 1 1 2 SET 2 SET V P 31 2 Press the Power button 1 to the SET position. Rotate the Mode control 2 to turn the unit...
... † button 2 to set all the digits of the year using the Up π button 1 or the Down † button 2, then press the Menu button 3 and the next digit will appear. 3 41 23 Set the first digit of the year, date and time. When finished setting, press the OK button 4. 21 OPERATION (CONTINUED) SETTING THE DATE AND TIME 1 1 2 SET 2 SET V P 31 2 Press the Power button 1 to the SET position. Rotate the Mode control 2 to turn the unit...

User Guide
Page 26
Rotate the Mode control 2 to turn the unit on your computer Press the MENU button 1 to select the desired mode (see above), and then press the OK button 2 to your computer. OPERATION (CONTINUED) SETTING THE PC CAMERA/MASS STORAGE 1 1 2 SET 2 SET V P 1 2 Press the Power button 1 to the SET position. Press the Up π button 1 or the Down † button 2 to select the PC Camera/Mass Storage setting. 3 2 1 Select to use this camera as a video cam on . Select to use this camera as an external hard drive when connected to confirm. 25
Rotate the Mode control 2 to turn the unit on your computer Press the MENU button 1 to select the desired mode (see above), and then press the OK button 2 to your computer. OPERATION (CONTINUED) SETTING THE PC CAMERA/MASS STORAGE 1 1 2 SET 2 SET V P 1 2 Press the Power button 1 to the SET position. Press the Up π button 1 or the Down † button 2 to select the PC Camera/Mass Storage setting. 3 2 1 Select to use this camera as a video cam on . Select to use this camera as an external hard drive when connected to confirm. 25
User Guide
Page 32
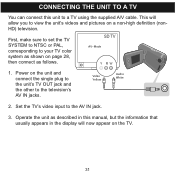
AV-Mode R Video Yellow Audio White 2. Set the TV's video input to the television's AV IN jacks. Operate the unit as follows. 1. Power on the unit and connect the single plug to the unit's TV OUT jack and the other to the AV IN jack. 3. First, make sure to set the TV SYSTEM to NTSC or PAL, corresponding to a TV using the supplied A/V cable. CONNECTING THE UNIT...
AV-Mode R Video Yellow Audio White 2. Set the TV's video input to the television's AV IN jacks. Operate the unit as follows. 1. Power on the unit and connect the single plug to the unit's TV OUT jack and the other to the AV IN jack. 3. First, make sure to set the TV SYSTEM to NTSC or PAL, corresponding to a TV using the supplied A/V cable. CONNECTING THE UNIT...

User Guide
Page 33
... download the files into your computer. Turn on your computer screen. 5. A "Removable Disk" window will automatically pop up on your computer. 2. Simply drag and drop the files from the camera's folder to your USB port on your PC. 4. Connect the smaller end of the cable to the USB jack on the unit and the larger end of the cable to your computer. 6. Turn on the camera...
... download the files into your computer. Turn on your computer screen. 5. A "Removable Disk" window will automatically pop up on your computer. 2. Simply drag and drop the files from the camera's folder to your USB port on your PC. 4. Connect the smaller end of the cable to the USB jack on the unit and the larger end of the cable to your computer. 6. Turn on the camera...

User Guide
Page 36
... "Removable Disk". 35 Connect the smaller end of the cable to the USB jack on the unit and the larger end of the cable to play the files you have finished your PC. 4. Turn on the unit. 3. After you transferred. The unit is ready to your USB port on your computer. 2. Turn on your hard drive. 5. DOWNLOADING AND TRANSFERRING FILES TRANSFERRING PHOTO/VIDEO FILES FROM THE UNIT USING DRAG AND DROP METHOD USING WINDOWS...
... "Removable Disk". 35 Connect the smaller end of the cable to the USB jack on the unit and the larger end of the cable to play the files you have finished your PC. 4. Turn on the unit. 3. After you transferred. The unit is ready to your USB port on your computer. 2. Turn on your hard drive. 5. DOWNLOADING AND TRANSFERRING FILES TRANSFERRING PHOTO/VIDEO FILES FROM THE UNIT USING DRAG AND DROP METHOD USING WINDOWS...

User Guide
Page 40
Click OPEN and then set the file size as desired. Click STOP when finished. 39 Click FILE -> SET CAPTURE FILE, then name the file. USING THE UNIT AS A PC CAM (CONTINUED) 6. Click FILE -> START CAPTURE to start recording the live video sequence. 10. Click OK. 9. Use the following icons to start the preview. 8. Click CAPTURE -> START CAPTURE FILE, then click OK to capture and save still photos: Save Save As Start Capture Capture Frame Stop Capture Self-Timer 7.
Click OPEN and then set the file size as desired. Click STOP when finished. 39 Click FILE -> SET CAPTURE FILE, then name the file. USING THE UNIT AS A PC CAM (CONTINUED) 6. Click FILE -> START CAPTURE to start recording the live video sequence. 10. Click OK. 9. Use the following icons to start the preview. 8. Click CAPTURE -> START CAPTURE FILE, then click OK to capture and save still photos: Save Save As Start Capture Capture Frame Stop Capture Self-Timer 7.

User Guide
Page 41
... "Safely Remove Hardware" window (shown at right), select "USB Mass Storage Device" and click the "Stop" button. Right click on "Removable Disk" and left click on the task bar. SAFELY REMOVING THE HARDWARE SAFELY REMOVING THE UNIT FROM THE COMPUTER NOTE: To avoid damage to remove the unit from the computer. 40 When the "Safe to Remove Hardware" window is not displayed on the...
... "Safely Remove Hardware" window (shown at right), select "USB Mass Storage Device" and click the "Stop" button. Right click on "Removable Disk" and left click on the task bar. SAFELY REMOVING THE HARDWARE SAFELY REMOVING THE UNIT FROM THE COMPUTER NOTE: To avoid damage to remove the unit from the computer. 40 When the "Safe to Remove Hardware" window is not displayed on the...
User Guide
Page 42
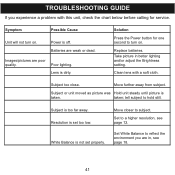
... better lighting and/or adjust the Brightness setting. Images/pictures are poor quality. Replace batteries. taken; White Balance is taken. Symptom Possible Cause Unit will not turn on . Poor lighting. TROUBLESHOOTING GUIDE If you are weak or dead. Take picture in , see page 12. Subject or unit moved as picture was Hold unit steady until picture is not set too low. Power is set properly. Solution Press the Power button for service...
... better lighting and/or adjust the Brightness setting. Images/pictures are poor quality. Replace batteries. taken; White Balance is taken. Symptom Possible Cause Unit will not turn on . Poor lighting. TROUBLESHOOTING GUIDE If you are weak or dead. Take picture in , see page 12. Subject or unit moved as picture was Hold unit steady until picture is not set too low. Power is set properly. Solution Press the Power button for service...

User Guide
Page 43
Press the Power button for one second to a TV, picture is off. selected for playback as described on . Memory is not No sound during playback. When connected to turn on page 28. 42 TROUBLESHOOTING GUIDE (CONTINUED) Can't take video/picture. Options are set incorrectly. Turn on the recorded audio for playback. The recorded audio is full. Set TV System to PAL or NTSC. Delete some pictures/videos. Power is poor.
Press the Power button for one second to a TV, picture is off. selected for playback as described on . Memory is not No sound during playback. When connected to turn on page 28. 42 TROUBLESHOOTING GUIDE (CONTINUED) Can't take video/picture. Options are set incorrectly. Turn on the recorded audio for playback. The recorded audio is full. Set TV System to PAL or NTSC. Delete some pictures/videos. Power is poor.

User Guide
Page 44
... unless it stops working and you have selected "FAT" at the file system pull-down menu; NOTE: Make sure you are instructed to connect the player and the computer. 2. FORMATTING THE UNIT Formatting the Player WARNING! Double click on My Computer, then right click "Removable Disk" and left click on "Format". 3. When finished, click "Close" to close the Format window. 43 Use the USB cable to...
... unless it stops working and you have selected "FAT" at the file system pull-down menu; NOTE: Make sure you are instructed to connect the player and the computer. 2. FORMATTING THE UNIT Formatting the Player WARNING! Double click on My Computer, then right click "Removable Disk" and left click on "Format". 3. When finished, click "Close" to close the Format window. 43 Use the USB cable to...

User Guide
Page 46
... and Compatibility • Operating System: For PC: Windows XP (SP2)/Vista • USB 1.1 • CD-ROM Drive If you have questions regarding your system specifications, please call your PC manufacturer. Camera Specifications Internal Memory 8MB External Memory SD/MMC card, up to 2 MB Resolution 640 x 480 to 2048 x 1536 (Interpolation) Video Clip High (VGA @ 15-20 fps Low (QVGA @ 20-25 fps) File Format JPEG (Photo), AVI (Video) External Connector USB Power...
... and Compatibility • Operating System: For PC: Windows XP (SP2)/Vista • USB 1.1 • CD-ROM Drive If you have questions regarding your system specifications, please call your PC manufacturer. Camera Specifications Internal Memory 8MB External Memory SD/MMC card, up to 2 MB Resolution 640 x 480 to 2048 x 1536 (Interpolation) Video Clip High (VGA @ 15-20 fps Low (QVGA @ 20-25 fps) File Format JPEG (Photo), AVI (Video) External Connector USB Power...


