User Guide
Page 1
MC7100 Suffix A User's Guide CD Clock Radio with Dual Alarm and Detachable Speaker Before operating this product, please read these instructions completely.
MC7100 Suffix A User's Guide CD Clock Radio with Dual Alarm and Detachable Speaker Before operating this product, please read these instructions completely.
User Guide
Page 5
... traffic Light traffic, normal conversation, quiet office Air conditioner at 20 feet, sewing machine Vacuum cleaner, hair dryer, noisy restaurant Average city traffic, garbage disposals, alarm clock at a safe level. Sound can be loud and harmful to get the most importantly, without affecting your hearing "comfort level" adapts to higher volumes of...
... traffic Light traffic, normal conversation, quiet office Air conditioner at 20 feet, sewing machine Vacuum cleaner, hair dryer, noisy restaurant Average city traffic, garbage disposals, alarm clock at a safe level. Sound can be loud and harmful to get the most importantly, without affecting your hearing "comfort level" adapts to higher volumes of...
User Guide
Page 6
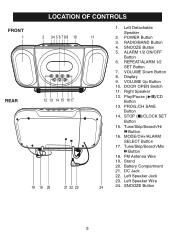
... CONTROLS FRONT 1 2 3 4 5 6 7 8 9 10 REAR 12 13 14 15 16 17 18 19 20 21 22 23 11 24 1. REPEAT/ALARM 1/2 SET Button 7. Right Speaker 12. PROG./CH SAVE Button 14. Tune/Skip/Search/Min n Button 18. Battery Compartment 21. SNOOZE Button 5. Tune/Skip.... Stand 20. DC Jack 22. SNOOZE Button 5 POWER Button 3. ALARM 1/2 ON/OFF Button 6. VOLUME Down Button 8. FM Antenna Wire 19. Left Detachable Speaker 2. RADIO/BAND Button 4. Play/Pause (®p)/CD Button 13. Left Speaker Wire 24. MODE/CH+/ALARM SELECT Button 17. Left Speaker Jack 23. DOOR OPEN Switch 11. ...
... CONTROLS FRONT 1 2 3 4 5 6 7 8 9 10 REAR 12 13 14 15 16 17 18 19 20 21 22 23 11 24 1. REPEAT/ALARM 1/2 SET Button 7. Right Speaker 12. PROG./CH SAVE Button 14. Tune/Skip/Search/Min n Button 18. Battery Compartment 21. SNOOZE Button 5. Tune/Skip.... Stand 20. DC Jack 22. SNOOZE Button 5 POWER Button 3. ALARM 1/2 ON/OFF Button 6. VOLUME Down Button 8. FM Antenna Wire 19. Left Detachable Speaker 2. RADIO/BAND Button 4. Play/Pause (®p)/CD Button 13. Left Speaker Wire 24. MODE/CH+/ALARM SELECT Button 17. Left Speaker Jack 23. DOOR OPEN Switch 11. ...
User Guide
Page 7
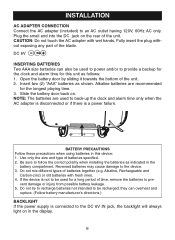
... possible battery leakage. 5. Insert two (2) "AAA" batteries as indicated in this unit as follows: 1. Be sure to provide a backup for the clock and alarm time for this device: 1. they can also be recharged; Fully insert the plug without exposing any part of batteries together (e.g. Do not mix different...failure. ++ BATTERY PRECAUTIONS Follow these precautions when using batteries in the battery compartment. If the device is not to back-up the clock and alarm time only when the AC adapter is disconnected or if there is connected to pre- Plug the small end into the DC jack on...
... possible battery leakage. 5. Insert two (2) "AAA" batteries as indicated in this unit as follows: 1. Be sure to provide a backup for the clock and alarm time for this device: 1. they can also be recharged; Fully insert the plug without exposing any part of batteries together (e.g. Do not mix different...failure. ++ BATTERY PRECAUTIONS Follow these precautions when using batteries in the battery compartment. If the device is not to back-up the clock and alarm time only when the AC adapter is disconnected or if there is connected to pre- Plug the small end into the DC jack on...
User Guide
Page 12
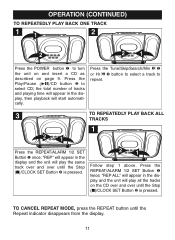
...Repeat indicator disappears from the display. 11 play, then playback will play the same track over and over until the Stop (I )/CLOCK SET Button 2 is pressed. Press the REPEAT/ALARM 1/2 SET Button 1 twice; Press the Tune/Skip/Search/Min n 1 or Hr o 2 button to select a track to 2... select CD; OPERATION (CONTINUED) TO REPEATEDLY PLAY BACK ONE TRACK 11 2 2 21 Press the POWER button 1 to turn the unit on and insert a CD as described on the CD over ...
...Repeat indicator disappears from the display. 11 play, then playback will play the same track over and over until the Stop (I )/CLOCK SET Button 2 is pressed. Press the REPEAT/ALARM 1/2 SET Button 1 twice; Press the Tune/Skip/Search/Min n 1 or Hr o 2 button to select a track to 2... select CD; OPERATION (CONTINUED) TO REPEATEDLY PLAY BACK ONE TRACK 11 2 2 21 Press the POWER button 1 to turn the unit on and insert a CD as described on the CD over ...
User Guide
Page 14
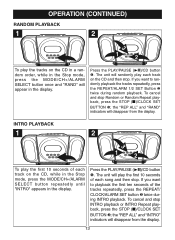
... Repeat playback, press the STOP (I )/CLOCK SET BUTTON 3; The unit will play each track on the CD, while in the Stop mode, press the MODE/CH+/ALARM SELECT button repeatedly until "INTRO" appears in the display. 3 1 Press the PLAY/PAUSE (®p)/CD button 1. the "REP ALL" and... seconds of the tracks repeatedly, press the REPEAT/ CLOCK/ALARM SET button 2 twice during random playback. OPERATION (CONTINUED) RANDOM PLAYBACK 1 2 3 1 2 To play the tracks on the CD in a random order, while in the Stop mode, press the MODE/CH+/ALARM SELECT button once and "RAND" will appear in ...
... Repeat playback, press the STOP (I )/CLOCK SET BUTTON 3; The unit will play each track on the CD, while in the Stop mode, press the MODE/CH+/ALARM SELECT button repeatedly until "INTRO" appears in the display. 3 1 Press the PLAY/PAUSE (®p)/CD button 1. the "REP ALL" and... seconds of the tracks repeatedly, press the REPEAT/ CLOCK/ALARM SET button 2 twice during random playback. OPERATION (CONTINUED) RANDOM PLAYBACK 1 2 3 1 2 To play the tracks on the CD in a random order, while in the Stop mode, press the MODE/CH+/ALARM SELECT button once and "RAND" will appear in ...
User Guide
Page 16
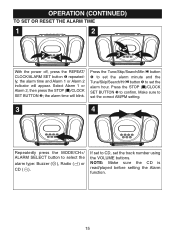
the alarm time and Alarm 1 or Alarm 2 indicator will blink. alarm type: Buzzer ( CD ( ).ZZZ ), RadioZZZ( ) or ZZZ NOTE: Make sure the CD is read/played before setting the Alarm function. 11 15 Press the Tune/Skip/Search/Min n button 1 to set the alarm hour. Press the STOP (I )/CLOCK 1 SET BUTTON 2; Select Alarm 1 or Alarm 2, then press the STOP (I )/CLOCK SET BUTTON 3 to...
the alarm time and Alarm 1 or Alarm 2 indicator will blink. alarm type: Buzzer ( CD ( ).ZZZ ), RadioZZZ( ) or ZZZ NOTE: Make sure the CD is read/played before setting the Alarm function. 11 15 Press the Tune/Skip/Search/Min n button 1 to set the alarm hour. Press the STOP (I )/CLOCK 1 SET BUTTON 2; Select Alarm 1 or Alarm 2, then press the STOP (I )/CLOCK SET BUTTON 3 to...
User Guide
Page 20
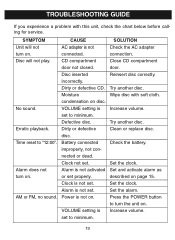
... is not activated or set . Disc inserted incorrectly. Alarm is not connected. Alarm is not set properly. Close CD compartment door. Try another disc. Wipe disc with this unit, check the chart below before calling for service. Clean or replace disc. Set the clock. Set the alarm. Increase volume. 19 Battery connected improperly, not connected...
... is not activated or set . Disc inserted incorrectly. Alarm is not connected. Alarm is not set properly. Close CD compartment door. Try another disc. Wipe disc with this unit, check the chart below before calling for service. Clean or replace disc. Set the clock. Set the alarm. Increase volume. 19 Battery connected improperly, not connected...


