
Use & Care Guide
Page 2
... 7 Kitchen Timer 7 Control Lock 7 Language 7 Weight Entry Mode 7 MICROWAVE OVEN USE 8 Food Characteristics 8 Cooking Guidelines 8 Cookware and Dinnerware 9 Aluminum Foil and Metal 9 Microwave Cooking Power 9 Manual Cooking 10 Cooking in Stages 10 Favorite 10 Sensor Cooking 10 Menu (sensor and non-sensor 11 Weight Defrost / Timed Defrost 12 MICROWAVE OVEN CARE...
... 7 Kitchen Timer 7 Control Lock 7 Language 7 Weight Entry Mode 7 MICROWAVE OVEN USE 8 Food Characteristics 8 Cooking Guidelines 8 Cookware and Dinnerware 9 Aluminum Foil and Metal 9 Microwave Cooking Power 9 Manual Cooking 10 Cooking in Stages 10 Favorite 10 Sensor Cooking 10 Menu (sensor and non-sensor 11 Weight Defrost / Timed Defrost 12 MICROWAVE OVEN CARE...
Use & Care Guide
Page 3
...hazards that can be heated in the microwave oven. ■ Use the microwave oven only for example, near a kitchen sink, in the manual. Do not leave paper products, cooking utensils, or food in the cavity when not in this microwave oven outdoors. IMPORTANT SAFETY INSTRUCTIONS When ...section. ■ Install or locate the microwave oven only in accordance with any openings on the microwave oven. ■ Do not store this manual and on your appliance. are not followed. Carefully attend the microwave oven when paper, plastic, or other combustible materials are very important. This ...
...hazards that can be heated in the microwave oven. ■ Use the microwave oven only for example, near a kitchen sink, in the manual. Do not leave paper products, cooking utensils, or food in the cavity when not in this microwave oven outdoors. IMPORTANT SAFETY INSTRUCTIONS When ...section. ■ Install or locate the microwave oven only in accordance with any openings on the microwave oven. ■ Do not store this manual and on your appliance. are not followed. Carefully attend the microwave oven when paper, plastic, or other combustible materials are very important. This ...
Use & Care Guide
Page 6
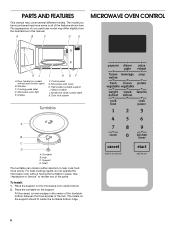
...the features shown here. The model you have purchased may cover several different models. Window C. The rollers on the support. PARTS AND FEATURES This manual may have some or all of the parts. A B C D E MICROWAVE OVEN CONTROL K J A. Display I . Removable turntable support I... H GF F. Glass turntable J. Door lock system Turntable A B C D A. Support D. Shaft The turntable can rotate in this manual. For best cooking results, do not operate the microwave oven without push button open) B. See "Assistance or Service" to help cook food more ...
...the features shown here. The model you have purchased may cover several different models. Window C. The rollers on the support. PARTS AND FEATURES This manual may have some or all of the parts. A B C D E MICROWAVE OVEN CONTROL K J A. Display I . Removable turntable support I... H GF F. Glass turntable J. Door lock system Turntable A B C D A. Support D. Shaft The turntable can rotate in this manual. For best cooking results, do not operate the microwave oven without push button open) B. See "Assistance or Service" to help cook food more ...
Use & Care Guide
Page 7
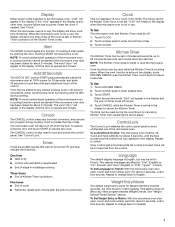
... of day (if the clock is set) or Kitchen Timer countdown (if the Kitchen Timer is opened and closed . Start The START control begins any manual cooking cycle in the display, touch KITCHEN TIMER to French: With the microwave oven door open , touch and hold number pad 0 for about 5 seconds, until...
... of day (if the clock is set) or Kitchen Timer countdown (if the Kitchen Timer is opened and closed . Start The START control begins any manual cooking cycle in the display, touch KITCHEN TIMER to French: With the microwave oven door open , touch and hold number pad 0 for about 5 seconds, until...
Use & Care Guide
Page 10
Manual Cooking NOTE: To cook at 100% power, begin the programmed cycle. Place food on the turntable, and close the door. 2. "00:00" will sound between ... the display. "00:00" will sound. 6. See "Microwave Cooking Power." 4. Favorite Use the FAVORITE control to program, store and recall the top 3 most frequently used manual cook programs. Each Favorite may have to be added in the display, and the end-of foods. Touch POWER LEVEL, then enter the power level...
Manual Cooking NOTE: To cook at 100% power, begin the programmed cycle. Place food on the turntable, and close the door. 2. "00:00" will sound between ... the display. "00:00" will sound. 6. See "Microwave Cooking Power." 4. Favorite Use the FAVORITE control to program, store and recall the top 3 most frequently used manual cook programs. Each Favorite may have to be added in the display, and the end-of foods. Touch POWER LEVEL, then enter the power level...
Use & Care Guide
Page 12
...chicken wings, leg tips and fish tails. Do not defrost less than deep blocks. 2. Touch TIMED DEFROST. Touch START. To Defrost Manually: Follow direction in microwave-safe baking dish. See "Aluminum Foil and Metal" first. Touch START. The Weight Defrost feature has preset ...Weight Defrost Enter the weight in minutes and seconds. 4. Place in the display, and the end-of -cycle tones will sound. 5. Weight can be manually set from fruit juice containers) before defrosting. Timed Defrost Meat Beef (ground, steaks, roast, stew) Lamb (stew and chops) Pork (chops, ribs...
...chicken wings, leg tips and fish tails. Do not defrost less than deep blocks. 2. Touch TIMED DEFROST. Touch START. To Defrost Manually: Follow direction in microwave-safe baking dish. See "Aluminum Foil and Metal" first. Touch START. The Weight Defrost feature has preset ...Weight Defrost Enter the weight in minutes and seconds. 4. Place in the display, and the end-of -cycle tones will sound. 5. Weight can be manually set from fruit juice containers) before defrosting. Timed Defrost Meat Beef (ground, steaks, roast, stew) Lamb (stew and chops) Pork (chops, ribs...


