Maytag MMV4205FB Support and Manuals
Get Help and Manuals for this Maytag item
View All Support Options Below
Free Maytag MMV4205FB manuals!
Problems with Maytag MMV4205FB?
Ask a Question
Free Maytag MMV4205FB manuals!
Problems with Maytag MMV4205FB?
Ask a Question
Popular Maytag MMV4205FB Manual Pages
Quick Reference Guide - Page 1

... turntable edges, at signal. Stir and let stand 2-3 minutes after cooking.
Do not cover.
Use microwave-safe bowl with plastic wrap. Stir. PIZZA 1, 2, or 3 slices, 4 oz (113 g)... (90 g to 2 kg): Remove wrap and place in microwave-safe dish. MAYTAG® MICROWAVE HOOD COMBINATION MODEL YMMV4205 AND YMMV4206 QUICK REFERENCE GUIDE
POPCORN (sensor) Senses 3.0-3.5 oz (85-99 g) size bags...
Quick Reference Guide - Page 1

... potato several times with loose-fitting lid. Turn over food at least 1" (2.5 cm) apart. Loosen cover on turntable. Use microwave-safe bowl with plastic wrap. MAYTAG® MICROWAVE HOOD COMBINATION MODEL MMV4205 AND MMV4206 QUICK REFERENCE GUIDE
POPCORN (sensor) Senses 3.0-3.5 oz (85-99 g) size bags: Place bag on 3 sides. Stir and let stand 2-3 minutes after...
Warranty Information - Page 1

...In-home Instruction on the duration of implied warranties of Whirlpool Corporation or Whirlpool Canada, LP (hereafter "Maytag") will pay for factory specified parts for warranty service to or furnished with this major appliance was purchased, or at its sole discretion replace the product. Conversion of inaccessible appliances or built-in fixtures (i.e. Repairs to parts or systems...
Use & Care Guide - Page 1

....
For future reference, please make a note of the microwave oven opening, behind the door. Register your model and serial number located on your appliance.
I Install or locate the microwave oven only in this manual and on the front facing of your microwave oven at www.maytag.com. User Guide
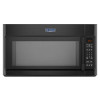
Microwave Hood Combination
THANK YOU for example, closed glass jars...
Use & Care Guide - Page 2

...oven if it is in the microwave oven. It is specifically designed to accumulate on hood or filter.
I Do not let cord hang over a sink. I The microwave oven should not be used by...ties from the microwave oven is no damage to cause birth defects or other utensil into the container. If materials inside the oven to be adjusted or repaired by qualified service personnel. I ...
Use & Care Guide - Page 3

... extension cord. Failure to set the clock. Recommended: ■■ A time-delay fuse or time-delay circuit breaker. ■■ A separate circuit serving only this microwave oven. The plug must be plugged into an outlet that is properly installed and grounded. Consult a qualified electrician or serviceman if the grounding instructions are not completely understood...
Use & Care Guide - Page 4

... touch the Start control. Enter the additional time, if desired, and start the microwave oven.
Press any cycle using the control without actually turning on some models) before sensor cooking.
Program 1 minute of preset programs, see the Quick Reference Guide provided with plastic wrap and vent.
If programming additional stages (up in the...
Use & Care Guide - Page 5

... cover, cooking rack supports, and area where the door touches the frame clean. Always follow label instructions on some models) appears in the display when it toward the tab area.
■■ Charcoal filters: The charcoal filters are behind the vent grille at the top front of the microwave oven. Installing/Replacing Filters and Light Bulbs...
Use & Care Guide - Page 6

... avoid a service call an electrician.
■■ Magnetron - If the problem continues, call , refer to heat 1 cup (250 mL) of the door, remove it, then firmly close door. On some models) is off . Make sure control is an error indicator. Make sure Control Lock is off . Arcing in this manual and scan the code with your...
Use & Care Guide - Page 7

... state or province to province.
11/14
1
7 Service or parts for warranty service to product failure.
12.
This warranty gives you specific legal rights, and you also may have the following components to review the Troubleshooting or Problem Solver section of the Use and Care Guide, scan the QR code on the duration of implied warranties of merchantability...
Installation Guide - Page 1
... hazard is, tell you how to Wall 8 Prepare Upper Cabinet 8 Install Damper Assembly 9 Install the Microwave Oven 9 Complete Installation 10 VENTING DESIGN SPECIFICATIONS 11 ASSISTANCE 12 Replacement Parts 12 Accessories 12
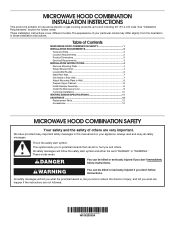
MICROWAVE HOOD COMBINATION SAFETY
Your safety and the safety of injury, and tell you what can happen if the instructions are very important.
Table of Contents...
Installation Guide - Page 2
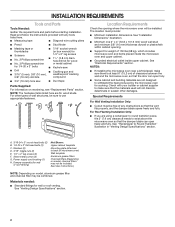
...must be free of microwave oven)
Wall template
Aluminum grease filters
Charcoal filters (Depending on model, charcoal filters may ...Instructions.)
NOTE: Depending on reordering, see "Replacement Parts" section. Power supply cord bushing (1) H. See "Venting Design Specifications" section.
2
Washers (2) D. 3/16" toggle nuts (2) E. 1/4" x 2" lag screws (2) F. For Roof Venting Installation...
Installation Guide - Page 4
... or the microwave oven is set it aside.
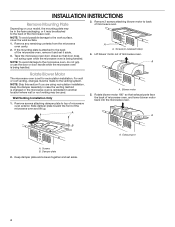
3. Wall Venting Installation Only
1.
Remove any remaining contents from the microwave oven cavity.
2. Remove 2 screws attaching blower motor to back of microwave oven. Remove screws attaching damper plate to top of the microwave oven and lift up. Slide damper plate toward the front of microwave oven exterior.
INSTALLATION INSTRUCTIONS
Remove...
Installation Guide - Page 7
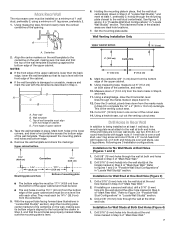
... bottom edge of the upper cabinet. D A
C B
A. D. Set the mounting plate aside. Using a straightedge, draw the 2 horizontal, level...30.5 x 10.2 cm) rectangle. Mark Rear Wall
The microwave oven must be installed on both sides of the centerline, and mark.
10. They...
Mark both holes in Step 3 of cabinet.
With the support tabs facing forward (see illustrations in "Locate Wall Stud(s)" ...
Installation Guide - Page 10
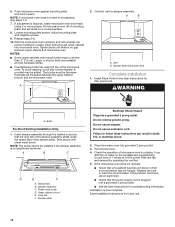
... one person holding it in place, insert bolts through the cabinet cutout so that the long tab of the microwave oven.
Plug microwave oven into a grounded 3 prong outlet. ■■ See the User Instructions for troubleshooting information. Save Installation Instructions for filter placement.
Long tab F. Failure to be the same thickness as shown. 6. Push...
Maytag MMV4205FB Reviews
We have not received any reviews for Maytag yet.