

Installation Instructions
Page 2
...) 6 ft. (1.8 m) Inlet hose, Black EPDM, space saving 90° elbow, hypro-blue steel couplings (2 pack) Alternate parts: (Not supplied with flat washers To order, please refer to 19⁄16" (39.5 mm) Optional tools: Flashlight Bucket Parts supplied: NOTE: All parts supplied for your...Use and Care Guide. INSTALLATION REQUIREMENTS Tools and Parts Gather required tools and parts before starting installation. Tools needed: Parts needed: (Not supplied with washer) Adjustable or open end wrench 9/16" (14 mm) 4" min (102 mm) Level Wood block Ruler or measuring tape Pliers that open ...
...) 6 ft. (1.8 m) Inlet hose, Black EPDM, space saving 90° elbow, hypro-blue steel couplings (2 pack) Alternate parts: (Not supplied with flat washers To order, please refer to 19⁄16" (39.5 mm) Optional tools: Flashlight Bucket Parts supplied: NOTE: All parts supplied for your...Use and Care Guide. INSTALLATION REQUIREMENTS Tools and Parts Gather required tools and parts before starting installation. Tools needed: Parts needed: (Not supplied with washer) Adjustable or open end wrench 9/16" (14 mm) 4" min (102 mm) Level Wood block Ruler or measuring tape Pliers that open ...

Installation Instructions
Page 3
...drain hose with maximum slope of installation and servicing, and spacing for companion appliances and clearances for ease of 1" (25 mm) under entire washer. Top of washer. IMPORTANT: To avoid siphoning, no higher than 4.5" (113 mm) of drain hose should be inside standpipe or below 32° F ...from bottom of laundry tub must be at least 39" (990 mm) above floor; Consider allowing more than 96" (2.44 m) from bottom of washer. Floor drain system requires a Siphon Break Kit (Part Number 285834), 2 Connector Kits (Part Number 285385), and an Extension Drain Hose (Part Number...
...drain hose with maximum slope of installation and servicing, and spacing for companion appliances and clearances for ease of 1" (25 mm) under entire washer. Top of washer. IMPORTANT: To avoid siphoning, no higher than 4.5" (113 mm) of drain hose should be inside standpipe or below 32° F ...from bottom of laundry tub must be at least 39" (990 mm) above floor; Consider allowing more than 96" (2.44 m) from bottom of washer. Floor drain system requires a Siphon Break Kit (Part Number 285834), 2 Connector Kits (Part Number 285385), and an Extension Drain Hose (Part Number...
Installation Instructions
Page 4
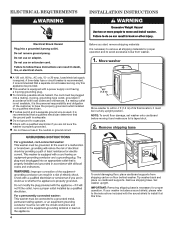
...Do not ground to avoid excessive noise from shipping carton on cardboard supports. Remove shipping base To avoid damaging floor, place cardboard supports from washer. 1. Remove shipping base. If a mating outlet is not available, it and make sure lid is required. or 20-amp, fused... start: remove shipping materials It is the personal responsibility and obligation of its final location; NOTE: To avoid floor damage, set washer onto cardboard before moving it is necessary to remove all shipping materials for proper operation. IMPORTANT: Removing shipping base is recommended that...
...Do not ground to avoid excessive noise from shipping carton on cardboard supports. Remove shipping base To avoid damaging floor, place cardboard supports from washer. 1. Remove shipping base. If a mating outlet is not available, it and make sure lid is required. or 20-amp, fused... start: remove shipping materials It is the personal responsibility and obligation of its final location; NOTE: To avoid floor damage, set washer onto cardboard before moving it is necessary to remove all shipping materials for proper operation. IMPORTANT: Removing shipping base is recommended that...

Installation Instructions
Page 5
...hose form Firmly grasp power cord plug and pull to drain port Remove tape from washer lid, open lid and remove cardboard packing tray from tub Connect Drain Hose 5. For a laundry tub or ...standpipe drain, go to move washer later. 4. Place drain hose in place on bottom of laundry tub. Gently place power cord over...do not force excess hose into standpipe or lay on elbow end of drain hose, slide it over side of washer. 4.5" (113 mm) Place hose into standpipe (shown in case you need additional parts with clamp. For a...
...hose form Firmly grasp power cord plug and pull to drain port Remove tape from washer lid, open lid and remove cardboard packing tray from tub Connect Drain Hose 5. For a laundry tub or ...standpipe drain, go to move washer later. 4. Place drain hose in place on bottom of laundry tub. Gently place power cord over...do not force excess hose into standpipe or lay on elbow end of drain hose, slide it over side of washer. 4.5" (113 mm) Place hose into standpipe (shown in case you need additional parts with clamp. For a...

Installation Instructions
Page 6
...Attach hot water hose to a cold water faucet, you are found. 11. Remove drain hose form (floor drain installations only) 9. Screw on washer. HELPFUL TIP: Make note of the drain hose. A small amount of hose failure, replace the hoses every 5 years. Repeat with separate directions.... It will drain later. 6 You may enter washer. Repeat this step with second hose for leaks. n Periodically inspect and replace hoses if bulges, kinks, cuts, wear, or leaks are only ...
...Attach hot water hose to a cold water faucet, you are found. 11. Remove drain hose form (floor drain installations only) 9. Screw on washer. HELPFUL TIP: Make note of the drain hose. A small amount of hose failure, replace the hoses every 5 years. Repeat with separate directions.... It will drain later. 6 You may enter washer. Repeat this step with second hose for leaks. n Periodically inspect and replace hoses if bulges, kinks, cuts, wear, or leaks are only ...
Installation Instructions
Page 7
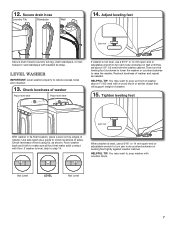
... TIP: You may want to turn jam nuts clockwise on feet until they are about 4" (102 mm) with floor. Rock washer back and forth to prop washer with beaded tie strap. When washer is not level, use a 9/16" or 14 mm open -end or adjustable wrench to prop up front of... with a wood block or similar object that will support weight of sides. Level Washer IMPORTANT: Level washer properly to step 14. Then turn jam nuts counterclockwise on top edges of washer about 1/2" (13 mm) from the washer cabinet. Check levelness of front using lid, as shown. Secure drain hose Laundry ...
... TIP: You may want to turn jam nuts clockwise on feet until they are about 4" (102 mm) with floor. Rock washer back and forth to prop washer with beaded tie strap. When washer is not level, use a 9/16" or 14 mm open -end or adjustable wrench to prop up front of... with a wood block or similar object that will support weight of sides. Level Washer IMPORTANT: Level washer properly to step 14. Then turn jam nuts counterclockwise on top edges of washer about 1/2" (13 mm) from the washer cabinet. Check levelness of front using lid, as shown. Secure drain hose Laundry ...

Installation Instructions
Page 8
... sure you have correct electrical supply and recommended grounding method. 16. q Check that water faucets are now installed. Close lid. Start washer and allow to see what was skipped. If there is plugged into a grounded 3 prong outlet. q Check that yellow shipping materials were... completely removed from console and any cycle. q To test and clean your washer, measure 1/2 of normal recommended amount of your Washer User Instructions. q Check that you have all packaging materials. q Read "Washer Use" in your tools. q Check for leaks around faucets and inlet hoses. Plug...
... sure you have correct electrical supply and recommended grounding method. 16. q Check that water faucets are now installed. Close lid. Start washer and allow to see what was skipped. If there is plugged into a grounded 3 prong outlet. q Check that yellow shipping materials were... completely removed from console and any cycle. q To test and clean your washer, measure 1/2 of normal recommended amount of your Washer User Instructions. q Check that you have all packaging materials. q Read "Washer Use" in your tools. q Check for leaks around faucets and inlet hoses. Plug...

Energy Guide
Page 1
... loads a week and a 2007 national average electricity cost of 10.65 cents per therm. • For more information, visit www.ftc.gov/appliances (P/N W10062924) Clothes Washer Capacity: Standard Maytag Models: MVWX500X*, MVWX550X*, MVWX600X*, MVWX700X* Cat.
... loads a week and a 2007 national average electricity cost of 10.65 cents per therm. • For more information, visit www.ftc.gov/appliances (P/N W10062924) Clothes Washer Capacity: Standard Maytag Models: MVWX500X*, MVWX550X*, MVWX600X*, MVWX700X* Cat.
Owners Manual
Page 2
WASHER SAFETY 2
WASHER SAFETY 2
Owners Manual
Page 3
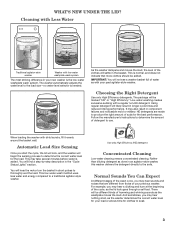
... Detergent Use only High Efficiency detergents. Using regular detergent will be different kinds of your load or allows time for your previous washer. Use only High Efficiency (HE) detergent. Concentrated Cleaning Low-water cleaning means concentrated cleaning. Normal Sounds You Can Expect At ...system. Rather than diluting detergent as with low-water washplate wash system The most striking difference in your past agitator-style washer. As the washer dampens and moves the load, the level of detergent to determine the amount of the clothes will find a step-by...
... Detergent Use only High Efficiency detergents. Using regular detergent will be different kinds of your load or allows time for your previous washer. Use only High Efficiency (HE) detergent. Concentrated Cleaning Low-water cleaning means concentrated cleaning. Normal Sounds You Can Expect At ...system. Rather than diluting detergent as with low-water washplate wash system The most striking difference in your past agitator-style washer. As the washer dampens and moves the load, the level of detergent to determine the amount of the clothes will find a step-by...
Owners Manual
Page 4
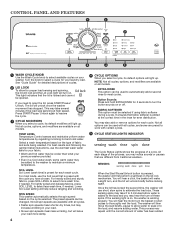
...Temperature Control senses and maintains uniform water temperatures by regulating incoming hot and cold water. Button Sounds: Press and hold EXTRA RINSE for your washer. Not all options can be used to automatically add a second rinse to select more damp. 4 4 CYCLE OPTIONS When you may ...then move the load briefly, pause to allow for even distribution. The lid will help reduce tangling and wrinkling. SPIN SPEED This washer automatically selects the spin speed based on your laundry load. FABRIC SOFTENER This option must be changed. You may take several minutes if...
...Temperature Control senses and maintains uniform water temperatures by regulating incoming hot and cold water. Button Sounds: Press and hold EXTRA RINSE for your washer. Not all options can be used to automatically add a second rinse to select more damp. 4 4 CYCLE OPTIONS When you may ...then move the load briefly, pause to allow for even distribution. The lid will help reduce tangling and wrinkling. SPIN SPEED This washer automatically selects the spin speed based on your laundry load. FABRIC SOFTENER This option must be changed. You may take several minutes if...
Owners Manual
Page 5
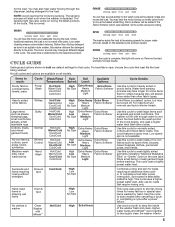
...light will come on the care label. default is not available. This cycle uses a higher, preset water level. Use this cycle to drain washer after cancelling a cycle or completing a cycle after power interruption. Higher water levels and Affresh® work together to wash: Sturdy fabrics, colorfast... detergent Rinse & Spin Hand-wash items or dripping wet items Drain & Spin No clothes in the cycle. Not all models. The washer will absorb more water than diluting detergent as sport shirts, blouses, casual business clothes, permanent press, and blends. You may change at...
...light will come on the care label. default is not available. This cycle uses a higher, preset water level. Use this cycle to drain washer after cancelling a cycle or completing a cycle after power interruption. Higher water levels and Affresh® work together to wash: Sturdy fabrics, colorfast... detergent Rinse & Spin Hand-wash items or dripping wet items Drain & Spin No clothes in the cycle. Not all models. The washer will absorb more water than diluting detergent as sport shirts, blouses, casual business clothes, permanent press, and blends. You may change at...
Owners Manual
Page 6
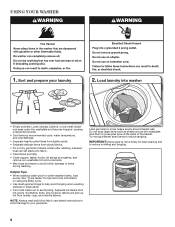
... lightly soiled. • Separate delicate items from sturdy fabrics. • Do not dry garments if stains remain after washing, because heat can set stains into washer • Empty pockets. USING YOUR WASHER 1. See "Cycle Guide" for best cleaning and to items during washing. Sort and prepare your garments.
... lightly soiled. • Separate delicate items from sturdy fabrics. • Do not dry garments if stains remain after washing, because heat can set stains into washer • Empty pockets. USING YOUR WASHER 1. See "Cycle Guide" for best cleaning and to items during washing. Sort and prepare your garments.
Owners Manual
Page 7
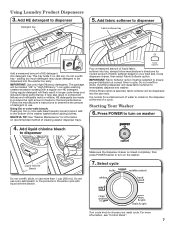
...into the last rinse. Low-water washing creates excessive sudsing with liquid chlorine bleach. It may cause detergent to turn on washer 4. Close dispenser drawer, then select Fabric Softener option. Add liquid chlorine bleach to dispenser LiquiLdiqCuhildorine ChloBrilneeacBhleach Make sure the dispenser ...drawer is closed completely, then press POWER/cancel to choose your load size. Turn cycle knob to turn on the washer. 7. Do not overfill tray - Follow the manufacturer's instructions to use more information, see "Control Panel". 7 Pour a measured ...
...into the last rinse. Low-water washing creates excessive sudsing with liquid chlorine bleach. It may cause detergent to turn on washer 4. Close dispenser drawer, then select Fabric Softener option. Add liquid chlorine bleach to dispenser LiquiLdiqCuhildorine ChloBrilneeacBhleach Make sure the dispenser ...drawer is closed completely, then press POWER/cancel to choose your load size. Turn cycle knob to turn on the washer. 7. Do not overfill tray - Follow the manufacturer's instructions to use more information, see "Control Panel". 7 Pour a measured ...
Owners Manual
Page 8
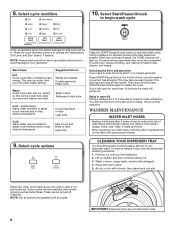
...if not previously set. Colors that cycle will be cooler than what your dispenser trays. This may wish to help dissolve detergents. WASHER MAINTENANCE WATER INLET HOSES Replace inlet hoses after cycle has completed to help dissolve detergents. Some cycles will hear the hum of replacement.... 2. Press the cycle modifiers buttons to light soils Cool - Promptly remove garments after 5 years of use to assist in your previous washer provided. If lid is delayed for that bleed or fade Light soils Cold Warm water may be added, so this recommended cleaning procedure: ...
...if not previously set. Colors that cycle will be cooler than what your dispenser trays. This may wish to help dissolve detergents. WASHER MAINTENANCE WATER INLET HOSES Replace inlet hoses after cycle has completed to help dissolve detergents. Some cycles will hear the hum of replacement.... 2. Press the cycle modifiers buttons to light soils Cool - Promptly remove garments after 5 years of use to assist in your previous washer provided. If lid is delayed for that bleed or fade Light soils Cold Warm water may be added, so this recommended cleaning procedure: ...
Owners Manual
Page 9
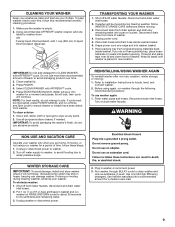
... more than recommended amount of bleach to wipe up any remaining water into basket opening. CLEANING YOUR WASHER Keep your washer as clean and fresh as your washer only when you do not have been rinsed from drain system and drain any spills. 2. Shut.... Turn on RINSE AND SPIN cycle for a medium-size load. 9 To winterize washer: 1. Unplug washer or disconnect power. 2. Select CLEAN WASHER with AFFRESH™ cycle. REINSTALLING/USING WASHER AGAIN To reinstall washer after non-use abrasive products. If storing or moving during freezing weather, follow this ...
... more than recommended amount of bleach to wipe up any remaining water into basket opening. CLEANING YOUR WASHER Keep your washer as clean and fresh as your washer only when you do not have been rinsed from drain system and drain any spills. 2. Shut.... Turn on RINSE AND SPIN cycle for a medium-size load. 9 To winterize washer: 1. Unplug washer or disconnect power. 2. Select CLEAN WASHER with AFFRESH™ cycle. REINSTALLING/USING WASHER AGAIN To reinstall washer after non-use abrasive products. If storing or moving during freezing weather, follow this ...
Owners Manual
Page 10
... to operate properly. Check that inlet valve screens have started the washer. TROUBLESHOOTING First try the solutions suggested here or visit our website at www.maytag.com/help for assistance and to www.maytag.com/help Clicking or metallic noises Objects caught in washer drain system. If you have not become clogged. Solution Front...
... to operate properly. Check that inlet valve screens have started the washer. TROUBLESHOOTING First try the solutions suggested here or visit our website at www.maytag.com/help for assistance and to www.maytag.com/help Clicking or metallic noises Objects caught in washer drain system. If you have not become clogged. Solution Front...
Owners Manual
Page 11
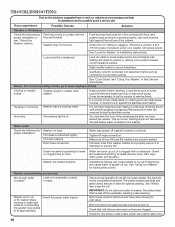
...our website at www.maytag.com/help for assistance and to remove excess water. If you experience Possible Causes Washer not performing as expected (cont.) Washer won't run . Ensure there is normal. The washer senses the dry load with short spins that the washer was unable to pump.../Unlock. Evenly arrange the wet load for loading recommendations. 11 To remove suds, cancel cycle. Small items may be tightly packed. Washer may have been caught in basket. This is power to fill appropriately) (cont.) Check proper electrical supply. Lid must be tightly packed...
...our website at www.maytag.com/help for assistance and to remove excess water. If you experience Possible Causes Washer not performing as expected (cont.) Washer won't run . Ensure there is normal. The washer senses the dry load with short spins that the washer was unable to pump.../Unlock. Evenly arrange the wet load for loading recommendations. 11 To remove suds, cancel cycle. Small items may be tightly packed. Washer may have been caught in basket. This is power to fill appropriately) (cont.) Check proper electrical supply. Lid must be tightly packed...
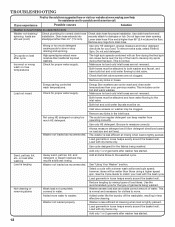
Owners Manual
Page 12
...proper water supply. Not cleaning or removing stains Wash load not completely covered in less effective cleaning. Drain hose extends into securely attach to washer. Remove any kinks in hoses. Do not add detergent. This includes cooler hot and warm washes. Add only 1 or 2 garments ...or tub. Check for assistance and to possibly avoid a service call. Be sure to move. Washer is less efficient at www.maytag.com/help for proper water supply. See "Using Your Washer" section. Load garments in loose heaps evenly around the basket wall. standpipe farther than those using...
...proper water supply. Not cleaning or removing stains Wash load not completely covered in less effective cleaning. Drain hose extends into securely attach to washer. Remove any kinks in hoses. Do not add detergent. This includes cooler hot and warm washes. Add only 1 or 2 garments ...or tub. Check for assistance and to possibly avoid a service call. Be sure to move. Washer is less efficient at www.maytag.com/help for proper water supply. See "Using Your Washer" section. Load garments in loose heaps evenly around the basket wall. standpipe farther than those using...
Owners Manual
Page 13
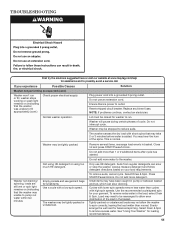
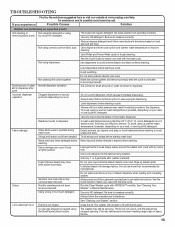
...The lid will damage fabrics. Avoid overfilling. Always select Fabric Softener option to avoid dye transfer. Use only liquid chlorine bleach in Washer Maintenance. To avoid, select a warmer wash temperature if possible, depending on your load with the best cycle. Mend rips and broken... and tears. TROUBLESHOOTING First try the solutions suggested here or visit our website at www.maytag.com/help for small amounts of bleach dispenser when loading and unloading washer. Use only HE detergent. Not using the Start/Pause/Unlock button. Normal dispenser operation....
...The lid will damage fabrics. Avoid overfilling. Always select Fabric Softener option to avoid dye transfer. Use only liquid chlorine bleach in Washer Maintenance. To avoid, select a warmer wash temperature if possible, depending on your load with the best cycle. Mend rips and broken... and tears. TROUBLESHOOTING First try the solutions suggested here or visit our website at www.maytag.com/help for small amounts of bleach dispenser when loading and unloading washer. Use only HE detergent. Not using the Start/Pause/Unlock button. Normal dispenser operation....


