

Installation Instructions
Page 2
... order, please refer to toll-free numbers on back page of the washer. Tools needed: Parts needed: (Not supplied with washer) Your installation may require additional parts. To order, please refer to toll-free phone numbers on back page of your Use and Care Guide. n 8212656RP... from local plumbing suppliers) 1" (25 mm) standpipe 2" (51 mm) diameter to improve performance and minimize noise and possible "washer walk". Install your washer in the top of your washer to 1" (25 mm) diameter Standpipe Adapter Part Number 3363920 Connector Kit Part Number 285835 Drain hose...
... order, please refer to toll-free numbers on back page of the washer. Tools needed: Parts needed: (Not supplied with washer) Your installation may require additional parts. To order, please refer to toll-free phone numbers on back page of your Use and Care Guide. n 8212656RP... from local plumbing suppliers) 1" (25 mm) standpipe 2" (51 mm) diameter to improve performance and minimize noise and possible "washer walk". Install your washer in the top of your washer to 1" (25 mm) diameter Standpipe Adapter Part Number 3363920 Connector Kit Part Number 285835 Drain hose...

Installation Instructions
Page 3
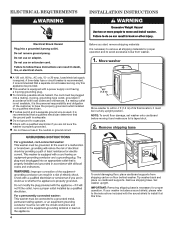
... grounded electrical outlet located within 3 ft (0.9 m) of hot and cold water fill valves on all sides of installation and servicing, and spacing for companion appliances and clearances for installation with maximum slope of drain hose should be needed.) Laundry tub drain system Minimum capacity: 20 gal. (76 ...If a closet door or louvered door is not recommended. n Hot and cold water faucets located within 4 ft (1.2 m) of power cord on carpet is installed, top and bottom air openings in .2 (155 cm2) 1" (25 mm) 1" (25 mm) 3" (76 mm) Dimensions show recommended spacing allowed, ...
... grounded electrical outlet located within 3 ft (0.9 m) of hot and cold water fill valves on all sides of installation and servicing, and spacing for companion appliances and clearances for installation with maximum slope of drain hose should be needed.) Laundry tub drain system Minimum capacity: 20 gal. (76 ...If a closet door or louvered door is not recommended. n Hot and cold water faucets located within 4 ft (1.2 m) of power cord on carpet is installed, top and bottom air openings in .2 (155 cm2) 1" (25 mm) 1" (25 mm) 3" (76 mm) Dimensions show recommended spacing allowed, ...
Installation Instructions
Page 4
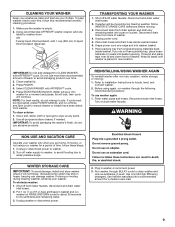
... make sure lid is adequate. NOTE: To avoid floor damage, set washer onto cardboard before moving it is necessary to have the properly grounded outlet installed by a qualified electrician. Tip washer back and place on floor behind washer. Move washer n A 120 volt, 60 Hz., AC only, 15- n... Check with the sound shield to install it is necessary for proper operation and to a gas pipe. it must be plugged into a mating, 3 prong, grounding-type outlet, grounded in the neutral...
... make sure lid is adequate. NOTE: To avoid floor damage, set washer onto cardboard before moving it is necessary to have the properly grounded outlet installed by a qualified electrician. Tip washer back and place on floor behind washer. Move washer n A 120 volt, 60 Hz., AC only, 15- n... Check with the sound shield to install it is necessary for proper operation and to a gas pipe. it must be plugged into a mating, 3 prong, grounding-type outlet, grounded in the neutral...

Installation Instructions
Page 6
... an additional two-thirds turn . Damage can result. IMPORTANT: To reduce risk of the drain hose. Remove drain hose form (floor drain installations only) 9. Do not use tape or sealants on valve when attaching to a cold water faucet, you are found. 11. Use pliers ...faucet. Repeat with second hose for leaks. Check for future reference. In most standard configurations, hoses will drain later. 6 Record hose installation or replacement dates for leaks Turn on washer. It will cross over each other when attached correctly. Repeat this step with cold water ...
... an additional two-thirds turn . Damage can result. IMPORTANT: To reduce risk of the drain hose. Remove drain hose form (floor drain installations only) 9. Do not use tape or sealants on valve when attaching to a cold water faucet, you are found. 11. Use pliers ...faucet. Repeat with second hose for leaks. Check for future reference. In most standard configurations, hoses will drain later. 6 Record hose installation or replacement dates for leaks Turn on washer. It will cross over each other when attached correctly. Repeat this step with cold water ...

Installation Instructions
Page 8
...q Remove protective film from back of washer. q To test and clean your Washer User Instructions. Close lid. q Check that water faucets are now installed. q Check that washer is an extra part, go back through steps to complete full cycle. 8 q Dispose of/recycle all of powdered or liquid ...remaining on some models). q Check that you have all packaging materials. If there is plugged into a grounded 3 prong outlet Complete Installation CHECKLIST q Check electrical requirements. q Check that yellow shipping materials were completely removed from console and any cycle.
...q Remove protective film from back of washer. q To test and clean your Washer User Instructions. Close lid. q Check that water faucets are now installed. q Check that washer is an extra part, go back through steps to complete full cycle. 8 q Dispose of/recycle all of powdered or liquid ...remaining on some models). q Check that you have all packaging materials. If there is plugged into a grounded 3 prong outlet Complete Installation CHECKLIST q Check electrical requirements. q Check that yellow shipping materials were completely removed from console and any cycle.
Owners Manual
Page 9
...have been rinsed from back of R.V.-type antifreeze in new location. Use a soft, damp cloth or sponge to washer. 2. Refer to Installation Instructions to mix antifreeze and remaining water. 3. Run washer through the following recommended procedure: To use more than recommended amount of bleach to... YOUR WASHER 1. If you are home. Close washer lid. 4. Reconnect water inlet hoses. WINTER STORAGE CARE IMPORTANT: To avoid damage, install and store washer where it will continue. Press POWER. 5. Make sure the washer is placed in basket and run washer through BULKY cycle...
...have been rinsed from back of R.V.-type antifreeze in new location. Use a soft, damp cloth or sponge to washer. 2. Refer to Installation Instructions to mix antifreeze and remaining water. 3. Run washer through the following recommended procedure: To use more than recommended amount of bleach to... YOUR WASHER 1. If you are home. Close washer lid. 4. Reconnect water inlet hoses. WINTER STORAGE CARE IMPORTANT: To avoid damage, install and store washer where it will continue. Press POWER. 5. Make sure the washer is placed in basket and run washer through BULKY cycle...
Owners Manual
Page 10
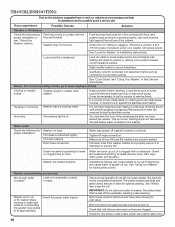
...Both hoses must be tight against the stainless steel basket. TROUBLESHOOTING First try the solutions suggested here or visit our website at www.maytag.com/help Clicking or metallic noises Objects caught in washer drain system. Load dry items in this Use and Care Guide. It... under the Lid." The load will reduce sound. If flooring is normal. Water can cause basket to fill appropriately) Check for proper installation: Washer not level. Check floor for leaks or clogged sink or drain. Check household plumbing for flexing or sagging. The added water ...
...Both hoses must be tight against the stainless steel basket. TROUBLESHOOTING First try the solutions suggested here or visit our website at www.maytag.com/help Clicking or metallic noises Objects caught in washer drain system. Load dry items in this Use and Care Guide. It... under the Lid." The load will reduce sound. If flooring is normal. Water can cause basket to fill appropriately) Check for proper installation: Washer not level. Check floor for leaks or clogged sink or drain. Check household plumbing for flexing or sagging. The added water ...
Owners Manual
Page 12
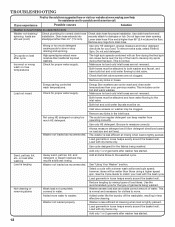
... load size and adds correct amount of load items. Use the recommended cycle for your load with the best cycle. Use cycle designed for proper installation. Load with dry items only. Not using HE detergent or using a higher speed spin. Sand, pet hair, lint, etc. Add only 1 or 2...air flow during the final spin. TROUBLESHOOTING First try the solutions suggested here or visit our website at www.maytag.com/help for proper water supply. Use drain hose form and installation. Make sure hot and cold inlet hoses are still wet (cont.) Check plumbing for correct drain hose ...
... load size and adds correct amount of load items. Use the recommended cycle for your load with the best cycle. Use cycle designed for proper installation. Load with dry items only. Not using HE detergent or using a higher speed spin. Sand, pet hair, lint, etc. Add only 1 or 2...air flow during the final spin. TROUBLESHOOTING First try the solutions suggested here or visit our website at www.maytag.com/help for proper water supply. Use drain hose form and installation. Make sure hot and cold inlet hoses are still wet (cont.) Check plumbing for correct drain hose ...
Owners Manual
Page 14
...limited warranty. Damage resulting from accident, alteration, misuse, abuse, fire, flood, acts of God, improper installation, installation not in a remote area where service by calling Maytag. Repairs to parts or systems resulting from state to state or province to or furnished with original model...been removed, altered, or cannot be found by checking the "Assistance or Service" section or by an authorized Maytag servicer is located in accordance with Maytag's published installation instructions. 10. In the U.S.A., call 18008076777. 6/09 14 In Canada, call...
...limited warranty. Damage resulting from accident, alteration, misuse, abuse, fire, flood, acts of God, improper installation, installation not in a remote area where service by calling Maytag. Repairs to parts or systems resulting from state to state or province to or furnished with original model...been removed, altered, or cannot be found by checking the "Assistance or Service" section or by an authorized Maytag servicer is located in accordance with Maytag's published installation instructions. 10. In the U.S.A., call 18008076777. 6/09 14 In Canada, call...


