
User Instructions
Page 1
... OU SERVICE 9 SI_CURITI_ DE LA LAVEUSE 10 UTILISATION DE LA LAVEUSE 11 WASHER CARE 4 TROUBLESHOOTING 5 ENTRETIEN DE LA LAVEUSE 12 DI_PANNAGE 13 WARRANTY 8 GARANTIE 16 Para obtener acceso al manual de uso y cuidado en espaffol, o para obtener informaci6n www.maytag.com. Dealer name Serial number Address Phone number Model number Purchase date...
... OU SERVICE 9 SI_CURITI_ DE LA LAVEUSE 10 UTILISATION DE LA LAVEUSE 11 WASHER CARE 4 TROUBLESHOOTING 5 ENTRETIEN DE LA LAVEUSE 12 DI_PANNAGE 13 WARRANTY 8 GARANTIE 16 Para obtener acceso al manual de uso y cuidado en espaffol, o para obtener informaci6n www.maytag.com. Dealer name Serial number Address Phone number Model number Purchase date...
User Instructions
Page 2
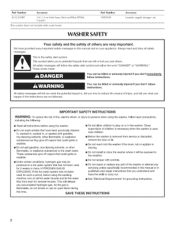
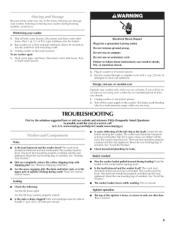
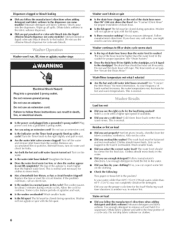
... WARNING: To reduce the risk of fire, electric shock, or injury to persons when using the washer, follow basic precautions, including the following: [] Read all instructions before using the washer. [] Do not wash articles that you don't immediately follow the safety alert symbol and either the... word "DANGER" or "WARNING." Close supervision of others . Before the washer is removed from each for grounding instructions. Always read and obey all hot water faucets and let the water flow from service or ...
... WARNING: To reduce the risk of fire, electric shock, or injury to persons when using the washer, follow basic precautions, including the following: [] Read all instructions before using the washer. [] Do not wash articles that you don't immediately follow the safety alert symbol and either the... word "DANGER" or "WARNING." Close supervision of others . Before the washer is removed from each for grounding instructions. Always read and obey all hot water faucets and let the water flow from service or ...
User Instructions
Page 3
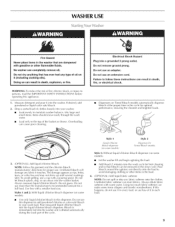
... shock, or injury to persons, read the IMPORTANT SAFETY INSTRUCTIONS before operating this dispenser. Undiluted fabric softener can cause poor cleaning. No washer can result in death, fire, or electrical shock. Do not dry anything that has ever had any fabric softener onto the clothes. Do... NOTE: Do not spill or drip any type of the cycle. If this dispenser to add powdered chlorine or color-safe bleach to your washer. • I..o..ad evenly to follow these instructions can completeJy remove oil. If desired, add powdered or liquid color safe bleach. 2. Electrical...
... shock, or injury to persons, read the IMPORTANT SAFETY INSTRUCTIONS before operating this dispenser. Undiluted fabric softener can cause poor cleaning. No washer can result in death, fire, or electrical shock. Do not dry anything that has ever had any fabric softener onto the clothes. Do... NOTE: Do not spill or drip any type of the cycle. If this dispenser to add powdered chlorine or color-safe bleach to your washer. • I..o..ad evenly to follow these instructions can completeJy remove oil. If desired, add powdered or liquid color safe bleach. 2. Electrical...
User Instructions
Page 4
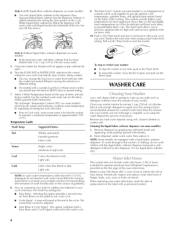
...user instructions. Rinse dispenser under warm wateb then replace it is an integrated set of replacement on the Fabric Select setting. When replacing your washer interior by mixing 1 cup (250 ml_) of approximately 70°F (21 °C). selector to maintain a minimum temperature of chlorine ...bleach and enough detergent to equal twice the manufacturer's recommended amount for your washer: • To stop or restart your wash load and the type of fabric being washed. • You may change the load size...
...user instructions. Rinse dispenser under warm wateb then replace it is an integrated set of replacement on the Fabric Select setting. When replacing your washer interior by mixing 1 cup (250 ml_) of approximately 70°F (21 °C). selector to maintain a minimum temperature of chlorine ...bleach and enough detergent to equal twice the manufacturer's recommended amount for your washer: • To stop or restart your wash load and the type of fabric being washed. • You may change the load size...
User Instructions
Page 5
...properly installed and the nuts tightened. This is normal. Shut off the load. Pour 1 qt (1 I .) of R.V.-type antifreeze into a grounded 3 prong outlet. Run the washer through a complete cycle with shipping pins? This helps avoid flooding (due to handle 1 7 gal. (64 I .) of water per minute. See "Remove Shipping Materials." •...for leaks. Center the tub before starting wash. Electrical Shock Hazard Plug into the basket. 2. Reset the rear leveling legs (if needed). www.maytag.com/help In Canada www.maytag.ca Noisy Is the load balanced and the washer level?
...properly installed and the nuts tightened. This is normal. Shut off the load. Pour 1 qt (1 I .) of R.V.-type antifreeze into a grounded 3 prong outlet. Run the washer through a complete cycle with shipping pins? This helps avoid flooding (due to handle 1 7 gal. (64 I .) of water per minute. See "Remove Shipping Materials." •...for leaks. Center the tub before starting wash. Electrical Shock Hazard Plug into the basket. 2. Reset the rear leveling legs (if needed). www.maytag.com/help In Canada www.maytag.ca Noisy Is the load balanced and the washer level?
User Instructions
Page 6
...corduroy, synthetics). Are both the hot and cold water faucets turned on the water. Replace the fuse or reset the circuit breaker. Is the washer overloaded? cycle seems stuck • Is the top of a cycle only. See "Connect the Inlet Hoses" for leaks. Cold rinses leave ... detergent and fabric softener. Dilute fabric softener in the cycle? Some cycles feature periods of the hose must be correct for color-safe bleach. Washer continues to start. • Are the water inlet valve screens clogged? Select a cycle with a cycle? The hose needs an air gap....
...corduroy, synthetics). Are both the hot and cold water faucets turned on the water. Replace the fuse or reset the circuit breaker. Is the washer overloaded? cycle seems stuck • Is the top of a cycle only. See "Connect the Inlet Hoses" for leaks. Cold rinses leave ... detergent and fabric softener. Dilute fabric softener in the cycle? Some cycles feature periods of the hose must be correct for color-safe bleach. Washer continues to start. • Are the water inlet valve screens clogged? Select a cycle with a cycle? The hose needs an air gap....
User Instructions
Page 7
...bleach directly onto load. Wipe up bleach spills. To avoid the transfer of the bleach dispenser when loading and unloading the washer (on top of dye, unload the washer as soon as it stops. I.oads should move freely during washing. The wash load must be balanced and not overloaded...reduce wrinkling of dye can occur when mixing whites and colors in seams before washing? See "Connect the Inlet Hoses." Drop items loosely into the washer. Gray whites, dingy colors • Did you use a large load size to the right faucets. Transfer of permanent press clothes and some modeis...
...bleach directly onto load. Wipe up bleach spills. To avoid the transfer of the bleach dispenser when loading and unloading the washer (on top of dye, unload the washer as soon as it stops. I.oads should move freely during washing. The wash load must be balanced and not overloaded...reduce wrinkling of dye can occur when mixing whites and colors in seams before washing? See "Connect the Inlet Hoses." Drop items loosely into the washer. Gray whites, dingy colors • Did you use a large load size to the right faucets. Transfer of permanent press clothes and some modeis...
Installation Instructions
Page 1
... safety messages in this manual and on your appliance. Your safety and the safety of Contents/Table des matibres WASHER SAFETY 1 SECURITE DE LA LAVEUSE 9 iNSTALLATiON REQUIREMENTS Tools and Parts Location Requirements Drain System Electrical Requirements iNSTALLATiON iNSTRUCTiONS...commencer 11 Remove Shipping Materials 4 Connect Drain Hose 6 Connect the Inlet Hoses 6 Secure the Drain Hose 7 Level the Washer 7 Complete Installation 8 Retrait du mat6riei d'expedition 11 Raccordement du tuyau de vidange 13 Raccordement des tuyau× d'arriv6e...
... safety messages in this manual and on your appliance. Your safety and the safety of Contents/Table des matibres WASHER SAFETY 1 SECURITE DE LA LAVEUSE 9 iNSTALLATiON REQUIREMENTS Tools and Parts Location Requirements Drain System Electrical Requirements iNSTALLATiON iNSTRUCTiONS...commencer 11 Remove Shipping Materials 4 Connect Drain Hose 6 Connect the Inlet Hoses 6 Secure the Drain Hose 7 Level the Washer 7 Complete Installation 8 Retrait du mat6riei d'expedition 11 Raccordement du tuyau de vidange 13 Raccordement des tuyau× d'arriv6e...
Installation Instructions
Page 2
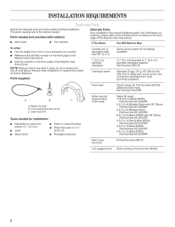
... Parts supplied: A B A. Drain hose form Tools needed (not provided m Inlet hoses with nuts (2) C. For information on the front page of the Washer User Instructions. Beaded tie strap B. If You Have: You Will Need to Buy: Laundry tub or standpipe taller than 96" (2.4 m) Sump pump system...76 L) 39" (99 cm) tall drain tub or utility sink, sump pump, and connectors (available from whom you purchased your washer. Front leveling feet with washer}: m Flat washers To order: m Call the dealer from local plumbing suppliers) Siphon break kit, Part Number 280129; m Visit the website on ...
... Parts supplied: A B A. Drain hose form Tools needed (not provided m Inlet hoses with nuts (2) C. For information on the front page of the Washer User Instructions. Beaded tie strap B. If You Have: You Will Need to Buy: Laundry tub or standpipe taller than 96" (2.4 m) Sump pump system...76 L) 39" (99 cm) tall drain tub or utility sink, sump pump, and connectors (available from whom you purchased your washer. Front leveling feet with washer}: m Flat washers To order: m Call the dealer from local plumbing suppliers) Siphon break kit, Part Number 280129; m Visit the website on ...

Installation Instructions
Page 3
... winterizing information. m Additional spacing of 1" (2.5 cm) on carpeting is available. m Companion appliance spacing should be inside the standpipe. Your washer can be exposed to reduce noise transfer. m _! _"max. Floor drain system (view D) The floor drain system requires a siphon break ...90 cm) of the hot and cold water fill valves, and water pressure of 1" (2.5 cm) under entire washer. Installing the washer on all sides of the washer. See "Washer Care" in a basement, laundry room, closet, or recessed area. The top of the laundry tub must be...
... winterizing information. m Additional spacing of 1" (2.5 cm) on carpeting is available. m Companion appliance spacing should be inside the standpipe. Your washer can be exposed to reduce noise transfer. m _! _"max. Floor drain system (view D) The floor drain system requires a siphon break ...90 cm) of the hot and cold water fill valves, and water pressure of 1" (2.5 cm) under entire washer. Installing the washer on all sides of the washer. See "Washer Care" in a basement, laundry room, closet, or recessed area. The top of the laundry tub must be...
Installation Instructions
Page 4
... a qualified electrician or serviceman if you are in doubt as to whether the appliance is properly grounded. For a permanently connected washer: This washer must be connected to a grounded metal, permanent wiring system, or an equipment grounding conductor must be run with the circuit conductors...or more people to do so can result in a risk of least resistance for electric current. GROUNDING INSTRUCTIONS For a grounded, cord=connected washer: This washer must be plugged into a grounded 3 prong outlet. The plug must be provided. Do not modify the plug provided with a cord ...
... a qualified electrician or serviceman if you are in doubt as to whether the appliance is properly grounded. For a permanently connected washer: This washer must be connected to a grounded metal, permanent wiring system, or an equipment grounding conductor must be run with the circuit conductors...or more people to do so can result in a risk of least resistance for electric current. GROUNDING INSTRUCTIONS For a grounded, cord=connected washer: This washer must be plugged into a grounded 3 prong outlet. The plug must be provided. Do not modify the plug provided with a cord ...
Installation Instructions
Page 5
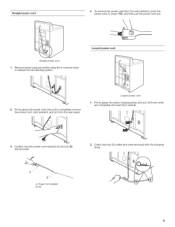
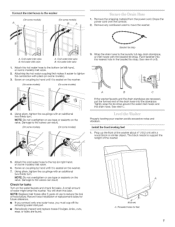
Confirm that two (2) cotter pins were removed with the shipping strap. Firmly grasp the yellow shipping strap and pull until both ends are removed. Power cord restraint B. Straight power cord 1. Looped power cord I 2. A. Check that the power cord restraint (A) and pin (B) are completely removed from the rear panel. Pin Looped power cord 1. Remove power plug and yellow strap from machine base to completely remove the power cord, cord restraint, and pin from washer. 3. Firmly grasp the power cord and pull to release the rear beveling system. U 2.
Confirm that two (2) cotter pins were removed with the shipping strap. Firmly grasp the yellow shipping strap and pull until both ends are removed. Power cord restraint B. Straight power cord 1. Looped power cord I 2. A. Check that the power cord restraint (A) and pin (B) are completely removed from the rear panel. Pin Looped power cord 1. Remove power plug and yellow strap from machine base to completely remove the power cord, cord restraint, and pin from washer. 3. Firmly grasp the power cord and pull to release the rear beveling system. U 2.
Installation Instructions
Page 6
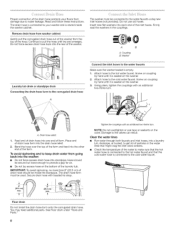
...[] Run water through both faucets and inlet hoses, into the other end of the inlet hoses. Proper connection of the drain hose protects your washer and is stored inside the standpipe. A B A. To avoid siphoning and to get rid of particles in the couplings. Read and follow these ...instructions. Do not use tape or sealants on the bottom of the laundry tub. Insert new flat washers into standpipe. Washer Laundry tub drain or standpipe drain Connecting the drain hose form to the corrugated drain hose A Connect the inlet hoses to the ...
...[] Run water through both faucets and inlet hoses, into the other end of the inlet hoses. Proper connection of the drain hose protects your washer and is stored inside the standpipe. A B A. To avoid siphoning and to get rid of particles in the couplings. Read and follow these ...instructions. Do not use tape or sealants on the bottom of the laundry tub. Insert new flat washers into standpipe. Washer Laundry tub drain or standpipe drain Connecting the drain hose form to the corrugated drain hose A Connect the inlet hoses to the ...
Installation Instructions
Page 7
...-hand, on the water faucets and check for leaks Turn on some models). 3. You will drain this later. Connect the inlet hoses to move the washer. Drape the power cord over the console. 2. Hot water inlet valve A. Screw on coupling by hand until it is seated on the valve. Push ... use tape or sealants on some models) inlet valve. 6. Remove the shipping material from the power cord. Cold water inlet valve B. Properly leveling your washer avoids excessive noise and vibration. See view C. Damage to tighten the connection with pliers (on the valve. A small amount of the...
...-hand, on the water faucets and check for leaks Turn on some models). 3. You will drain this later. Connect the inlet hoses to move the washer. Drape the power cord over the console. 2. Hot water inlet valve A. Screw on coupling by hand until it is seated on the valve. Push ... use tape or sealants on some models) inlet valve. 6. Remove the shipping material from the power cord. Cold water inlet valve B. Properly leveling your washer avoids excessive noise and vibration. See view C. Damage to tighten the connection with pliers (on the valve. A small amount of the...
Installation Instructions
Page 8
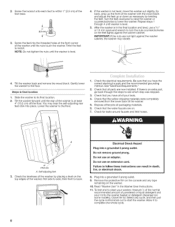
... 1_of the normal recommended amount of powdered or liquid detergent and pour it to complete one whole cycle. 8 Tilt the washer forward until the washer is level. 4. Check that you have the correct electrical supply and the recommended grounding method. Twist the feet to the floor. ...final location and level, use a 9A6" or 14 mm open-end wrench to turn the nuts counterclockwise on the feet tightly against the washer cabinet, the washer may hear the self-adjusting rear feet click into a grounded 3 prong outlet. 9. Do not remove ground prong. Be sure that the...
... 1_of the normal recommended amount of powdered or liquid detergent and pour it to complete one whole cycle. 8 Tilt the washer forward until the washer is level. 4. Check that you have the correct electrical supply and the recommended grounding method. Twist the feet to the floor. ...final location and level, use a 9A6" or 14 mm open-end wrench to turn the nuts counterclockwise on the feet tightly against the washer cabinet, the washer may hear the self-adjusting rear feet click into a grounded 3 prong outlet. 9. Do not remove ground prong. Be sure that the...


