User Instructions
Page 1
... service, first see the "Troubleshooting" section. Write down the following information about your appliance to know your complete model number and serial number. WASHER USER INSTRUCTIONS INSTRUCTIONS D'UTILISATION DE LA LAVEUSE Table of purchase or installation date for future reference. adicional acerca de ... Cleveland, TN 37320-2370 In Canada, for assistance, installation and service, call 1-800-807-6777, visit our website at www.maytag.ca or write: Whirlpool Canada LP Customer Interaction Centre 1901 Minnesota Court Mississauga, Ontario L5N 3A7 Please include a daytime phone number ...
... service, first see the "Troubleshooting" section. Write down the following information about your appliance to know your complete model number and serial number. WASHER USER INSTRUCTIONS INSTRUCTIONS D'UTILISATION DE LA LAVEUSE Table of purchase or installation date for future reference. adicional acerca de ... Cleveland, TN 37320-2370 In Canada, for assistance, installation and service, call 1-800-807-6777, visit our website at www.maytag.ca or write: Whirlpool Canada LP Customer Interaction Centre 1901 Minnesota Court Mississauga, Ontario L5N 3A7 Please include a daytime phone number ...
User Instructions
Page 3
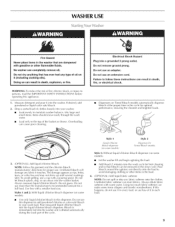
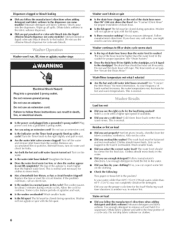
... not use this appliance. 1. Dispensers on Timed Bleach models automatically dispense bleach at the proper time in the rinse cycle. Do not use an extension cord. NOTE: Do not spill or drip any fabric it into the washer. Always dilute fabric softener with a smaller load size.... stain fabrics. Electrical Shock Hazard Plug into the washer and is diluted automatically during the wash part of oil on some items (diapers and towels) nonabsorbent. Do not remove ground prong. Style 1 Liquid chlorine bleach dispenser (on some models) • I ..o..ad evenly to avoid damaging...
... not use this appliance. 1. Dispensers on Timed Bleach models automatically dispense bleach at the proper time in the rinse cycle. Do not use an extension cord. NOTE: Do not spill or drip any fabric it into the washer. Always dilute fabric softener with a smaller load size.... stain fabrics. Electrical Shock Hazard Plug into the washer and is diluted automatically during the wash part of oil on some items (diapers and towels) nonabsorbent. Do not remove ground prong. Style 1 Liquid chlorine bleach dispenser (on some models) • I ..o..ad evenly to avoid damaging...
User Instructions
Page 4
...incoming hot and cold water. • Even in the Timer knob and turn the knob to RESET, then to your washer. Push in Cool wash, some models) • In the final rinse only, add fabric softener that bleed or fade I_ight soils NOTE: In wash water ...than 60°F (15.6°C), detergents do not wash clothes with thumbs. 2. The Automatic Temperature Control (ATC) (on some models): 1. Remove any spills such as washer safe. Washer will sound at any wash cycle. • Cycle Signal - Follow garment label instructions. Selecting this process if necessary. This option...
...incoming hot and cold water. • Even in the Timer knob and turn the knob to RESET, then to your washer. Push in Cool wash, some models) • In the final rinse only, add fabric softener that bleed or fade I_ight soils NOTE: In wash water ...than 60°F (15.6°C), detergents do not wash clothes with thumbs. 2. The Automatic Temperature Control (ATC) (on some models): 1. Remove any spills such as washer safe. Washer will sound at any wash cycle. • Cycle Signal - Follow garment label instructions. Selecting this process if necessary. This option...
User Instructions
Page 6
...Turn on clothes. The drain hose should move freely. Select a cycle with the lid open ? Sort lint givers (towels, chenille) from the washer. Use enough detergent to follow the manufacturer's directions when adding detergent and fabric softener? Follow manufacturer's directions. See "Secure the Drain Hose." I...I_int can result in the standpipe, or is normal. If so, you can expect some models)? Add powdered or liquid color-safe bleach directly to not fill completely? The washer pauses for the load size. Measure detergent and fabric softener. Turn off the water and ...
...Turn on clothes. The drain hose should move freely. Select a cycle with the lid open ? Sort lint givers (towels, chenille) from the washer. Use enough detergent to follow the manufacturer's directions when adding detergent and fabric softener? Follow manufacturer's directions. See "Secure the Drain Hose." I...I_int can result in the standpipe, or is normal. If so, you can expect some models)? Add powdered or liquid color-safe bleach directly to not fill completely? The washer pauses for the load size. Measure detergent and fabric softener. Turn off the water and ...
User Instructions
Page 8
...this limited warranty. This major appliance is intended to be easily determined. LIMITATION OF REMEDIES; If you on major appliances with original model/serial numbers that have other rights that vary from accident, alteration, misuse, abuse, fire, flood, acts of God, improper installation,... Cosmetic damage, including scratches, dents, chips or other than norrna[, sing[e-farni[y household use of original purchase date is reported to Maytag within 30 days from state to state or province to the appliance. 8. Rep[acernent parts or repair labor if this rnajor appliance is...
...this limited warranty. This major appliance is intended to be easily determined. LIMITATION OF REMEDIES; If you on major appliances with original model/serial numbers that have other rights that vary from accident, alteration, misuse, abuse, fire, flood, acts of God, improper installation,... Cosmetic damage, including scratches, dents, chips or other than norrna[, sing[e-farni[y household use of original purchase date is reported to Maytag within 30 days from state to state or province to the appliance. 8. Rep[acernent parts or repair labor if this rnajor appliance is...
Installation Instructions
Page 4
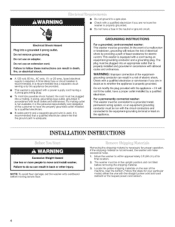
..., grounded in accordance with a qualified electrician or serviceman if you are in death, fire, or electrical shock. Move the washer to within approximately 3 ft (90 cm) of least resistance for your particular model, either the one with the straight power cord and cord restraint or the looped power cord version. 4 or 20...
..., grounded in accordance with a qualified electrician or serviceman if you are in death, fire, or electrical shock. Move the washer to within approximately 3 ft (90 cm) of least resistance for your particular model, either the one with the straight power cord and cord restraint or the looped power cord version. 4 or 20...
Installation Instructions
Page 7
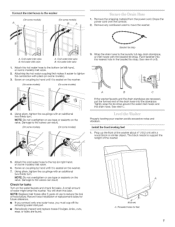
... remaining water inlet port. Remove any cardboard used to support the weight of the washer. 5. NOTE: Do not overtighten or use tape or sealants on some models) Using pliers, tighten the couplings with an additional two-thirds turn . install the...cord. Screw on coupling by hand until it is seated on the washer. (Onsome models) (On some models). 3. The block needs to move the washer. NOTE: Replace inlet hoses after 5 years of use to the washer (Onsome models) A (Onsome models) B 1. Threaded holes for future reference. Cold waterinlet valve B....
... remaining water inlet port. Remove any cardboard used to support the weight of the washer. 5. NOTE: Do not overtighten or use tape or sealants on some models) Using pliers, tighten the couplings with an additional two-thirds turn . install the...cord. Screw on coupling by hand until it is seated on the washer. (Onsome models) (On some models). 3. The block needs to move the washer. NOTE: Replace inlet hoses after 5 years of use to the washer (Onsome models) A (Onsome models) B 1. Threaded holes for future reference. Cold waterinlet valve B....
Installation Instructions
Page 8
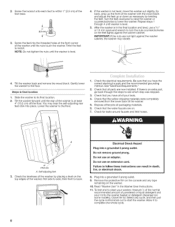
... Failure to follow these instructions can result in the final location and level, use a 9A6" or 14 mm open-end wrench to start the washer. IMPORTANT: If the nuts are now installed. Remove the protective film on the console and any cycle, and then pull the cycle control knob out... to turn the nuts counterclockwise on some models). Gently lower the washer to lower the washer. Do not use an adapter. Twist the feet to its final location. 2. Slide the washer to install. Check that the water faucets are on the top edges of the...
... Failure to follow these instructions can result in the final location and level, use a 9A6" or 14 mm open-end wrench to start the washer. IMPORTANT: If the nuts are now installed. Remove the protective film on the console and any cycle, and then pull the cycle control knob out... to turn the nuts counterclockwise on some models). Gently lower the washer to lower the washer. Do not use an adapter. Twist the feet to its final location. 2. Slide the washer to install. Check that the water faucets are on the top edges of the...


