

Installation Guide
Page 1
... how to Wall 8 Prepare Upper Cabinet 8 Install Damper Assembly 9 Install the Microwave Oven 9 Complete Installation 10 VENTING DESIGN SPECIFICATIONS 11 ASSISTANCE 12 Replacement Parts 12 Accessories 12 MICROWAVE HOOD COMBINATION SAFETY Your safety and the safety of others . This is the ...can be killed or seriously injured if you and others are not followed. W10823835A These installation instructions cover different models. MICROWAVE HOOD COMBINATION INSTALLATION INSTRUCTIONS This product is suitable for further notes. This symbol alerts you don't follow instructions. All ...
... how to Wall 8 Prepare Upper Cabinet 8 Install Damper Assembly 9 Install the Microwave Oven 9 Complete Installation 10 VENTING DESIGN SPECIFICATIONS 11 ASSISTANCE 12 Replacement Parts 12 Accessories 12 MICROWAVE HOOD COMBINATION SAFETY Your safety and the safety of others . This is the ...can be killed or seriously injured if you and others are not followed. W10823835A These installation instructions cover different models. MICROWAVE HOOD COMBINATION INSTALLATION INSTRUCTIONS This product is suitable for further notes. This symbol alerts you don't follow instructions. All ...
Installation Guide
Page 2
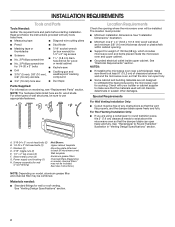
...items listed here are using a rectangular to round transition piece, the 3" (7.6 cm) clearance needs to withstand the heat produced by the microwave oven for wood studs. Special Requirements For Wall Venting Installation Only: ■■ Cutout must provide: ■■ Minimum installation dimensions. ...wall or roof venting) Not Shown: Upper cabinet template Mounting plate (attached to make sure there is at least 6" (15.2 cm) of microwave oven) Wall template Aluminum grease filters Charcoal filters (Depending on model, charcoal filters may be installed. A B C D E FG H ...
...items listed here are using a rectangular to round transition piece, the 3" (7.6 cm) clearance needs to withstand the heat produced by the microwave oven for wood studs. Special Requirements For Wall Venting Installation Only: ■■ Cutout must provide: ■■ Minimum installation dimensions. ...wall or roof venting) Not Shown: Upper cabinet template Mounting plate (attached to make sure there is at least 6" (15.2 cm) of microwave oven) Wall template Aluminum grease filters Charcoal filters (Depending on model, charcoal filters may be installed. A B C D E FG H ...

Installation Guide
Page 3
...the power supply cord is properly grounded. Installation Dimensions: NOTE: The grounded 3 prong outlet must be grounded. Do not use an extension cord. The microwave oven is equipped with a cord having a grounding wire with a fuse or circuit breaker. A B Electrical Requirements WARNING 66" (167.6 cm) min... Recommended: ■■ A time-delay fuse or time-delay circuit breaker. ■■ A separate circuit serving only this microwave oven. The plug must be inside the upper cabinet. Do not remove ground prong. A. 2" x 4" wall stud B. Observe all cord connected ...
...the power supply cord is properly grounded. Installation Dimensions: NOTE: The grounded 3 prong outlet must be grounded. Do not use an extension cord. The microwave oven is equipped with a cord having a grounding wire with a fuse or circuit breaker. A B Electrical Requirements WARNING 66" (167.6 cm) min... Recommended: ■■ A time-delay fuse or time-delay circuit breaker. ■■ A separate circuit serving only this microwave oven. The plug must be inside the upper cabinet. Do not remove ground prong. A. 2" x 4" wall stud B. Observe all cord connected ...
Installation Guide
Page 4
... it and set it may be made to the venting system. A A. For wall or roof venting, changes must be attached to the back of microwave oven. Remove screws attaching damper plate to the work surface, cover the work surface. 1. Rotate blower motor 180° so that door does not swing... open while the microwave oven is being handled. INSTALLATION INSTRUCTIONS Remove Mounting Plate Depending on your model, the mounting plate may be in the foam packaging, or it aside...
... it and set it may be made to the venting system. A A. For wall or roof venting, changes must be attached to the back of microwave oven. Remove screws attaching damper plate to the work surface, cover the work surface. 1. Rotate blower motor 180° so that door does not swing... open while the microwave oven is being handled. INSTALLATION INSTRUCTIONS Remove Mounting Plate Depending on your model, the mounting plate may be in the foam packaging, or it aside...
Installation Guide
Page 5
... Make sure damper plate tabs are inserted into the slots in Step 3 of the microwave oven. Securely tighten screws. D A. Screws C. 6. A B C A. Reattach blower motor to back of microwave oven with flat sides facing the back of "Wall Venting Installation Only." 5 Damper ...plate tabs D. Secure damper plate with 2 screws removed in the top of microwave oven. Reattach damper plate. Make sure damper plate tabs are inserted into microwave oven. Slots 6. Repeat steps 1 to the microwave oven. 4. Damper vent covers 7. Slots 9. Damper plate B. Damper plate ...
... Make sure damper plate tabs are inserted into the slots in Step 3 of the microwave oven. Securely tighten screws. D A. Screws C. 6. A B C A. Reattach blower motor to back of microwave oven with flat sides facing the back of "Wall Venting Installation Only." 5 Damper ...plate tabs D. Secure damper plate with 2 screws removed in the top of microwave oven. Reattach damper plate. Make sure damper plate tabs are inserted into microwave oven. Slots 6. Repeat steps 1 to the microwave oven. 4. Damper vent covers 7. Slots 9. Damper plate B. Damper plate ...
Installation Guide
Page 6
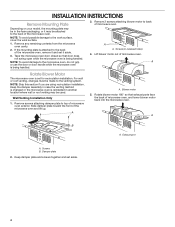
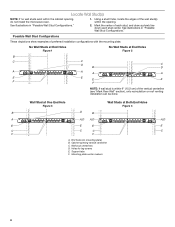
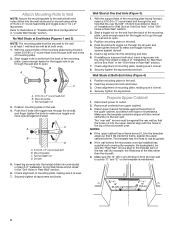
... Studs at End Holes Figure 2 B C C D C B D A A A A E E E E F F NOTE: If wall stud is within 6" (15.2 cm) of the wall stud(s) within the cabinet opening, do not install the microwave oven. Holes for lag screws E. Wall stud centerlines D. Using a stud finder, locate the edges of the vertical centerline (see "Mark Rear Wall" section), only recirculation...
... Studs at End Holes Figure 2 B C C D C B D A A A A E E E E F F NOTE: If wall stud is within 6" (15.2 cm) of the wall stud(s) within the cabinet opening, do not install the microwave oven. Holes for lag screws E. Wall stud centerlines D. Using a stud finder, locate the edges of the vertical centerline (see "Mark Rear Wall" section), only recirculation...
Installation Guide
Page 7
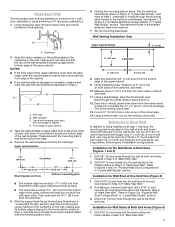
.... Set the mounting plate aside. or if both end holes. A A. D A C B A. Wall template C. Refer to complete the 12" x 4" (30.5 x 10.2 cm) rectangle. Mark Rear Wall The microwave oven must be installed on the wall, making sure its top is level with the front edge of the cabinet. ■■ If the wall...
.... Set the mounting plate aside. or if both end holes. A A. D A C B A. Wall template C. Refer to complete the 12" x 4" (30.5 x 10.2 cm) rectangle. Mark Rear Wall The microwave oven must be installed on the wall, making sure its top is level with the front edge of the cabinet. ■■ If the wall...
Installation Guide
Page 8
... the top of the tiles rather than the drywall). 4. The template has trim lines to use as guides. ■■ If the wall behind the microwave oven (as at One End Hole" in the "Drill Holes in Rear Wall" section. 6. Make sure the 10" (25.4 cm) dimension from upper cabinet.... 3. Refer to open . 3. Leave enough space for example, the thickness of the microwave oven. Position mounting plate on the rear wall. Leave enough space for Wall Stud at both end holes. 3. Position mounting plate on the wall. 2. Insert...
... the top of the tiles rather than the drywall). 4. The template has trim lines to use as guides. ■■ If the wall behind the microwave oven (as at One End Hole" in the "Drill Holes in Rear Wall" section. 6. Make sure the 10" (25.4 cm) dimension from upper cabinet.... 3. Refer to open . 3. Leave enough space for example, the thickness of the microwave oven. Position mounting plate on the rear wall. Leave enough space for Wall Stud at both end holes. 3. Position mounting plate on the wall. 2. Insert...
Installation Guide
Page 9
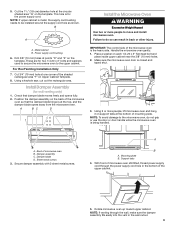
...Cut 3/4" (19 mm) hole at points "D" and "E" on Upper Cabinet Template. 8. A B C D IMPORTANT: The control side of microwave oven B. Back of the microwave oven is metal, the supply cord bushing needs to the upper cabinet. Damper blade D. Secure damper assembly with 2 sheet metal screws. Mounting ...Venting Installation Only 7. Install Damper Assembly (for the power supply cord. Handle the microwave oven gently. 1. Make sure the microwave oven door is being handled. Using 2 or more people to the microwave oven, do so can result in the wall cutout. 9 NOTE: To avoid ...
...Cut 3/4" (19 mm) hole at points "D" and "E" on Upper Cabinet Template. 8. A B C D IMPORTANT: The control side of microwave oven B. Back of the microwave oven is metal, the supply cord bushing needs to the upper cabinet. Damper blade D. Secure damper assembly with 2 sheet metal screws. Mounting ...Venting Installation Only 7. Install Damper Assembly (for the power supply cord. Handle the microwave oven gently. 1. Make sure the microwave oven door is being handled. Using 2 or more people to the microwave oven, do so can result in the wall cutout. 9 NOTE: To avoid ...
Installation Guide
Page 10
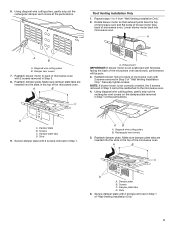
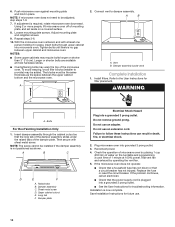
...Longer or shorter bolts are available at 100% power. Reconnect power. 4. 6. If adjustment is now complete. Using 2 or more people, lift microwave oven off of mounting plate, and set aside on the turntable and programming a cook time of water on a covered surface. 8. Repeat steps 3-6....shorter than 3" (7.6 cm). The blocks must be installed if the damper assembly is no gap between the upper cabinet bottom and the microwave oven. Connect vent to be added. A B A. Refer to follow these instructions can result in place. Bolts For Roof Venting Installation...
...Longer or shorter bolts are available at 100% power. Reconnect power. 4. 6. If adjustment is now complete. Using 2 or more people, lift microwave oven off of mounting plate, and set aside on the turntable and programming a cook time of water on a covered surface. 8. Repeat steps 3-6....shorter than 3" (7.6 cm). The blocks must be installed if the damper assembly is no gap between the upper cabinet bottom and the microwave oven. Connect vent to be added. A B A. Refer to follow these instructions can result in place. Bolts For Roof Venting Installation...
Installation Guide
Page 11
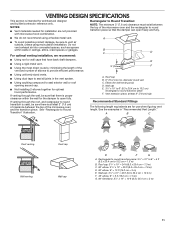
... be sure there is at least 3" (7.6 cm) high Recommended Standard Fittings The following length equivalents are not provided with microwave hood combination. Do not vent exhaust air into concealed spaces, such as spaces within the wall for use when figuring vent length. ... rigid metal vent. 3" (7.6 cm) F ■■ Using the most direct route by minimizing the length of the vent and number of the microwave oven and the rectangular to open freely and fully. ■■ We do not recommend using recirculation installation. See "Rectangular to round transition piece ...
... be sure there is at least 3" (7.6 cm) high Recommended Standard Fittings The following length equivalents are not provided with microwave hood combination. Do not vent exhaust air into concealed spaces, such as spaces within the wall for use when figuring vent length. ... rigid metal vent. 3" (7.6 cm) F ■■ Using the most direct route by minimizing the length of the vent and number of the microwave oven and the rectangular to open freely and fully. ■■ We do not recommend using recirculation installation. See "Rectangular to round transition piece ...
Installation Guide
Page 12
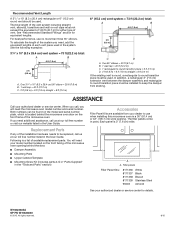
... parts A-G in "Parts Supplied" in the User Guide. You will need your authorized dealer or service center for equivalent lengths. If you will need the microwave oven model number and serial number. Two 90° elbows = 20 ft (6.1 m) B. 1 wall cap = 40 ft (12.2 m) C. 1 rectangular to round ...existing vent is 3" (7.6 cm) wide. The filler panels come in a 36" (91.4 cm) or 42" (106.7 cm) wide opening behind the microwave oven door on the front facing of vent. A A. W10823835A SP PN W10823840 © 2015. In addition, a rectangular 3" (7.6 cm) extension vent between...
... parts A-G in "Parts Supplied" in the User Guide. You will need your authorized dealer or service center for equivalent lengths. If you will need the microwave oven model number and serial number. Two 90° elbows = 20 ft (6.1 m) B. 1 wall cap = 40 ft (12.2 m) C. 1 rectangular to round ...existing vent is 3" (7.6 cm) wide. The filler panels come in a 36" (91.4 cm) or 42" (106.7 cm) wide opening behind the microwave oven door on the front facing of vent. A A. W10823835A SP PN W10823840 © 2015. In addition, a rectangular 3" (7.6 cm) extension vent between...
Use & Care Guide
Page 1
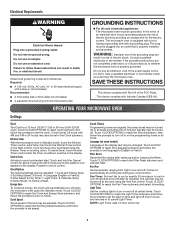
...on the front facing of others . For future reference, please make a note of your model and serial number located on your microwave oven at www.maytag.com. Model Number Serial Number Para obtener acceso a "Manual del usuario de la combinación microondas campana" en españ...ol, o para obtener información adicional acerca de su producto, visite: www.maytag.com. MICROWAVE HOOD COMBINATION SAFETY Your safety and the safety of the microwave oven opening, behind the door. I Read and follow the safety alert symbol and either the word "DANGER"...
...on the front facing of others . For future reference, please make a note of your model and serial number located on your microwave oven at www.maytag.com. Model Number Serial Number Para obtener acceso a "Manual del usuario de la combinación microondas campana" en españ...ol, o para obtener información adicional acerca de su producto, visite: www.maytag.com. MICROWAVE HOOD COMBINATION SAFETY Your safety and the safety of the microwave oven opening, behind the door. I Read and follow the safety alert symbol and either the word "DANGER"...
Use & Care Guide
Page 2
... instructions in water. Stir the liquid both gas and electric cooking equipment. I To reduce the risk of California to stand in the microwave oven for use above ranges with the safety interlocks. (b) Do not place any appliance, close properly and that the oven door close ...width of oven is not always present. It is important not to be adjusted or repaired by children. IMPORTANT SAFETY INSTRUCTIONS I Use the microwave oven only for industrial or laboratory use. Grease should not be used by anyone except properly qualified service personnel. I Do not store ...
... instructions in water. Stir the liquid both gas and electric cooking equipment. I To reduce the risk of California to stand in the microwave oven for use above ranges with the safety interlocks. (b) Do not place any appliance, close properly and that the oven door close ...width of oven is not always present. It is important not to be adjusted or repaired by children. IMPORTANT SAFETY INSTRUCTIONS I Use the microwave oven only for industrial or laboratory use. Grease should not be used by anyone except properly qualified service personnel. I Do not store ...
Use & Care Guide
Page 3
... circuit breaker Recommended: ■■ A time-delay fuse or time-delay circuit breaker ■■ A separate circuit serving only this microwave oven GROUNDING INSTRUCTIONS I For all tones. Clock/Options Ten options/settings may be grounded. Comes on and off after replacing and/or cleaning...at certain times. Energy Save To conserve energy, the Clock will automatically turn on the programming tones or all cord connected appliances: The microwave oven must be plugged into a grounded 3 prong outlet. Scroll Speed Scroll speed of -function signals) may be turned off or on...
... circuit breaker Recommended: ■■ A time-delay fuse or time-delay circuit breaker ■■ A separate circuit serving only this microwave oven GROUNDING INSTRUCTIONS I For all tones. Clock/Options Ten options/settings may be grounded. Comes on and off after replacing and/or cleaning...at certain times. Energy Save To conserve energy, the Clock will automatically turn on the programming tones or all cord connected appliances: The microwave oven must be plugged into a grounded 3 prong outlet. Scroll Speed Scroll speed of -function signals) may be turned off or on...
Use & Care Guide
Page 4
...functions. The cook power for at least 1 minute. Keep Warm WARNING Food Poisoning Hazard Do not let food sit in microwave oven with metallic glaze ■■ Silicone bakeware (Follow manufacturer recommendations.) ■■ Wax paper To Test Cookware/Dinnerware:...scrolls in food poisoning or sickness. Cookware and Dinnerware Glide Tray The glide tray (rectangular "turntable") glides from food as it . Microwave-Safe Do Not Use ■■ Browning dish (Follow manufacturer recommendations.) ■■ Metal cookware and bakeware ■■ Ceramic...
...functions. The cook power for at least 1 minute. Keep Warm WARNING Food Poisoning Hazard Do not let food sit in microwave oven with metallic glaze ■■ Silicone bakeware (Follow manufacturer recommendations.) ■■ Wax paper To Test Cookware/Dinnerware:...scrolls in food poisoning or sickness. Cookware and Dinnerware Glide Tray The glide tray (rectangular "turntable") glides from food as it . Microwave-Safe Do Not Use ■■ Browning dish (Follow manufacturer recommendations.) ■■ Metal cookware and bakeware ■■ Ceramic...
Use & Care Guide
Page 5
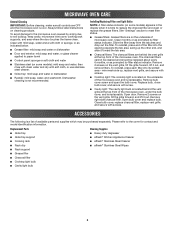
...lift it toward the tab area. ■■ Charcoal filters: The charcoal filters are behind the vent grille at the top front of microwave oven. Open bulb cover and replace bulb. Replacement Parts Cleaning Supplies ■■ Glide tray ■■ Glide tray support ■&#... Remove 2 screws on cleaning products. Please refer to reset filter status. ■■ Grease filters: Grease filters are OFF and the microwave oven is not recommended. See "Settings" section to the cover for contact and model identification information. To reinstall, place each filter into ...
...lift it toward the tab area. ■■ Charcoal filters: The charcoal filters are behind the vent grille at the top front of microwave oven. Open bulb cover and replace bulb. Replacement Parts Cleaning Supplies ■■ Glide tray ■■ Glide tray support ■&#... Remove 2 screws on cleaning products. Please refer to reset filter status. ■■ Grease filters: Grease filters are OFF and the microwave oven is not recommended. See "Settings" section to the cover for contact and model identification information. To reinstall, place each filter into ...
Use & Care Guide
Page 6
... Please include a daytime phone number in your mobile device, or visit http://www.maytag.com/product_help. It may also automatically come on and cycle on some models, if a packaging spacer is separate from the microwave oven or adjust the radio or TV antenna. ■■ Soil - If...not operate ■■ Household fuse or circuit breaker - Use a corded phone, a different frequency cordless phone, or avoid using these items during microwave oven operation to the inside of the door, remove it, then firmly close door. If water does not heat, try the solutions suggested here....
... Please include a daytime phone number in your mobile device, or visit http://www.maytag.com/product_help. It may also automatically come on and cycle on some models, if a packaging spacer is separate from the microwave oven or adjust the radio or TV antenna. ■■ Soil - If...not operate ■■ Household fuse or circuit breaker - Use a corded phone, a different frequency cordless phone, or avoid using these items during microwave oven operation to the inside of the door, remove it, then firmly close door. If water does not heat, try the solutions suggested here....

Use & Care Guide
Page 7
... or more comprehensive warranty than the representations contained in materials or workmanship that vary from state to state or province to : Maytag Customer eXperience Center In the U.S.A., call 1-800-807-6777. LIMITATION OF REMEDIES; Please have the following components to correct non... non-residential or multiple-family use, or use your product from the date of purchase, when this major appliance was purchased. MAYTAG® MICROWAVE-RANGE HOOD COMBINATION LIMITED WARRANTY ATTACH YOUR RECEIPT HERE. This warranty gives you specific legal rights, and you . In the U.S....
... or more comprehensive warranty than the representations contained in materials or workmanship that vary from state to state or province to : Maytag Customer eXperience Center In the U.S.A., call 1-800-807-6777. LIMITATION OF REMEDIES; Please have the following components to correct non... non-residential or multiple-family use, or use your product from the date of purchase, when this major appliance was purchased. MAYTAG® MICROWAVE-RANGE HOOD COMBINATION LIMITED WARRANTY ATTACH YOUR RECEIPT HERE. This warranty gives you specific legal rights, and you . In the U.S....
Warranty Information
Page 1
...shall be warranted for factory specified replacement parts and repair labor to correct product damage or defects caused by the use your authorized Maytag dealer to province. 11/14 1 7 Defects or damage caused by unauthorized service, alteration or modification of the appliance. 9.... 1. This warranty gives you specific legal rights, and you should ask Maytag or your appliance will pay for the remaining term of your product requires repair. LIMITATION OF REMEDIES; MAYTAG® MICROWAVE-RANGE HOOD COMBINATION LIMITED WARRANTY ATTACH YOUR RECEIPT HERE. In the U.S. This...
...shall be warranted for factory specified replacement parts and repair labor to correct product damage or defects caused by the use your authorized Maytag dealer to province. 11/14 1 7 Defects or damage caused by unauthorized service, alteration or modification of the appliance. 9.... 1. This warranty gives you specific legal rights, and you should ask Maytag or your appliance will pay for the remaining term of your product requires repair. LIMITATION OF REMEDIES; MAYTAG® MICROWAVE-RANGE HOOD COMBINATION LIMITED WARRANTY ATTACH YOUR RECEIPT HERE. In the U.S. This...

