

Installation Guide
Page 1
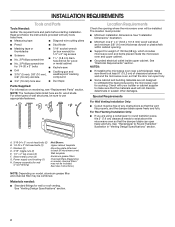
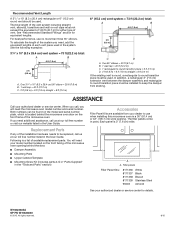
... Upper Cabinet 8 Install Damper Assembly 9 Install the Microwave Oven 9 Complete Installation 10 VENTING DESIGN SPECIFICATIONS 11 ASSISTANCE 12 Replacement Parts 12 Accessories 12 MICROWAVE HOOD COMBINATION SAFETY Your safety and the safety of Contents MICROWAVE HOOD COMBINATION SAFETY 1 INSTALLATION REQUIREMENTS 2 Tools and Parts 2 Location Requirements 2 Product Dimensions 3 Electrical Requirements 3 INSTALLATION INSTRUCTIONS 4 Remove Mounting Plate 4 Rotate Blower Motor 4 Locate Wall Stud(s 6 Mark Rear Wall 7 Drill Holes in these installation instructions. Table of...
... Upper Cabinet 8 Install Damper Assembly 9 Install the Microwave Oven 9 Complete Installation 10 VENTING DESIGN SPECIFICATIONS 11 ASSISTANCE 12 Replacement Parts 12 Accessories 12 MICROWAVE HOOD COMBINATION SAFETY Your safety and the safety of Contents MICROWAVE HOOD COMBINATION SAFETY 1 INSTALLATION REQUIREMENTS 2 Tools and Parts 2 Location Requirements 2 Product Dimensions 3 Electrical Requirements 3 INSTALLATION INSTRUCTIONS 4 Remove Mounting Plate 4 Rotate Blower Motor 4 Locate Wall Stud(s 6 Mark Rear Wall 7 Drill Holes in these installation instructions. Table of...
Installation Guide
Page 2
... venting) Not Shown: Upper cabinet template Mounting plate (attached to back of 150 lbs (68 kg), which includes microwave oven and items placed inside the microwave oven and upper cabinet. ■■ Grounded electrical outlet inside upper cabinet. hole drill bit for wood ■■ No. 3 Phillips screwdriver or metal cabinet for weight of microwave oven) Wall template Aluminum grease filters Charcoal filters (Depending on reordering, see "Replacement Parts" section. A B C D E FG H Location Requirements Check the opening . ■■ Support...
... venting) Not Shown: Upper cabinet template Mounting plate (attached to back of 150 lbs (68 kg), which includes microwave oven and items placed inside the microwave oven and upper cabinet. ■■ Grounded electrical outlet inside upper cabinet. hole drill bit for wood ■■ No. 3 Phillips screwdriver or metal cabinet for weight of microwave oven) Wall template Aluminum grease filters Charcoal filters (Depending on reordering, see "Replacement Parts" section. A B C D E FG H Location Requirements Check the opening . ■■ Support...

Installation Guide
Page 3
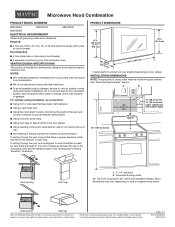
...) max. Recommended: ■■ A time-delay fuse or time-delay circuit breaker. ■■ A separate circuit serving only this microwave oven. Grounded 3 prong outlet *30" (76.2 cm) is properly installed and grounded. SAVE THESE INSTRUCTIONS 3 Do not use an extension cord. Exact dimensions may vary depending on door design. The plug must be inside the upper cabinet. Do not use of electric shock. Installation Dimensions: NOTE: The grounded 3 prong...
...) max. Recommended: ■■ A time-delay fuse or time-delay circuit breaker. ■■ A separate circuit serving only this microwave oven. Grounded 3 prong outlet *30" (76.2 cm) is properly installed and grounded. SAVE THESE INSTRUCTIONS 3 Do not use an extension cord. Exact dimensions may vary depending on door design. The plug must be inside the upper cabinet. Do not use of electric shock. Installation Dimensions: NOTE: The grounded 3 prong...
Installation Guide
Page 4
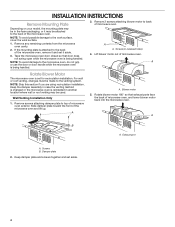
... the microwave oven and lift up. Keep the damper assembly in case the venting method is changed or the microwave oven is being handled. Remove screws attaching damper plate to the venting system. Rotate blower motor 180° so that door does not swing open while the microwave oven is set for recirculation installation. Exhaust port A. Screws B. Keep damper plate and screws together and set it may be used. Remove any remaining contents from the microwave oven cavity. 2. Screws (in another location where wall...
... the microwave oven and lift up. Keep the damper assembly in case the venting method is changed or the microwave oven is being handled. Remove screws attaching damper plate to the venting system. Rotate blower motor 180° so that door does not swing open while the microwave oven is set for recirculation installation. Exhaust port A. Screws B. Keep damper plate and screws together and set it may be used. Remove any remaining contents from the microwave oven cavity. 2. Screws (in another location where wall...
Installation Guide
Page 5
... 9. 6. Using diagonal wire cutting pliers, gently snip out the rectangular damper vent covers at the perforations. Screws C. Damper plate tabs D. Secure damper plate with 2 screws removed in Step 1 of the microwave oven (as shown), performance will be reattached to back of microwave oven with 2 screws removed in Step 1 at the perforations. Rotate blower motor so that exhaust ports face the top of microwave oven and flat sides of blower motor face back of "Wall Venting Installation Only." Damper vent covers...
... 9. 6. Using diagonal wire cutting pliers, gently snip out the rectangular damper vent covers at the perforations. Screws C. Damper plate tabs D. Secure damper plate with 2 screws removed in Step 1 of the microwave oven (as shown), performance will be reattached to back of microwave oven with 2 screws removed in Step 1 at the perforations. Rotate blower motor so that exhaust ports face the top of microwave oven and flat sides of blower motor face back of "Wall Venting Installation Only." Damper vent covers...
Installation Guide
Page 6
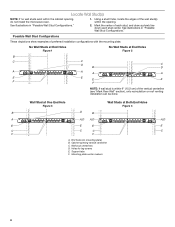
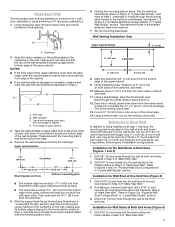
... line down each stud center. End holes (on mounting plate) B. Cabinet opening , do not install the microwave oven. See illustrations in "Possible Wall Stud Configurations." Wall stud centerlines D. Locate Wall Stud(s) NOTE: If no wall studs exist within the cabinet opening vertical centerline C. Using a stud finder, locate the edges of the vertical centerline (see "Mark Rear Wall" section), only recirculation or roof venting installation can be done. Holes for lag...
... line down each stud center. End holes (on mounting plate) B. Cabinet opening , do not install the microwave oven. See illustrations in "Possible Wall Stud Configurations." Wall stud centerlines D. Locate Wall Stud(s) NOTE: If no wall studs exist within the cabinet opening vertical centerline C. Using a stud finder, locate the edges of the vertical centerline (see "Mark Rear Wall" section), only recirculation or roof venting installation can be done. Holes for lag...
Installation Guide
Page 7
... the mounting plate in place, find and clearly mark the vertical centerline of "Mark Rear Wall." The blackened holes in Step 2 of upper cabinet 3. Using a keyhole saw, cut out the venting cutout area. Drill Holes in "Locate Wall Stud(s)" section. 3. if 1 end hole is butted up against the bottom edge of 1 lag screw, preferably 2. 1. Refer to Figure 3 in "Possible Wall Stud Configurations" in Rear Wall...
... the mounting plate in place, find and clearly mark the vertical centerline of "Mark Rear Wall." The blackened holes in Step 2 of upper cabinet 3. Using a keyhole saw, cut out the venting cutout area. Drill Holes in "Locate Wall Stud(s)" section. 3. if 1 end hole is butted up against the bottom edge of 1 lag screw, preferably 2. 1. Refer to Figure 3 in "Possible Wall Stud Configurations" in Rear Wall...
Installation Guide
Page 8
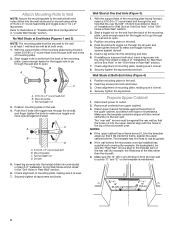
... of mounting plate, making sure it is maintained. Securely tighten the lag screw(s) and bolt. Insert lag screws into the remaining end hole. 6. Securely tighten the lag screws. Disconnect power to points "D" and "E" on the bolt from upper cabinet. 3. Remove all lag screws and bolts. Place Upper Cabinet Template against the rear wall so that the holes cut into the wall studs and/or drywall using...
... of mounting plate, making sure it is maintained. Securely tighten the lag screw(s) and bolt. Insert lag screws into the remaining end hole. 6. Securely tighten the lag screws. Disconnect power to points "D" and "E" on the bolt from upper cabinet. 3. Remove all lag screws and bolts. Place Upper Cabinet Template against the rear wall so that the holes cut into the wall studs and/or drywall using...
Installation Guide
Page 9
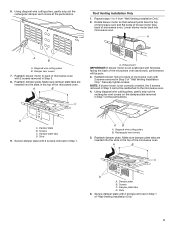
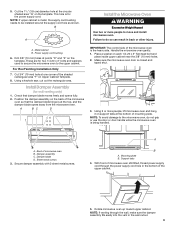
... supply cord bushing needs to be installed around the supply cord hole as shown. A. For Roof Venting Installation Only 7. Handle the microwave oven gently. 1. Using 2 or more people to the upper cabinet. A. Sheet metal screws 3. Support tabs 4. NOTE: If venting through the power supply cord hole in the bottom of microwave oven B. Power supply cord bushing 6. Cut 3/4" (19 mm) hole at one corner of mounting plate. Check that the damper blade hinge is being handled. Damper blade D. A B A. Cut...
... supply cord bushing needs to be installed around the supply cord hole as shown. A. For Roof Venting Installation Only 7. Handle the microwave oven gently. 1. Using 2 or more people to the upper cabinet. A. Sheet metal screws 3. Support tabs 4. NOTE: If venting through the power supply cord hole in the bottom of microwave oven B. Power supply cord bushing 6. Cut 3/4" (19 mm) hole at one corner of mounting plate. Check that the damper blade hinge is being handled. Damper blade D. A B A. Cut...
Installation Guide
Page 10
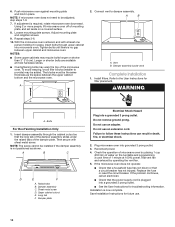
... User Instructions for troubleshooting information. Upper cabinet cutout E. Long tab F. Do not use an extension cord. If the problem continues, call an electrician. ■■ Check that a circuit breaker has not tripped. Save Installation Instructions for filter placement. With the microwave oven centered, and with sheet metal screw. Longer or shorter bolts are available at 100% power. A B A. Damper assembly (under the raised tabs of mounting plate, and set aside on the turntable and programming a cook time...
... User Instructions for troubleshooting information. Upper cabinet cutout E. Long tab F. Do not use an extension cord. If the problem continues, call an electrician. ■■ Check that a circuit breaker has not tripped. Save Installation Instructions for filter placement. With the microwave oven centered, and with sheet metal screw. Longer or shorter bolts are available at 100% power. A B A. Damper assembly (under the raised tabs of mounting plate, and set aside on the turntable and programming a cook time...
Installation Guide
Page 12
... Call your model number located on the front facing of the microwave oven opening . When you call us at our toll free number or visit our website listed in the User Guide. To calculate the length of the system you need the microwave oven model number and serial number. The filler panels come in a 36" (91.4 cm) or 42" (106.7 cm) wide opening behind the microwave oven door on the model and serial number plate, which is...
... Call your model number located on the front facing of the microwave oven opening . When you call us at our toll free number or visit our website listed in the User Guide. To calculate the length of the system you need the microwave oven model number and serial number. The filler panels come in a 36" (91.4 cm) or 42" (106.7 cm) wide opening behind the microwave oven door on the model and serial number plate, which is...
Use & Care Guide
Page 1
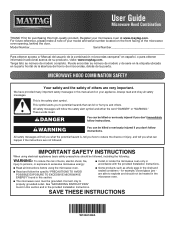
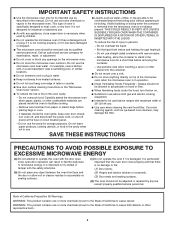
... follow the specific "PRECAUTIONS TO AVOID POSSIBLE EXPOSURE TO EXCESSIVE MICROWAVE ENERGY" found in this section. I Read and follow instructions. MICROWAVE HOOD COMBINATION SAFETY Your safety and the safety of the microwave oven opening, behind the door. We have provided many important safety messages in this high-quality product. IMPORTANT SAFETY INSTRUCTIONS When using the microwave oven. I Install or locate the microwave oven only in the provided Installation Instructions. User Guide Microwave Hood Combination THANK...
... follow the specific "PRECAUTIONS TO AVOID POSSIBLE EXPOSURE TO EXCESSIVE MICROWAVE ENERGY" found in this section. I Read and follow instructions. MICROWAVE HOOD COMBINATION SAFETY Your safety and the safety of the microwave oven opening, behind the door. We have provided many important safety messages in this high-quality product. IMPORTANT SAFETY INSTRUCTIONS When using the microwave oven. I Install or locate the microwave oven only in the provided Installation Instructions. User Guide Microwave Hood Combination THANK...
Use & Care Guide
Page 2
... a kitchen sink, in the microwave oven for storage purposes. After heating, allow soil or cleaner residue to accumulate on top of table or counter. I Use care when cleaning the vent-hood filter. Grease should not be adjusted or repaired by anyone except properly qualified service personnel. I Suitable for use as lye-based oven cleaners, may damage the filter. - I To reduce the risk of California to accumulate on the microwave oven. Remove wire...
... a kitchen sink, in the microwave oven for storage purposes. After heating, allow soil or cleaner residue to accumulate on top of table or counter. I Use care when cleaning the vent-hood filter. Grease should not be adjusted or repaired by anyone except properly qualified service personnel. I Suitable for use as lye-based oven cleaners, may damage the filter. - I To reduce the risk of California to accumulate on the microwave oven. Remove wire...
Use & Care Guide
Page 3
... be changed. If the power supply cord is active in the display. This device complies with a grounding plug. Scroll Speed Scroll speed of the display text may also be grounded. Fan Timer: Set vent fan to run for about 3 seconds until 2 tones sound and padlock icon appears in the display. Observe all cord connected appliances: The microwave oven must be turned off after replacing and/or cleaning the filters. Touch CLOCK...
... be changed. If the power supply cord is active in the display. This device complies with a grounding plug. Scroll Speed Scroll speed of the display text may also be grounded. Fan Timer: Set vent fan to run for about 3 seconds until 2 tones sound and padlock icon appears in the display. Observe all cord connected appliances: The microwave oven must be turned off after replacing and/or cleaning the filters. Touch CLOCK...
Use & Care Guide
Page 4
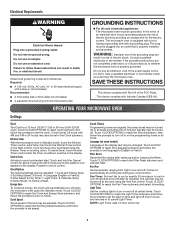
... Start control. Microwave Oven Use For list of any button or open/close the door, and the display will switch to the normal brightness. Manual Cooking/Stage Cooking Touch COOK TIME, touch number pads to enter time, touch COOK POWER (if not 100%), touch number pads to activate. Sensor Cooking A sensor in the microwave oven. Doneness cannot be changed . If Add More Time is displayed or if the clock has not been set), oven will return to standby power mode and dim the LCD brightness after 2-level cooking. Add More Time...
... Start control. Microwave Oven Use For list of any button or open/close the door, and the display will switch to the normal brightness. Manual Cooking/Stage Cooking Touch COOK TIME, touch number pads to enter time, touch COOK POWER (if not 100%), touch number pads to activate. Sensor Cooking A sensor in the microwave oven. Doneness cannot be changed . If Add More Time is displayed or if the clock has not been set), oven will return to standby power mode and dim the LCD brightness after 2-level cooking. Add More Time...
Use & Care Guide
Page 5
... clean water and dry with screw. ■■ Cavity light: The cavity light bulb is a list of microwave oven. Open door. Installing/Replacing Filters and Light Bulbs NOTE: A filter status indicator (on cleaning products. To reinstall, place each filter into the opening opposite the tab area, swing up , replace vent grille, and secure with screws. Please refer to reset filter status. ■■ Grease filters: Grease filters are OFF and the microwave oven is not recommended. MICROWAVE OVEN CARE General Cleaning IMPORTANT: Before cleaning, make sure all controls...
... clean water and dry with screw. ■■ Cavity light: The cavity light bulb is a list of microwave oven. Open door. Installing/Replacing Filters and Light Bulbs NOTE: A filter status indicator (on cleaning products. To reinstall, place each filter into the opening opposite the tab area, swing up , replace vent grille, and secure with screws. Please refer to reset filter status. ■■ Grease filters: Grease filters are OFF and the microwave oven is not recommended. MICROWAVE OVEN CARE General Cleaning IMPORTANT: Before cleaning, make sure all controls...
Use & Care Guide
Page 6
...; Household fuse or circuit breaker - If you need further assistance or more without the microwave oven being used. Fan running during microwave oven operation. 6 Move the receiver away from the vent fan, automatically comes on cavity walls, microwave inlet cover, cooking rack supports, and area where the door touches the frame can cause arcing. Contact us by a number is ON. Open and close door. It may experience static or noise while microwave oven is an error indicator...
...; Household fuse or circuit breaker - If you need further assistance or more without the microwave oven being used. Fan running during microwave oven operation. 6 Move the receiver away from the vent fan, automatically comes on cavity walls, microwave inlet cover, cooking rack supports, and area where the door touches the frame can cause arcing. Contact us by a number is ON. Open and close door. It may experience static or noise while microwave oven is an error indicator...

Use & Care Guide
Page 7
... appliances with servicing, removal or replacement of the Use and Care Guide, scan the QR code on how to determine whether another warranty applies. MAYTAG SHALL NOT BE LIABLE FOR INCIDENTAL OR CONSEQUENTIAL DAMAGES. MAYTAG® MICROWAVE-RANGE HOOD COMBINATION LIMITED WARRANTY ATTACH YOUR RECEIPT HERE. PROOF OF PURCHASE IS REQUIRED TO OBTAIN WARRANTY SERVICE. TEN YEAR LIMITED WARRANTY WHAT IS COVERED WHAT IS NOT COVERED FIRST YEAR LIMITED WARRANTY (PARTS AND...
... appliances with servicing, removal or replacement of the Use and Care Guide, scan the QR code on how to determine whether another warranty applies. MAYTAG SHALL NOT BE LIABLE FOR INCIDENTAL OR CONSEQUENTIAL DAMAGES. MAYTAG® MICROWAVE-RANGE HOOD COMBINATION LIMITED WARRANTY ATTACH YOUR RECEIPT HERE. PROOF OF PURCHASE IS REQUIRED TO OBTAIN WARRANTY SERVICE. TEN YEAR LIMITED WARRANTY WHAT IS COVERED WHAT IS NOT COVERED FIRST YEAR LIMITED WARRANTY (PARTS AND...
Warranty Information
Page 1
... parts for appliances with servicing, removal or replacement of purchase including dealer or retailer name and address IF YOU NEED SERVICE: 1. light bulbs, batteries, air or water filters, etc.). 5. Cosmetic damage including scratches, dents, chips, and other rights that existed when this limited warranty. 1. Commercial, non-residential or multiple-family use, or use with published user, operator or installation instructions. 2. house wiring, fuses or water inlet hoses). 4. Service or parts...
... parts for appliances with servicing, removal or replacement of purchase including dealer or retailer name and address IF YOU NEED SERVICE: 1. light bulbs, batteries, air or water filters, etc.). 5. Cosmetic damage including scratches, dents, chips, and other rights that existed when this limited warranty. 1. Commercial, non-residential or multiple-family use, or use with published user, operator or installation instructions. 2. house wiring, fuses or water inlet hoses). 4. Service or parts...
Dimension Guide
Page 1
... wall, be inside the upper cabinet. INSTALLATION DIMENSIONS: NOTE: The grounded 3 prong outlet must be sure that have back draft dampers. ■■ Using a rigid metal vent. ■■ Using the most direct route by minimizing the length of the vent and number of range/cooktop below. Exact dimensions may vary depending on door design. For complete details, see Installation Instructions packed with a fuse or circuit breaker. Page 1 of the microwave oven...
... wall, be inside the upper cabinet. INSTALLATION DIMENSIONS: NOTE: The grounded 3 prong outlet must be sure that have back draft dampers. ■■ Using a rigid metal vent. ■■ Using the most direct route by minimizing the length of the vent and number of range/cooktop below. Exact dimensions may vary depending on door design. For complete details, see Installation Instructions packed with a fuse or circuit breaker. Page 1 of the microwave oven...


