Installation Instructions
Page 2
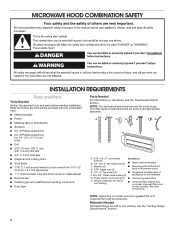
... the required tools and parts before starting installation. See the "Venting Design Specifications" section. 2 For other types of wall structures, be sure to back of microwave oven) E. 1/4" x 2" lag screws (2) ■■ Cardboard template (part of F. #6 x 3/8" Sheet metal screws (2) packaging) or wall template G. Materials Needed Standard fittings for wood studs. A B C D E FG H A. 3/16...
... the required tools and parts before starting installation. See the "Venting Design Specifications" section. 2 For other types of wall structures, be sure to back of microwave oven) E. 1/4" x 2" lag screws (2) ■■ Cardboard template (part of F. #6 x 3/8" Sheet metal screws (2) packaging) or wall template G. Materials Needed Standard fittings for wood studs. A B C D E FG H A. 3/16...
Installation Instructions
Page 3
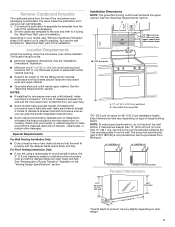
...template. 1. Location Requirements Check the opening . ■■ Support for 66" (167.6 cm) installation height. NOTES: ■■ If installing the microwave oven near a right side wall, make sure that the damper blade can be free of any obstructions so that the door can grab the handle.... Check with your model, skip "Remove Cardboard Template" steps if full carton box is at least 6" (15.2 cm) of clearance between wall and microwave oven so you are not designed to make sure there is used will be inside the perforation is perforated. A B 66" (167.6 cm) min....
...template. 1. Location Requirements Check the opening . ■■ Support for 66" (167.6 cm) installation height. NOTES: ■■ If installing the microwave oven near a right side wall, make sure that the damper blade can be free of any obstructions so that the door can grab the handle.... Check with your model, skip "Remove Cardboard Template" steps if full carton box is at least 6" (15.2 cm) of clearance between wall and microwave oven so you are not designed to make sure there is used will be inside the perforation is perforated. A B 66" (167.6 cm) min....
Installation Instructions
Page 4
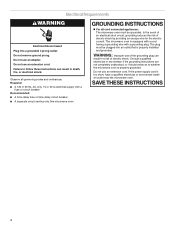
... or time-delay circuit breaker ■■ A separate circuit serving only this microwave oven GROUNDING INSTRUCTIONS For all governing codes and ordinances. Failure to whether the microwave oven is properly grounded. The microwave oven is too short, have a qualified electrician or serviceman install an outlet near... plug can result in a risk of electric shock by providing an escape wire for the electric current. Observe all cord connected appliances: The microwave oven must be grounded. Required: ■■ A 120 V, 60 Hz, AC only, 15 or 20 A electrical supply with a ...
... or time-delay circuit breaker ■■ A separate circuit serving only this microwave oven GROUNDING INSTRUCTIONS For all governing codes and ordinances. Failure to whether the microwave oven is properly grounded. The microwave oven is too short, have a qualified electrician or serviceman install an outlet near... plug can result in a risk of electric shock by providing an escape wire for the electric current. Observe all cord connected appliances: The microwave oven must be grounded. Required: ■■ A 120 V, 60 Hz, AC only, 15 or 20 A electrical supply with a ...
Installation Instructions
Page 5
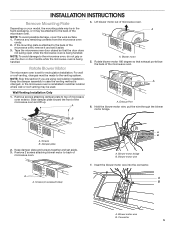
...Blower motor bridge B. Screws (in recessed holes) A B A. Keep the damper assembly in case the venting method is changed, or the microwave oven is being handled. Damper plate 2. Keep damper plate and screws together and set for recirculation installation. Blower motor wire B. Remove any ...remaining contents from the microwave oven cavity. 2. A A. NOTE: Skip this section if you are using recirculation installation. A A. Hold the blower motor wire, ...
...Blower motor bridge B. Screws (in recessed holes) A B A. Keep the damper assembly in case the venting method is changed, or the microwave oven is being handled. Damper plate 2. Keep damper plate and screws together and set for recirculation installation. Blower motor wire B. Remove any ...remaining contents from the microwave oven cavity. 2. A A. NOTE: Skip this section if you are using recirculation installation. A A. Hold the blower motor wire, ...
Installation Instructions
Page 6
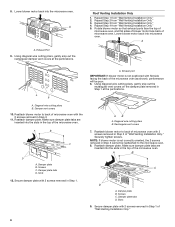
...inserted into the slots in Step 3 of "Wall Venting Installation Only." Slots 12. Reattach blower motor to back of microwave oven with 2 screws removed in the top of microwave oven with 2 screws removed in Step 3. 11. NOTE: If blower motor is not positioned with 2 screws removed ...vent covers at the perforations. Diagonal wire cutting pliers B. Reattach damper plate. Secure damper plate with flat side facing the back of microwave oven. Securely tighten screws. Damper vent covers 10. Using diagonal wire cutting pliers, gently snip out the rectangular vent covers on the...
...inserted into the slots in Step 3 of "Wall Venting Installation Only." Slots 12. Reattach blower motor to back of microwave oven with 2 screws removed in the top of microwave oven with 2 screws removed in Step 3. 11. NOTE: If blower motor is not positioned with 2 screws removed ...vent covers at the perforations. Diagonal wire cutting pliers B. Reattach damper plate. Secure damper plate with flat side facing the back of microwave oven. Securely tighten screws. Damper vent covers 10. Using diagonal wire cutting pliers, gently snip out the rectangular vent covers on the...

Installation Instructions
Page 7
... examples of each stud, and draw a plumb line down each stud center. See illustrations in "Possible Wall Stud Configurations." 1. Cabinet opening , do not install the microwave oven.
... examples of each stud, and draw a plumb line down each stud center. See illustrations in "Possible Wall Stud Configurations." 1. Cabinet opening , do not install the microwave oven.

Installation Instructions
Page 8
... cabinet and must be 141⁄8" (35.96 cm) from the bottom edge of the upper cabinet. 9. They must each other. Mark Rear Wall The microwave oven must be installed on a level line with each be on a minimum of 1 wall stud, preferably 2, using a minimum of 1 lag screw, preferably 2. 1. NOTES: ■■...
... cabinet and must be 141⁄8" (35.96 cm) from the bottom edge of the upper cabinet. 9. They must each other. Mark Rear Wall The microwave oven must be installed on a level line with each be on a minimum of 1 wall stud, preferably 2, using a minimum of 1 lag screw, preferably 2. 1. NOTES: ■■...
Installation Instructions
Page 10
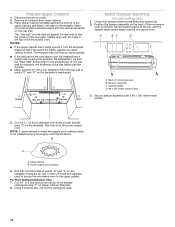
... upper cabinet. 3. Back of t he rear wall (for the power supply cord. Remove all contents from the rear wall to the thickest part of microwave oven B. NOTES: ■■ If the upper cabinet has a frame around the supply cord hole as shown. A B C D Upper-cabinet template... D 10" (25.4 cm) F E 10" G (25.4 cm) A. Damper assembly C. Drill 3/8" (10 mm) holes at one corner of the microwave oven. Cut 3/4" (1.9 cm) hole at points "D" and "E" on the rear wall. Secure damper assembly with the vertical centerline on the template. B A A. These are...
... upper cabinet. 3. Back of t he rear wall (for the power supply cord. Remove all contents from the rear wall to the thickest part of microwave oven B. NOTES: ■■ If the upper cabinet has a frame around the supply cord hole as shown. A B C D Upper-cabinet template... D 10" (25.4 cm) F E 10" G (25.4 cm) A. Damper assembly C. Drill 3/8" (10 mm) holes at one corner of the microwave oven. Cut 3/4" (1.9 cm) hole at points "D" and "E" on the rear wall. Secure damper assembly with the vertical centerline on the template. B A A. These are...

Installation Instructions
Page 11
...head bolt and place inside upper cabinet near the 3/8" (10 mm) holes. 3. Using 2 or more people, lift microwave oven off of the upper cabinet. With the microwave oven centered, and with at most hardware stores. ■■ Overtightening bolts may not have packing spacers, begin with ... do not grip or use the door or door handle while the microwave oven is required, rotate microwave oven downward. Handle the microwave oven gently. 1. NOTE: If venting through 6. 11. A 4. Install the Microwave Oven WARNING 5. Longer or shorter bolts are available at least one ...
...head bolt and place inside upper cabinet near the 3/8" (10 mm) holes. 3. Using 2 or more people, lift microwave oven off of the upper cabinet. With the microwave oven centered, and with at most hardware stores. ■■ Overtightening bolts may not have packing spacers, begin with ... do not grip or use the door or door handle while the microwave oven is required, rotate microwave oven downward. Handle the microwave oven gently. 1. NOTE: If venting through 6. 11. A 4. Install the Microwave Oven WARNING 5. Longer or shorter bolts are available at least one ...

Installation Instructions
Page 12
..., make sure the bolts thread in death, fire, or electrical shock. 2. Raised tabs B. Do not use an adapter. Check the operation of microwave oven by operating the vent fan. 5. Refer to damper assembly. Upper cabinet cutout E. Long tab F. Damper plate Electrical Shock Hazard Plug into grounded...9632;■ Check that the long tab of the damper assembly slides under vent) 12 Do not use an extension cord. A B A. If the microwave oven does not operate: ■■ Check that a household fuse has not blown, or that a circuit breaker has not tripped. Do not ...
..., make sure the bolts thread in death, fire, or electrical shock. 2. Raised tabs B. Do not use an adapter. Check the operation of microwave oven by operating the vent fan. 5. Refer to damper assembly. Upper cabinet cutout E. Long tab F. Damper plate Electrical Shock Hazard Plug into grounded...9632;■ Check that the long tab of the damper assembly slides under vent) 12 Do not use an extension cord. A B A. If the microwave oven does not operate: ■■ Check that a household fuse has not blown, or that a circuit breaker has not tripped. Do not ...
Installation Instructions
Page 13
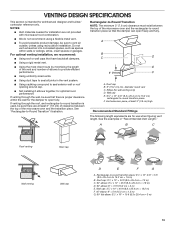
...9632;■ Using a rigid metal vent. ■■ Using the most direct route by minimizing the length of the vent and number of the microwave oven and the rectangular-to -round transition is used, be sure that the damper can open fully. diameter round vent C. Wall cap E. 31&#... venting through the wall, be sure there are at least 3" (7.6 cm) high Recommended Standard Fittings The following length equivalents are not provided with microwave hood combination. ■■ We do not recommend using a flexible metal vent. ■■ To avoid possible product damage, be sure to...
...9632;■ Using a rigid metal vent. ■■ Using the most direct route by minimizing the length of the vent and number of the microwave oven and the rectangular-to -round transition is used, be sure that the damper can open fully. diameter round vent C. Wall cap E. 31&#... venting through the wall, be sure there are at least 3" (7.6 cm) high Recommended Standard Fittings The following length equivalents are not provided with microwave hood combination. ■■ We do not recommend using a flexible metal vent. ■■ To avoid possible product damage, be sure to...
Installation Instructions
Page 14
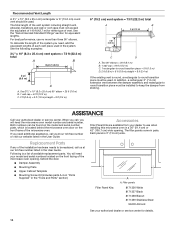
... the equivalent lengths of the installation hardware needs to round transition piece must not exceed the equivalent of the microwave oven. If you need additional assistance, call us at our toll-free number or visit our website listed in...12.2 m) C. 1 rectangular-to-round transition piece = 5 ft (1.5 m) D. 2 ft (0.6 m) + 6 ft (1.8 m) straight = 8 ft (2.4 m) If the existing vent is located behind the microwave oven door on the front facing of available replacement parts. Accessories Filler Panel Kits are available from sticking. Recommended Vent Length A 31⁄4" x 10" (8.3 x 25...
... the equivalent lengths of the installation hardware needs to round transition piece must not exceed the equivalent of the microwave oven. If you need additional assistance, call us at our toll-free number or visit our website listed in...12.2 m) C. 1 rectangular-to-round transition piece = 5 ft (1.5 m) D. 2 ft (0.6 m) + 6 ft (1.8 m) straight = 8 ft (2.4 m) If the existing vent is located behind the microwave oven door on the front facing of available replacement parts. Accessories Filler Panel Kits are available from sticking. Recommended Vent Length A 31⁄4" x 10" (8.3 x 25...


