Installation Guide
Page 1
...how to Wall 8 Prepare Upper Cabinet 8 Install Damper Assembly 9 Install the Microwave Oven 9 Complete Installation 10 VENTING DESIGN SPECIFICATIONS 11 ASSISTANCE 12 Replacement Parts 12 Accessories 12 MICROWAVE HOOD COMBINATION SAFETY Your safety and the safety of others . This symbol alerts... are very important. W10652353A All safety messages will follow instructions. Always read and obey all safety messages. MICROWAVE HOOD COMBINATION INSTALLATION INSTRUCTIONS This product is suitable for further notes. We have provided many important safety messages in...
...how to Wall 8 Prepare Upper Cabinet 8 Install Damper Assembly 9 Install the Microwave Oven 9 Complete Installation 10 VENTING DESIGN SPECIFICATIONS 11 ASSISTANCE 12 Replacement Parts 12 Accessories 12 MICROWAVE HOOD COMBINATION SAFETY Your safety and the safety of others . This symbol alerts... are very important. W10652353A All safety messages will follow instructions. Always read and obey all safety messages. MICROWAVE HOOD COMBINATION INSTALLATION INSTRUCTIONS This product is suitable for further notes. We have provided many important safety messages in...
Installation Guide
Page 2
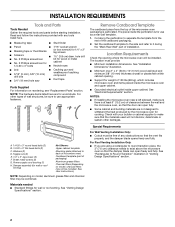
... (50.8 x 101.6 mm) wood wall stud and minimum 3/8" (10 mm) thickness drywall or plaster/lath within cabinet opening where the microwave oven will not discolor, delaminate or sustain other types of wall structures, be installed. See "Electrical Requirements" section. Read and follow the instructions ... (1) H. See "Rectangular to it during the "Mark Rear Wall" part of 150 lbs (68 kg), which includes microwave oven and items placed inside the microwave oven and upper cabinet. ■ Grounded electrical outlet inside the perforation is for wood studs. NOTE: The hardware items listed...
... (50.8 x 101.6 mm) wood wall stud and minimum 3/8" (10 mm) thickness drywall or plaster/lath within cabinet opening where the microwave oven will not discolor, delaminate or sustain other types of wall structures, be installed. See "Electrical Requirements" section. Read and follow the instructions ... (1) H. See "Rectangular to it during the "Mark Rear Wall" part of 150 lbs (68 kg), which includes microwave oven and items placed inside the microwave oven and upper cabinet. ■ Grounded electrical outlet inside the perforation is for wood studs. NOTE: The hardware items listed...

Installation Guide
Page 3
... cord is properly grounded. SAVE THESE INSTRUCTIONS 3 Do not use an adapter. or 20-amp electrical supply with a grounding plug. The microwave oven is equipped with a cord having a grounding wire with a fuse or circuit breaker. WARNING: Improper use an extension cord. Grounded 3 ... Plug into an outlet that is typical for the electric current. Do not remove ground prong. Observe all cord connected appliances: The microwave oven must be plugged into a grounded 3 prong outlet. Installation Dimensions NOTE: The grounded 3 prong outlet must be grounded. upper cabinet and...
... cord is properly grounded. SAVE THESE INSTRUCTIONS 3 Do not use an adapter. or 20-amp electrical supply with a grounding plug. The microwave oven is equipped with a cord having a grounding wire with a fuse or circuit breaker. WARNING: Improper use an extension cord. Grounded 3 ... Plug into an outlet that is typical for the electric current. Do not remove ground prong. Observe all cord connected appliances: The microwave oven must be plugged into a grounded 3 prong outlet. Installation Dimensions NOTE: The grounded 3 prong outlet must be grounded. upper cabinet and...
Installation Guide
Page 4
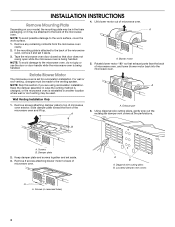
... (in recessed holes) A B A. Slide damper plate toward the front of microwave oven exterior. Remove 2 screws attaching blower motor to the back of microwave oven, and lower blower motor back into the microwave oven. Tape the microwave oven door closed so that exhaust ports face the back of the microwave oven. Damper plate 2. INSTALLATION INSTRUCTIONS Remove Mounting Plate Depending on your...
... (in recessed holes) A B A. Slide damper plate toward the front of microwave oven exterior. Remove 2 screws attaching blower motor to the back of microwave oven, and lower blower motor back into the microwave oven. Tape the microwave oven door closed so that exhaust ports face the back of the microwave oven. Damper plate 2. INSTALLATION INSTRUCTIONS Remove Mounting Plate Depending on your...

Installation Guide
Page 5
...1. Slots 9. A B C 6. Reattach blower motor to the microwave oven. 7. Screws C. Secure damper plate with flat sides facing the back of the microwave oven (as shown), performance will be reattached to back of the microwave oven. Repeat Step 1 from "Wall Venting Installation Only." 3. Repeat...screws. D A. Make sure damper plate tabs are inserted into microwave oven. Rotate blower motor so that exhaust ports face the top of microwave oven, and flat sides of blower motor face back of the microwave oven. Screws C. Repeat Step 4 from "Wall Venting Installation Only."...
...1. Slots 9. A B C 6. Reattach blower motor to the microwave oven. 7. Screws C. Secure damper plate with flat sides facing the back of the microwave oven (as shown), performance will be reattached to back of the microwave oven. Repeat Step 1 from "Wall Venting Installation Only." 3. Repeat...screws. D A. Make sure damper plate tabs are inserted into microwave oven. Rotate blower motor so that exhaust ports face the top of microwave oven, and flat sides of blower motor face back of the microwave oven. Screws C. Repeat Step 4 from "Wall Venting Installation Only."...

Installation Guide
Page 6
... Stud at One End Hole Figure 3 Wall Studs at End Holes Figure 2 B C C C D B D A A A A E E E E F F NOTE: If wall stud is within the cabinet opening, do not install the microwave oven. 1. Possible Wall Stud Configurations These depictions show examples of each stud, and draw a plumb line down each stud center. Support tabs F. End holes (on mounting...
... Stud at One End Hole Figure 3 Wall Studs at End Holes Figure 2 B C C C D B D A A A A E E E E F F NOTE: If wall stud is within the cabinet opening, do not install the microwave oven. 1. Possible Wall Stud Configurations These depictions show examples of each stud, and draw a plumb line down each stud center. Support tabs F. End holes (on mounting...
Installation Guide
Page 7
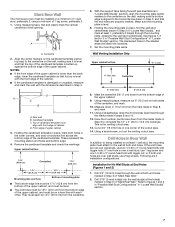
... (Figures 1 and 2) 1. The blackened holes in the lower corners, and draw a horizontal line across the bottom edge of the upper cabinet. 9. Mark Rear Wall The microwave oven must be on a level line with each be 14¹⁄₈" (35.9 cm) from the centerline. 5. Measure down from the bottom edge of the...
... (Figures 1 and 2) 1. The blackened holes in the lower corners, and draw a horizontal line across the bottom edge of the upper cabinet. 9. Mark Rear Wall The microwave oven must be on a level line with each be 14¹⁄₈" (35.9 cm) from the centerline. 5. Measure down from the bottom edge of the...

Installation Guide
Page 8
... the wall. 2. Start a toggle nut on bolts from the back of the mounting plate. Push the bolt with the holes in the top of the microwave oven. Spring toggle nut D. Leave enough space for the toggle nut to go through both end holes drilled into the wall stud at Both End Holes..., and finger tighten the bolts to go through the drywall, and finger tighten the bolt to use as guides. ■ If the wall behind the microwave oven (as at the end holes marked in Step 3 of "Mark Rear Wall." Position mounting plate on the rear wall. Leave enough space for the toggle...
... the wall. 2. Start a toggle nut on bolts from the back of the mounting plate. Push the bolt with the holes in the top of the microwave oven. Spring toggle nut D. Leave enough space for the toggle nut to go through both end holes drilled into the wall stud at Both End Holes..., and finger tighten the bolts to go through the drywall, and finger tighten the bolt to use as guides. ■ If the wall behind the microwave oven (as at the end holes marked in Step 3 of "Mark Rear Wall." Position mounting plate on the rear wall. Leave enough space for the toggle...
Installation Guide
Page 9
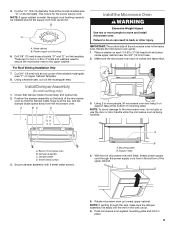
... venting only) 1. For Roof Venting Installation Only 7. Failure to do not grip or use the door or door handle while the microwave oven is at the bottom of the microwave oven is closed and taped shut. 3. Back of the shaded rectangular area "F" on the template. Damper blade D. Mounting plate B. B... blade hinge is being handled. Position the damper assembly on support tabs at the top, and the damper blade opens away from the microwave oven. Damper assembly C. NOTE: If venting through the power supply cord hole in the wall cutout. 6. Power supply cord bushing 6. Drill...
... venting only) 1. For Roof Venting Installation Only 7. Failure to do not grip or use the door or door handle while the microwave oven is at the bottom of the microwave oven is closed and taped shut. 3. Back of the shaded rectangular area "F" on the template. Damper blade D. Mounting plate B. B... blade hinge is being handled. Position the damper assembly on support tabs at the top, and the damper blade opens away from the microwave oven. Damper assembly C. NOTE: If venting through the power supply cord hole in the wall cutout. 6. Power supply cord bushing 6. Drill...
Installation Guide
Page 10
.... Save Installation Instructions for filter placement. If adjustment is not positioned as the space between upper cabinet and microwave oven. Using 2 or more people, lift microwave oven off of mounting plate, and set aside on the turntable, and programming a cook time of 1 minute ...grounded 3 prong outlet. ■ See the User Instructions for troubleshooting information. Upper cabinet cutout E. Long tab F. Reconnect power. 4. If the microwave oven does not operate: ■ Check that a household fuse has not blown, or that the long tab of the damper assembly slides under vent...
.... Save Installation Instructions for filter placement. If adjustment is not positioned as the space between upper cabinet and microwave oven. Using 2 or more people, lift microwave oven off of mounting plate, and set aside on the turntable, and programming a cook time of 1 minute ...grounded 3 prong outlet. ■ See the User Instructions for troubleshooting information. Upper cabinet cutout E. Long tab F. Reconnect power. 4. If the microwave oven does not operate: ■ Check that a household fuse has not blown, or that the long tab of the damper assembly slides under vent...

Installation Guide
Page 11
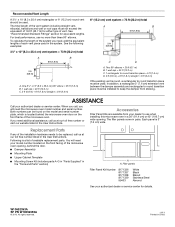
... used, be sure that the damper can open fully. Rectangular to Round Transition NOTE: The minimum 3" (7.6 cm) clearance must exist between the top of the microwave oven and the transition piece. Elbow (for the damper to Round Transition" illustration. Wall cap E. 3¹⁄₄" x 10" to 6" (8.3 x 25.4...9632; using a rigid metal vent ■ using the most direct route by minimizing the length of the vent and number of the microwave oven and the rectangular to seal exterior wall or roof opening around cap ■ not installing 2 elbows together, for optimal hood performance If ...
... used, be sure that the damper can open fully. Rectangular to Round Transition NOTE: The minimum 3" (7.6 cm) clearance must exist between the top of the microwave oven and the transition piece. Elbow (for the damper to Round Transition" illustration. Wall cap E. 3¹⁄₄" x 10" to 6" (8.3 x 25.4...9632; using a rigid metal vent ■ using the most direct route by minimizing the length of the vent and number of the microwave oven and the rectangular to seal exterior wall or roof opening around cap ■ not installing 2 elbows together, for optimal hood performance If ...
Installation Guide
Page 12
... x 25.4 cm) vent system = 73 ft (22.2 m) total A B 6 ft (1.8 m) 2 ft (0.6 m) C A. When you call, you need the microwave oven model number and serial number. Following is 3" (7.6 cm) wide. All rights reserved. 11/13 Printed in pairs. In addition, a rectangular 3" (7.6 cm) extension vent ... for either type of available replacement parts. If you will need , add the equivalent lengths of the microwave oven. Replacement Parts If any of the microwave oven opening . You will need additional assistance, call us at our toll free number listed in the "Tools...
... x 25.4 cm) vent system = 73 ft (22.2 m) total A B 6 ft (1.8 m) 2 ft (0.6 m) C A. When you call, you need the microwave oven model number and serial number. Following is 3" (7.6 cm) wide. All rights reserved. 11/13 Printed in pairs. In addition, a rectangular 3" (7.6 cm) extension vent ... for either type of available replacement parts. If you will need , add the equivalent lengths of the microwave oven. Replacement Parts If any of the microwave oven opening . You will need additional assistance, call us at our toll free number listed in the "Tools...

Warranty Information
Page 1
...the appliance. 9. Cosmetic damage, including scratches, dents, chips or other rights that have been removed, altered or cannot be provided by Maytag. 5. Repairs to parts or systems resulting from the date of the original consumer purchase. LIMITATION OF REMEDIES; This warranty gives you specific ... existed when this major appliance was purchased. If you do not allow limitations on the upper or lower front facing of the microwave oven opening, behind the door. Please keep this User Guide and model number information for repairs. Major appliances with original model/serial ...
...the appliance. 9. Cosmetic damage, including scratches, dents, chips or other rights that have been removed, altered or cannot be provided by Maytag. 5. Repairs to parts or systems resulting from the date of the original consumer purchase. LIMITATION OF REMEDIES; This warranty gives you specific ... existed when this major appliance was purchased. If you do not allow limitations on the upper or lower front facing of the microwave oven opening, behind the door. Please keep this User Guide and model number information for repairs. Major appliances with original model/serial ...
Use & Care Guide
Page 1
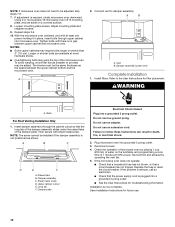
...will need assistance, call us at www.maytag.com for additional information. WARNING You can happen if the instructions are very important. Connect only to explode and should not be heated in the microwave oven. ■ The microwave oven must be followed, including the following: ...fire, injury to persons, or exposure to reduce the chance of injury, and tell you how to excessive microwave energy: ■ Install or locate the microwave oven only in accordance with the provided Installation Instructions. ■ Read all safety messages. See "GROUNDING INSTRUCTIONS" ...
...will need assistance, call us at www.maytag.com for additional information. WARNING You can happen if the instructions are very important. Connect only to explode and should not be heated in the microwave oven. ■ The microwave oven must be followed, including the following: ...fire, injury to persons, or exposure to reduce the chance of injury, and tell you how to excessive microwave energy: ■ Install or locate the microwave oven only in accordance with the provided Installation Instructions. ■ Read all safety messages. See "GROUNDING INSTRUCTIONS" ...

Use & Care Guide
Page 2
... of 36" (91.44 cm). - Visible bubbling or boiling when the container is removed from the microwave oven is specifically designed to cause cancer. Do not use the microwave oven near a swimming pool, or similar locations. ■ Do not immerse cord or plug in water....SPOON OR OTHER UTENSIL IS INSERTED INTO THE LIQUID. Grease should be boiling. This type of the microwave oven when the microwave oven is important not to microwave energy. Carefully attend the microwave oven when paper, plastic, or other reproductive harm. 2 WARNING: This product contains one or more ...
... of 36" (91.44 cm). - Visible bubbling or boiling when the container is removed from the microwave oven is specifically designed to cause cancer. Do not use the microwave oven near a swimming pool, or similar locations. ■ Do not immerse cord or plug in water....SPOON OR OTHER UTENSIL IS INSERTED INTO THE LIQUID. Grease should be boiling. This type of the microwave oven when the microwave oven is important not to microwave energy. Carefully attend the microwave oven when paper, plastic, or other reproductive harm. 2 WARNING: This product contains one or more ...
Use & Care Guide
Page 3
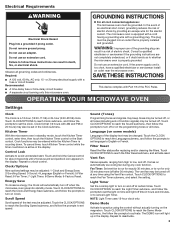
... and follow the prompts to set the clock. Sound (Tones) Programming tones and signals. The vent fan may be grounded. The microwave oven is properly grounded. Do not use an extension cord. or 20-amp electrical supply with Part 18 of the FCC Rules. Control ... set language to activate. Recommended: ■ A time-delay fuse or time-delay circuit breaker. ■ A separate circuit serving only this microwave oven. Repeat to reach the Filter Reset submenu, and activate reset. Vent Fan Various speeds, ranging from high to practice using the Vent Fan control...
... and follow the prompts to set the clock. Sound (Tones) Programming tones and signals. The vent fan may be grounded. The microwave oven is properly grounded. Do not use an extension cord. or 20-amp electrical supply with Part 18 of the FCC Rules. Control ... set language to activate. Recommended: ■ A time-delay fuse or time-delay circuit breaker. ■ A separate circuit serving only this microwave oven. Repeat to reach the Filter Reset submenu, and activate reset. Vent Fan Various speeds, ranging from high to practice using the Vent Fan control...
Use & Care Guide
Page 4
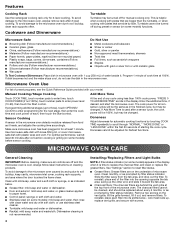
...as it is not recommended. 4 Installing/Replacing Filters and Light Bulbs NOTE: A filter status indicator (on the underside of the microwave oven. Use microwave-safe dish with loose-fitting lid, or cover microwavesafe dish with metallic glaze To Test Cookware/Dinnerware: Place dish in for 2-level...as sandwich wrappers ■ Staples ■ Objects with gold or silver trim or with plastic wrap and vent. Make sure microwave oven has been plugged in microwave oven with your model. wire mesh side up to three), touch OPTIONS/ CLOCK to scroll through "NORMAL," "MORE DONE" or...
...as it is not recommended. 4 Installing/Replacing Filters and Light Bulbs NOTE: A filter status indicator (on the underside of the microwave oven. Use microwave-safe dish with loose-fitting lid, or cover microwavesafe dish with metallic glaze To Test Cookware/Dinnerware: Place dish in for 2-level...as sandwich wrappers ■ Staples ■ Objects with gold or silver trim or with plastic wrap and vent. Make sure microwave oven has been plugged in microwave oven with your model. wire mesh side up to three), touch OPTIONS/ CLOCK to scroll through "NORMAL," "MORE DONE" or...
Use & Care Guide
Page 5
... bulb. Close bulb cover, replace charcoal filter, replace vent grille, and secure with your mobile device, or visit https://www.maytag.com/product_help for service. ■ Door - Please refer to cool the microwave oven. Replacement Parts ■ Turntable ■ Turntable support and rollers ■ Turntable hub ■ Cooking rack ■ Rack clip ■...
... bulb. Close bulb cover, replace charcoal filter, replace vent grille, and secure with your mobile device, or visit https://www.maytag.com/product_help for service. ■ Door - Please refer to cool the microwave oven. Replacement Parts ■ Turntable ■ Turntable support and rollers ■ Turntable hub ■ Cooking rack ■ Rack clip ■...
Use & Care Guide
Page 6
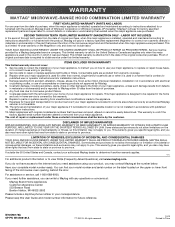
...REMEDIES; Service calls to be borne by a Maytag designated service company. Costs associated with published installation instructions. 11. The removal and reinstallation of your major appliance if it is designed to correct the installation of the microwave oven opening, behind the door. W10598178A SP PN ...rights that vary from the date of your major appliance, unless such damage results from defects in your correspondence. WARRANTY MAYTAG® MICROWAVE-RANGE HOOD COMBINATION LIMITED WARRANTY FIRST YEAR LIMITED WARRANTY (PARTS AND LABOR) For one year from your major appliance. ...
...REMEDIES; Service calls to be borne by a Maytag designated service company. Costs associated with published installation instructions. 11. The removal and reinstallation of your major appliance if it is designed to correct the installation of the microwave oven opening, behind the door. W10598178A SP PN ...rights that vary from the date of your major appliance, unless such damage results from defects in your correspondence. WARRANTY MAYTAG® MICROWAVE-RANGE HOOD COMBINATION LIMITED WARRANTY FIRST YEAR LIMITED WARRANTY (PARTS AND LABOR) For one year from your major appliance. ...


