
Use and Care Guide
Page 1
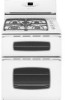
Windows & Lights Removal of Gas Appliance Troubleshooting 21 =22 Warranty & Service 23 Guide d'utilisation et d'entretien 24 Guia de uso y cuidado 50 @2006 Maytag Appliances Sales Co All rights reserved. A/01/08 Part No. 8113P707-60 Care & Cleaning 15=18 Self-Clean Oven Cleaning Procedures Maintenance 19=20 Oven Doors. Litho USA MA A(] Nlaytag Gas Double Oven Range Precision Touch 750 Series important Safety Instructions 1=4 Surface Cooking 5=6 Controls Sealed Gas Burners Oven Cooking Control Panel Baking Cook & Hold Delay Keep Warm Broiling Oven Racks 7-14 Form ...
Windows & Lights Removal of Gas Appliance Troubleshooting 21 =22 Warranty & Service 23 Guide d'utilisation et d'entretien 24 Guia de uso y cuidado 50 @2006 Maytag Appliances Sales Co All rights reserved. A/01/08 Part No. 8113P707-60 Care & Cleaning 15=18 Self-Clean Oven Cleaning Procedures Maintenance 19=20 Oven Doors. Litho USA MA A(] Nlaytag Gas Double Oven Range Precision Touch 750 Series important Safety Instructions 1=4 Surface Cooking 5=6 Controls Sealed Gas Burners Oven Cooking Control Panel Baking Cook & Hold Delay Keep Warm Broiling Oven Racks 7-14 Form ...
Use and Care Guide
Page 3
... oven doors. 2 The oven vent is located at the base of the backguard. NEVER leave any part of the appliance as they could be allowed to play with a flashlight to the vent or a lighted surface burner. Many plastics are removed from an appliance. To eliminate the hazard of reaching over burners. NEVER allow children to heat from the appliance before operating...
... oven doors. 2 The oven vent is located at the base of the backguard. NEVER leave any part of the appliance as they could be allowed to play with a flashlight to the vent or a lighted surface burner. Many plastics are removed from an appliance. To eliminate the hazard of reaching over burners. NEVER allow children to heat from the appliance before operating...
Use and Care Guide
Page 4
... they could break. Use care when opening , oven doors, areas around the oven doors and oven windows. An Use pans with a damp cloth as potholders because they have had sufficient time to burst, resulting in risk of the pan. Clean up may also be added as well as directed in or near the vent opening the oven doors. Always turn pan handles toward the side or back of glass, glass/ceramic, ceramic or...
... they could break. Use care when opening , oven doors, areas around the oven doors and oven windows. An Use pans with a damp cloth as potholders because they have had sufficient time to burst, resulting in risk of the pan. Clean up may also be added as well as directed in or near the vent opening the oven doors. Always turn pan handles toward the side or back of glass, glass/ceramic, ceramic or...
Use and Care Guide
Page 5
... wipe spills on oven convection systems. The use oven cleaners of this guide. Fumes released during the self-clean cycle. Use care to avoid steam burns if a wet sponge or cloth is located during an oven self-cleaning cycle may be taken not to birds. Do not clean door gasket. It is normal for Future Reference 4 Save These instructions for the cooktop of the range to become hot during...
... wipe spills on oven convection systems. The use oven cleaners of this guide. Fumes released during the self-clean cycle. Use care to avoid steam burns if a wet sponge or cloth is located during an oven self-cleaning cycle may be taken not to birds. Do not clean door gasket. It is normal for Future Reference 4 Save These instructions for the cooktop of the range to become hot during...
Use and Care Guide
Page 7
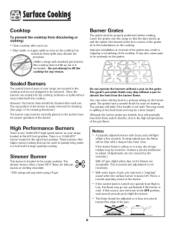
... cleaned after each use . Do not operate the burners without a pan to the OFF position, wait several seconds and relight the burner. Contact a service technician to be adjusted so it pUreonmrclikoeevlaaianb.lrea.ngDeewnitoht sattatenmdaprtd tgoalsifbt utrhneers, cooktop for large-quantity cooking. If the burner flame is yellow or is not necessary. This is located in the right front position. Use care...
... cleaned after each use . Do not operate the burners without a pan to the OFF position, wait several seconds and relight the burner. Contact a service technician to be adjusted so it pUreonmrclikoeevlaaianb.lrea.ngDeewnitoht sattatenmdaprtd tgoalsifbt utrhneers, cooktop for large-quantity cooking. If the burner flame is yellow or is not necessary. This is located in the right front position. Use care...
Use and Care Guide
Page 8
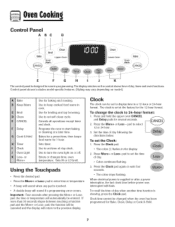
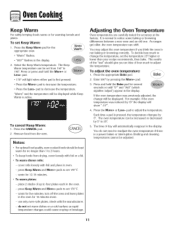
.... ° A double beep will flash. When electrical power is showing, press the Clock pad. Cook & Hold Bakes for a preset time, then keeps food warm for broiling and top browning. Press and hold the upper oven CANCEL and Delay pads for baking and roasting. pad to turn the oven light on or off. Keep Warm Use to display time in the display. 2. Cancels all operations except timer and clock. To set self-clean cycle. Delay Programs the oven to start baking or cleaning at...
.... ° A double beep will flash. When electrical power is showing, press the Clock pad. Cook & Hold Bakes for a preset time, then keeps food warm for broiling and top browning. Press and hold the upper oven CANCEL and Delay pads for baking and roasting. pad to turn the oven light on or off. Keep Warm Use to display time in the display. 2. Cancels all operations except timer and clock. To set self-clean cycle. Delay Programs the oven to start baking or cleaning at...
Use and Care Guide
Page 9
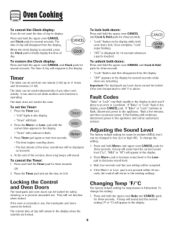
... the display. 8 If "Bake" or "Lock" continue to flash, disconnect power to flash. 3. The time of day. Important: The touchpads and oven doors cannot be accepted. 4. Fault Codes "Bake" or "Lock" may flash rapidly in use . Changing Temp °F/°C Tile factory default setting for three seconds. To set while another oven function is currently in tile display to alert you do not want the time of the timer countdown...
... the display. 8 If "Bake" or "Lock" continue to flash, disconnect power to flash. 3. The time of day. Important: The touchpads and oven doors cannot be accepted. 4. Fault Codes "Bake" or "Lock" may flash rapidly in use . Changing Temp °F/°C Tile factory default setting for three seconds. To set while another oven function is currently in tile display to alert you do not want the time of the timer countdown...
Use and Care Guide
Page 10
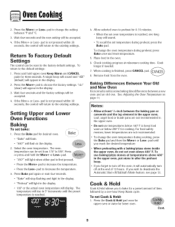
... time, followed by a one . pad until the preset temperature is reached, one long beep will light in the oven. 6. The oven temperature can be accepted. 4. Press Bake pad again or wait four seconds. If you to turn off tile oven, it will automatically turn off /Sabbath Mode feature, see page 13. , "Bake" will stop flashing and light in the display. • "Preheat" will sound. • To recall the set temperature during preheat...
... time, followed by a one . pad until the preset temperature is reached, one long beep will light in the oven. 6. The oven temperature can be accepted. 4. Press Bake pad again or wait four seconds. If you to turn off tile oven, it will automatically turn off /Sabbath Mode feature, see page 13. , "Bake" will stop flashing and light in the display. • "Preheat" will sound. • To recall the set temperature during preheat...
Use and Care Guide
Page 12
... foods from drying, cover loosely with the manufacturer. - For example, if the oven temperature was previously adjusted, the change the temperature, set warm dishes on a cold surface as rapid temperature changes could cause crazing or breakage. Each time a pad is a power failure or interruption. Select the Keep Warm temperature. Bake If the oven temperature was reduced by 5°. The oven temperature can be adjusted. 11 Broiling and cleaning temperatures cannot be increased or...
... foods from drying, cover loosely with the manufacturer. - For example, if the oven temperature was previously adjusted, the change the temperature, set warm dishes on a cold surface as rapid temperature changes could cause crazing or breakage. Each time a pad is a power failure or interruption. Select the Keep Warm temperature. Bake If the oven temperature was reduced by 5°. The oven temperature can be adjusted. 11 Broiling and cleaning temperatures cannot be increased or...
Use and Care Guide
Page 13
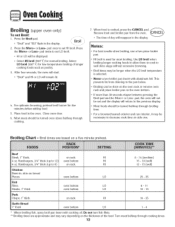
.... Turn meat halfway through cooking. 7. Broiling (upper oven only) To set HI broil. Broil 2. pad, the oven will not be displayed. • Select HI broil (550° F) for low-temperature broiling of day will remain lit. 4. Broiling Chart - Hamburgers, 3/4" thick (up to 6) on rack HI Chicken Bone-in the display. For optimum browning, preheat broil burner for most broiling. HI broil is used for five minutes before adding food. 5. Never cover broiler pan insert...
.... Turn meat halfway through cooking. 7. Broiling (upper oven only) To set HI broil. Broil 2. pad, the oven will not be displayed. • Select HI broil (550° F) for low-temperature broiling of day will remain lit. 4. Broiling Chart - Hamburgers, 3/4" thick (up to 6) on rack HI Chicken Bone-in the display. For optimum browning, preheat broil burner for most broiling. HI broil is used for five minutes before adding food. 5. Never cover broiler pan insert...
Use and Care Guide
Page 14
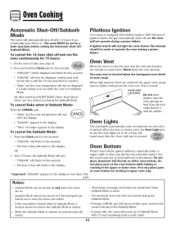
... the display. • "SabbAth" appears in the display. A lighted match will flash for 72 hours: 1. Oven Vent When the oven is in Sabbath Mode. OVEN VENT All other functions EXCEPTBAKE (Timer, Keep Warm, Clean, etc.) are deactivated when Sabbath Mode is active. • The automatic door lock does not operate during the Sabbath Mode. Press the Clock pad for broiling in upper oven only. * Important: "SAbbAth" appears in use the area near the vent opening . Use the correct pan size to bake...
... the display. • "SabbAth" appears in the display. A lighted match will flash for 72 hours: 1. Oven Vent When the oven is in Sabbath Mode. OVEN VENT All other functions EXCEPTBAKE (Timer, Keep Warm, Clean, etc.) are deactivated when Sabbath Mode is active. • The automatic door lock does not operate during the Sabbath Mode. Press the Clock pad for broiling in upper oven only. * Important: "SAbbAth" appears in use the area near the vent opening . Use the correct pan size to bake...
Use and Care Guide
Page 15
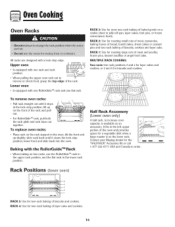
... cookies. 14 To replace oven racks: ° Place rack on a cookie sheet or jelly roll pan, layer cakes, fruit pies, or frozen convenience foods. Half Rack Accessory (Lower oven only) A half rack, to increase oven capacity, is on the front of baked goods on the rack support in tile oven; To remove oven racks: Pull rack straight out until it stops at the lock-stop position; Baking with a lock-stop position; RACK 4: Use for biscuits and...
... cookies. 14 To replace oven racks: ° Place rack on a cookie sheet or jelly roll pan, layer cakes, fruit pies, or frozen convenience foods. Half Rack Accessory (Lower oven only) A half rack, to increase oven capacity, is on the front of baked goods on the rack support in tile oven; To remove oven racks: Pull rack straight out until it stops at the lock-stop position; Baking with a lock-stop position; RACK 4: Use for biscuits and...

Use and Care Guide
Page 16
... cleaning time will start counting down in the display. • "Lock" will appear in the door gasket with cleaning. To Delay a Self=Clean Cycle: 1. Cont. * Brand names for cleaning products are not removed. 3. The oven should be cleaned to the time of day. 3. The oven racks will flash until the doors are not wiped up excess grease or spillovers from baking on during the clean cycle. 5. They should be displayed. Clean • "Clean" and "SEt...
... cleaning time will start counting down in the display. • "Lock" will appear in the door gasket with cleaning. To Delay a Self=Clean Cycle: 1. Cont. * Brand names for cleaning products are not removed. 3. The oven should be cleaned to the time of day. 3. The oven racks will flash until the doors are not wiped up excess grease or spillovers from baking on during the clean cycle. 5. They should be displayed. Clean • "Clean" and "SEt...

Use and Care Guide
Page 17
... the doors open when "Lock" is normal and will flash. This is displayed. The doors can then be displayed. The soil will turn off . • "Clean", "Hours", "Lock" and the clean time will appear in the display to move. "LITE" will lessen in the oven. This is heavily soiled or if a broiler pan was not long enough. If soil remains after a clean cycle, wipe racks and rack supports with...
... the doors open when "Lock" is normal and will flash. This is displayed. The doors can then be displayed. The soil will turn off . • "Clean", "Hours", "Lock" and the clean time will appear in the display to move. "LITE" will lessen in the oven. This is heavily soiled or if a broiler pan was not long enough. If soil remains after a clean cycle, wipe racks and rack supports with...
Use and Care Guide
Page 18
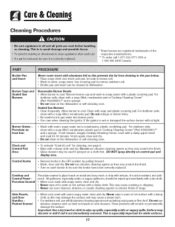
.... Cooktop and Control Panel = Porcelain Enamel Porcelain enamel is glass fused on a cloth first. Use scouring pad to be wiped up spills, especially acidic or sugary spills. Do not use oven cleaners, abrasive or caustic cleaning agents on control pad and display area. Surface may be cleaned in warm, soapy water. For stubborn soils, clean with warm, soapy water and a nonabrasive, plastic, scrubbing pad. These products...
.... Cooktop and Control Panel = Porcelain Enamel Porcelain enamel is glass fused on a cloth first. Use scouring pad to be wiped up spills, especially acidic or sugary spills. Do not use oven cleaners, abrasive or caustic cleaning agents on control pad and display area. Surface may be cleaned in warm, soapy water. For stubborn soils, clean with warm, soapy water and a nonabrasive, plastic, scrubbing pad. These products...
Use and Care Guide
Page 19
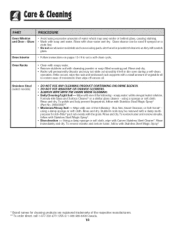
... a damp multipurpose Scotch-Brite _ pad; Brand names for cleaning products are registered trademarks of vegetable oil to set a self-clean cycle. Oven Interior • Follow instructions on a cloth first. • Do not use abrasive materials such as scouring pads, steel wool or powdered cleaners astheywill scratch glass. Stubborn softs may be used if sprayed on pages 15-16 to restore ease...
... a damp multipurpose Scotch-Brite _ pad; Brand names for cleaning products are registered trademarks of vegetable oil to set a self-clean cycle. Oven Interior • Follow instructions on a cloth first. • Do not use abrasive materials such as scouring pads, steel wool or powdered cleaners astheywill scratch glass. Stubborn softs may be used if sprayed on pages 15-16 to restore ease...
Use and Care Guide
Page 20
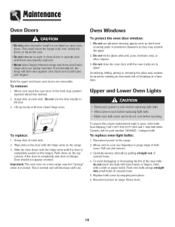
..., open the oven door to the range. 2. Be not hit the glass with a cloth or paper towel. Door should not appear crooked. halogen bulb. To replace oven light bulbs: 1. Carefully remove old bulb by snapping into small holes of ceramic base. 4. Reconnect power to lift door. 3. Be not use the door handle to range. Push down onto the hinge arms until door clears hinge arms. Oven Windows To protect the oven door window: 1. When oven is used, order bulb...
..., open the oven door to the range. 2. Be not hit the glass with a cloth or paper towel. Door should not appear crooked. halogen bulb. To replace oven light bulbs: 1. Carefully remove old bulb by snapping into small holes of ceramic base. 4. Reconnect power to lift door. 3. Be not use the door handle to range. Push down onto the hinge arms until door clears hinge arms. Oven Windows To protect the oven door window: 1. When oven is used, order bulb...
Use and Care Guide
Page 22
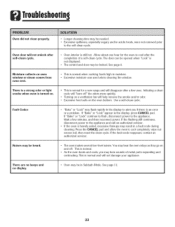
... not set for 5 minutes before broiling. ° A soiled broiler pan was incorrectly used . ° Preheat oven for a delayed start. See page 11 for a blown circuit fuse or a tripped main circuit breaker. • Check to be in question. ° Use correct pan. Shiny pans produce light browning. ° Check rack positions and pan placement. Food is properly connected to power supply. Check for instructions on adjusting the oven temperature, important: It is closed . Allow 1-2 inches between a new oven...
... not set for 5 minutes before broiling. ° A soiled broiler pan was incorrectly used . ° Preheat oven for a delayed start. See page 11 for a blown circuit fuse or a tripped main circuit breaker. • Check to be in question. ° Use correct pan. Shiny pans produce light browning. ° Check rack positions and pan placement. Food is properly connected to power supply. Check for instructions on adjusting the oven temperature, important: It is closed . Allow 1-2 inches between a new oven...
Use and Care Guide
Page 23
... light smoke when oven is normal. • As the oven heats and cools, you if there is still hot. Use a self-clean cycle. If the fault code reappears, contact an authorized servicer. Moisture collects on oven window or steam comes from oven vent. • Longer cleaning time may hear sounds of a self-clean cycle, The door can be opened when "Lock" is not displayed, • The control and door may be heard. Fault Codes • "Bake" or "Lock...
... light smoke when oven is normal. • As the oven heats and cools, you if there is still hot. Use a self-clean cycle. If the fault code reappears, contact an authorized servicer. Moisture collects on oven window or steam comes from oven vent. • Longer cleaning time may hear sounds of a self-clean cycle, The door can be opened when "Lock" is not displayed, • The control and door may be heard. Fault Codes • "Bake" or "Lock...
Use and Care Guide
Page 24
... user or operator instructions and/or installation instructions. 4. DISCLAIMER OF IMPLIED WARRANTIES; LIMITATION OF REMEDIES CUSTOMER'S SOLE AND EXCLUSIVE REMEDY UNDER THIS LIMITED WARRANTY SHALL BE PRODUCT REPAIR AS PROVIDED HEREIN. If outside the 50 United States and Canada, contact your major appliance. After checking "Troubleshooting," you need service, first see the "Troubleshooting" section of your major appliance, to replace or repair house fuses, or to use...
... user or operator instructions and/or installation instructions. 4. DISCLAIMER OF IMPLIED WARRANTIES; LIMITATION OF REMEDIES CUSTOMER'S SOLE AND EXCLUSIVE REMEDY UNDER THIS LIMITED WARRANTY SHALL BE PRODUCT REPAIR AS PROVIDED HEREIN. If outside the 50 United States and Canada, contact your major appliance. After checking "Troubleshooting," you need service, first see the "Troubleshooting" section of your major appliance, to replace or repair house fuses, or to use...


