
Use and Care Guide
Page 1
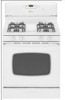
Maytag Electric Smoothtop Double Oven Range ® Precision Touch 750 Series Use and Care Guide Table of Contents Safety 1-3 Surface Cooking 4-7 Warming Center Controls Smoothtop Surface Oven Cooking 8-17 Control Panel ... Oven Doors and Windows Oven Lights Troubleshooting 24-25 Warranty & Service 27 Guide d'utilisation et d'entretien 28 Guía de Uso y Cuidado 56 ©2006 Maytag Appliances Sales Co.
Maytag Electric Smoothtop Double Oven Range ® Precision Touch 750 Series Use and Care Guide Table of Contents Safety 1-3 Surface Cooking 4-7 Warming Center Controls Smoothtop Surface Oven Cooking 8-17 Control Panel ... Oven Doors and Windows Oven Lights Troubleshooting 24-25 Warranty & Service 27 Guide d'utilisation et d'entretien 28 Guía de Uso y Cuidado 56 ©2006 Maytag Appliances Sales Co.
Use and Care Guide
Page 2
TTY for hearing or speech impaired) (Mon.-Fri., 8 am-8 pm Eastern Time) Internet: http://www.maytag.com In our continuing effort to improve the quality and performance of fire, electric shock, personal injury or damage to a qualified servicer. Important ... installed and grounded by closing the oven doors. Always disconnect power to avoid spreading the flame. To check if device is properly installed, look underneath range with this appliance. For service information, see page 27. Common sense, caution, and care must be exercised when installing, maintaining, or operating the appliance...
TTY for hearing or speech impaired) (Mon.-Fri., 8 am-8 pm Eastern Time) Internet: http://www.maytag.com In our continuing effort to improve the quality and performance of fire, electric shock, personal injury or damage to a qualified servicer. Important ... installed and grounded by closing the oven doors. Always disconnect power to avoid spreading the flame. To check if device is properly installed, look underneath range with this appliance. For service information, see page 27. Common sense, caution, and care must be exercised when installing, maintaining, or operating the appliance...

Use and Care Guide
Page 4
... the outdoors by properly venting the oven to birds. Child Safety CAUTION NEVER store items of hot grease. When ovens are cool. Ventilating Hoods Clean range hood and filters frequently to prevent grease or other flammable materials from the kitchen could be allowed to sit or stand on any part of...
... the outdoors by properly venting the oven to birds. Child Safety CAUTION NEVER store items of hot grease. When ovens are cool. Ventilating Hoods Clean range hood and filters frequently to prevent grease or other flammable materials from the kitchen could be allowed to sit or stand on any part of...

Use and Care Guide
Page 5
... off . • Clean up messy spills as soon as possible. CAUTION BEFORE COOKING • Always place a pan on the surface elements. To prevent damage to range, never operate surface unit without a pan in either direction to the desired heat setting. • The control panel is an element "ON" indicator light on...
... off . • Clean up messy spills as soon as possible. CAUTION BEFORE COOKING • Always place a pan on the surface elements. To prevent damage to range, never operate surface unit without a pan in either direction to the desired heat setting. • The control panel is an element "ON" indicator light on...
Use and Care Guide
Page 6
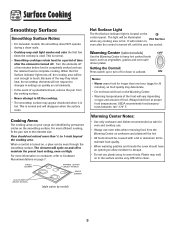
...smoothtop elements will not respond to clean. 5 For most efficient cooking, fit the pan size to 1-inch beyond the cooking area. Always hold food at proper food temperatures. Plastic may melt on , a glow... the elements off a few times the cooktop is used. For more than one hour (eggs for 30 minutes), as coil elements. • In the event of the food will vary depending on the..., even after the element is turned off to activate. Cooking Areas The cooking areas on your range are identified by model) Hot Surface Light The Hot Surface indicator light is located on High. ...
...smoothtop elements will not respond to clean. 5 For most efficient cooking, fit the pan size to 1-inch beyond the cooking area. Always hold food at proper food temperatures. Plastic may melt on , a glow... the elements off a few times the cooktop is used. For more than one hour (eggs for 30 minutes), as coil elements. • In the event of the food will vary depending on the..., even after the element is turned off to activate. Cooking Areas The cooking areas on your range are identified by model) Hot Surface Light The Hot Surface indicator light is located on High. ...
Use and Care Guide
Page 16
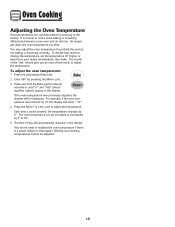
... the oven temperature was previously adjusted, the change the temperature, set the temperature 25° higher or lower than your recipe recommends, then bake. As ranges get older, the oven temperature can be adjusted. 15 Press and hold the Bake pad for accuracy at the factory. pad to adjust the temperature...
... the oven temperature was previously adjusted, the change the temperature, set the temperature 25° higher or lower than your recipe recommends, then bake. As ranges get older, the oven temperature can be adjusted. 15 Press and hold the Bake pad for accuracy at the factory. pad to adjust the temperature...
Use and Care Guide
Page 17
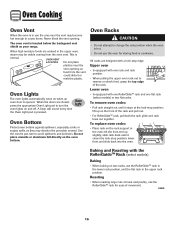
... is located below the backguard vent shield on when an oven door is opened. cont. 16 Oven Lights The oven lights automatically come on your range. lift up slightly; Oven Racks CAUTION • Do not attempt to avoid spillovers and boilovers. Do not place utensils or aluminum foil directly on the...
... is located below the backguard vent shield on when an oven door is opened. cont. 16 Oven Lights The oven lights automatically come on your range. lift up slightly; Oven Racks CAUTION • Do not attempt to avoid spillovers and boilovers. Do not place utensils or aluminum foil directly on the...
Use and Care Guide
Page 19
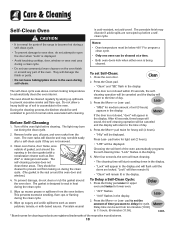
... displayed. If the door is displayed. Press the More+ or Less- Care & Cleaning Self-Clean Oven CAUTION • It is normal for parts of the range to become hot during a self-clean cycle. • To prevent damage to oven door, do not clean or rub the gasket around the opening in...
... displayed. If the door is displayed. Press the More+ or Less- Care & Cleaning Self-Clean Oven CAUTION • It is normal for parts of the range to become hot during a self-clean cycle. • To prevent damage to oven door, do not clean or rub the gasket around the opening in...
Use and Care Guide
Page 21
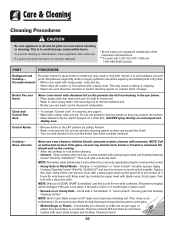
... after each element to 45 minutes (2-3 hours for daily cleaning as they may crack or chip with a damp paper towel and let stand 30 to be cleaned in dishwasher. Clean cooktop after each use abrasive cleaning agents as described above. NOTE: Only use oven cleaners, abrasive or caustic...)**. Do not use , or when needed, with soapy water, rinse and dry. • Never wipe off and all parts are registered trademarks of range. NOTE: Call an authorized servicer if the glass-ceramic top should crack, break or if metal or aluminum foil should be used . • Burned...
... after each element to 45 minutes (2-3 hours for daily cleaning as they may crack or chip with a damp paper towel and let stand 30 to be cleaned in dishwasher. Clean cooktop after each use abrasive cleaning agents as described above. NOTE: Only use oven cleaners, abrasive or caustic...)**. Do not use , or when needed, with soapy water, rinse and dry. • Never wipe off and all parts are registered trademarks of range. NOTE: Call an authorized servicer if the glass-ceramic top should crack, break or if metal or aluminum foil should be used . • Burned...

Use and Care Guide
Page 23
... on or stand on open the oven door to the broil stop position (opened about four inches). 2. If accidentally hit, the hinge will decrease with the hinge arms on the hinges. When...hinges. Grasp door at each side. Align slots in place. When oven is completely seated on the range. 3. Push new bulb prongs straight into place. 6. Reset clock. This could injure your fingers. ...acidic or sugary spills, as they may feel "spongy" when it is used, order bulb from Maytag. Do not hit the glass with a cloth or paper towel. Disconnect power to avoid spillovers and ...
... on or stand on open the oven door to the broil stop position (opened about four inches). 2. If accidentally hit, the hinge will decrease with the hinge arms on the hinges. When...hinges. Grasp door at each side. Align slots in place. When oven is completely seated on the range. 3. Push new bulb prongs straight into place. 6. Reset clock. This could injure your fingers. ...acidic or sugary spills, as they may feel "spongy" when it is used, order bulb from Maytag. Do not hit the glass with a cloth or paper towel. Disconnect power to avoid spillovers and ...

Use and Care Guide
Page 24
... accidentally tipping. To reset the circuit breaker, press the switch located on the lower left side of the range, until range is not level, turn the leveling legs, located at each corner of the backguard. Be sure appliance cords do not rest on , the cord and ...outlet will be leveled when installed. If the range is level. CIRCUIT BREAKER 23 If the surface element is located on the lower edge of the rear leveling legs to the floor. The convenience...
... accidentally tipping. To reset the circuit breaker, press the switch located on the lower left side of the range, until range is not level, turn the leveling legs, located at each corner of the backguard. Be sure appliance cords do not rest on , the cord and ...outlet will be leveled when installed. If the range is level. CIRCUIT BREAKER 23 If the surface element is located on the lower edge of the rear leveling legs to the floor. The convenience...
Use and Care Guide
Page 25
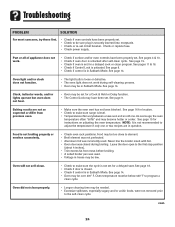
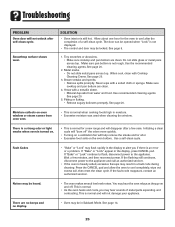
...Oven may be sure plug is in Sabbath Mode. Food is activated. Oven will not self-clean. • Check to the first stop position (about 4 inches). • Trim excess fat from previous oven. • Make sure the oven vent has not been blocked. Baking results are in Sabbath Mode. Never line... operate but oven does not heat. • Oven may become hotter or cooler. cont. 24 See page 14. Leave the door open to make sure range is in question. See page 9. • Check if control is level. • Temperatures often vary between a new oven and an old one or two...
...Oven may be sure plug is in Sabbath Mode. Food is activated. Oven will not self-clean. • Check to the first stop position (about 4 inches). • Trim excess fat from previous oven. • Make sure the oven vent has not been blocked. Baking results are in Sabbath Mode. Never line... operate but oven does not heat. • Oven may become hotter or cooler. cont. 24 See page 14. Leave the door open to make sure range is in question. See page 9. • Check if control is level. • Temperatures often vary between a new oven and an old one or two...
Use and Care Guide
Page 26
... oven bottom. Fault Codes • "Bake" or "Lock" may be locked. You may hear sounds of a self-clean cycle. Allow about one hour for a new range and will help remove the smoke and/or odor. • Excessive food soils on . • This is not rough. Smoothtop surface shows wear. See page...
... oven bottom. Fault Codes • "Bake" or "Lock" may be locked. You may hear sounds of a self-clean cycle. Allow about one hour for a new range and will help remove the smoke and/or odor. • Excessive food soils on . • This is not rough. Smoothtop surface shows wear. See page...


