Use and Care Guide
Page 1
... U.S.A . Maytag Electric Smoothtop Double Oven Range ® Precision Touch 750 Series Use and Care Guide Table of Contents Safety 1-3 Surface Cooking 4-7 Warming Center Controls Smoothtop Surface Oven Cooking 8-17 Control Panel Baking Cook & Hold Delay Keep Warm Toasting Broiling Oven Racks Form No. A/01/08 Part No. 8113P741-60 Care & Cleaning 18-21 Self-Clean Oven Cleaning Procedures Maintenance 22-23 Oven Doors and Windows Oven Lights Troubleshooting 24-25 Warranty & Service 27 Guide d'utilisation et d'entretien 28 Guía de Uso y Cuidado 56 ©2006 Maytag...
... U.S.A . Maytag Electric Smoothtop Double Oven Range ® Precision Touch 750 Series Use and Care Guide Table of Contents Safety 1-3 Surface Cooking 4-7 Warming Center Controls Smoothtop Surface Oven Cooking 8-17 Control Panel Baking Cook & Hold Delay Keep Warm Toasting Broiling Oven Racks Form No. A/01/08 Part No. 8113P741-60 Care & Cleaning 18-21 Self-Clean Oven Cleaning Procedures Maintenance 22-23 Oven Doors and Windows Oven Lights Troubleshooting 24-25 Warranty & Service 27 Guide d'utilisation et d'entretien 28 Guía de Uso y Cuidado 56 ©2006 Maytag...
Use and Care Guide
Page 2
... necessary to adjust, repair, service, or replace any part of the oven doors, the appliance must be exercised when installing, maintaining, or operating the appliance. Do not attempt to make sure one of door, and serious injuries. 1 The anti-tip device secures the rear leveling leg to smother fire or flame. NEVER pick up or move a flaming pan. • Ovens: Smother fire or flame by a qualified technician. Use baking soda, a dry...
... necessary to adjust, repair, service, or replace any part of the oven doors, the appliance must be exercised when installing, maintaining, or operating the appliance. Do not attempt to make sure one of door, and serious injuries. 1 The anti-tip device secures the rear leveling leg to smother fire or flame. NEVER pick up or move a flaming pan. • Ovens: Smother fire or flame by a qualified technician. Use baking soda, a dry...
Use and Care Guide
Page 3
..., result in risk of glass, glass-ceramic, ceramic, earthen- oven doors, areas around the doors and oven windows. Clean cooktop with different size surface ele- An unattended boilover could catch utensil handles or ignite temperature. NEVER use , do not adjust, service, repair or replace any devices or accesso- Clothing could cause smok- oven service without breaking due to warm or heat the room. This reduces the risk of burns, ignition of ovens until they are dark...
..., result in risk of glass, glass-ceramic, ceramic, earthen- oven doors, areas around the doors and oven windows. Clean cooktop with different size surface ele- An unattended boilover could catch utensil handles or ignite temperature. NEVER use , do not adjust, service, repair or replace any devices or accesso- Clothing could cause smok- oven service without breaking due to warm or heat the room. This reduces the risk of burns, ignition of ovens until they are dark...

Use and Care Guide
Page 4
... the self-clean cycle, there may become hot during an oven self-cleaning cycle may be allowed to move the gasket. Children should be some of this guide. Therefore, avoid touching the cooktop, door, window or oven vent during the self-clean cycle. When ovens are cool. Important Safety Instructions Deep Fat Fryers Use extreme caution when moving the grease pan or disposing of small children. Ovens Use care when opening...
... the self-clean cycle, there may become hot during an oven self-cleaning cycle may be allowed to move the gasket. Children should be some of this guide. Therefore, avoid touching the cooktop, door, window or oven vent during the self-clean cycle. When ovens are cool. Important Safety Instructions Deep Fat Fryers Use extreme caution when moving the grease pan or disposing of small children. Ovens Use care when opening...

Use and Care Guide
Page 5
... the right to change the size of the smoothtop. Remove pan. Turn control knob to OFF before you to use the small element. Low (2): Use to cook. Maintain fast boil for large amounts of liquids and for large amounts of liquids. After cooking, turn the knob in place. • NEVER use a high heat setting for deep fat frying or sauteing. Dual Elements (select models) The cooking surface has two dual elements located in closed containers...
... the right to change the size of the smoothtop. Remove pan. Turn control knob to OFF before you to use the small element. Low (2): Use to cook. Maintain fast boil for large amounts of liquids and for large amounts of liquids. After cooking, turn the knob in place. • NEVER use a high heat setting for deep fat frying or sauteing. Dual Elements (select models) The cooking surface has two dual elements located in closed containers...
Use and Care Guide
Page 6
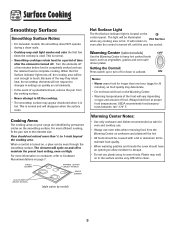
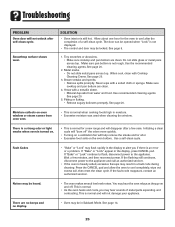
... area has cooled. Setting the Control: Press switch up to turn off a few times the cooktop is hot. USDA recommends food temperatures between 140°-170° F. Cooking Areas The cooking areas on your range are identified by model) Hot Surface Light The Hot Surface indicator light is completely cooked and use the retained heat to complete cooking. SINGLE ELEMENT WARMING CENTER (SELECT MODELS) SINGLE ELEMENT DUAL ELEMENT (SELECT MODELS) (style varies by permanent circles on the control panel. Warming Center Notes: •...
... area has cooled. Setting the Control: Press switch up to turn off a few times the cooktop is hot. USDA recommends food temperatures between 140°-170° F. Cooking Areas The cooking areas on your range are identified by model) Hot Surface Light The Hot Surface indicator light is completely cooked and use the retained heat to complete cooking. SINGLE ELEMENT WARMING CENTER (SELECT MODELS) SINGLE ELEMENT DUAL ELEMENT (SELECT MODELS) (style varies by permanent circles on the control panel. Warming Center Notes: •...
Use and Care Guide
Page 9
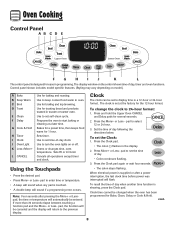
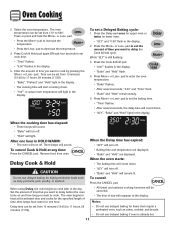
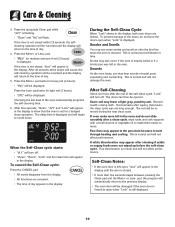
... oven. To set self-clean cycle. Press the Clock pad again or wait four seconds. • The colon stops flashing. Clock time cannot be canceled and the display will return to set at a later time. cont. 8 Control panel shown includes model specific features. (Styling may vary depending on or off. Use to turn the oven lights on model.) A Bake B Keep Warm C Broil D Toast E Clean F Delay G Cook & Hold H Timer I J K L The control panel is touched. • A double beep will sound if a programming error...
... oven. To set self-clean cycle. Press the Clock pad again or wait four seconds. • The colon stops flashing. Clock time cannot be canceled and the display will return to set at a later time. cont. 8 Control panel shown includes model specific features. (Styling may vary depending on or off. Use to turn the oven lights on model.) A Bake B Keep Warm C Broil D Toast E Clean F Delay G Cook & Hold H Timer I J K L The control panel is touched. • A double beep will sound if a programming error...
Use and Care Guide
Page 10
... to prevent unwanted use , the touchpads and doors cannot be set while another oven function is not pressed within 30 seconds, the control will disappear from one minute (1:00) up to display: Press and hold the Upper Oven CANCEL and Clock pads for temperature is currently in the display. 2. To set the Timer: 1. If "Bake" or "Lock" continue to flash, disconnect power to decrease sound level. 3. A beep will...
... to prevent unwanted use , the touchpads and doors cannot be set while another oven function is not pressed within 30 seconds, the control will disappear from one minute (1:00) up to display: Press and hold the Upper Oven CANCEL and Clock pads for temperature is currently in the display. 2. To set the Timer: 1. If "Bake" or "Lock" continue to flash, disconnect power to decrease sound level. 3. A beep will...
Use and Care Guide
Page 11
... preheat. • When the set oven temperature is reached, one long beep will sound. • To recall the set temperature during baking. The temperature will flash in the display. 3. See "Adjusting the Oven Temperature" on a cookie sheet to keep food warm or below 140° F to avoid overbrowning. • When preheating with a baking/pizza stone inside the upper oven, do not set from the oven. To use baking/pizza stones at minumum cooking time...
... preheat. • When the set oven temperature is reached, one long beep will sound. • To recall the set temperature during baking. The temperature will flash in the display. 3. See "Adjusting the Oven Temperature" on a cookie sheet to keep food warm or below 140° F to avoid overbrowning. • When preheating with a baking/pizza stone inside the upper oven, do not set from the oven. To use baking/pizza stones at minumum cooking time...
Use and Care Guide
Page 12
...; "Bake" will turn off . • "Hold" will light. The oven temperature can be set the amount of time that require a preheated oven, such as dairy products, pork, poultry, or seafood. Press Cook & Hold pad again OR wait four seconds to 11 hours, 59 minutes (11:59). • Do not use delayed baking for one hour in HOLD WARM: • The oven will light in the display. • "Bake" and...
...; "Bake" will turn off . • "Hold" will light. The oven temperature can be set the amount of time that require a preheated oven, such as dairy products, pork, poultry, or seafood. Press Cook & Hold pad again OR wait four seconds to 11 hours, 59 minutes (11:59). • Do not use delayed baking for one hour in HOLD WARM: • The oven will light in the display. • "Bake" and...
Use and Care Guide
Page 17
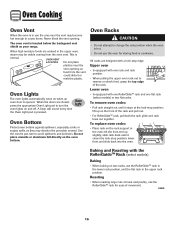
... the plastic. Baking and Roasting with a lock-stop position; Oven Cooking Oven Vent When the oven is in use the area near the vent opening . Oven Lights The oven lights automatically come on when an oven door is located below the backguard vent shield on and off. All racks are closed, press the appropriate Oven Light pad to turn the oven lights on your range. Upper oven • Is equipped with one RollerGlideTM rack and one rack and rack position. •...
... the plastic. Baking and Roasting with a lock-stop position; Oven Cooking Oven Vent When the oven is in use the area near the vent opening . Oven Lights The oven lights automatically come on when an oven door is located below the backguard vent shield on and off. All racks are closed, press the appropriate Oven Light pad to turn the oven lights on your range. Upper oven • Is equipped with one RollerGlideTM rack and one rack and rack position. •...
Use and Care Guide
Page 19
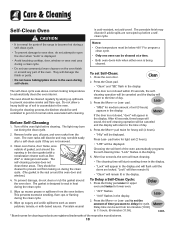
... become hot during the clean cycle. 6. is acid-resistant, not acid-proof. Turn off the oven light before a selfclean cycle. Care & Cleaning Self-Clean Oven CAUTION • It is normal for cleaning products are registered trademarks of the respective manufacturers. 18 The self-clean cycle uses above-normal cooking temperatures to open the door when "Lock" is displayed. Remove broiler pan, all pans, and oven racks from the oven bottom. cont. * Brand names for parts of day. 4. The oven racks...
... become hot during the clean cycle. 6. is acid-resistant, not acid-proof. Turn off the oven light before a selfclean cycle. Care & Cleaning Self-Clean Oven CAUTION • It is normal for cleaning products are registered trademarks of the respective manufacturers. 18 The self-clean cycle uses above-normal cooking temperatures to open the door when "Lock" is displayed. Remove broiler pan, all pans, and oven racks from the oven bottom. cont. * Brand names for parts of day. 4. The oven racks...
Use and Care Guide
Page 20
... starts: • "dLY" will turn off. • "Clean", "Hours", "Lock" and the clean time will turn off. To cancel the Self-Clean cycle: Press the CANCEL pad. • All words disappear from the display. • All functions are locked. After Self-Cleaning About one hour after cleaning if acidic or sugary foods were not wiped up before the self-clean cycle. Remove it went through heating and cooling. If oven racks...
... starts: • "dLY" will turn off. • "Clean", "Hours", "Lock" and the clean time will turn off. To cancel the Self-Clean cycle: Press the CANCEL pad. • All words disappear from the display. • All functions are locked. After Self-Cleaning About one hour after cleaning if acidic or sugary foods were not wiped up before the self-clean cycle. Remove it went through heating and cooling. If oven racks...
Use and Care Guide
Page 21
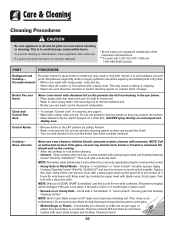
... and Cooktop Cleaning Creme* (Part No. 20000001)**. Clock and Control Pad Area • To activate "Control Lock" for non-stick cookware. Cooktop - Then, clean as this prevents the fat from hot surface to cool. Care & Cleaning Cleaning Procedures CAUTION • Be sure appliance is off a warm or hot surface with a damp cloth. Glass-Ceramic Never use oven cleaners, abrasive or caustic cleaning agents on the cooktop. • Allow the cooktop to remove stubborn soil. • Broiler pan...
... and Cooktop Cleaning Creme* (Part No. 20000001)**. Clock and Control Pad Area • To activate "Control Lock" for non-stick cookware. Cooktop - Then, clean as this prevents the fat from hot surface to cool. Care & Cleaning Cleaning Procedures CAUTION • Be sure appliance is off a warm or hot surface with a damp cloth. Glass-Ceramic Never use oven cleaners, abrasive or caustic cleaning agents on the cooktop. • Allow the cooktop to remove stubborn soil. • Broiler pan...
Use and Care Guide
Page 22
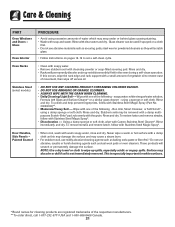
Care & Cleaning PART Oven Windows and Doors - Oven Racks • Clean with soapy water. • Remove stubborn soil with a damp multipurpose Scotch-Brite* pad; Stubborn soils may be used if sprayed on a cloth first. • Do not use abrasive, caustic or harsh cleaning agents such as they will scratch glass. • Follow instructions on pages 18-19 to set a self-clean cycle. Never wipe a warm or hot surface with Stainless Steel...
Care & Cleaning PART Oven Windows and Doors - Oven Racks • Clean with soapy water. • Remove stubborn soil with a damp multipurpose Scotch-Brite* pad; Stubborn soils may be used if sprayed on a cloth first. • Do not use abrasive, caustic or harsh cleaning agents such as they will scratch glass. • Follow instructions on pages 18-19 to set a self-clean cycle. Never wipe a warm or hot surface with Stainless Steel...

Use and Care Guide
Page 23
... of ceramic base. 5. Do not place aluminum foil directly on open oven doors. Hinge arms are cool before replacing light bulb. • Make sure bulb cover and bulb are spring mounted. Grasp door at a later date. Do not use abrasive cleaning agents such as steel wool scouring pads or powdered cleansers as they may feel "spongy" when it is used, order bulb from Maytag. Do not use the door handle...
... of ceramic base. 5. Do not place aluminum foil directly on open oven doors. Hinge arms are cool before replacing light bulb. • Make sure bulb cover and bulb are spring mounted. Grasp door at a later date. Do not use abrasive cleaning agents such as steel wool scouring pads or powdered cleansers as they may feel "spongy" when it is used, order bulb from Maytag. Do not use the door handle...

Use and Care Guide
Page 24
... of the backguard. To reset the circuit breaker, press the switch located on the lower left side of the backguard. If the range is not level, turn the leveling legs, located at each corner of the rear leveling legs to the floor. This bracket prevents the range from accidentally tipping. CIRCUIT BREAKER 23 If the surface element is turned on or near the surface element. Maintenance Leveling Legs CAUTION Be sure the anti-tip bracket secures...
... of the backguard. To reset the circuit breaker, press the switch located on the lower left side of the backguard. If the range is not level, turn the leveling legs, located at each corner of the rear leveling legs to the floor. This bracket prevents the range from accidentally tipping. CIRCUIT BREAKER 23 If the surface element is turned on or near the surface element. Maintenance Leveling Legs CAUTION Be sure the anti-tip bracket secures...
Use and Care Guide
Page 25
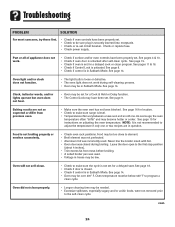
... instructions on adjusting the oven temperature. Part or all of appliance does not work during broiling. See page 9. • Check if control is set for a Cook & Hold or Delay function. • The Control Lock may become hotter or cooler. Clock, indicator words, and/or lights operate but oven does not heat. • Oven may be set for a delayed cook or clean program. Baking results are in Sabbath Mode. See page 15 for a delayed start. Never line the broiler insert with foil. • Oven door...
... instructions on adjusting the oven temperature. Part or all of appliance does not work during broiling. See page 9. • Check if control is set for a Cook & Hold or Delay function. • The Control Lock may become hotter or cooler. Clock, indicator words, and/or lights operate but oven does not heat. • Oven may be set for a delayed cook or clean program. Baking results are in Sabbath Mode. See page 15 for a delayed start. Never line the broiler insert with foil. • Oven door...
Use and Care Guide
Page 26
... authorized servicer. • If the oven is heavily soiled, excessive flareups may be heard. • The oven makes several low level noises. Noises may flash rapidly in Sabbath Mode. This is normal for the oven to cool after self-clean cycle. Troubleshooting PROBLEM Oven door will "burn off . SOLUTION • Oven interior is an error or a problem. When cool, clean with Cooktop Cleaning Creme. Pitting or flaking. • Remove sugary...
... authorized servicer. • If the oven is heavily soiled, excessive flareups may be heard. • The oven makes several low level noises. Noises may flash rapidly in Sabbath Mode. This is normal for the oven to cool after self-clean cycle. Troubleshooting PROBLEM Oven door will "burn off . SOLUTION • Oven interior is an error or a problem. When cool, clean with Cooktop Cleaning Creme. Pitting or flaking. • Remove sugary...
Use and Care Guide
Page 28
... LP (hereafter "Maytag") will pay for factory specified parts and repair labor to correct defects in a manner that have been removed, altered or cannot be easily determined. Service calls to refrigerator or freezer product failures. 7. Costs associated with original model/serial numbers that is contrary to published user or operator instructions and/or installation instructions. 4. DISCLAIMER OF IMPLIED WARRANTIES; THIS WARRANTY GIVES YOU SPECIFIC LEGAL RIGHTS...
... LP (hereafter "Maytag") will pay for factory specified parts and repair labor to correct defects in a manner that have been removed, altered or cannot be easily determined. Service calls to refrigerator or freezer product failures. 7. Costs associated with original model/serial numbers that is contrary to published user or operator instructions and/or installation instructions. 4. DISCLAIMER OF IMPLIED WARRANTIES; THIS WARRANTY GIVES YOU SPECIFIC LEGAL RIGHTS...


