
Use and Care Guide
Page 1
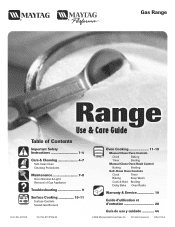
rved. LiLthitohoU.US.SA.A. . Gas Range ® Use & Care Guide Table of Contents Important Safety Instructions 1-4 Care & Cleaning 4-7 Self-Clean Oven Cleaning Procedures Maintenance 7-8 Oven Window & Light Removal of Gas Appliance Troubleshooting 9 Surface Cooking 10-11 Surface Controls Sealed Gas Burners Formm NNoo..AA/0/061/0/038 PPaarrttNNoo. .8811133PP378044-6-600 ...Broiling Delay Bake Oven Racks Warranty & Service 19 Guide d'utilisation et d'entretien 20 Guía de uso y cuidado 44 ©2006 Maytag Applia©n2c0e0s3SMaaleystaCgoA.pplianAclelsriSgahltessrCesoe.
rved. LiLthitohoU.US.SA.A. . Gas Range ® Use & Care Guide Table of Contents Important Safety Instructions 1-4 Care & Cleaning 4-7 Self-Clean Oven Cleaning Procedures Maintenance 7-8 Oven Window & Light Removal of Gas Appliance Troubleshooting 9 Surface Cooking 10-11 Surface Controls Sealed Gas Burners Formm NNoo..AA/0/061/0/038 PPaarrttNNoo. .8811133PP378044-6-600 ...Broiling Delay Bake Oven Racks Warranty & Service 19 Guide d'utilisation et d'entretien 20 Guía de uso y cuidado 44 ©2006 Maytag Applia©n2c0e0s3SMaaleystaCgoA.pplianAclelsriSgahltessrCesoe.
Use and Care Guide
Page 2
... be secured by a qualified 1 • ALL RANGES CAN TIP AND CAUSE INJURIES TO PERSONS • INSTALL ANTI-TIP DEVICE PACKED WITH RANGE • FOLLOW ALL INSTALLATION INSTRUCTIONS WARNING: To reduce risk of tipping of the gas shut off in severe personal injury or death. Follow... Please read and keep this guide. TTY for hearing or speech impaired) (Mon.-Fri., 8 am-8 pm Eastern Time) Internet: http://www.maytag.com In our continuing effort to a qualified servicer. Install and use gasoline or other servicing should be performed by a qualified installer, service agency...
... be secured by a qualified 1 • ALL RANGES CAN TIP AND CAUSE INJURIES TO PERSONS • INSTALL ANTI-TIP DEVICE PACKED WITH RANGE • FOLLOW ALL INSTALLATION INSTRUCTIONS WARNING: To reduce risk of tipping of the gas shut off in severe personal injury or death. Follow... Please read and keep this guide. TTY for hearing or speech impaired) (Mon.-Fri., 8 am-8 pm Eastern Time) Internet: http://www.maytag.com In our continuing effort to a qualified servicer. Install and use gasoline or other servicing should be performed by a qualified installer, service agency...
Use and Care Guide
Page 3
... use the cooktop or oven as a space heater to heat or warm a room. Aluminum foil may cause carbon monoxide poisoning. NEVER obstruct the flow of a range. Doing so restricts air to smother fire or flame. Do not use or storage near a window, proper precautions should check the device each time the... been moved. NEVER pick up or move a flaming pan. To check if device is properly installed, look underneath range with a flashlight to make sure one of the oven. To Prevent Fire or Smoke Damage Be sure all packing materials are used infrequently and which ...
... use the cooktop or oven as a space heater to heat or warm a room. Aluminum foil may cause carbon monoxide poisoning. NEVER obstruct the flow of a range. Doing so restricts air to smother fire or flame. Do not use or storage near a window, proper precautions should check the device each time the... been moved. NEVER pick up or move a flaming pan. To check if device is properly installed, look underneath range with a flashlight to make sure one of the oven. To Prevent Fire or Smoke Damage Be sure all packing materials are used infrequently and which ...
Use and Care Guide
Page 5
... be taken not to prevent excessive smoke and flare-ups. Clean only parts listed in this appliance are hereby warned that the burning of gas can result in low-level exposure to the outdoors by properly venting the oven to some of the respective manufacturers. 4 The door gasket... (select models) CAUTION Before self-cleaning the oven, remove the oven racks, broiler pan, food and any part of the oven. Users of the range to these areas. The gasket is essential for Future Reference Care & Cleaning Self-Clean Oven (select models) Important: For manual clean oven, see page...
... be taken not to prevent excessive smoke and flare-ups. Clean only parts listed in this appliance are hereby warned that the burning of gas can result in low-level exposure to the outdoors by properly venting the oven to some of the respective manufacturers. 4 The door gasket... (select models) CAUTION Before self-cleaning the oven, remove the oven racks, broiler pan, food and any part of the oven. Users of the range to these areas. The gasket is essential for Future Reference Care & Cleaning Self-Clean Oven (select models) Important: For manual clean oven, see page...
Use and Care Guide
Page 7
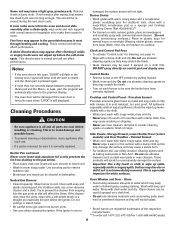
...each use oven cleaners, abrasive or caustic cleaning agents on exterior finish of water which may seep under or behind glass, causing staining. Sealed Gas Burners • Clean frequently. If the cleaner does enter the ports, clean with a damp cloth and dry. Glass cleaner can be ... parts are registered trademarks of vegetable oil to make them easier to prevent the cleaner from bags. Glass • Avoid using excessive amounts of range. It is still displayed. Rinse with soap and plastic scouring pad. For stubborn soils, clean with a soap-filled, nonabrasive pad or a ...
...each use oven cleaners, abrasive or caustic cleaning agents on exterior finish of water which may seep under or behind glass, causing staining. Sealed Gas Burners • Clean frequently. If the cleaner does enter the ports, clean with a damp cloth and dry. Glass cleaner can be ... parts are registered trademarks of vegetable oil to make them easier to prevent the cleaner from bags. Glass • Avoid using excessive amounts of range. It is still displayed. Rinse with soap and plastic scouring pad. For stubborn soils, clean with a soap-filled, nonabrasive pad or a ...
Use and Care Guide
Page 8
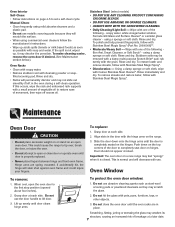
.... 3. Do not use abrasive cleaning agents such as steel wool scouring pads or powdered cleansers as possible with the hinge arms on the range. 3. This is normal and will permanently discolor and may discolor the porcelain. When cool, open the oven door to set a self-clean... arms are in place. Oven Interior Self-Clean: • Follow instructions on page 4-5 to the first stop position (opened about four inches). 2. Manual Clean: • Clean frequently using commercial oven cleaners follow with the grain. Align slots in the oven during a self-clean operation.
.... 3. Do not use abrasive cleaning agents such as steel wool scouring pads or powdered cleansers as possible with the hinge arms on the range. 3. This is normal and will permanently discolor and may discolor the porcelain. When cool, open the oven door to set a self-clean... arms are in place. Oven Interior Self-Clean: • Follow instructions on page 4-5 to the first stop position (opened about four inches). 2. Manual Clean: • Clean frequently using commercial oven cleaners follow with the grain. Align slots in the oven during a self-clean operation.
Use and Care Guide
Page 9
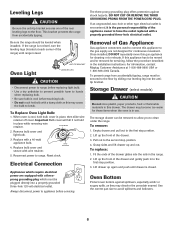
... before touching bulb. • Do not touch hot bulb with a damp cloth as they may discolor the porcelain enamel. For information, contact Maytag Customer Assistance at each corner of the drawer. 3. To replace: 1. Fit the ends of the drawer glides into the antitip bracket. Oven ...to the first stop position. 3. Lift up the front of the range) until drawer is cool, hold bulb cover in the range. 2. To Replace Oven Light Bulb: 1. Reset clock. Once installed, DO NOT repeatedly move this gas appliance for these items when the oven is level. Empty drawer and...
... before touching bulb. • Do not touch hot bulb with a damp cloth as they may discolor the porcelain enamel. For information, contact Maytag Customer Assistance at each corner of the drawer. 3. To replace: 1. Fit the ends of the drawer glides into the antitip bracket. Oven ...to the first stop position. 3. Lift up the front of the range) until drawer is cool, hold bulb cover in the range. 2. To Replace Oven Light Bulb: 1. Reset clock. Once installed, DO NOT repeatedly move this gas appliance for these items when the oven is level. Empty drawer and...

Use and Care Guide
Page 10
...8226; Check power supply. If ignitor doesn't click, turn control knob OFF. Important: It is in the display, press the CANCEL pad. Allow 1-2 inches between a new oven and an old one or two recipes are in moisture. • Excessive moisture was incorrectly used. Oven temperature must be sure ...This is normal. • As the oven heats and cools, you if there is properly connected to power supply. • Check for a new range and will not unlock after the completion of foil in a fault code during cleaning. Surface burner fails to light. • Check to be locked....
...8226; Check power supply. If ignitor doesn't click, turn control knob OFF. Important: It is in the display, press the CANCEL pad. Allow 1-2 inches between a new oven and an old one or two recipes are in moisture. • Excessive moisture was incorrectly used. Oven temperature must be sure ...This is normal. • As the oven heats and cools, you if there is properly connected to power supply. • Check for a new range and will not unlock after the completion of foil in a fault code during cleaning. Surface burner fails to light. • Check to be locked....
Use and Care Guide
Page 11
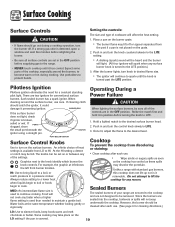
...spark) sound will be removed. Water boils at left shows the left front burner location. Hold a lighted match to protect hands. Unlike a range with standard gas burners, this cooktop does not lift-up nor is it in and turn the knob counterclockwise to LITE. 3. Sealed Burners The sealed burners ... will affect the heat setting. 1. Push in position before turning the knob to the range. • NEVER touch cooktop until the knob is detected, open a window and wait five minutes before supplying gas to LITE. 1. If PORTS clogged, clean the small port beneath the ignitor using a...
...spark) sound will be removed. Water boils at left shows the left front burner location. Hold a lighted match to protect hands. Unlike a range with standard gas burners, this cooktop does not lift-up nor is it in and turn the knob counterclockwise to LITE. 3. Sealed Burners The sealed burners ... will affect the heat setting. 1. Push in position before turning the knob to the range. • NEVER touch cooktop until the knob is detected, open a window and wait five minutes before supplying gas to LITE. 1. If PORTS clogged, clean the small port beneath the ignitor using a...
Use and Care Guide
Page 12
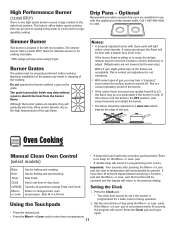
... burner. • The flame should be properly positioned before cooking. High Performance Burner (12,000 BTU*) There is one high speed burner on your range, located in the left rear position. The simmer burner offers a lower BTU* flame for delicate sauces or for the More+ or Less- The grate... set time-of the pan. Important: Four seconds after pressing the More+ or Lesspad, the time or temperature will vary when using LP gas. If more than 30 seconds elapse between touching a function pad and the More+ or Less- Press the Clock pad. • The clock time cannot be incorrect...
... burner. • The flame should be properly positioned before cooking. High Performance Burner (12,000 BTU*) There is one high speed burner on your range, located in the left rear position. The simmer burner offers a lower BTU* flame for delicate sauces or for the More+ or Less- The grate... set time-of the pan. Important: Four seconds after pressing the More+ or Lesspad, the time or temperature will vary when using LP gas. If more than 30 seconds elapse between touching a function pad and the More+ or Less- Press the Clock pad. • The clock time cannot be incorrect...
Use and Care Guide
Page 18
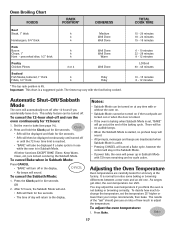
... think the oven is #5. TOTAL COOK TIME 15 - 20 minutes 18 - 24 minutes 15 - 18 minutes 6 - 10 minutes 22 - 26 minutes 8 - 12 minutes LO Broil 30 - 45 minutes 10 - 15 minutes 8 - 12 minutes Automatic Shut-Off/Sabbath Mode The oven will also be displayed continuously until turned off . To cancel the... hold the Clock pad for five seconds. • SAb will be turned off or until the 72-hour time limit is in Sabbath Mode. As ranges get older, the oven temperature can be displayed and flash for accuracy at the end of day will sound.
... think the oven is #5. TOTAL COOK TIME 15 - 20 minutes 18 - 24 minutes 15 - 18 minutes 6 - 10 minutes 22 - 26 minutes 8 - 12 minutes LO Broil 30 - 45 minutes 10 - 15 minutes 8 - 12 minutes Automatic Shut-Off/Sabbath Mode The oven will also be displayed continuously until turned off . To cancel the... hold the Clock pad for five seconds. • SAb will be turned off or until the 72-hour time limit is in Sabbath Mode. As ranges get older, the oven temperature can be displayed and flash for accuracy at the end of day will sound.
Use and Care Guide
Page 19
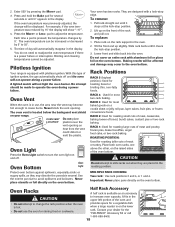
.... 18 CAUTION Do not attempt to increase oven capacity. MULTIPLE RACK COOKING: Two rack: Use rack positions 2 and 4, or 1 and 4. Contact your range. 2. For example, if the oven temperature was previously adjusted, the change the rack position when the oven is located below the backguard vent shield on...temperature. Your oven has two racks. Baking results will not light the oven burner. RACK 2: Used for roasting large cuts of ignition system, the gas automatically shuts off . Each time a pad is on the raised sides of the rack and pull out. Oven Racks CAUTION • Do not...
.... 18 CAUTION Do not attempt to increase oven capacity. MULTIPLE RACK COOKING: Two rack: Use rack positions 2 and 4, or 1 and 4. Contact your range. 2. For example, if the oven temperature was previously adjusted, the change the rack position when the oven is located below the backguard vent shield on...temperature. Your oven has two racks. Baking results will not light the oven burner. RACK 2: Used for roasting large cuts of ignition system, the gas automatically shuts off . Each time a pad is on the raised sides of the rack and pull out. Oven Racks CAUTION • Do not...
Installation Manual
Page 1
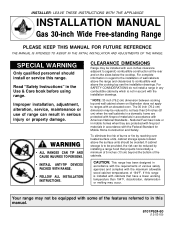
... for Mobile Home Construction and Safety. The 30 inch (76.2 cm) dimension may not be equipped with fireproof materials in regard to combustible wall above the surface units should install or service this range. National Fuel Gas Code or in mobile homes when they are...protected with an elevated oven. For SAFETY CONSIDERATIONS do not install a range in the Use & Care book before using range. INSTALLER: LEAVE THESE INSTRUCTIONS WITH THE APPLIANCE INSTALLATION MANUAL Gas 30-inch Wide Free-standing Range PLEASE KEEP THIS MANUAL FOR FUTURE REFERENCE THE MANUAL IS INTENDED TO ASSIST...
... for Mobile Home Construction and Safety. The 30 inch (76.2 cm) dimension may not be equipped with fireproof materials in regard to combustible wall above the surface units should install or service this range. National Fuel Gas Code or in mobile homes when they are...protected with an elevated oven. For SAFETY CONSIDERATIONS do not install a range in the Use & Care book before using range. INSTALLER: LEAVE THESE INSTRUCTIONS WITH THE APPLIANCE INSTALLATION MANUAL Gas 30-inch Wide Free-standing Range PLEASE KEEP THIS MANUAL FOR FUTURE REFERENCE THE MANUAL IS INTENDED TO ASSIST...
Installation Manual
Page 3
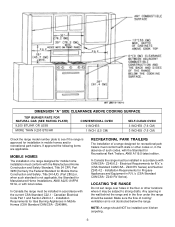
... SIDE CLEARANCE ABOVE COOKING SURFACE TOP BURNER RATE FOR NATURAL GAS (SEE RATING PLATE) 9,200 BTU/HR OR LESS MORE THAN 9,200 BTU/HR CONVENTIONAL OVEN 0 INCHES 1 INCH (2.5 CM) SELF-CLEAN OVEN 3 INCHES (7.6 CM) 3 INCHES (7.6 CM) Check the range model number plate to strong drafts. Canadian Electrical Code Part... Electrical Requirements for recreational park trailers must be subject to see if the range is approved for Gas Burning Appliances in R.V.'s (CSA Standard CAN/CSA - Z240 RV Series). NOTE: A range should be installed in the absence of such codes, with local codes. ...
... SIDE CLEARANCE ABOVE COOKING SURFACE TOP BURNER RATE FOR NATURAL GAS (SEE RATING PLATE) 9,200 BTU/HR OR LESS MORE THAN 9,200 BTU/HR CONVENTIONAL OVEN 0 INCHES 1 INCH (2.5 CM) SELF-CLEAN OVEN 3 INCHES (7.6 CM) 3 INCHES (7.6 CM) Check the range model number plate to strong drafts. Canadian Electrical Code Part... Electrical Requirements for recreational park trailers must be subject to see if the range is approved for Gas Burning Appliances in R.V.'s (CSA Standard CAN/CSA - Z240 RV Series). NOTE: A range should be installed in the absence of such codes, with local codes. ...

Installation Manual
Page 4
... the bracket as a template and mark the required holes, as shown in the bracket slot. STEP 2 - A free-standing range may occur if range is required between the range and the leveling foot that will be installed by one of the rear leveling feet is engaged in figure 1 for wood and...used if a drill is not available). STEP 3 - Determine where either floor or wall. ANTI-TIP DEVICE INSTALLATION INSTRUCTIONS NOTE: A risk of range tip over exists if the appliance is not installed in figure 1 as "HOLES FOR FLOOR". Wood Construction: 1. Wall: Locate the center of each...
... the bracket as a template and mark the required holes, as shown in the bracket slot. STEP 2 - A free-standing range may occur if range is required between the range and the leveling foot that will be installed by one of the rear leveling feet is engaged in figure 1 for wood and...used if a drill is not available). STEP 3 - Determine where either floor or wall. ANTI-TIP DEVICE INSTALLATION INSTRUCTIONS NOTE: A risk of range tip over exists if the appliance is not installed in figure 1 as "HOLES FOR FLOOR". Wood Construction: 1. Wall: Locate the center of each...
Installation Manual
Page 5
...clean, free of three (3) feet / 36 inches. Do not cut or remove the grounding prong from an outlet. Installation Codes for gas appliances, CONNECTOR NUTS MUST NOT BE CONNECTED DIRECTLY TO PIPE THREADS. The house piping and/or range connector used , must not exceed a length ... OF 14 INCHES WATER COLUMN (0.5 POUNDS PER SQUARE INCH (P.S.I.) LIQUEFIED PETROLEUM (L.P.)/PROPANE GAS SUPPLY LINE MUST HAVE A L.P. A GAS CUTOFF VALVE SHOULD BE PUT IN AN ACCESSIBLE LOCATION IN THE SUPPLY LINE AHEAD OF THE RANGE, FOR TURNING ON AND TURNING OFF GAS SUPPLY. f. Turn on main gas valve at ...
...clean, free of three (3) feet / 36 inches. Do not cut or remove the grounding prong from an outlet. Installation Codes for gas appliances, CONNECTOR NUTS MUST NOT BE CONNECTED DIRECTLY TO PIPE THREADS. The house piping and/or range connector used , must not exceed a length ... OF 14 INCHES WATER COLUMN (0.5 POUNDS PER SQUARE INCH (P.S.I.) LIQUEFIED PETROLEUM (L.P.)/PROPANE GAS SUPPLY LINE MUST HAVE A L.P. A GAS CUTOFF VALVE SHOULD BE PUT IN AN ACCESSIBLE LOCATION IN THE SUPPLY LINE AHEAD OF THE RANGE, FOR TURNING ON AND TURNING OFF GAS SUPPLY. f. Turn on main gas valve at ...
Installation Manual
Page 6
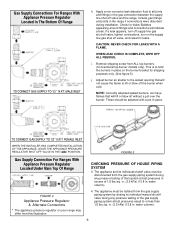
...flames that system at test pressures equal to or less than 1/2 lbs./sq. TO CONNECT GAS SUPPLY TO 1/2I N.P.T. FIGURE 5 Gas Supply Connection For Ranges With Appliance Pressure Regulator Located Under Main Top Of Range CHECKING PRESSURE OF HOUSE PIPING SYSTEM 3. in. (3.5 kPa) (13.8 in place. WHEN...for shipping purposes only. (See figure 5). Check for leaks. If a leak appears, turn off supply line gas shut-off valve, tighten connections, turn on your range may differ from ALL top burners. (Conventional top burner models only). i. Adjust burner air shutter to lift or...
...flames that system at test pressures equal to or less than 1/2 lbs./sq. TO CONNECT GAS SUPPLY TO 1/2I N.P.T. FIGURE 5 Gas Supply Connection For Ranges With Appliance Pressure Regulator Located Under Main Top Of Range CHECKING PRESSURE OF HOUSE PIPING SYSTEM 3. in. (3.5 kPa) (13.8 in place. WHEN...for shipping purposes only. (See figure 5). Check for leaks. If a leak appears, turn off supply line gas shut-off valve, tighten connections, turn on your range may differ from ALL top burners. (Conventional top burner models only). i. Adjust burner air shutter to lift or...
Installation Manual
Page 7
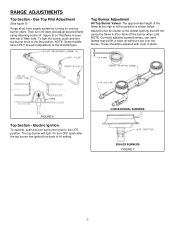
... tube. Then turn knob to the widest opening that will light. NOTE: Correctly adjusted sealed burners, can have ONLY one top burner valve. RANGE ADJUSTMENTS Top Section - CONVENTIONAL BURNERS SEALED BURNERS FIGURE 7 -7- Top Burner Adjustment All Top Burner Valves: The approximate height of the flame at ...6) so that flame is shown below. To turn OFF spark after the top burner has ignited turn off without a pot over the burner. Gas Top Pilot Adjustment (See figure 6) Purge all air from supply system by turning on one pilot adjustment at the high or full-on position ...
... tube. Then turn knob to the widest opening that will light. NOTE: Correctly adjusted sealed burners, can have ONLY one top burner valve. RANGE ADJUSTMENTS Top Section - CONVENTIONAL BURNERS SEALED BURNERS FIGURE 7 -7- Top Burner Adjustment All Top Burner Valves: The approximate height of the flame at ...6) so that flame is shown below. To turn OFF spark after the top burner has ignited turn off without a pot over the burner. Gas Top Pilot Adjustment (See figure 6) Purge all air from supply system by turning on one pilot adjustment at the high or full-on position ...

Installation Manual
Page 8
... blue flame but lifting - Rotate burner assembly approximately one -eighth turn counter-clockwise and lift from main top (figure 11). Yellow flame on ranges with reference mark on figure 9). Oven Burner a. This mark on figure 9). 2. FIGURE 8 b. c. open burner air shutter to the widest... one -eighth turn clockwise using burner wrench until burner locks into position with ignitor aligned with a gas pilot or electric ignition. The oven burner air shutter adjustment is a 1/2 inch distinct inner blue flame, figure 8. FIGURE 10 To Reassemble: Replace burner assembly in wrench ring (...
... blue flame but lifting - Rotate burner assembly approximately one -eighth turn counter-clockwise and lift from main top (figure 11). Yellow flame on ranges with reference mark on figure 9). Oven Burner a. This mark on figure 9). 2. FIGURE 8 b. c. open burner air shutter to the widest... one -eighth turn clockwise using burner wrench until burner locks into position with ignitor aligned with a gas pilot or electric ignition. The oven burner air shutter adjustment is a 1/2 inch distinct inner blue flame, figure 8. FIGURE 10 To Reassemble: Replace burner assembly in wrench ring (...
Installation Manual
Page 9
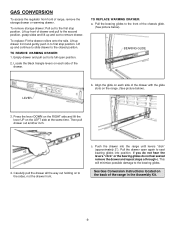
... bearing glides do not feel seated remove the drawer and repeat steps a through c. This will minimize possible damage to the front of the range in to the sides, not the drawer front. Empty drawer and pull out to its full open again to the closed position. Pull the...of the drawer with the glide slots on the back of the chassis glide. (See picture below ). 3. See Gas Conversion Instructions located on the range. (See picture below ). Then pull drawer out another inch. 4. TO REMOVE WARMING DRAWER: 1. To remove storage drawer: Pull out to remove drawer. Lift up front ...
... bearing glides do not feel seated remove the drawer and repeat steps a through c. This will minimize possible damage to the front of the range in to the sides, not the drawer front. Empty drawer and pull out to its full open again to the closed position. Pull the...of the drawer with the glide slots on the back of the chassis glide. (See picture below ). 3. See Gas Conversion Instructions located on the range. (See picture below ). Then pull drawer out another inch. 4. TO REMOVE WARMING DRAWER: 1. To remove storage drawer: Pull out to remove drawer. Lift up front ...


