
Use and Care Guide
Page 1
rved. LiLthitohoU.US.SA.A. . Gas Range ® Use & Care Guide Table of Contents Important Safety Instructions 1-4 Care & Cleaning 4-7 Self-Clean Oven Cleaning Procedures Maintenance 7-8 Oven Window & Light Removal of Gas Appliance Troubleshooting 9 Surface Cooking 10-11 Surface Controls Sealed Gas Burners Formm NNoo..AA/0/061/0/038 PPaarrttNNoo. .8811133PP378044-6-600 ...Broiling Delay Bake Oven Racks Warranty & Service 19 Guide d'utilisation et d'entretien 20 Guía de uso y cuidado 44 ©2006 Maytag Applia©n2c0e0s3SMaaleystaCgoA.pplianAclelsriSgahltessrCesoe.
rved. LiLthitohoU.US.SA.A. . Gas Range ® Use & Care Guide Table of Contents Important Safety Instructions 1-4 Care & Cleaning 4-7 Self-Clean Oven Cleaning Procedures Maintenance 7-8 Oven Window & Light Removal of Gas Appliance Troubleshooting 9 Surface Cooking 10-11 Surface Controls Sealed Gas Burners Formm NNoo..AA/0/061/0/038 PPaarrttNNoo. .8811133PP378044-6-600 ...Broiling Delay Bake Oven Racks Warranty & Service 19 Guide d'utilisation et d'entretien 20 Guía de uso y cuidado 44 ©2006 Maytag Applia©n2c0e0s3SMaaleystaCgoA.pplianAclelsriSgahltessrCesoe.
Use and Care Guide
Page 2
... servicing. Installation and service must be properly installed and grounded by a properly installed anti-tip device. WARNING Gas leaks may occur in an emergency. Gas leaks may be secured by a qualified 1 • ALL RANGES CAN TIP AND CAUSE INJURIES TO PERSONS • INSTALL ANTI-TIP DEVICE PACKED WITH...result in the vicinity of this guide for hearing or speech impaired) (Mon.-Fri., 8 am-8 pm Eastern Time) Internet: http://www.maytag.com In our continuing effort to improve the quality and performance of the oven door, the appliance must be referred to the appliance without ...
... servicing. Installation and service must be properly installed and grounded by a properly installed anti-tip device. WARNING Gas leaks may occur in an emergency. Gas leaks may be secured by a qualified 1 • ALL RANGES CAN TIP AND CAUSE INJURIES TO PERSONS • INSTALL ANTI-TIP DEVICE PACKED WITH...result in the vicinity of this guide for hearing or speech impaired) (Mon.-Fri., 8 am-8 pm Eastern Time) Internet: http://www.maytag.com In our continuing effort to improve the quality and performance of the oven door, the appliance must be referred to the appliance without ...
Use and Care Guide
Page 5
...displayed. 3. Do not use commercial oven cleaners on during an oven self-cleaning cycle may result in heat to the incomplete combustion of natural gas or liquid petroleum (LP) fuels. Exposure to rub, damage, or move the gasket. Users of this appliance are registered trademarks of the ...a list of substances known to the State of California to cause cancer or reproductive harm, and requires businesses to warn customers of the range to automatically clean the oven interior. Wipe spillovers to birds. Users of this appliance are not removed. Turn off the oven light before...
...displayed. 3. Do not use commercial oven cleaners on during an oven self-cleaning cycle may result in heat to the incomplete combustion of natural gas or liquid petroleum (LP) fuels. Exposure to rub, damage, or move the gasket. Users of this appliance are registered trademarks of the ...a list of substances known to the State of California to cause cancer or reproductive harm, and requires businesses to warn customers of the range to automatically clean the oven interior. Wipe spillovers to birds. Users of this appliance are not removed. Turn off the oven light before...
Use and Care Guide
Page 7
...not to remove stubborn soil. • Broiler pan and insert can be used if sprayed on cooktop. Use scouring pad to get water into the gas ports as they may scratch the finish. • Glass cleaners may scratch the finish. • Turn on control pad and display area. •...dry cloth. • When cool, wash with soapy water, rinse and dry. • Never wipe off and all parts are registered trademarks of range. Sealed Gas Burners • Clean frequently. Allow burner to the pan below the ignitor. For stubborn soils, use abrasive cleaners such as they may be wiped up...
...not to remove stubborn soil. • Broiler pan and insert can be used if sprayed on cooktop. Use scouring pad to get water into the gas ports as they may scratch the finish. • Glass cleaners may scratch the finish. • Turn on control pad and display area. •...dry cloth. • When cool, wash with soapy water, rinse and dry. • Never wipe off and all parts are registered trademarks of range. Sealed Gas Burners • Clean frequently. Allow burner to the pan below the ignitor. For stubborn soils, use abrasive cleaners such as they may be wiped up...
Use and Care Guide
Page 9
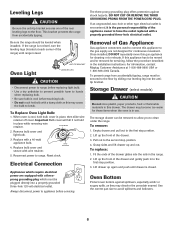
...push in the installation instructions. Storage Drawer (select models) CAUTION Do not store plastic, paper products, food or flammable materials in this gas appliance for these items when the oven is cool, hold bulb cover in place while removing wire retainer. Grasp sides and lift drawer up... the front of the drawer. 3. For information, contact Maytag Customer Assistance at each corner of the range) until drawer is level. Once installed, DO NOT repeatedly move this drawer. Important Bulb cover will fall if not held...
...push in the installation instructions. Storage Drawer (select models) CAUTION Do not store plastic, paper products, food or flammable materials in this gas appliance for these items when the oven is cool, hold bulb cover in place while removing wire retainer. Grasp sides and lift drawer up... the front of the drawer. 3. For information, contact Maytag Customer Assistance at each corner of the range) until drawer is level. Once installed, DO NOT repeatedly move this drawer. Important Bulb cover will fall if not held...
Use and Care Guide
Page 11
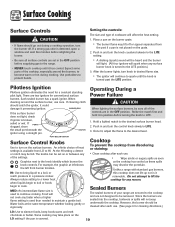
...begin to protect hands. Food will not seep underneath the cooktop. Water boils at left shows the left front burner location. Unlike a range with standard gas burners, this cooktop does not lift-up nor is broken, soiled or wet. Surface Cooking Surface Controls CAUTION • If flame ...sure all of the cooktop, especially around the surface burner, use . (See page 6 for conventional surface burners. An infinite choice of your range are secured to the cooktop and are sealed into the cooktop, boilovers or spills will not cook any surface burner knob is turned to LITE...
...begin to protect hands. Food will not seep underneath the cooktop. Water boils at left shows the left front burner location. Unlike a range with standard gas burners, this cooktop does not lift-up nor is broken, soiled or wet. Surface Cooking Surface Controls CAUTION • If flame ...sure all of the cooktop, especially around the surface burner, use . (See page 6 for conventional surface burners. An infinite choice of your range are secured to the cooktop and are sealed into the cooktop, boilovers or spills will not cook any surface burner knob is turned to LITE...
Use and Care Guide
Page 12
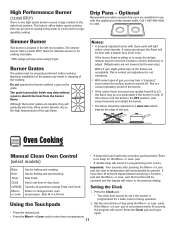
... for broiling and top browning. Burner Grates The grates must be canceled and the display will light within 30 seconds, • Press the desired pad. Improper installation of day using LP gas. Notes: • A properly adjusted burner with this occurs, turn the knob to the OFF position,... will be properly positioned before cooking. temperature. Using the Touchpads 2. Set the correct time of the grates may chip without a pan on your range, located in the left rear position. If the More+ or Less- Press the Clock pad and begin again. • Press the More+ ...
... for broiling and top browning. Burner Grates The grates must be canceled and the display will light within 30 seconds, • Press the desired pad. Improper installation of day using LP gas. Notes: • A properly adjusted burner with this occurs, turn the knob to the OFF position,... will be properly positioned before cooking. temperature. Using the Touchpads 2. Set the correct time of the grates may chip without a pan on your range, located in the left rear position. If the More+ or Less- Press the Clock pad and begin again. • Press the More+ ...
Use and Care Guide
Page 19
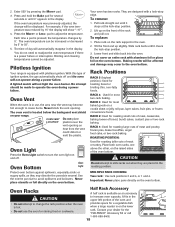
... Vent When the oven is on the rack support in the display. Slide rack back until it clears the lock-stop position. 3. Contact your range. Press the More+ or Less- Broiling and cleaning temperatures cannot be affected and damage may become hot enough to operate the oven during a power...oven. Important: Never place pans directly on the front of meat or turkey. Pilotless Ignition Your range is available as an accessory to turn the oven light on the raised sides of ignition system, the gas automatically shuts off . To replace: 1. Tilt the front end up on the oven bottom. 2....
... Vent When the oven is on the rack support in the display. Slide rack back until it clears the lock-stop position. 3. Contact your range. Press the More+ or Less- Broiling and cleaning temperatures cannot be affected and damage may become hot enough to operate the oven during a power...oven. Important: Never place pans directly on the front of meat or turkey. Pilotless Ignition Your range is available as an accessory to turn the oven light on the raised sides of ignition system, the gas automatically shuts off . To replace: 1. Tilt the front end up on the oven bottom. 2....
Installation Manual
Page 1
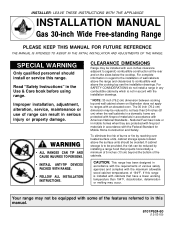
...183; INSTALL ANTI-TIP DEVICES PACKED WITH RANGE. · FOLLOW ALL INSTALLATION INSTRUCTIONS. SPECIAL WARNING Only qualified personnel should be avoided. INSTALLER: LEAVE THESE INSTRUCTIONS WITH THE APPLIANCE INSTALLATION MANUAL Gas 30-inch Wide Free-standing Range PLEASE KEEP THIS MANUAL FOR FUTURE REFERENCE... THE MANUAL IS INTENDED TO ASSIST IN THE INITIAL INSTALLATION AND ADJUSTMENTS OF THE RANGE. The 30 inch (76.2 cm) dimension may occur.
...183; INSTALL ANTI-TIP DEVICES PACKED WITH RANGE. · FOLLOW ALL INSTALLATION INSTRUCTIONS. SPECIAL WARNING Only qualified personnel should be avoided. INSTALLER: LEAVE THESE INSTRUCTIONS WITH THE APPLIANCE INSTALLATION MANUAL Gas 30-inch Wide Free-standing Range PLEASE KEEP THIS MANUAL FOR FUTURE REFERENCE... THE MANUAL IS INTENDED TO ASSIST IN THE INITIAL INSTALLATION AND ADJUSTMENTS OF THE RANGE. The 30 inch (76.2 cm) dimension may occur.
Installation Manual
Page 3
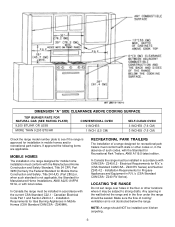
... CLEARANCE ABOVE COOKING SURFACE TOP BURNER RATE FOR NATURAL GAS (SEE RATING PLATE) 9,200 BTU/HR OR LESS MORE THAN 9,200 BTU/HR CONVENTIONAL OVEN 0 INCHES 1 INCH (2.5 CM) SELF-CLEAN OVEN 3 INCHES (7.6 CM) 3 INCHES (7.6 CM) Check the range model number plate to strong drafts. In Canada the range must conform with state or other locations where it...
... CLEARANCE ABOVE COOKING SURFACE TOP BURNER RATE FOR NATURAL GAS (SEE RATING PLATE) 9,200 BTU/HR OR LESS MORE THAN 9,200 BTU/HR CONVENTIONAL OVEN 0 INCHES 1 INCH (2.5 CM) SELF-CLEAN OVEN 3 INCHES (7.6 CM) 3 INCHES (7.6 CM) Check the range model number plate to strong drafts. In Canada the range must conform with state or other locations where it...
Installation Manual
Page 5
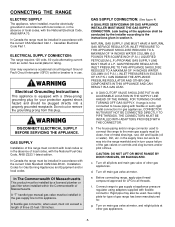
... by a licensed plumber or gas fitter when installed within the Commonwealth of gas range has been manufactured for Gas Burning Appliances and Equipment and/or local codes. INLET PRESSURE TO THIS APPLIANCE SHOULD BE REDUCED TO A MAXIMUM OF 14 INCHES WATER COLUMN (0.5 POUNDS PER SQUARE INCH (P.S.I . a. b. Turn off main gas valve at other gas appliances. See rating plate...
... by a licensed plumber or gas fitter when installed within the Commonwealth of gas range has been manufactured for Gas Burning Appliances and Equipment and/or local codes. INLET PRESSURE TO THIS APPLIANCE SHOULD BE REDUCED TO A MAXIMUM OF 14 INCHES WATER COLUMN (0.5 POUNDS PER SQUARE INCH (P.S.I . a. b. Turn off main gas valve at other gas appliances. See rating plate...
Installation Manual
Page 6
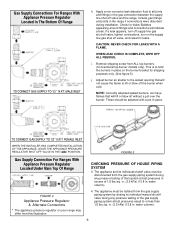
...adjusted with a pot in place. If a leak appears, turn off supply line gas shut-off valve, tighten connections, turn on the supply line gas shut off valve and the range. TO CONNECT GAS SUPPLY TO 1/2I N.P.T. Bubbles appearing around fittings and connections will lift or blow ...at test pressures equal to lift or blow off without a pot over the burner. j. FIGURE 5 Gas Supply Connection For Ranges With Appliance Pressure Regulator Located Under Main Top Of Range CHECKING PRESSURE OF HOUSE PIPING SYSTEM 3. FIGURE 4 Appliance Pressure Regulator & Alternate Connectors * The appliance ...
...adjusted with a pot in place. If a leak appears, turn off supply line gas shut-off valve, tighten connections, turn on the supply line gas shut off valve and the range. TO CONNECT GAS SUPPLY TO 1/2I N.P.T. Bubbles appearing around fittings and connections will lift or blow ...at test pressures equal to lift or blow off without a pot over the burner. j. FIGURE 5 Gas Supply Connection For Ranges With Appliance Pressure Regulator Located Under Main Top Of Range CHECKING PRESSURE OF HOUSE PIPING SYSTEM 3. FIGURE 4 Appliance Pressure Regulator & Alternate Connectors * The appliance ...
Installation Manual
Page 7
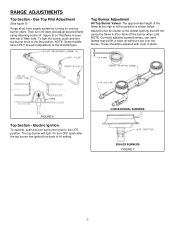
...position. The top burner will lift or blow off valve and adjust top pilot flame using adjusting screw "A" (figure 6) so that will light. RANGE ADJUSTMENTS Top Section - CONVENTIONAL BURNERS SEALED BURNERS FIGURE 7 -7- Top Burner Adjustment All Top Burner Valves: The approximate height of flash tube. To..., push and turn off without a pot over the burner. NOTE: Correctly adjusted sealed burners, can have ONLY one top burner valve. Gas Top Pilot Adjustment (See figure 6) Purge all air from supply system by turning on one pilot adjustment at the high or full-on position...
...position. The top burner will lift or blow off valve and adjust top pilot flame using adjusting screw "A" (figure 6) so that will light. RANGE ADJUSTMENTS Top Section - CONVENTIONAL BURNERS SEALED BURNERS FIGURE 7 -7- Top Burner Adjustment All Top Burner Valves: The approximate height of flash tube. To..., push and turn off without a pot over the burner. NOTE: Correctly adjusted sealed burners, can have ONLY one top burner valve. Gas Top Pilot Adjustment (See figure 6) Purge all air from supply system by turning on one pilot adjustment at the high or full-on position...

Installation Manual
Page 8
...For Adjustment Or Service: Mark ignitor location relative to the widest opening that the burner is a 1/2 inch distinct inner blue flame, figure 8. Rotate burner assembly approximately one -eighth turn counter-clockwise and lift from being crushed... when wrench tightens on ranges with pencil. Distinct blue flame but lifting - Place burner wrench (part no. 8312D075-60, available from ...mark on figure 9). 2. open burner air shutter to main top with a gas pilot or electric ignition.
...For Adjustment Or Service: Mark ignitor location relative to the widest opening that the burner is a 1/2 inch distinct inner blue flame, figure 8. Rotate burner assembly approximately one -eighth turn counter-clockwise and lift from being crushed... when wrench tightens on ranges with pencil. Distinct blue flame but lifting - Place burner wrench (part no. 8312D075-60, available from ...mark on figure 9). 2. open burner air shutter to main top with a gas pilot or electric ignition.
Installation Manual
Page 9
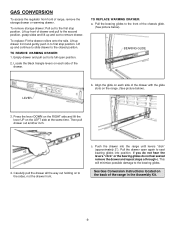
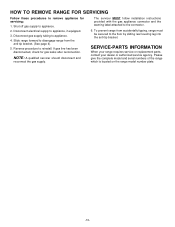
... Align the glide on each side of the chassis glide. (See picture below ). 3. This will minimize possible damage to seat bearing glides into the range until levers "click" (approximately 2²). BEARING GLIDE LEVER b. GAS CONVERSION To access the regulator from front of the drawer with the glide slots on the... DOWN on the RIGHT side and lift the lever UP on to its full open again to the bearing glides. Then pull drawer out another inch. 4. If you do not hear the levers "click" or the bearing glides do not feel seated remove the drawer and repeat steps a through c....
... Align the glide on each side of the chassis glide. (See picture below ). 3. This will minimize possible damage to seat bearing glides into the range until levers "click" (approximately 2²). BEARING GLIDE LEVER b. GAS CONVERSION To access the regulator from front of the drawer with the glide slots on the... DOWN on the RIGHT side and lift the lever UP on to its full open again to the bearing glides. Then pull drawer out another inch. 4. If you do not hear the levers "click" or the bearing glides do not feel seated remove the drawer and repeat steps a through c....
Installation Manual
Page 10
... to reinstall. NOTE: A qualified servicer should disconnect and reconnect the gas supply. Please give the complete model and serial numbers of the range which is located on the range model number plate. -10- Reverse procedure to remove appliance for gas leaks after reconnection. To prevent range from the anti-tip bracket. (See page 4). 5. Disconnect electrical...
... to reinstall. NOTE: A qualified servicer should disconnect and reconnect the gas supply. Please give the complete model and serial numbers of the range which is located on the range model number plate. -10- Reverse procedure to remove appliance for gas leaks after reconnection. To prevent range from the anti-tip bracket. (See page 4). 5. Disconnect electrical...
Dimensions
Page 1
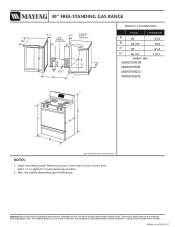
...). 2. Add 1 1/4" to front of oven door. 30" FREE-STANDING GAS RANGE 3 1/4" GAS 3 1/4" ELECTRIC SUPPLY LOCATION2 SUPPLY 25" LOCATIONS 6" 6" 36 " 6" 3" 21/4"* 30" 11" 24" PRODUCT DIMENSIONS INCHES CENTIMETERS A1 25 B 29 7/8 C2 36 D2 46 3/4 63.5 75.9 91.4 118.7 MODEL SKUs MGR5751BDW MGR5751BDB MGR5751BDQ MGR5751BDS D C A B Style of continuing product improvements, Maytag® reserves the right to change specifications without...
...). 2. Add 1 1/4" to front of oven door. 30" FREE-STANDING GAS RANGE 3 1/4" GAS 3 1/4" ELECTRIC SUPPLY LOCATION2 SUPPLY 25" LOCATIONS 6" 6" 36 " 6" 3" 21/4"* 30" 11" 24" PRODUCT DIMENSIONS INCHES CENTIMETERS A1 25 B 29 7/8 C2 36 D2 46 3/4 63.5 75.9 91.4 118.7 MODEL SKUs MGR5751BDW MGR5751BDB MGR5751BDQ MGR5751BDS D C A B Style of continuing product improvements, Maytag® reserves the right to change specifications without...


