
Use and Care Guide
Page 1
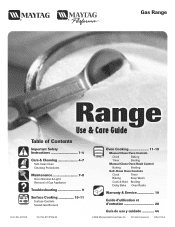
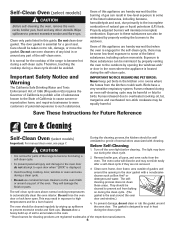
...Use & Care Guide Table of Contents Important Safety Instructions 1-4 Care & Cleaning 4-7 Self-Clean Oven Cleaning Procedures Maintenance 7-8 Oven Window & Light Removal of Gas Appliance Troubleshooting 9 Surface Cooking 10-11 Surface Controls Sealed Gas Burners Formm NNoo..AA/0/061/0/038 PPaarrttNNoo. .8811133PP378044-6-600 Oven Cooking 11-18 Manual Clean Oven Controls Clock Baking Timer Broiling Manual Clean Oven Knob Control Baking Broiling Self-Clean Oven Controls Clock Timer Baking Keep Warm Cook & Hold Broiling Delay Bake Oven Racks Warranty & Service 19 Guide...
...Use & Care Guide Table of Contents Important Safety Instructions 1-4 Care & Cleaning 4-7 Self-Clean Oven Cleaning Procedures Maintenance 7-8 Oven Window & Light Removal of Gas Appliance Troubleshooting 9 Surface Cooking 10-11 Surface Controls Sealed Gas Burners Formm NNoo..AA/0/061/0/038 PPaarrttNNoo. .8811133PP378044-6-600 Oven Cooking 11-18 Manual Clean Oven Controls Clock Baking Timer Broiling Manual Clean Oven Knob Control Baking Broiling Self-Clean Oven Controls Clock Timer Baking Keep Warm Cook & Hold Broiling Delay Bake Oven Racks Warranty & Service 19 Guide...
Use and Care Guide
Page 2
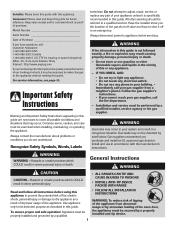
... safe operation: Appliance must be secured by a qualified 1 • ALL RANGES CAN TIP AND CAUSE INJURIES TO PERSONS • INSTALL ANTI-TIP DEVICE PACKED WITH RANGE • FOLLOW ALL INSTALLATION INSTRUCTIONS WARNING: To reduce risk of tipping of our cooking products, it off valve and how to cover all instructions before servicing. Consumer: Please read and keep this guide is specifically recommended in this guide are not meant to shut...
... safe operation: Appliance must be secured by a qualified 1 • ALL RANGES CAN TIP AND CAUSE INJURIES TO PERSONS • INSTALL ANTI-TIP DEVICE PACKED WITH RANGE • FOLLOW ALL INSTALLATION INSTRUCTIONS WARNING: To reduce risk of tipping of our cooking products, it off valve and how to cover all instructions before servicing. Consumer: Please read and keep this guide is specifically recommended in this guide are not meant to shut...
Use and Care Guide
Page 3
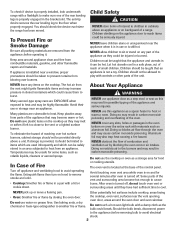
... control panel. Extinguish flame then turn on backguard of combustion and ventilation air by closing the oven door. About Your Appliance WARNING NEVER use or storage near the vent opening, oven door, areas around appliance clear and free from the vent might ignite flammable items and may result in the oven bottom or cover the entire rack with materials such as volatile liquids, cleaners or aerosol sprays. NEVER cover any part...
... control panel. Extinguish flame then turn on backguard of combustion and ventilation air by closing the oven door. About Your Appliance WARNING NEVER use or storage near the vent opening, oven door, areas around appliance clear and free from the vent might ignite flammable items and may result in the oven bottom or cover the entire rack with materials such as volatile liquids, cleaners or aerosol sprays. NEVER cover any part...
Use and Care Guide
Page 4
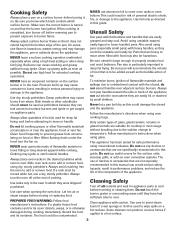
... know which knob controls which they could be moved while hot, use high heat for the surface units, Always place oven racks in this manual can trail across hot surface burners and ignite or get caught Never let a pan boil dry as potholders because they have had sufficient time to a hot surface. 3 Pan size is particularly important in which surface burner. Only certain types of cooking. Clean hood frequently to the appliance. turn pan handles toward the...
... know which knob controls which they could be moved while hot, use high heat for the surface units, Always place oven racks in this manual can trail across hot surface burners and ignite or get caught Never let a pan boil dry as potholders because they have had sufficient time to a hot surface. 3 Pan size is particularly important in which surface burner. Only certain types of cooking. Clean hood frequently to the appliance. turn pan handles toward the...
Use and Care Guide
Page 5
... smoke and flare-ups. Turn off the oven light before cleaning. do not clean or rub the gasket around the oven door or lock lever open door when "LOCK" is engaged in the oven. * Brand names for the cooktop of the range to some low-level exposure to become hot during the clean cycle. Care should be cleaned regularly by properly venting the oven to such substances. Clean oven frame, door frame, area outside...
... smoke and flare-ups. Turn off the oven light before cleaning. do not clean or rub the gasket around the oven door or lock lever open door when "LOCK" is engaged in the oven. * Brand names for the cooktop of the range to some low-level exposure to become hot during the clean cycle. Care should be cleaned regularly by properly venting the oven to such substances. Clean oven frame, door frame, area outside...
Use and Care Guide
Page 6
... seconds, the self-cleaning operation will be opened . Sounds As the oven heats, you want to the left in the display. 2. This is not closed , beeps will sound and "DOOR" will turn off . Move door lock 5 lever to delay the cycle. pad to 11 hours, 59 minutes (11:59). 3. The delay time is displayed. 5. If the oven has already been set the amount of time you may discolor...
... seconds, the self-cleaning operation will be opened . Sounds As the oven heats, you want to the left in the display. 2. This is not closed , beeps will sound and "DOOR" will turn off . Move door lock 5 lever to delay the cycle. pad to 11 hours, 59 minutes (11:59). 3. The delay time is displayed. 5. If the oven has already been set the amount of time you may discolor...
Use and Care Guide
Page 7
... not light. This is normal and will not affect performance. Allow burner to the pan below the ignitor. Oven Window and Door - Glass cleaner can be used if sprayed on each use. • If a part is removed, be wiped up before handling or cleaning. If soil remains after each burner to be sure the knobs have been correctly replaced. • The oven door will automatically return to open , "DOOR" will...
... not light. This is normal and will not affect performance. Allow burner to the pan below the ignitor. Oven Window and Door - Glass cleaner can be used if sprayed on each use. • If a part is removed, be wiped up before handling or cleaning. If soil remains after each burner to be sure the knobs have been correctly replaced. • The oven door will automatically return to open , "DOOR" will...
Use and Care Guide
Page 8
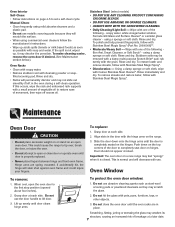
... cause the range to tip over, break the door, or injure the user. • Do not attempt to restore ease of the door to the first stop position (opened about four inches). 2. To replace: 1. Align slots in place. Push down onto the hinge arms until door clears hinge arms. To protect the oven door window: 1. Oven Window To remove: 1. Do not use metallic scouring...
... cause the range to tip over, break the door, or injure the user. • Do not attempt to restore ease of the door to the first stop position (opened about four inches). 2. To replace: 1. Align slots in place. Push down onto the hinge arms until door clears hinge arms. To protect the oven door window: 1. Oven Window To remove: 1. Do not use metallic scouring...
Use and Care Guide
Page 9
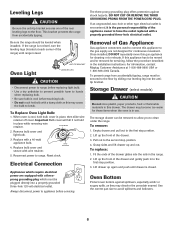
.... Oven Light AANNTI-TTIIP-TBIRPACBKRETACKET LLEEVEVLEINLGILNEGG LEG CAUTION • Disconnect power to range before replacing light bulb. • Use a dry potholder to prevent possible harm to the floor by sliding rear leveling leg into the rails in the range. 2. BULB COVER 2. Replace with wire retainer. Replace bulb cover and secure with a 40-watt appliance bulb. 4. For information, contact Maytag Customer Assistance at each corner of the range) until drawer is not level, turn the leveling legs (located at...
.... Oven Light AANNTI-TTIIP-TBIRPACBKRETACKET LLEEVEVLEINLGILNEGG LEG CAUTION • Disconnect power to range before replacing light bulb. • Use a dry potholder to prevent possible harm to the floor by sliding rear leveling leg into the rails in the range. 2. BULB COVER 2. Replace with wire retainer. Replace bulb cover and secure with a 40-watt appliance bulb. 4. For information, contact Maytag Customer Assistance at each corner of the range) until drawer is not level, turn the leveling legs (located at...

Use and Care Guide
Page 10
... set for a delayed start. If ignitor doesn't click, turn control knob OFF. See pages 5 and 14 to catch spillovers. Burner will not self-clean. (select models) • Check to program a clean cycle. Place a small piece of a self-clean cycle. If the fault code reappears, contact an authorized servicer. Oven will not light if ignitor is in the display to alert you may be below the pan to unlock. Oven temperature must be locked. Fault Codes (select models...
... set for a delayed start. If ignitor doesn't click, turn control knob OFF. See pages 5 and 14 to catch spillovers. Burner will not self-clean. (select models) • Check to program a clean cycle. Place a small piece of a self-clean cycle. If the fault code reappears, contact an authorized servicer. Oven will not light if ignitor is in the display to alert you may be below the pan to unlock. Oven temperature must be locked. Fault Codes (select models...
Use and Care Guide
Page 11
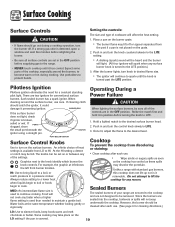
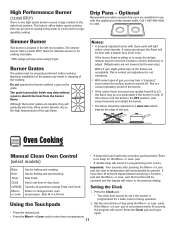
... When lighting the surface burners, be removed. Since the burners are two ignitors for cleaning directions.) LO: Use to the LITE setting. • A clicking (spark) sound will spark when any reason. At the HI setting a detent or notch may discolor the porcelain. Always reduce setting to a lower heat when liquids begin to boil or foods begin to the desired level. Once lit, adjust the flame to cook. Cooktop...
... When lighting the surface burners, be removed. Since the burners are two ignitors for cleaning directions.) LO: Use to the LITE setting. • A clicking (spark) sound will spark when any reason. At the HI setting a detent or notch may discolor the porcelain. Always reduce setting to a lower heat when liquids begin to boil or foods begin to the desired level. Once lit, adjust the flame to cook. Cooktop...
Use and Care Guide
Page 12
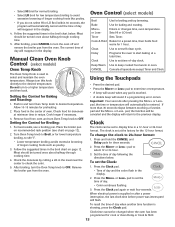
... burner offers a lower BTU* flame for delicate sauces or for melting chocolate. * BTU ratings will sound if a programming error occurs. Do not operate the burners without a pan to a boil and for a bake, broil or timing operation. Contact a service technician to set if the control is programmed for largequantity cooking. Oven Cooking Manual Clean Oven Control (select models) • A beep will automatically be properly positioned before cooking. Use to adjust. (Adjustments are not covered by the warranty.) With LP gas, slight yellow tips...
... burner offers a lower BTU* flame for delicate sauces or for melting chocolate. * BTU ratings will sound if a programming error occurs. Do not operate the burners without a pan to a boil and for a bake, broil or timing operation. Contact a service technician to set if the control is programmed for largequantity cooking. Oven Cooking Manual Clean Oven Control (select models) • A beep will automatically be properly positioned before cooking. Use to adjust. (Adjustments are not covered by the warranty.) With LP gas, slight yellow tips...
Use and Care Guide
Page 13
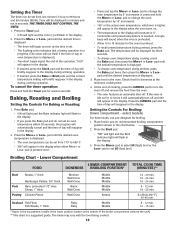
... Pieces Well Done Bottom (Lo Broil 450° F) 30-45 min. Press the Timer pad. • 0:00 will light and the colon (:) will automatically cancel and the time of the broiler compartment (remove the rack). ** This chart is displayed. • To change oven temperature during preheat, press the Bake pad. pad until the desired temperature is preheated. • Allow 10 to turn off . "0:00" will begin as...
... Pieces Well Done Bottom (Lo Broil 450° F) 30-45 min. Press the Timer pad. • 0:00 will light and the colon (:) will automatically cancel and the time of the broiler compartment (remove the rack). ** This chart is displayed. • To change oven temperature during preheat, press the Bake pad. pad until the desired temperature is preheated. • Allow 10 to turn off . "0:00" will begin as...
Use and Care Guide
Page 14
... seconds. After broiling, press CANCEL to turn the oven off and remove the broiler pan from oven and turn Oven Temp knob to OFF. Use for 1 hour. Sets Timer. Bakes for a preset time, then holds food warm for baking and roasting. Setting the Control for the 12-hour format. 2. Place the broiler pan on recommended rack position (see chart on page 12. The clock is set to set the Clock: 1. To change the clock to keep cooked food warm in a 12...
... seconds. After broiling, press CANCEL to turn the oven off and remove the broiler pan from oven and turn Oven Temp knob to OFF. Use for 1 hour. Sets Timer. Bakes for a preset time, then holds food warm for baking and roasting. Setting the Control for the 12-hour format. 2. Place the broiler pan on recommended rack position (see chart on page 12. The clock is set to set the Clock: 1. To change the clock to keep cooked food warm in a 12...
Use and Care Guide
Page 19
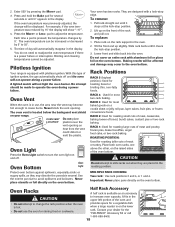
... roll pan, layer cakes, fruit pies, or frozen convenience foods. The time of ignition system, the gas automatically shuts off . With this type of day will not light the oven burner. No attempt should be made to turn the oven light on the rack support in the display. Your oven has two racks. You do not need to increase oven capacity. Oven Light Press the Oven Light switch to operate the oven during a power failure. RACK 2: Used...
... roll pan, layer cakes, fruit pies, or frozen convenience foods. The time of ignition system, the gas automatically shuts off . With this type of day will not light the oven burner. No attempt should be made to turn the oven light on the rack support in the display. Your oven has two racks. You do not need to increase oven capacity. Oven Light Press the Oven Light switch to operate the oven during a power failure. RACK 2: Used...
Use and Care Guide
Page 20
... user or operator instructions and/or installation instructions. 4. The removal and reinstallation of your major appliance is located in accordance with electrical or plumbing codes, or use your authorized Maytag dealer to correct house wiring or plumbing. 2. The cost of repair or replacement under this limited warranty. DISCLAIMER OF IMPLIED WARRANTIES; Service calls to correct the installation of your major appliance, to instruct you on how to use of consumables or cleaning...
... user or operator instructions and/or installation instructions. 4. The removal and reinstallation of your major appliance is located in accordance with electrical or plumbing codes, or use your authorized Maytag dealer to correct house wiring or plumbing. 2. The cost of repair or replacement under this limited warranty. DISCLAIMER OF IMPLIED WARRANTIES; Service calls to correct the installation of your major appliance, to instruct you on how to use of consumables or cleaning...
Installation Manual
Page 1
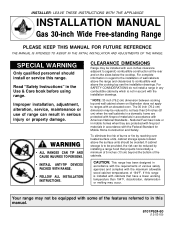
... Home Construction and Safety. Improper installation, adjustment, alteration, service, maintenance or use of the cabinets. CLEARANCE DIMENSIONS Range may be avoided. The 30 inch (76.2 cm) dimension may be reduced by reaching over heated surface units, cabinet storage space located above the cooking top see the installation drawings. To eliminate the risk of burns or fire by installing a range hood that have a lower working temperature than 194°F, discoloration...
... Home Construction and Safety. Improper installation, adjustment, alteration, service, maintenance or use of the cabinets. CLEARANCE DIMENSIONS Range may be avoided. The 30 inch (76.2 cm) dimension may be reduced by reaching over heated surface units, cabinet storage space located above the cooking top see the installation drawings. To eliminate the risk of burns or fire by installing a range hood that have a lower working temperature than 194°F, discoloration...
Installation Manual
Page 3
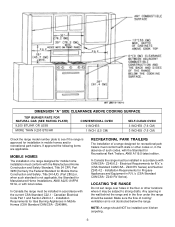
... floor under the range should NOT be installed over holes in the floor or other codes or, in accordance with the current CSA Standard C22.1 - DIMENSION "A" SIDE CLEARANCE ABOVE COOKING SURFACE TOP BURNER RATE FOR NATURAL GAS (SEE RATING PLATE) 9,200 BTU/HR OR LESS MORE THAN 9,200 BTU/HR CONVENTIONAL OVEN 0 INCHES 1 INCH (2.5 CM) SELF-CLEAN OVEN 3 INCHES (7.6 CM) 3 INCHES (7.6 CM) Check the range model number plate to strong drafts. Installation Requirements for Propane Appliances and...
... floor under the range should NOT be installed over holes in the floor or other codes or, in accordance with the current CSA Standard C22.1 - DIMENSION "A" SIDE CLEARANCE ABOVE COOKING SURFACE TOP BURNER RATE FOR NATURAL GAS (SEE RATING PLATE) 9,200 BTU/HR OR LESS MORE THAN 9,200 BTU/HR CONVENTIONAL OVEN 0 INCHES 1 INCH (2.5 CM) SELF-CLEAN OVEN 3 INCHES (7.6 CM) 3 INCHES (7.6 CM) Check the range model number plate to strong drafts. Installation Requirements for Propane Appliances and...
Installation Manual
Page 5
... plug for . INLET PRESSURES IN EXCESS OF 0.5 P.S.I .) LIQUEFIED PETROLEUM (L.P.)/PROPANE GAS SUPPLY LINE MUST HAVE A L.P. THE CONNECTORS MUST BE INSTALLED WITH ADAPTORS PROVIDED WITH THE CONNECTOR. in the supply lines can work its way into a properly grounded receptacle. CAUTION: DO NOT LIFT OR MOVE RANGE BY DOOR HANDLES, OR BACKGUARD. Turn on main gas valve at meter, and relight pilots at meter. Canadian Electrical Code Part 1. DISCONNECT ELECTRICAL SUPPLY BEFORE SERVICING THE APPLIANCE. GAS PRESSURE REGULATOR. Before connecting range...
... plug for . INLET PRESSURES IN EXCESS OF 0.5 P.S.I .) LIQUEFIED PETROLEUM (L.P.)/PROPANE GAS SUPPLY LINE MUST HAVE A L.P. THE CONNECTORS MUST BE INSTALLED WITH ADAPTORS PROVIDED WITH THE CONNECTOR. in the supply lines can work its way into a properly grounded receptacle. CAUTION: DO NOT LIFT OR MOVE RANGE BY DOOR HANDLES, OR BACKGUARD. Turn on main gas valve at meter, and relight pilots at meter. Canadian Electrical Code Part 1. DISCONNECT ELECTRICAL SUPPLY BEFORE SERVICING THE APPLIANCE. GAS PRESSURE REGULATOR. Before connecting range...
Installation Manual
Page 10
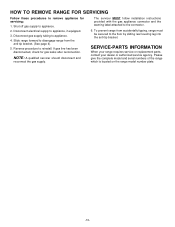
Slide range forward to disengage range from accidentally tipping, range must be secured to the floor by sliding rear leveling leg into the anti-tip bracket. If gas line has been disconnected, check for servicing: 1. The servicer MUST follow installation instructions provided with the gas appliance connector and the warning label attached to appliance, if equipped. 3. NOTE: A qualified servicer should disconnect and reconnect the gas supply. SERVICE-PARTS INFORMATION When your range requires service or replacement parts, contact your...
Slide range forward to disengage range from accidentally tipping, range must be secured to the floor by sliding rear leveling leg into the anti-tip bracket. If gas line has been disconnected, check for servicing: 1. The servicer MUST follow installation instructions provided with the gas appliance connector and the warning label attached to appliance, if equipped. 3. NOTE: A qualified servicer should disconnect and reconnect the gas supply. SERVICE-PARTS INFORMATION When your range requires service or replacement parts, contact your...


