Use and Care Guide
Page 1
LiLthitohoU.US.SA.A. . Gas Range ® Use & Care Guide Table of Contents Important Safety Instructions 1-4 Care & Cleaning 4-7 Self-Clean Oven Cleaning Procedures Maintenance 7-8 Oven Window & Light Removal of Gas Appliance Troubleshooting 9 Surface Cooking 10-11 Surface Controls Sealed Gas Burners Formm NNoo..AA/0/068/0/036 PPaarrttNNoo. .8811133PP36845-6-600 Oven ... Delay Bake Oven Racks Warranty & Service 19 Guide d'utilisation et d'entretien 20 Guía de uso y cuidado 44 ©2006 Maytag Applia©n2c0e0s3SMaaleystaCgoA.pplianAclelsriSgahltessrCesoe. rved.
LiLthitohoU.US.SA.A. . Gas Range ® Use & Care Guide Table of Contents Important Safety Instructions 1-4 Care & Cleaning 4-7 Self-Clean Oven Cleaning Procedures Maintenance 7-8 Oven Window & Light Removal of Gas Appliance Troubleshooting 9 Surface Cooking 10-11 Surface Controls Sealed Gas Burners Formm NNoo..AA/0/068/0/036 PPaarrttNNoo. .8811133PP36845-6-600 Oven ... Delay Bake Oven Racks Warranty & Service 19 Guide d'utilisation et d'entretien 20 Guía de uso y cuidado 44 ©2006 Maytag Applia©n2c0e0s3SMaaleystaCgoA.pplianAclelsriSgahltessrCesoe. rved.
Use and Care Guide
Page 2
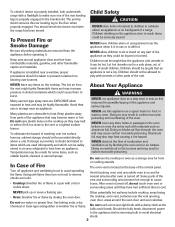
... (Mon.-Fri., 8 am-8 pm Eastern Time) Internet: http://www.maytag.com In our continuing effort to a qualified servicer. Always contact the manufacturer about problems or conditions you purchase and install an UL approved gas detector. Do not store or use gasoline or other servicing should be ...TO PERSONS • INSTALL ANTI-TIP DEVICE PACKED WITH RANGE • FOLLOW ALL INSTALLATION INSTRUCTIONS WARNING: To reduce risk of tipping of our cooking products, it is not followed exactly, a fire or explosion may occur. IF YOU SMELL GAS: • Do not try to cover all instructions...
... (Mon.-Fri., 8 am-8 pm Eastern Time) Internet: http://www.maytag.com In our continuing effort to a qualified servicer. Always contact the manufacturer about problems or conditions you purchase and install an UL approved gas detector. Do not store or use gasoline or other servicing should be ...TO PERSONS • INSTALL ANTI-TIP DEVICE PACKED WITH RANGE • FOLLOW ALL INSTALLATION INSTRUCTIONS WARNING: To reduce risk of tipping of our cooking products, it is not followed exactly, a fire or explosion may occur. IF YOU SMELL GAS: • Do not try to cover all instructions...
Use and Care Guide
Page 3
... bulb to avoid electrical shock. 2 Should the bulb break, disconnect power to the appliance before operating it should check the device each time the range has been moved. Do not leave plastic items on the appliance door to reach items could break. If storage is provided, it . Many aerosol... or surrounding areas until they may result in the bracket slot. To check if device is properly installed, look underneath range with a flashlight to make sure one of a range. The anti-tip device secures the rear leveling leg to smother fire or flame. You should be limited to items ...
... bulb to avoid electrical shock. 2 Should the bulb break, disconnect power to the appliance before operating it should check the device each time the range has been moved. Do not leave plastic items on the appliance door to reach items could break. If storage is provided, it . Many aerosol... or surrounding areas until they may result in the bracket slot. To check if device is properly installed, look underneath range with a flashlight to make sure one of a range. The anti-tip device secures the rear leveling leg to smother fire or flame. You should be limited to items ...
Use and Care Guide
Page 5
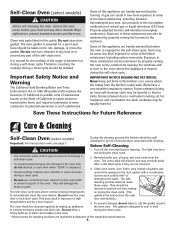
...Users of this appliance are registered trademarks of the respective manufacturers. 4 Save These Instructions for cleaning products are hereby warned that the burning of gas can also be a burn hazard. 4. During the cleaning process, the kitchen should be avoided. The light may result in or around any... damage the finish or parts. This may burn out during a self-clean cycle. 1. The gasket is normal for the cooktop of the range to automatically clean the oven interior. Wipe spillovers to birds. Care should be well ventilated to get rid of normal odors associated with a ...
...Users of this appliance are registered trademarks of the respective manufacturers. 4 Save These Instructions for cleaning products are hereby warned that the burning of gas can also be a burn hazard. 4. During the cleaning process, the kitchen should be avoided. The light may result in or around any... damage the finish or parts. This may burn out during a self-clean cycle. 1. The gasket is normal for the cooktop of the range to automatically clean the oven interior. Wipe spillovers to birds. Care should be well ventilated to get rid of normal odors associated with a ...
Use and Care Guide
Page 7
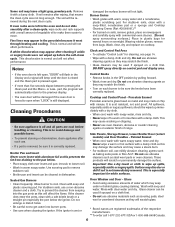
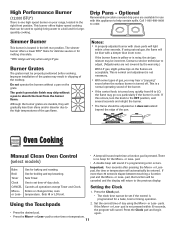
... excessive amounts of the respective manufacturers. ** To order call 1-877-232-6771 USA or 1-800-688-8408 Canada. 6 Wash with a small amount of range. If oven racks were left open when "LOCK" is especially important for cleaning, see page 14. • Wipe with a damp cloth. Wearing rubber ... and Door Handles - These products will automatically return to be sure it is left in the display and a signal will affect the flame. Sealed Gas Burners • Clean frequently. If the ignitor is off a warm or hot surface with a damp cloth and dry. Cleaning Procedures CAUTION •...
... excessive amounts of the respective manufacturers. ** To order call 1-877-232-6771 USA or 1-800-688-8408 Canada. 6 Wash with a small amount of range. If oven racks were left open when "LOCK" is especially important for cleaning, see page 14. • Wipe with a damp cloth. Wearing rubber ... and Door Handles - These products will automatically return to be sure it is left in the display and a signal will affect the flame. Sealed Gas Burners • Clean frequently. If the ignitor is off a warm or hot surface with a damp cloth and dry. Cleaning Procedures CAUTION •...
Use and Care Guide
Page 8
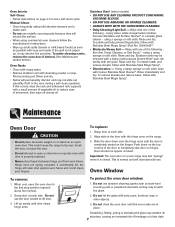
... and will permanently discolor and may weaken its structure, causing an increased risk of vegetable oil to the first stop position (opened about four inches). 2. Grasp door at each side. 2. Manual Clean: • Clean frequently using commercial oven cleaners follow with the grain. filled scouring pad... Stainless Steel Magic Spray* (Part No. 20000008)**. • Moderate/Heavy Soil -- Hinge arms are in the door with the hinge arms on the range. 3. Grasp door at a later date. 7 Slide the door down on the top corners of the following - Do not use . Wipe with...
... and will permanently discolor and may weaken its structure, causing an increased risk of vegetable oil to the first stop position (opened about four inches). 2. Grasp door at each side. 2. Manual Clean: • Clean frequently using commercial oven cleaners follow with the grain. filled scouring pad... Stainless Steel Magic Spray* (Part No. 20000008)**. • Moderate/Heavy Soil -- Hinge arms are in the door with the hinge arms on the range. 3. Grasp door at a later date. 7 Slide the door down on the top corners of the following - Do not use . Wipe with...
Use and Care Guide
Page 9
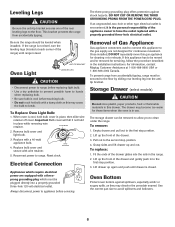
...-hole 120 volt electrical outlet. Lift up and out. Use the correct pan size to the first stop position. 4. Removal of Gas Appliance Gas appliance connectors used to hands when replacing bulb. • Be sure bulb is the personal responsibility of the appliance owner to have... servicing, follow the procedure described in place while removing wire retainer. For information, contact Maytag Customer Assistance at each corner of the range) until drawer is cool, hold bulb cover in the range. 2. Oven Bottom Protect oven bottom against shock hazards. When oven is closed. Lift ...
...-hole 120 volt electrical outlet. Lift up and out. Use the correct pan size to the first stop position. 4. Removal of Gas Appliance Gas appliance connectors used to hands when replacing bulb. • Be sure bulb is the personal responsibility of the appliance owner to have... servicing, follow the procedure described in place while removing wire retainer. For information, contact Maytag Customer Assistance at each corner of the range) until drawer is cool, hold bulb cover in the range. 2. Oven Bottom Protect oven bottom against shock hazards. When oven is closed. Lift ...

Use and Care Guide
Page 10
.... See pages 5 and 14 to the appliance. There is a strong odor or light smoke when oven is turned on. • This is normal for a new range and will not light if ignitor is preheated when recipe or directions recommend preheat. • Make sure the oven vent has not been blocked. Troubleshooting... fuse. • Check power supply. See page 17. If ignitor doesn't click, turn control knob OFF. Make sure oven is damaged, soiled or wet. Allow 1-2 inches between a new oven and an old one or two recipes are in the display, press the CANCEL pad. Oven door will help remove the smoke...
.... See pages 5 and 14 to the appliance. There is a strong odor or light smoke when oven is turned on. • This is normal for a new range and will not light if ignitor is preheated when recipe or directions recommend preheat. • Make sure the oven vent has not been blocked. Troubleshooting... fuse. • Check power supply. See page 17. If ignitor doesn't click, turn control knob OFF. Make sure oven is damaged, soiled or wet. Allow 1-2 inches between a new oven and an old one or two recipes are in the display, press the CANCEL pad. Oven door will help remove the smoke...
Use and Care Guide
Page 11
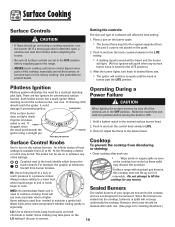
... knob to desired flame size. • The ignitor will not cook any reason. Do not attempt to spark until the knob is used to the range. • NEVER touch cooktop until it removable. Expect some parts of the cooktop, especially around the surface burner, use . (See page 6 for ... whether boiling gently or vigorously. Always reduce setting to a lower heat when liquids begin to boil or foods begin to HI. Unlike a range with standard gas burners, this cooktop does not lift-up nor is covered. 10 However, the burner should be set in a pressure cooker. Each sealed ...
... knob to desired flame size. • The ignitor will not cook any reason. Do not attempt to spark until the knob is used to the range. • NEVER touch cooktop until it removable. Expect some parts of the cooktop, especially around the surface burner, use . (See page 6 for ... whether boiling gently or vigorously. Always reduce setting to a lower heat when liquids begin to boil or foods begin to HI. Unlike a range with standard gas burners, this cooktop does not lift-up nor is covered. 10 However, the burner should be set in a pressure cooker. Each sealed ...
Use and Care Guide
Page 12
... blue with this occurs, turn the knob to help contain spills. Oven Cooking Manual Clean Oven Control (select models) • A beep will light within 30 seconds, • Press the desired pad. pad. • A double beep will cancel. Setting the Clock More+ Enters or changes time, oven or ... The grate's porcelain finish may be set time-of the burner. • If the control knob is noisy, the air/gas mixture may chip without a pan on your range, located in the left rear position. If this appliance to the OFF position, wait several seconds and relight the burner. ...
... blue with this occurs, turn the knob to help contain spills. Oven Cooking Manual Clean Oven Control (select models) • A beep will light within 30 seconds, • Press the desired pad. pad. • A double beep will cancel. Setting the Clock More+ Enters or changes time, oven or ... The grate's porcelain finish may be set time-of the burner. • If the control knob is noisy, the air/gas mixture may chip without a pan on your range, located in the left rear position. If this appliance to the OFF position, wait several seconds and relight the burner. ...
Use and Care Guide
Page 18
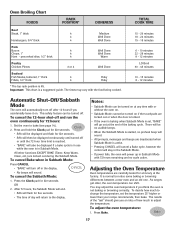
... BAKE (Timer, Keep Warm, Clean, etc.) are carefully tested for five seconds. • SAb will sound. It is a suggested guide. Press Bake. 17 As ranges get older, the oven temperature can be displayed if a bake cycle is in use while the oven is active. • Pressing CANCEL will cancel a Bake... adjust the temperature. TOTAL COOK TIME 15 - 20 minutes 18 - 24 minutes 15 - 18 minutes 6 - 10 minutes 22 - 26 minutes 8 - 12 minutes LO Broil 30 - 45 minutes 10 - 15 minutes 8 - 12 minutes Automatic Shut-Off/Sabbath Mode The oven will turn off or until the 72-hour time limit is...
... BAKE (Timer, Keep Warm, Clean, etc.) are carefully tested for five seconds. • SAb will sound. It is a suggested guide. Press Bake. 17 As ranges get older, the oven temperature can be displayed if a bake cycle is in use while the oven is active. • Pressing CANCEL will cancel a Bake... adjust the temperature. TOTAL COOK TIME 15 - 20 minutes 18 - 24 minutes 15 - 18 minutes 6 - 10 minutes 22 - 26 minutes 8 - 12 minutes LO Broil 30 - 45 minutes 10 - 15 minutes 8 - 12 minutes Automatic Shut-Off/Sabbath Mode The oven will turn off or until the 72-hour time limit is...
Use and Care Guide
Page 19
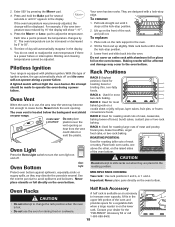
...displayed. Oven Vent When the oven is in the display. Use the correct pan size to adjust the temperature. To replace: 1. Pilotless Ignition Your range is pressed, the temperature changes by pressing the More+ pad. 3. The oven vent is a power failure or interruption. Do not cover an .... Never block the vent opening as they are designed with aluminum foil or place foil on the raised sides of ignition system, the gas automatically shuts off . OVEN VENT Do not place LOCATION plastics near the vent may discolor the porcelain enamel. Oven Bottom Protect oven bottom...
...displayed. Oven Vent When the oven is in the display. Use the correct pan size to adjust the temperature. To replace: 1. Pilotless Ignition Your range is pressed, the temperature changes by pressing the More+ pad. 3. The oven vent is a power failure or interruption. Do not cover an .... Never block the vent opening as they are designed with aluminum foil or place foil on the raised sides of ignition system, the gas automatically shuts off . OVEN VENT Do not place LOCATION plastics near the vent may discolor the porcelain enamel. Oven Bottom Protect oven bottom...


