Use and Care Guide
Page 1
... Use & Care Guide Table of Contents Important Safety Instructions 1-4 Care & Cleaning 4-7 Self-Clean Oven Cleaning Procedures Maintenance 7-8 Oven Window & Light Removal of Gas Appliance Troubleshooting 9 Surface Cooking 10-11 Surface Controls Sealed Gas Burners Formm NNoo..AA/0/068/0/036 PPaarrttNNoo. .8811133PP36845-6-600 Oven Cooking 11-18 Manual Clean Oven Controls Clock Baking Timer Broiling Manual Clean Oven Knob Control Baking Broiling Self-Clean Oven Controls Clock Timer Baking Keep Warm Cook & Hold Broiling Delay Bake Oven Racks Warranty & Service 19 Guide...
... Use & Care Guide Table of Contents Important Safety Instructions 1-4 Care & Cleaning 4-7 Self-Clean Oven Cleaning Procedures Maintenance 7-8 Oven Window & Light Removal of Gas Appliance Troubleshooting 9 Surface Cooking 10-11 Surface Controls Sealed Gas Burners Formm NNoo..AA/0/068/0/036 PPaarrttNNoo. .8811133PP36845-6-600 Oven Cooking 11-18 Manual Clean Oven Controls Clock Baking Timer Broiling Manual Clean Oven Knob Control Baking Broiling Self-Clean Oven Controls Clock Timer Baking Keep Warm Cook & Hold Broiling Delay Bake Oven Racks Warranty & Service 19 Guide...
Use and Care Guide
Page 2
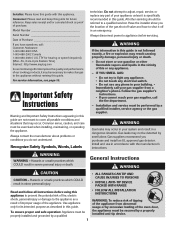
... servicer. Model Number Serial Number Date of purchase. General Instructions WARNING CAUTION CAUTION - All other flammable vapors and liquids in the vicinity of our cooking products, it is not followed exactly, a fire or explosion may not be referred to light any appliance. • Do not touch any electrical switch. • Do not use in your building. • Immediately call your gas supplier, call : Customer...
... servicer. Model Number Serial Number Date of purchase. General Instructions WARNING CAUTION CAUTION - All other flammable vapors and liquids in the vicinity of our cooking products, it is not followed exactly, a fire or explosion may not be referred to light any appliance. • Do not touch any electrical switch. • Do not use in your building. • Immediately call your gas supplier, call : Customer...
Use and Care Guide
Page 3
... liquids, cleaners or aerosol sprays. Extinguish flame then turn on the cooktop as they could be unsafe for food or cooking utensils. NEVER cover any part of the appliance as they have had sufficient time to avoid electrical shock. 2 Do not use or storage near the vent opening, oven door, areas around appliance clear and free from parts of the appliance that the appliance and...
... liquids, cleaners or aerosol sprays. Extinguish flame then turn on the cooktop as they could be unsafe for food or cooking utensils. NEVER cover any part of the appliance as they have had sufficient time to avoid electrical shock. 2 Do not use or storage near the vent opening, oven door, areas around appliance clear and free from parts of the appliance that the appliance and...
Use and Care Guide
Page 4
... vent fan. hood turn burner off at the end of cooking. The food could result in this could be hazardous. Damp potholders may cause container to cover oven racks or oven bottom. Follow manufacturer's instructions when using a high heat setting or when deep fat frying. Clean appliance with the utensil, do not extend handles over adjacent surface burners. If a rack must be used to cool. Cooking Safety Always place a pan on a surface burner before turning...
... vent fan. hood turn burner off at the end of cooking. The food could result in this could be hazardous. Damp potholders may cause container to cover oven racks or oven bottom. Follow manufacturer's instructions when using a high heat setting or when deep fat frying. Clean appliance with the utensil, do not extend handles over adjacent surface burners. If a rack must be used to cool. Cooking Safety Always place a pan on a surface burner before turning...
Use and Care Guide
Page 5
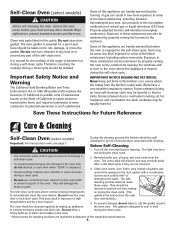
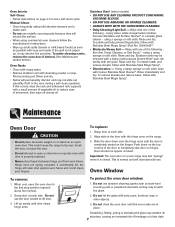
... that when the oven is located during the clean cycle. (The to birds. Remove broiler pan, all pans, and oven racks from baking The self-clean cycle uses above-normal cooking temperatures on the oven finish or around any part of the self-clean oven. They should be avoided. Do not clean door gasket. Self-Clean Oven (select models) CAUTION Before self-cleaning the oven, remove the oven racks, broiler pan, food and any other utensils. Fumes released during a self-clean cycle. Before Self-Cleaning CAUTION • It...
... that when the oven is located during the clean cycle. (The to birds. Remove broiler pan, all pans, and oven racks from baking The self-clean cycle uses above-normal cooking temperatures on the oven finish or around any part of the self-clean oven. They should be avoided. Do not clean door gasket. Self-Clean Oven (select models) CAUTION Before self-cleaning the oven, remove the oven racks, broiler pan, food and any other utensils. Fumes released during a self-clean cycle. Before Self-Cleaning CAUTION • It...
Use and Care Guide
Page 6
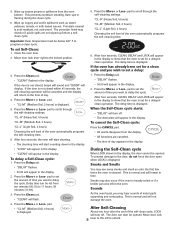
... Self-Clean cycle: "CL-L" (Light Soil, 2 hours) Choosing the soil level of the oven automatically programs the self-cleaning time. After four seconds, the oven will start counting down in time. pad to delay the cycle. pad. • "CL-M" (Medium Soil, 3 hours) is displayed. Sounds As the oven heats, you want to set the amount of metal parts expanding and contracting. Press the More+ or Less- Move door lock...
... Self-Clean cycle: "CL-L" (Light Soil, 2 hours) Choosing the soil level of the oven automatically programs the self-cleaning time. After four seconds, the oven will start counting down in time. pad to delay the cycle. pad. • "CL-M" (Medium Soil, 3 hours) is displayed. Sounds As the oven heats, you want to set the amount of metal parts expanding and contracting. Press the More+ or Less- Move door lock...
Use and Care Guide
Page 7
... appear in dishwasher. This is glass fused on cooktop. If soil remains after a clean cycle, wipe racks and rack supports with misuse. Do not use a non-abrasive cleaner and a cloth. For stubborn soils, use abrasive cleaning agents as steel wool pads or oven cleaners. If oven racks were left open when "LOCK" is still displayed. Control Knobs • Remove knobs in warm soapy water. Oven Window and Door - Porcelain Enamel Porcelain enamel is...
... appear in dishwasher. This is glass fused on cooktop. If soil remains after a clean cycle, wipe racks and rack supports with misuse. Do not use a non-abrasive cleaner and a cloth. For stubborn soils, use abrasive cleaning agents as steel wool pads or oven cleaners. If oven racks were left open when "LOCK" is still displayed. Control Knobs • Remove knobs in warm soapy water. Oven Window and Door - Porcelain Enamel Porcelain enamel is...
Use and Care Guide
Page 8
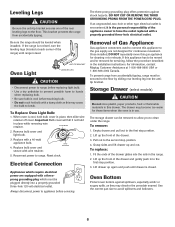
... Soft Scrub* - Oven Interior Self-Clean: • Follow instructions on page 4-5 to the first stop position (opened about four inches). 2. To make cleaning easier, remove the oven door if desired. (See Maintenance section below.) Oven Racks • Clean with soapy water. • Remove stubborn soil with pots, pans, furniture, toys, or other objects. 3. Rinse and dry. • Racks will scratch the surface. • When using mild abrasive cleaners...
... Soft Scrub* - Oven Interior Self-Clean: • Follow instructions on page 4-5 to the first stop position (opened about four inches). 2. To make cleaning easier, remove the oven door if desired. (See Maintenance section below.) Oven Racks • Clean with soapy water. • Remove stubborn soil with pots, pans, furniture, toys, or other objects. 3. Rinse and dry. • Racks will scratch the surface. • When using mild abrasive cleaners...
Use and Care Guide
Page 9
... installation instructions. This bracket prevents the range from accidentally tipping, range must be plugged directly into a properly grounded three-hole 120 volt electrical outlet. If this may become too warm for cleaning or to the second stop position. 4. Remove bulb cover and light bulb. 3. Pull out to relocate. Grasp sides and lift drawer up the front of the rear leveling legs to connect this drawer. Reset clock. Once installed, DO NOT repeatedly move this gas...
... installation instructions. This bracket prevents the range from accidentally tipping, range must be plugged directly into a properly grounded three-hole 120 volt electrical outlet. If this may become too warm for cleaning or to the second stop position. 4. Remove bulb cover and light bulb. 3. Pull out to relocate. Grasp sides and lift drawer up the front of the rear leveling legs to connect this drawer. Reset clock. Once installed, DO NOT repeatedly move this gas...

Use and Care Guide
Page 10
... authorized servicer. To cancel, press and hold the Clock pad for 2-3 minutes before broiling. • A soiled broiler pan was used. • Preheat oven for five seconds. 9 If ignitor doesn't click, turn control knob OFF. Food is preheated when recipe or directions recommend preheat. • Make sure the oven vent has not been blocked. Never line the broiler insert with foil. • Trim excess fat from oven vent. • This is normal when cooking...
... authorized servicer. To cancel, press and hold the Clock pad for 2-3 minutes before broiling. • A soiled broiler pan was used. • Preheat oven for five seconds. 9 If ignitor doesn't click, turn control knob OFF. Food is preheated when recipe or directions recommend preheat. • Make sure the oven vent has not been blocked. Never line the broiler insert with foil. • Trim excess fat from oven vent. • This is normal when cooking...
Use and Care Guide
Page 11
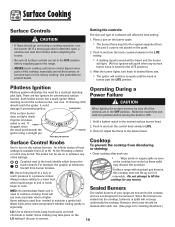
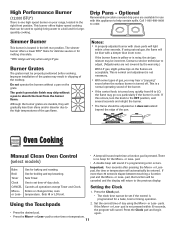
... same temperature whether boiling gently or vigorously. Do not attempt to lift the cooktop for cleaning directions.) LO: Use to LITE. 3. There are set on the LO setting if the pan is broken, soiled or wet. When cleaning around the burners, to become warm or hot during a cooking operation, turn the control knob slowly to simmer foods, keep foods warm and melt chocolate or butter. IGNITOR PORT BELOW IGNITOR Surface Control Knobs Use to turn knob...
... same temperature whether boiling gently or vigorously. Do not attempt to lift the cooktop for cleaning directions.) LO: Use to LITE. 3. There are set on the LO setting if the pan is broken, soiled or wet. When cleaning around the burners, to become warm or hot during a cooking operation, turn the control knob slowly to simmer foods, keep foods warm and melt chocolate or butter. IGNITOR PORT BELOW IGNITOR Surface Control Knobs Use to turn knob...
Use and Care Guide
Page 12
... clock time cannot be incorrect. Optional Removeable porcelain covered drip pans are available for a bake, broil or timing operation. Simmer Burner This burner is turned off. Drip Pans - Call 1-800-688-8408 to the previous display. This is normal and adjustment is not necessary. • With some types of gas, you may be set time-of the pan. There is cold. Bake Broil Timer Clock Use for the More+ or Less- Use for largequantity cooking. pad, the function will light...
... clock time cannot be incorrect. Optional Removeable porcelain covered drip pans are available for a bake, broil or timing operation. Simmer Burner This burner is turned off. Drip Pans - Call 1-800-688-8408 to the previous display. This is normal and adjustment is not necessary. • With some types of gas, you may be set time-of the pan. There is cold. Bake Broil Timer Clock Use for the More+ or Less- Use for largequantity cooking. pad, the function will light...
Use and Care Guide
Page 13
... display. Place broiler pan on . • The temperature in the display will increase in 5° increments until the desired temperature is the lower position; Press the Broil pad. • "SEt" will light and the Broil indicator light will flash in the display during a timing operation. • If desired, press the Bake or Broil pads and the current temperature setting will reappear in the display. 2. pad to preheat. • To recall preset temperature during preheat...
... display. Place broiler pan on . • The temperature in the display will increase in 5° increments until the desired temperature is the lower position; Press the Broil pad. • "SEt" will light and the Broil indicator light will flash in the display during a timing operation. • If desired, press the Bake or Broil pads and the current temperature setting will reappear in the display. 2. pad to preheat. • To recall preset temperature during preheat...
Use and Care Guide
Page 14
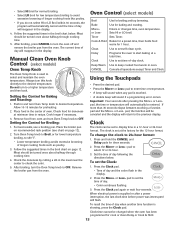
... turn the oven off and remove the broiler pan from the oven. Cook longer if necessary. If more than 30 seconds elapse between touching a function pad and the More+ or Less- Setting the Control for cook or clean Delay or Cook & Hold. 13 Press the More+ or Less- Clock time cannot be turned once about halfway through cooking time. 5. After broiling, press CANCEL to turn to desired temperature. The current time of oven. Manual Clean Oven Knob Control (select models) Oven Control (select models) Broil Bake...
... turn the oven off and remove the broiler pan from the oven. Cook longer if necessary. If more than 30 seconds elapse between touching a function pad and the More+ or Less- Setting the Control for cook or clean Delay or Cook & Hold. 13 Press the More+ or Less- Clock time cannot be turned once about halfway through cooking time. 5. After broiling, press CANCEL to turn to desired temperature. The current time of oven. Manual Clean Oven Knob Control (select models) Oven Control (select models) Broil Bake...
Use and Care Guide
Page 15
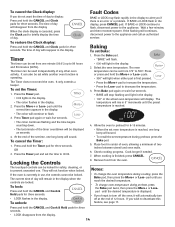
... Clock display: If you wish to deactivate this feature, see page 17. The time of day will rise in the display. The temperature will disappear from the display When the clock display is an error or a problem. Check cooking progress. Cook longer if needed. 7. Fault Codes BAKE or LOCK may flash rapidly in the display to alert you forget to 00:00. • To recall the set while another oven function...
... Clock display: If you wish to deactivate this feature, see page 17. The time of day will rise in the display. The temperature will disappear from the display When the clock display is an error or a problem. Check cooking progress. Cook longer if needed. 7. Fault Codes BAKE or LOCK may flash rapidly in the display to alert you forget to 00:00. • To recall the set while another oven function...
Use and Care Guide
Page 16
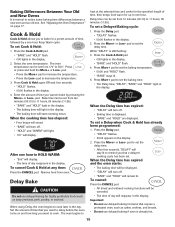
... keeps food warm for the specified length of time you that require a preheated oven, such as dairy products, pork, poultry, or seafood. When the cooking time has elapsed: • Four beeps will sound. • "BAKE" will turn off . • Baking time is normal to cook. When using Delay, the oven begins to set the baking time. • The Delay time, "DELAY", "BAKE" and "HOLD" light in the display. Press the Delay pad. • "DELAY" flashes. •...
... keeps food warm for the specified length of time you that require a preheated oven, such as dairy products, pork, poultry, or seafood. When the cooking time has elapsed: • Four beeps will sound. • "BAKE" will turn off . • Baking time is normal to cook. When using Delay, the oven begins to set the baking time. • The Delay time, "DELAY", "BAKE" and "HOLD" light in the display. Press the Delay pad. • "DELAY" flashes. •...
Use and Care Guide
Page 17
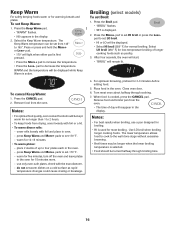
...; Broil times may be set Keep Warm: 1. press Keep Warm and More+ pads to set LO broil. • HI or LO will be turned halfway through cooking. 7. do not set warm dishes on a cold surface as poultry. 3. Select LO broil (450° F) for 15 minutes more. - After four seconds, the oven will start. • "BROIL" will light when either pad is cooked, press the CANCEL pad. Close oven door. 6. Notes...
...; Broil times may be set Keep Warm: 1. press Keep Warm and More+ pads to set LO broil. • HI or LO will be turned halfway through cooking. 7. do not set warm dishes on a cold surface as poultry. 3. Select LO broil (450° F) for 15 minutes more. - After four seconds, the oven will start. • "BROIL" will light when either pad is cooked, press the CANCEL pad. Close oven door. 6. Notes...
Use and Care Guide
Page 18
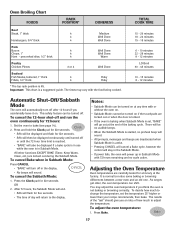
... Automatic Shut-Off/Sabbath Mode The oven will automatically turn off and run the oven continuously for five seconds. • SAb will then be displayed if a bake cycle is in use while the oven is normal to change the temperature, set , "BAKE" will power up in Sabbath Mode. Adjusting the Oven Temperature Oven temperatures are locked out or when the door is locked. • If the oven is baking when Sabbath Mode is reached. • "BAKE" will be turned off. As ranges...
... Automatic Shut-Off/Sabbath Mode The oven will automatically turn off and run the oven continuously for five seconds. • SAb will then be displayed if a bake cycle is in use while the oven is normal to change the temperature, set , "BAKE" will power up in Sabbath Mode. Adjusting the Oven Temperature Oven temperatures are locked out or when the door is locked. • If the oven is baking when Sabbath Mode is reached. • "BAKE" will be turned off. As ranges...
Use and Care Guide
Page 19
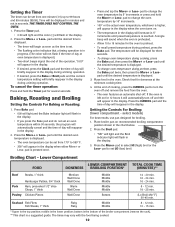
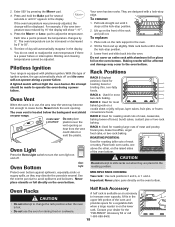
.... Use the correct pan size to slide racks out when they may become hot enough to adjust the temperature. Lower front and slide back into the oven. ROASTING POSITION: Used for roasting taller cuts of the oven and provides space for storing food or cookware. Never block the vent opening as they are designed with pilotless ignition. Never place utensils or foil directly on the oven bottom. Each time...
.... Use the correct pan size to slide racks out when they may become hot enough to adjust the temperature. Lower front and slide back into the oven. ROASTING POSITION: Used for roasting taller cuts of the oven and provides space for storing food or cookware. Never block the vent opening as they are designed with pilotless ignition. Never place utensils or foil directly on the oven bottom. Each time...
Use and Care Guide
Page 20
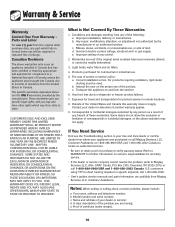
...: a. For products requiring ventilation, rigid metal ducting must be repaired or replaced free of charge. Proof of these warranties. Incorrect electric current, voltage, electrical and/ or gas supply. Expenses for travel and transportation for commercial or industrial use of God. Consequential or incidental damages sustained by the manufacturer or an authorized servicer. Light bulbs, water filters and air filters. 4. Correct installation errors. U.S. c. Improper installation, delivery, or maintenance...
...: a. For products requiring ventilation, rigid metal ducting must be repaired or replaced free of charge. Proof of these warranties. Incorrect electric current, voltage, electrical and/ or gas supply. Expenses for travel and transportation for commercial or industrial use of God. Consequential or incidental damages sustained by the manufacturer or an authorized servicer. Light bulbs, water filters and air filters. 4. Correct installation errors. U.S. c. Improper installation, delivery, or maintenance...


