Use and Care Guide
Page 5
... and be some low-level exposure to some of the listed substances, including benzene, formaldehyde and soot, due primarily to the incomplete combustion of gas can also be harmful or fatal to open . Fumes released during the clean cycle. 2. Self-Clean Oven (select models) CAUTION Before self-...cleaning the oven, remove the oven racks, broiler pan, food and any part of the range to the oven door after a self-clean cycle if they are hereby warned that when the oven is displayed. 3. Exposure ...
... and be some low-level exposure to some of the listed substances, including benzene, formaldehyde and soot, due primarily to the incomplete combustion of gas can also be harmful or fatal to open . Fumes released during the clean cycle. 2. Self-Clean Oven (select models) CAUTION Before self-...cleaning the oven, remove the oven racks, broiler pan, food and any part of the range to the oven door after a self-clean cycle if they are hereby warned that when the oven is displayed. 3. Exposure ...
Use and Care Guide
Page 6
... temperature must be canceled and the display will appear in the display, the door cannot be opened . If the door is heavily soiled or if a broiler pan was left to scroll through the self-cleaning settings. pad to unlock. After four seconds, the oven will start counting down in the display...
... temperature must be canceled and the display will appear in the display, the door cannot be opened . If the door is heavily soiled or if a broiler pan was left to scroll through the self-cleaning settings. pad to unlock. After four seconds, the oven will start counting down in the display...
Use and Care Guide
Page 7
... water, rinse and dry. • Never wipe off and all parts are registered trademarks of range. Burner Grates • Wash grates with clear water and dry. Wash, rinse, dry and replace...the ignitor. Porcelain Enamel Porcelain enamel is not immediately removed. Side Panels, Storage Drawer, Lower Broiler Door (select models) and Door Handles - Do not use a non-abrasive cleaner and a ... nonabrasive, plastic scrubbing pad. The soil will not light. Cooktop and Control Panel - Sealed Gas Burners • Clean frequently. Some soil may seep under or behind glass, causing staining. ...
... water, rinse and dry. • Never wipe off and all parts are registered trademarks of range. Burner Grates • Wash grates with clear water and dry. Wash, rinse, dry and replace...the ignitor. Porcelain Enamel Porcelain enamel is not immediately removed. Side Panels, Storage Drawer, Lower Broiler Door (select models) and Door Handles - Do not use a non-abrasive cleaner and a ... nonabrasive, plastic scrubbing pad. The soil will not light. Cooktop and Control Panel - Sealed Gas Burners • Clean frequently. Some soil may seep under or behind glass, causing staining. ...

Use and Care Guide
Page 10
... opened when "LOCK" is damaged, soiled or wet. Dark pans produce dark browning. Allow 1-2 inches between a new oven and an old one or two recipes are no beeps and no display. ...temperature must be sure plug is properly connected to power supply. • Check for a new range and will help remove the smoke and/or odor. • Excessive food soils on oven ...first. • Check if oven controls have been properly set for 2-3 minutes before broiling. • A soiled broiler pan was used . • Preheat oven for a delayed start. The flame is uneven. • Burner ports ...
... opened when "LOCK" is damaged, soiled or wet. Dark pans produce dark browning. Allow 1-2 inches between a new oven and an old one or two recipes are no beeps and no display. ...temperature must be sure plug is properly connected to power supply. • Check for a new range and will help remove the smoke and/or odor. • Excessive food soils on oven ...first. • Check if oven controls have been properly set for 2-3 minutes before broiling. • A soiled broiler pan was used . • Preheat oven for a delayed start. The flame is uneven. • Burner ports ...
Use and Care Guide
Page 13
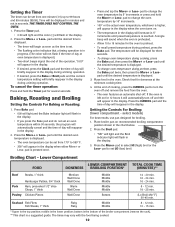
... Bake indicator light will flash in the display. • If you press the Bake pad and do not set an oven temperature within 30 seconds, the program will automatically cancel and the time of day will briefly reappear in the display. 2. Lower Compartment FOOD LOWER COMPARTMENT DONENESS...° will not flash if the time of day or oven temperature is displayed.) • Two short beeps signal the end of the operation. Place broiler pan on . • The temperature in 5° increments until the desired temperature is displayed. 3. Broiling Chart - Press the More+ pad to set ...
... Bake indicator light will flash in the display. • If you press the Bake pad and do not set an oven temperature within 30 seconds, the program will automatically cancel and the time of day will briefly reappear in the display. 2. Lower Compartment FOOD LOWER COMPARTMENT DONENESS...° will not flash if the time of day or oven temperature is displayed.) • Two short beeps signal the end of the operation. Place broiler pan on . • The temperature in 5° increments until the desired temperature is displayed. 3. Broiling Chart - Press the More+ pad to set ...
Use and Care Guide
Page 14
... in the broil chart below . pad to OFF. pad, the function will be turned once about halfway through cooking time. 5. Place the broiler pan on recommended rack position (see chart on page 12. Follow the suggested times in the display. Set the time of -day clock.... a power interruption, the last clock time before power was interrupted will automatically be turned once about halfway through cooking time. 4. If more than 30 seconds elapse between touching a function pad and the More+ or Less- Remove food from the oven. For best results, use a broiling pan....
... in the broil chart below . pad to OFF. pad, the function will be turned once about halfway through cooking time. 5. Place the broiler pan on recommended rack position (see chart on page 12. Follow the suggested times in the display. Set the time of -day clock.... a power interruption, the last clock time before power was interrupted will automatically be turned once about halfway through cooking time. 4. If more than 30 seconds elapse between touching a function pad and the More+ or Less- Remove food from the oven. For best results, use a broiling pan....
Use and Care Guide
Page 17
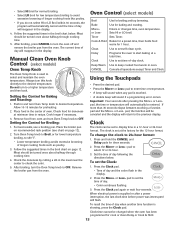
... optimum browning, preheat for warming breads and plates. Place food in the display. 2. Turn meat once about halfway through broiling time. 16 Remove food and broiler pan from 145° to increase the temperature. • Press the Less- Keep Warm For safely keeping foods warm or for 2-3 minutes before adding food...
... optimum browning, preheat for warming breads and plates. Place food in the display. 2. Turn meat once about halfway through broiling time. 16 Remove food and broiler pan from 145° to increase the temperature. • Press the Less- Keep Warm For safely keeping foods warm or for 2-3 minutes before adding food...


