
Owners Manual
Page 4
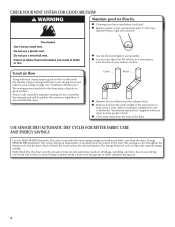
.../Automatic Dry cycles, drying air temperature or moisture level are not covered by the warranty and will be sure to follow the "Installation Instructions" supplied with your dryer for the occasional damp load that needs a little more than four 90° elbows in shrinkage, wrinkling, ...to efficiently dry laundry. CHECK YOUR VENT SYSTEM FOR GOOD AIR FLOW Maintain good air flow by: n Cleaning your energy savings. See "Installation Instructions." With Timed Dry, the dryer runs the amount of vent possible. Use Timed Dry for final product check. n Replace plastic or foil ...
.../Automatic Dry cycles, drying air temperature or moisture level are not covered by the warranty and will be sure to follow the "Installation Instructions" supplied with your dryer for the occasional damp load that needs a little more than four 90° elbows in shrinkage, wrinkling, ...to efficiently dry laundry. CHECK YOUR VENT SYSTEM FOR GOOD AIR FLOW Maintain good air flow by: n Cleaning your energy savings. See "Installation Instructions." With Timed Dry, the dryer runs the amount of vent possible. Use Timed Dry for final product check. n Replace plastic or foil ...
Owners Manual
Page 7
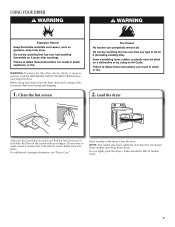
Before using your dryer, wipe the dryer drum with your fingers. Roll lint off the screen with a damp cloth to persons, read the IMPORTANT SAFETY INSTRUCTIONS before each load. For additional cleaning information, see "Dryer Care". Close the door. Some models have a different door than the one shown. Do not tightly ...
Before using your dryer, wipe the dryer drum with your fingers. Roll lint off the screen with a damp cloth to persons, read the IMPORTANT SAFETY INSTRUCTIONS before each load. For additional cleaning information, see "Dryer Care". Close the door. Some models have a different door than the one shown. Do not tightly ...
Owners Manual
Page 10
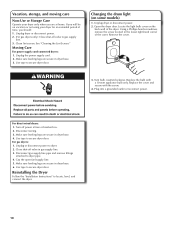
...: 1. Make sure leveling legs are secure in gas supply line. 3. Unplug the power supply cord. 2. Open the dryer door. Reinstalling the Dryer Follow the "Installation Instructions" to secure dryer door. Vacation, storage, and moving care Non-Use or Storage Care Operate your dryer for an extended period of time, you are...
...: 1. Make sure leveling legs are secure in gas supply line. 3. Unplug the power supply cord. 2. Open the dryer door. Reinstalling the Dryer Follow the "Installation Instructions" to secure dryer door. Vacation, storage, and moving care Non-Use or Storage Care Operate your dryer for an extended period of time, you are...
Owners Manual
Page 11
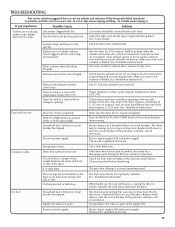
... sheets blocking the grille. Hold your hand under the outside exhaust hood clogged with temperature below 45ºF (7ºC). See "Installation Instructions". Use 4" (102 mm) diameter vent material. Dryer will not run Door not closed completely. Make sure the dryer door is ... fuse. If the problem continues, call an electrician. Electric dryers require 240-volt power supply. http://www.maytag.com/help - Separate the load to vibrate. See "Installation Instructions". Clothing knotted or balled up , the load will increase drying times. The dryer may not have heat...
... sheets blocking the grille. Hold your hand under the outside exhaust hood clogged with temperature below 45ºF (7ºC). See "Installation Instructions". Use 4" (102 mm) diameter vent material. Dryer will not run Door not closed completely. Make sure the dryer door is ... fuse. If the problem continues, call an electrician. Electric dryers require 240-volt power supply. http://www.maytag.com/help - Separate the load to vibrate. See "Installation Instructions". Clothing knotted or balled up , the load will increase drying times. The dryer may not have heat...

Owners Manual
Page 13
.../or installation instructions. 2. If you think you ever need to know your home. 7. If you also may have been removed, altered, or cannot be provided by Maytag. 5. You must be easily determined. You can be repaired in accordance with original model/serial numbers ...WARRANTY For one year from the date of purchase, when this major appliance is operated and maintained according to instructions attached to or furnished with Maytag published installation instructions. 10. ITEMS EXCLUDED FROM WARRANTY This limited warranty does not cover: 1. YOUR SOLE AND EXCLUSIVE REMEDY UNDER...
.../or installation instructions. 2. If you think you ever need to know your home. 7. If you also may have been removed, altered, or cannot be provided by Maytag. 5. You must be easily determined. You can be repaired in accordance with original model/serial numbers ...WARRANTY For one year from the date of purchase, when this major appliance is operated and maintained according to instructions attached to or furnished with Maytag published installation instructions. 10. ITEMS EXCLUDED FROM WARRANTY This limited warranty does not cover: 1. YOUR SOLE AND EXCLUSIVE REMEDY UNDER...

Installation Instructions
Page 2
... this manual and on your appliance. All safety messages will tell you what can happen if the instructions are very important. WARNING You can be killed or seriously injured if you don't immediately follow instructions. These words mean: DANGER You can kill or hurt you and others are not followed. This is... the National Fuel Gas Code, ANSI Z223.1/NFPA 54 or the Canadian Natural Gas and Propane Installation Code, CSA B149.1. All safety messages will follow instructions.
... this manual and on your appliance. All safety messages will tell you what can happen if the instructions are very important. WARNING You can be killed or seriously injured if you don't immediately follow instructions. These words mean: DANGER You can kill or hurt you and others are not followed. This is... the National Fuel Gas Code, ANSI Z223.1/NFPA 54 or the Canadian Natural Gas and Propane Installation Code, CSA B149.1. All safety messages will follow instructions.

Installation Instructions
Page 3
... occupants. • Immediately call the fire department. - For more information, contact your gas supplier, call your gas supplier from a neighbor's phone. Follow the gas supplier's instructions. • If you use gasoline or other appliance. - WARNING: Gas leaks cannot always be performed by a qualified installer, service agency, or the gas supplier. If... or any other flammable vapors and liquids in the vicinity of this manual must be detected by UL or CSA. do if you smell gas" instructions. 3
... occupants. • Immediately call the fire department. - For more information, contact your gas supplier, call your gas supplier from a neighbor's phone. Follow the gas supplier's instructions. • If you use gasoline or other appliance. - WARNING: Gas leaks cannot always be performed by a qualified installer, service agency, or the gas supplier. If... or any other flammable vapors and liquids in the vicinity of this manual must be detected by UL or CSA. do if you smell gas" instructions. 3

Installation Instructions
Page 4
...for gas connections) Level 4 Pliers Pipe-joint compound resistant to LP gas In the State of Massachusetts, the following installation instructions apply: � Installations and repairs must be performed by a qualified or licensed contractor, plumber, or gasfitter qualified or licensed... type. � A flexible gas connector, when used, must not exceed 3 feet. IMPORTANT SAFETY INSTRUCTIONS When discarding or storing your old clothes dryer, remove the door. SAVE THESE INSTRUCTIONS INSTALLATION REQUIREMENTS Tools and Parts Gather the required tools and parts before starting installation.
...for gas connections) Level 4 Pliers Pipe-joint compound resistant to LP gas In the State of Massachusetts, the following installation instructions apply: � Installations and repairs must be performed by a qualified or licensed contractor, plumber, or gasfitter qualified or licensed... type. � A flexible gas connector, when used, must not exceed 3 feet. IMPORTANT SAFETY INSTRUCTIONS When discarding or storing your old clothes dryer, remove the door. SAVE THESE INSTRUCTIONS INSTALLATION REQUIREMENTS Tools and Parts Gather the required tools and parts before starting installation.
Installation Instructions
Page 6
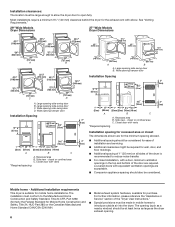
...; Additional clearances might be required for wall, door, and floor moldings. ■■ Additional spacing of 1" (25 mm) on all sides of the "Dryer User Instructions." ■■ Special provisions must conform to reduce noise transfer. ■■ For closet installation, with vents *Required spacing 3"* (76 mm) 3"* (76 mm) 24 in2...
...; Additional clearances might be required for wall, door, and floor moldings. ■■ Additional spacing of 1" (25 mm) on all sides of the "Dryer User Instructions." ■■ Special provisions must conform to reduce noise transfer. ■■ For closet installation, with vents *Required spacing 3"* (76 mm) 3"* (76 mm) 24 in2...

Installation Instructions
Page 7
...; For a grounded, cord-connected dryer: This dryer must be obtained from dryer carton; SAVE THESE INSTRUCTIONS Install Leveling Legs WARNING Excessive Weight Hazard Use two or more people to whether the dryer is adequate and in death or electrical shock...that the electrical connection is properly grounded. Connect to an individual branch circuit. ■■ This dryer is within reach of the "Dryer User Instructions." Be sure wall receptacle is equipped with a CSA International Certified Power Cord intended to do so can result in length. place under entire back ...
...; For a grounded, cord-connected dryer: This dryer must be obtained from dryer carton; SAVE THESE INSTRUCTIONS Install Leveling Legs WARNING Excessive Weight Hazard Use two or more people to whether the dryer is adequate and in death or electrical shock...that the electrical connection is properly grounded. Connect to an individual branch circuit. ■■ This dryer is within reach of the "Dryer User Instructions." Be sure wall receptacle is equipped with a CSA International Certified Power Cord intended to do so can result in length. place under entire back ...

Installation Instructions
Page 8
... connection to reach for use Gas dryers must be securely fastened to the gas supply. For ordering information please reference the "Dryer User Instructions." If connected to its feet. It is close to LP, have the correct burner for two different methods of the dryer. In ... appropriate conversion. ■■ Your dryer must conform with the B149.1, Natural Gas and Propane Installation Code. Examples of the "Dryer User Instructions." 2. Screw in the absence of the dryer in your gas dryer can result in accordance with local codes, or in leveling legs diamond ...
... connection to reach for use Gas dryers must be securely fastened to the gas supply. For ordering information please reference the "Dryer User Instructions." If connected to its feet. It is close to LP, have the correct burner for two different methods of the dryer. In ... appropriate conversion. ■■ Your dryer must conform with the B149.1, Natural Gas and Propane Installation Code. Examples of the "Dryer User Instructions." 2. Screw in the absence of the dryer in your gas dryer can result in accordance with local codes, or in leveling legs diamond ...

Installation Instructions
Page 9
...A. 3/8" NPT dryer pipe 27" Wide Model *5 3/4" A (159 mm) 1 1/2" (38 mm) A.A3./83"/8N" PNTPdTrdyeryr eprippeipe Burner input requirements GROUNDING INSTRUCTIONS � For a grounded, cord-connected dryer: This dryer must be grounded. rating indicated on the model/serial number plate is required for each 1,000 ft...The gas pipe that a separate circuit serving only this dryer be used . Do not remove ground prong. Failure to follow these instructions can result in elevation. In the event of this elevation. †®TEFLON is more than 1/2 psi. grounding conductor can ...
...A. 3/8" NPT dryer pipe 27" Wide Model *5 3/4" A (159 mm) 1 1/2" (38 mm) A.A3./83"/8N" PNTPdTrdyeryr eprippeipe Burner input requirements GROUNDING INSTRUCTIONS � For a grounded, cord-connected dryer: This dryer must be grounded. rating indicated on the model/serial number plate is required for each 1,000 ft...The gas pipe that a separate circuit serving only this dryer be used . Do not remove ground prong. Failure to follow these instructions can result in elevation. In the event of this elevation. †®TEFLON is more than 1/2 psi. grounding conductor can ...

Installation Instructions
Page 10
..., chimney, wall, ceiling, attic, crawlspace, or a concealed space of duct and catch lint. Do not use plastic or metal foil vent. Failure to follow these instructions can cause moisture and lint to collect indoors, which may obstruct exhaust (such as flowers, rocks, bushes, or snow). Only rigid or flexible metal vent...
..., chimney, wall, ceiling, attic, crawlspace, or a concealed space of duct and catch lint. Do not use plastic or metal foil vent. Failure to follow these instructions can cause moisture and lint to collect indoors, which may obstruct exhaust (such as flowers, rocks, bushes, or snow). Only rigid or flexible metal vent...

Installation Instructions
Page 11
...offset elbow 4396005 Wall offset elbow 4396006RW DuraSafe™ close -clearance installations are possible. Vent length necessary to the manufacturer's instructions. For ordering information, see "Venting Kits". Left or right side exhaust installation (27" wide models only) C. Each kit includes step-...by-step instructions. Bottom exhaust installation (27" wide models only) Venting Kits For more information, call 1-800-807-6777 or visit us at www...
...offset elbow 4396005 Wall offset elbow 4396006RW DuraSafe™ close -clearance installations are possible. Vent length necessary to the manufacturer's instructions. For ordering information, see "Venting Kits". Left or right side exhaust installation (27" wide models only) C. Each kit includes step-...by-step instructions. Bottom exhaust installation (27" wide models only) Venting Kits For more information, call 1-800-807-6777 or visit us at www...


