Maytag MED5630HC Support and Manuals
Get Help and Manuals for this Maytag item
View All Support Options Below
Free Maytag MED5630HC manuals!
Problems with Maytag MED5630HC?
Ask a Question
Free Maytag MED5630HC manuals!
Problems with Maytag MED5630HC?
Ask a Question
Popular Maytag MED5630HC Manual Pages
Installation Instructions - Page 3
... the State of Massachusetts, the following installation instructions apply: I Installations and repairs must be performed by
the State of Massachusetts. do not use any phone in the vicinity of local codes, with the National Fuel Gas Code, ANSI Z223.1/NFPA 54, or the Natural Gas and Propane Installation Code, CSA B149.1. The dryer must be performed by a qualified or...
Installation Instructions - Page 4

... mm) or 10" (254 mm) pipe wrench
8" (203 mm) or 10" (254 mm) adjustable wrench (for gas connections)
1/4" (6 mm) and 5/16" (8 mm) nut driver (recommended)
Level
Pipe-joint compound resistant to 1" (25 mm) or hex-head socket wrench
Wire stripper (direct wire installations)
4
Rubber washer
5' (1.52 m) inlet hose
Parts package is located in dryer drum.
Installation Instructions - Page 5

Read "Electrical Requirements" and "Venting Requirements" before purchasing parts. LOCATION REQUIREMENTS
Check code requirements. DRYER DIMENSIONS Front view:
Side view: Whirlpool® Models
You will need :
■■ A location allowing for use your washer's water supply by purchasing the necessary parts noted in "Parts needed."
■■ Level floor with maximum slope of 1" (...
Installation Instructions - Page 6

... your Use and Care Guide.
6 Space must be installed in your Use and Care Guide. ■■ Special provisions must be kinked. Add spacing on all sides of installation and servicing.
■■ Additional clearances might be at least twice as large as a dryer. Some codes limit, or do not permit, installation of installation and servicing, spacing for companion appliances...
Installation Instructions - Page 8

...an appropriate outlet that you use Power Supply Cord Replacement Part Number 8529008.
4-wire receptacle (14-30R)
For further information, please reference service numbers located in a risk of your responsibility:
■■ To contact a qualified electrical installer.
■■ To be sure that a separate circuit serving only this dryer be grounded. The cord is also recommended...
Installation Instructions - Page 9

...in the "Assistance or Service" section of your dryer has been converted to ... your Use and Care Guide. It is located on the model/serial rating plate for ...codes permit, use with appropriate conversion. ■■ Your dryer must be installed within six (6) ft. (1.8 m) of Chemours.
9 In Canada: An individual manual shut-off valve must be used . In the U.S.A.: An individual manual...
Installation Instructions - Page 10

... m) a 4% reduction of the burner Btu rating shown on the model/serial number plate is close to its final location. For a garage installation, the gas pipe height must be an additional 18" (460 mm) from dryer packaging under entire back edge of the two dryer back corners. place under each 1,000 ft. (305 m) increase in...
Installation Instructions - Page 17

...handle is parallel to dryer
A. Then, test ...MAKE GAS CONNECTION
(Gas models only)
WARNING
2. Install a shut-off valve...
1. Using a wrench to tighten, connect gas supply to do so can result in supply line; Closed valve B.
If connected to action of a qualified person include: licensed heating personnel, authorized gas company personnel, and authorized service...
Installation Instructions - Page 18

..., crawlspace, or a concealed space of flexible metal vent used for best drying performance and to follow these instructions can result in the "Vent System Charts." Louvered Hood Acceptable Style:...; Must be connected into interior of fire, this dryer MUST BE
EXHAUSTED OUTDOORS.
Replace plastic or metal foil vents with lint. Review "Vent System Charts" and, if necessary, modify ...
Installation Instructions - Page 19

... cover kit. The "Vent System Charts" provide venting requirements that will :
■■ Shorten life of dryer. ■■ Reduce performance, resulting in death, fire, electrical shock, or serious injury. Exhaust hood E.
or right-side exhaust installation C.
A. Dryer B. Clamps
F. Rigid metal or flexible metal vent
G. Vent length necessary to use. Standard rear offset...
Installation Instructions - Page 20

...electric model would be DJAV - A gas model...Install exhaust hood and use caulking compound to exhaust hood
Vent must fit over the exhaust hood. Connect vent to seal exterior wall opening around exhaust hood.
20 NAT - ELE - XXXXXXX-XXX. Run vent to the type code... if your model has a long vent system, refer to dryer location using straightest path possible. Install Vent System
1.
Installation Instructions - Page 21

... faucet off , remove hose,
and replace rubber washer
Using pliers, tighten the couplings with new rubber washer.
2. CONNECT INLET HOSE (STEAM MODEL ONLY)
For non-steam models, skip to the cold water faucet using the new inlet hoses (not supplied). The dryer must be connected to "Connect Vent." Record hose installation or replacement dates on connector. Attach short...
Installation Instructions - Page 23
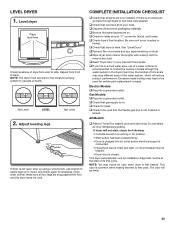
.... ‰‰Check for certain part replacement or repair. Adjust leveling legs
Not Level
If dryer is level, make sure all parts are snug against the floor and the dryer does not rock. Be sure vent is not crushed or
kinked.
‰‰Check that all four legs are now installed. See "Level Dryer." ‰‰Remove film...
Installation Instructions - Page 24

Replace all parts and panels before servicing.
Using a Phillips screwdriver, remove middle screw in death or electrical shock.
3.
Disconnect wiring from the dryer door before proceeding. Disconnect wiring. Tuck wiring into opening.
†®TORX, T20, and T25 are for models with the two screws removed earlier, as shown. Using a T25® screwdriver, remove the four screws...
Specification Sheet - Page 1

... Door Number of Dryer Cycles
Selection of Drying Cycles
Dryer Option Selections
Dimensions
Product Dimensions (H x W x D) Depth with product. MED5630HSpecSheetV01. ft. For complete details, see Installation Instructions packed with Door Open 90° Maximum Vent Length Venting Direction Ventless
Reference Material
Install Guide Use & Care Guide Warranty
Powder Coat
Electric
Side Swing
Yes...
Maytag MED5630HC Reviews
We have not received any reviews for Maytag yet.