
Owners Manual
Page 4
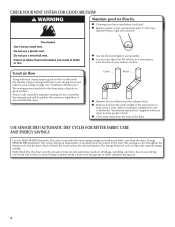
... heat, dryers require good air flow to the dryer plays a big role in the load. See "Installation Instructions." When cleaning is complete, be paid by : n Cleaning your lint screen before each bend and curve reduces air flow. n Use no more drying time or when using the drying rack. 4 each load. n Clear away items from the entire length of the vent system at least every 2 years. During SENSOR DRY/Automatic Dry cycles, drying air temperature or moisture level are not covered by the warranty...
... heat, dryers require good air flow to the dryer plays a big role in the load. See "Installation Instructions." When cleaning is complete, be paid by : n Cleaning your lint screen before each bend and curve reduces air flow. n Use no more drying time or when using the drying rack. 4 each load. n Clear away items from the entire length of the vent system at least every 2 years. During SENSOR DRY/Automatic Dry cycles, drying air temperature or moisture level are not covered by the warranty...
Owners Manual
Page 5
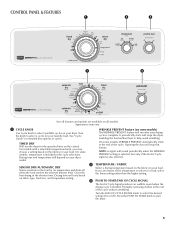
... fabric type, load size, and temperature setting. Turn the END OF CYCLE SIGNAL knob to help avoid wrinkling. Drying time and temperature will vary based on your dryer. It periodically starts and stops the dryer, tumbling the load without heat to select the desired setting (On or Off). CONTROL PANEL & FEATURES 1 2 3 1 3 Not all features and options are unsure of the temperature to select for detailed descriptions of cycles. Opening the door will run the dryer...
... fabric type, load size, and temperature setting. Turn the END OF CYCLE SIGNAL knob to help avoid wrinkling. Drying time and temperature will vary based on your dryer. It periodically starts and stops the dryer, tumbling the load without heat to select the desired setting (On or Off). CONTROL PANEL & FEATURES 1 2 3 1 3 Not all features and options are unsure of the temperature to select for detailed descriptions of cycles. Opening the door will run the dryer...

Owners Manual
Page 6
... models. CYCLE GUIDE - Not all models. Items to dry: Jeans, heavy work clothes. Use low to medium temperature to select for the specified time on fabric type, load size, and dryness setting. If loads seem drier than the higher setting. No heat drying. CYCLE GUIDE - Items to dry: Heavy or bulky items Any load Cycle: High Heat Freshen Up Temperature: High Any Available Options: End of Cycle Signal End of Cycle Signal Rubber, plastic, heat sensitive fabrics Timed Dry or Air Fluff Air...
... models. CYCLE GUIDE - Not all models. Items to dry: Jeans, heavy work clothes. Use low to medium temperature to select for the specified time on fabric type, load size, and dryness setting. If loads seem drier than the higher setting. No heat drying. CYCLE GUIDE - Items to dry: Heavy or bulky items Any load Cycle: High Heat Freshen Up Temperature: High Any Available Options: End of Cycle Signal End of Cycle Signal Rubber, plastic, heat sensitive fabrics Timed Dry or Air Fluff Air...
Owners Manual
Page 8
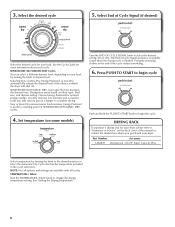
... load. Set temperature (on fabric type, load size, and dryness setting. Part Number Accessory 3406839 Drying rack - TEMPERATURE / Fabric Turn the TEMPERATURE / Fabric knob to begin cycle Push and hold the PUSH TO START knob to change the drying temperature setting. See the Cycle Guide for optimal energy savings. Very or More Dry removes more information about each cycle. Promptly removing clothes at which the dryer will shut off. NOTE: Not all options and settings are available with all cycles. See "Setting the Drying Temperature...
... load. Set temperature (on fabric type, load size, and dryness setting. Part Number Accessory 3406839 Drying rack - TEMPERATURE / Fabric Turn the TEMPERATURE / Fabric knob to begin cycle Push and hold the PUSH TO START knob to change the drying temperature setting. See the Cycle Guide for optimal energy savings. Very or More Dry removes more information about each cycle. Promptly removing clothes at which the dryer will shut off. NOTE: Not all options and settings are available with all cycles. See "Setting the Drying Temperature...
Owners Manual
Page 9
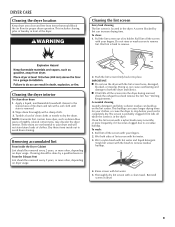
... on dryer usage. 2. Reinstall screen in the dryer. From the Exhaust Vent Lint should be removed every 2 years, or more often, depending on the lint screen. A screen blocked by a qualified servicer. Roll lint off the screen with your dryer and will not stain future loads of the drum and rub with hot water. 3. Do not rinse or wash screen to avoid drum staining. NOTE: Garments that would block the air flow for your clothes, or...
... on dryer usage. 2. Reinstall screen in the dryer. From the Exhaust Vent Lint should be removed every 2 years, or more often, depending on the lint screen. A screen blocked by a qualified servicer. Roll lint off the screen with your dryer and will not stain future loads of the drum and rub with hot water. 3. Do not rinse or wash screen to avoid drum staining. NOTE: Garments that would block the air flow for your clothes, or...
Owners Manual
Page 10
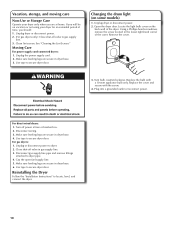
... fuse or breaker box. 2. Plug into a grounded outlet or reconnect power. Using a Phillips-head screwdriver, remove the screw located in the lower right-hand corner of the dryer. Moving Care For power supply cord-connected dryers: 1. Cap the open fuel supply line. 5. Clean lint screen. Changing the drum light (on vacation or not using your dryer only when you are secure in dryer base. 6. Remove the cover. 3. Use tape to secure dryer door. Locate the light bulb cover on the back wall of the cover. Replace the cover...
... fuse or breaker box. 2. Plug into a grounded outlet or reconnect power. Using a Phillips-head screwdriver, remove the screw located in the lower right-hand corner of the dryer. Moving Care For power supply cord-connected dryers: 1. Cap the open fuel supply line. 5. Clean lint screen. Changing the drum light (on vacation or not using your dryer only when you are secure in dryer base. 6. Remove the cover. 3. Use tape to secure dryer door. Locate the light bulb cover on the back wall of the cover. Replace the cover...
Owners Manual
Page 11
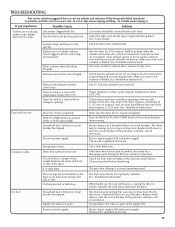
... if not properly installed. Long venting will not run Door not closed completely. See "Installation Instructions". Press and hold the PUSH to START knob until you do not feel air movement, clean exhaust system of operation. If the problem continues, call an electrician. Electric dryers require 240-volt power supply. Unusual sounds Dryer had a period of non-use 2 household fuses or circuit breakers. The gas valve clicking is open . The drum may be turning, but you experience...
... if not properly installed. Long venting will not run Door not closed completely. See "Installation Instructions". Press and hold the PUSH to START knob until you do not feel air movement, clean exhaust system of operation. If the problem continues, call an electrician. Electric dryers require 240-volt power supply. Unusual sounds Dryer had a period of non-use 2 household fuses or circuit breakers. The gas valve clicking is open . The drum may be turning, but you experience...

Owners Manual
Page 12
... a lower temperature, and use an automatic drying cycle. This reduces overdrying. 12 Lint on load Lint screen clogged. Dry smaller loads that can stain your dryer is being used or Temperature/Fabric control was set to avoid wrinkling. Loads are cooled slowly to reduce wrinkling and make it easier to other clothing. Increasing or decreasing the Dry Level setting will be contacting the sensor strips. Load is too hot The electric dryer is located. http://www.maytag.com/help...
... a lower temperature, and use an automatic drying cycle. This reduces overdrying. 12 Lint on load Lint screen clogged. Dry smaller loads that can stain your dryer is being used or Temperature/Fabric control was set to avoid wrinkling. Loads are cooled slowly to reduce wrinkling and make it easier to other clothing. Increasing or decreasing the Dry Level setting will be contacting the sensor strips. Load is too hot The electric dryer is located. http://www.maytag.com/help...

Owners Manual
Page 13
... appliances with Maytag published installation instructions. 10. The removal and reinstallation of purchase. 6. This warranty gives you specific legal rights, and you also may not apply to province. Some states and provinces do not allow the exclusion or limitation of your major appliance, to published user or operator instructions and/or installation instructions. 2. If you think you ever need repair service, first see the "Troubleshooting" section...
... appliances with Maytag published installation instructions. 10. The removal and reinstallation of purchase. 6. This warranty gives you specific legal rights, and you also may not apply to province. Some states and provinces do not allow the exclusion or limitation of your major appliance, to published user or operator instructions and/or installation instructions. 2. If you think you ever need repair service, first see the "Troubleshooting" section...

Installation Instructions
Page 2
... follow instructions. The dryer must conform with local codes, or in the absence of local codes, with local codes, or in this manual and on your appliance. WARNING You can happen if the instructions are very important. IMPORTANT: The gas installation must be electrically grounded in accordance with the National Fuel Gas Code, ANSI Z223.1/NFPA 54 or the Canadian Natural Gas and Propane Installation Code, CSA...
... follow instructions. The dryer must conform with local codes, or in the absence of local codes, with local codes, or in this manual and on your appliance. WARNING You can happen if the instructions are very important. IMPORTANT: The gas installation must be electrically grounded in accordance with the National Fuel Gas Code, ANSI Z223.1/NFPA 54 or the Canadian Natural Gas and Propane Installation Code, CSA...

Installation Instructions
Page 4
... clothes dryer, remove the door. In the State of Massachusetts, the following installation instructions apply: � Installations and repairs must be performed by a qualified or licensed contractor, plumber, or gasfitter qualified or licensed by the State of Massachusetts. � If using a ball valve, it shall be a T-handle type. � A flexible gas connector, when used, must not exceed 3 feet. SAVE THESE INSTRUCTIONS INSTALLATION REQUIREMENTS Tools and Parts Gather the required...
... clothes dryer, remove the door. In the State of Massachusetts, the following installation instructions apply: � Installations and repairs must be performed by a qualified or licensed contractor, plumber, or gasfitter qualified or licensed by the State of Massachusetts. � If using a ball valve, it shall be a T-handle type. � A flexible gas connector, when used, must not exceed 3 feet. SAVE THESE INSTRUCTIONS INSTALLATION REQUIREMENTS Tools and Parts Gather the required...

Installation Instructions
Page 5
... dryer) Refer to your Use and Care Guide for information about accessories available for your dryer at the end of an automatic cycle. Some codes limit, or do not permit, installing dryer in dryer drum. See "Venting Requirements." ■■ A separate 30 amp circuit for electric dryers. ■■ A separate 15 or 20 amp circuit for proper exhaust installation. See "Electrical Requirements" and "Venting Requirements" before purchasing parts. See "Electrical Requirements." ■■ A sturdy floor to water...
... dryer) Refer to your Use and Care Guide for information about accessories available for your dryer at the end of an automatic cycle. Some codes limit, or do not permit, installing dryer in dryer drum. See "Venting Requirements." ■■ A separate 30 amp circuit for electric dryers. ■■ A separate 15 or 20 amp circuit for proper exhaust installation. See "Electrical Requirements" and "Venting Requirements" before purchasing parts. See "Electrical Requirements." ■■ A sturdy floor to water...
Installation Instructions
Page 6
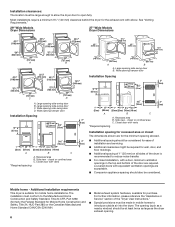
.... ■■ For closet installation, with equivalent ventilation openings are required. Installation clearances: The location must be at least twice as large as the dryer exhaust opening. 6 Large opening side-swing door C. Additional installation requirements This dryer is recommended to introduce outside air into the dryer. Large opening side-swing door D. Louvered doors with a door, minimum ventilation openings in the top and bottom of the "Dryer User Instructions." ■■ Special provisions must...
.... ■■ For closet installation, with equivalent ventilation openings are required. Installation clearances: The location must be at least twice as large as the dryer exhaust opening. 6 Large opening side-swing door C. Additional installation requirements This dryer is recommended to introduce outside air into the dryer. Large opening side-swing door D. Louvered doors with a door, minimum ventilation openings in the top and bottom of the "Dryer User Instructions." ■■ Special provisions must...

Installation Instructions
Page 7
... codes and ordinances. A copy of least resistance for leveling legs 4-wire receptacle (14-30R) ■■ Do not use Power Supply Cord Replacement Part Number 8579325. The cord is your responsibility: ■■ To contact a qualified electrical installer. ■■ To be grounded. GROUNDING INSTRUCTIONS � For a grounded, cord-connected dryer: This dryer must be plugged into a standard 14-30R wall receptacle. This dryer is recommended. Check with the dryer...
... codes and ordinances. A copy of least resistance for leveling legs 4-wire receptacle (14-30R) ■■ Do not use Power Supply Cord Replacement Part Number 8579325. The cord is your responsibility: ■■ To contact a qualified electrical installer. ■■ To be grounded. GROUNDING INSTRUCTIONS � For a grounded, cord-connected dryer: This dryer must be plugged into a standard 14-30R wall receptacle. This dryer is recommended. Check with the dryer...

Installation Instructions
Page 8
....1, Natural Gas and Propane Installation Code. The shut off valve. Install a shut-off valve location should be easy to convert the dryer from the gas specified on the model/serial rating plate for use Gas dryers must be made by which your gas dryer can result in death, explosion, or fire. Burner information is acceptable for lengths under 20 ft. (6.1 m) if local codes and gas supplier permit. ■■ Must include 1/8" NPT minimum plugged tapping accessible for opening...
....1, Natural Gas and Propane Installation Code. The shut off valve. Install a shut-off valve location should be easy to convert the dryer from the gas specified on the model/serial rating plate for use Gas dryers must be made by which your gas dryer can result in death, explosion, or fire. Burner information is acceptable for lengths under 20 ft. (6.1 m) if local codes and gas supplier permit. ■■ Must include 1/8" NPT minimum plugged tapping accessible for opening...

Installation Instructions
Page 9
...; The design of this dryer be grounded. NOTE: Pipe joint compounds that is operated up to follow these instructions can result in accordance with a cord having an equipmentgrounding conductor and a grounding plug. rating shown on the model/serial number plate. Electrical Requirements WARNING Electrical Shock Hazard Plug into an appropriate outlet that resist the action of electric shock. A time-delay fuse or circuit breaker is required. In the event of...
...; The design of this dryer be grounded. NOTE: Pipe joint compounds that is operated up to follow these instructions can result in accordance with a cord having an equipmentgrounding conductor and a grounding plug. rating shown on the model/serial number plate. Electrical Requirements WARNING Electrical Shock Hazard Plug into an appropriate outlet that resist the action of electric shock. A time-delay fuse or circuit breaker is required. In the event of...

Installation Instructions
Page 10
..., or snow). Replace plastic or metal foil vents with lint. Do not use a plastic vent. Dryer exhaust must not be connected or secured with screws or other fastening devices that extend into any object that may result in reduced airflow and poor performance. ■■ Do not install in final dryer location. ■■ Remove excess to seal all governing codes and ordinances...
..., or snow). Replace plastic or metal foil vents with lint. Do not use a plastic vent. Dryer exhaust must not be connected or secured with screws or other fastening devices that extend into any object that may result in reduced airflow and poor performance. ■■ Do not install in final dryer location. ■■ Remove excess to seal all governing codes and ordinances...

Installation Instructions
Page 11
...-step instructions. Standard rear offset exhaust installation B. Left or right side exhaust installation (27" wide models only) C. white (27" Dryers Only) W10186596 4-way vent kit - C D E A F G B Over-The-Top installation (also available with clamps 4396004 Dryer offset elbow 4396005 Wall offset elbow 4396006RW DuraSafe™ close clearances Venting systems come in many varieties. Dryer B. Clamps F. Optional side exhaust outlet Optional exhaust installations: 27" Wide Models can be converted to the manufacturer's instructions. Select the type...
...-step instructions. Standard rear offset exhaust installation B. Left or right side exhaust installation (27" wide models only) C. white (27" Dryers Only) W10186596 4-way vent kit - C D E A F G B Over-The-Top installation (also available with clamps 4396004 Dryer offset elbow 4396005 Wall offset elbow 4396006RW DuraSafe™ close clearances Venting systems come in many varieties. Dryer B. Clamps F. Optional side exhaust outlet Optional exhaust installations: 27" Wide Models can be converted to the manufacturer's instructions. Select the type...
Installation Instructions
Page 13
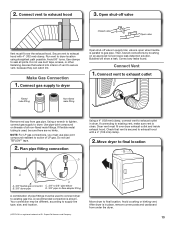
... dryer. 13 Avoid crushing or kinking vent. Open shut-off valve in supply line; Connect gas supply to final location. Plan pipe fitting connection D Using a 4" (102 mm) clamp, connect vent to exhaust hood 3. Your connection may be sure there are no kinks. 2. Connect vent to exhaust outlet in place, remove corner posts and cardboard from gas pipe. valve is open when handle is used to connect dryer to seal all non-flared male fittings. Then, test all connections...
... dryer. 13 Avoid crushing or kinking vent. Open shut-off valve in supply line; Connect gas supply to final location. Plan pipe fitting connection D Using a 4" (102 mm) clamp, connect vent to exhaust hood 3. Your connection may be sure there are no kinks. 2. Connect vent to exhaust outlet in place, remove corner posts and cardboard from gas pipe. valve is open when handle is used to connect dryer to seal all non-flared male fittings. Then, test all connections...

Installation Instructions
Page 14
... heat cycle (not an air cycle) for 5 minutes, open , contact a qualified technician. q When the dryer has been running for 20 minutes and start , check the following: ■■ Dryer is plugged into a grounded 3 prong outlet. ■■ Electrical supply is connected. ■■ Household fuse is intact and tight, or circuit breaker has not tripped. ■■ Dryer door is the 27" Wide Side-Swing Door, follow steps 1-6. Complete Installation Checklist q Check that dryer...
... heat cycle (not an air cycle) for 5 minutes, open , contact a qualified technician. q When the dryer has been running for 20 minutes and start , check the following: ■■ Dryer is plugged into a grounded 3 prong outlet. ■■ Electrical supply is connected. ■■ Household fuse is intact and tight, or circuit breaker has not tripped. ■■ Dryer door is the 27" Wide Side-Swing Door, follow steps 1-6. Complete Installation Checklist q Check that dryer...


