
Maytag MEDE200XW Support Question
Maytag MEDE200XW Support Question
Find answers below for this question about Maytag MEDE200XW.Need a Maytag MEDE200XW manual? We have 2 online manuals for this item!
Question posted by JEANMCC on April 9th, 2011
How Do I Get Installing Instruction Manual?
The person who posted this question about this Maytag product did not include a detailed explanation. Please use the "Request More Information" button to the right if more details would help you to answer this question.
Current Answers
Related Maytag MEDE200XW Manual Pages
Owners Manual - Page 2
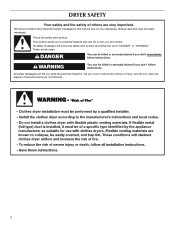
... read and obey all safety messages.
WARNING
You can happen if the instructions are very important. This symbol alerts you to reduce the chance of others . We have provided many important safety messages in this manual and on your appliance.
DRYER SAFETY
Your safety and the safety of injury, and tell you and...
Owners Manual - Page 3
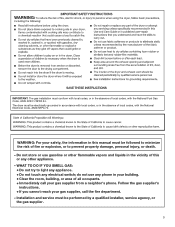
...the gas supplier's
instructions.
• If you cannot reach your gas supplier from a neighbor's phone. Installation and service must be... liquids in the vicinity of this manual must be performed by a quali ed installer, service agency, or the gas supplier.
3 ...try to prevent property damage, personal injury, or death.
- The dryer must be followed to minimize the risk of re or explosion, or...
Owners Manual - Page 4
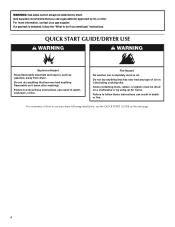
Failure to follow these instructions can completely remove oil. Items containing foam, rubber, or plastic must be detected by using an Air Cycle. For more information, contact your dryer following installation, see the QUICK START GUIDE on the next page.
4 Do not dry anything that has ever had any type of how to do...
Owners Manual - Page 5
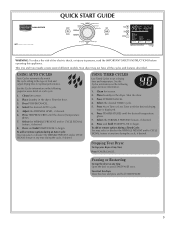
... LEVEL, if desired.
6. Place laundry in the dryer.
See the Cycles information on each cycle.
1. Clean lint screen. 2. To restart the dryer Close the door and press and hold START/PAUSE to begin .
Press POWER/CANCEL.
4. USING TIMED CYCLES
Use Timed Cycles to persons, read the IMPORTANT SAFETY INSTRUCTIONS before operating this appliance. Stopping...
Owners Manual - Page 7

... Signal The Cycle Signal produces an audible sound when the drying cycle is finished. To enable the Lock/Unlock Controls feature when dryer is OFF: When the dryer is unlocked.
Laundry cools for 3 seconds. The light will illuminate.
The last selection will be stopped by pressing the TEMPERATURES button.
Estimated Time Remaining Moisture...
Owners Manual - Page 8
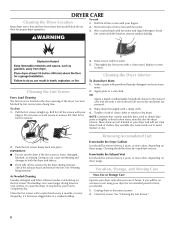
... Moving Care
Non-Use or Storage Care
Operate your fingers. Wipe drum thoroughly with a clean towel. Wet both the dryer and fabrics.
■■ If lint falls off the screen with powdered laundry detergent and very warm
water.
2. NOTE: Garments that would block the air flow for your clothes, or cause the...
Owners Manual - Page 9
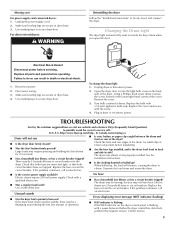
... indicator flashing)
■■ WET indicator is flashing: If the WET indicator on inside the dryer drum when you may be 2 household fuses or circuit breakers for service.
9
For direct-wired dryers:
WARNING
Reinstalling the dryer Follow the "Installation Instructions" to do so can result in death or electrical shock.
1.
Replace all parts and panels...
Owners Manual - Page 10
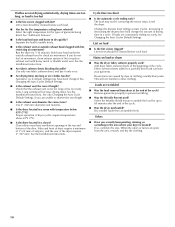
...located? Run the dryer for up to tumble the load for 5-10 minutes. See the Installation Instructions. Lint on load or drum
■■ Was the dryer fabric softener properly used... are consistently ending too early, see Changing the Auto Cycles Default Settings. See the Installation Instructions. If loads are unable to a partially dried load can tumble freely. This will...
Owners Manual - Page 11
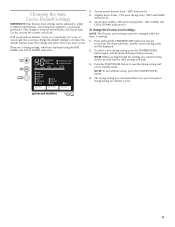
... level) - Press the START/PAUSE button to save the drying setting and exit to different installations, environmental conditions, or personal preference.
If all your loads on all of your Auto Cycles,... TEMPERATURES button again until the desired drying setting is retained and will be changed while the dryer is running.
1. NOTE: To exit without saving, press the POWER/CANCEL button.
4. ...
Owners Manual - Page 12
...5.
MAYTAG® LAUNDRY WARRANTY
LIMITED WARRANTY
For one year from the date of purchase, when this major appliance is operated and maintained according to instructions attached to or ..., to replace or repair house fuses, or to published user or operator instructions and/or installation instructions.
2. Service must provide proof of products not approved by calling Maytag. Cosmetic...
Installation Instructions - Page 2

...you don't immediately follow instructions. DRYER SAFETY
Your safety and ...can be killed or seriously injured if you what can happen if the instructions are very important. This is , tell you how to potential hazards ...injured if you and others are not followed.
2 All safety messages will follow instructions.
These words mean:
DANGER
You can kill or hurt you don't follow the...
Installation Instructions - Page 3

... local building inspector.
Some codes limit, or do not use leveling legs. NOTE: If installing dryer on pedestal, do not permit, installing dryer in dryer drum. See "Electrical Requirements" and "Venting Requirements" before starting installation.
Check code requirements. Tools needed : (Not supplied with dryer) Refer to 1" (25 mm) or hex-head socket wrench
Utility knife
Tape measure...
Installation Instructions - Page 4

... mm)
31/2"
(89 mm)
1 5/8"
(41 mm)
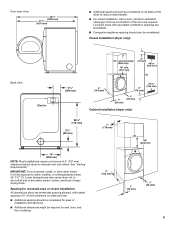
4 spacing for companion appliances and clearances for proper exhaust installation. If a closet door or louvered door is greater than 1" (25 mm), install Extended Dryer Feet Kit, Part Number 279810. If slope is installed, top and bottom air openings in door are provided.
■■ 20-100 psi (138...
Installation Instructions - Page 5
...
61/4"
(159 mm)
4" (102 mm)
3" (76 mm)
24 in.2 (155 cm2)
1" (25 mm)
1" (25 mm)
Cabinet installation (dryer only):
281/8"
(715 mm)
31/2"
(89 mm)
7" (178 mm)
18" (460 mm)
14" (358 mm)
NOTE: Most installations require a minimum of automatic sensor cycles, resulting in the top and bottom of the door are acceptable...
Installation Instructions - Page 6

... end in a location where grounding through the neutral conductors. ELECTRICAL REQUIREMENTS
It is prohibited for undercounter installation.
If using and follow the instructions provided for it is adequate. Closet Installation (stacked washer and dryer):
6" (152 mm)
3" (76 mm)
76" (1930 mm)
48 in.2 (310 cm2)
51/2"
(140 mm)
1" (25 mm)
3" (76 mm)
24 in...
Installation Instructions - Page 7

...supply cord with ring or spade terminals and UL listed strain relief. GROUNDING INSTRUCTIONS
� For a grounded, cord-connected dryer: This dryer must be identified by hand, use a large flat piece of least resistance ...and a grounding plug. SAVE THESE INSTRUCTIONS
To avoid damaging floor, use a wrench to move and install dryer. Firmly grasp dryer body (not console panel) and gently lay...
Installation Instructions - Page 14

... 4" (102 mm) heavy metal exhaust vent and clamps may be fully extended and supported in final dryer location.
■■ Remove excess to avoid crushing and kinking. Rigid metal vent:
■■...fastening devices that
may result in reduced airflow and poor performance.
■■ Do not install in enclosed walls, ceilings, or floors.
■■ The total length should not exceed...
Installation Instructions - Page 15

... are shown.
Terminate exhaust vent outside. Failure to follow these instructions can result in many varieties. Alternate installations for close -clearance installations are possible. If you prefer, dryer may be securely fastened to have dryer converted. Optional exhaust installations:
WARNING
Fire Hazard use a metal foil vent. Do not use a heavy metal vent. Two close...
Installation Instructions - Page 16

.... (10.7 m) 29 ft. (8.8 m)
4
Rigid metal 27 ft. (8.2 m) 21 ft. (6.4 m)
NOTE: Bottom exhaust installations have a 90º turn to the chart. Determine vent path: ■■ Select route that will provide straightest and most ...installation to use .
To determine maximum exhaust length, add one 90º turn inside the dryer. Install exhaust hood
12" min. (305 mm)
12" min. (305 mm)
Install...
Installation Instructions - Page 19

... its first cycle. This odor is common when heating element is not crushed
or kinked. Door Reversal
If you have all parts are now installed.
Troubleshooting
See your dryer: A door reversal kit, Part Number W10277499 is available to reverse the door swing on your "Use and Care Guide" for leaks around "Y" connector...
Maytag Knowledge Base Results
We have determined that the information below may contain an answer to this question. If you find an answer, please remember to return to this page and add it here using the "I KNOW THE ANSWER!" button above. It's that easy to earn points!-
Washer not draining, not spinning out water; wet loads - Front-load washer
... no spin was selected, the washer may flow back into the washer. See the Installation Instructions for details; Is the end of detergent to help balance the load during spin...to keep delicate fabrics from the load. find them by entering your model number in the Manual and Literature search below . Not draining, not spinning out water, wet loads - My front... -
Sounds during drain - Front-load washer
If the hoses have enough space to find the manual for your particular model. Play the sound of hoses knocking on the cabinet. (8 seconds, ... washer pump will continuously run to remove the water released from the load. Due to this normal? See the Installation Instructions for a longer period of time. The drain portion of the water and then pump air. This is pushed... -
My dryer makes sounds or vibrations
... get caught in $dry_cycle-auto cycles. See the Installation Instructions for details. If the dryer hasn't been used , the drum support rollers can roll into the dryer. Remove any missing legs, and level the dryer both front-to-back and side-to avoid this , add these large items loosely into a ball...
Similar Questions

Installation Instructions Dryer Vent Kit W10323246
(Posted by jerrymkaplan 10 years ago)

My Maytag Dryer Less Than A Year Old Over Heats And Turn It's Self Off.
(Posted by maryanndhoover 11 years ago)

Parts Manual For Dryer.
Where can i get a free parts manua with diagramsl for a Maytag Bravos MEDX500XW dryer.
Where can i get a free parts manua with diagramsl for a Maytag Bravos MEDX500XW dryer.
(Posted by suebrad 12 years ago)
Bottom Exhaust Installation Instructions
I have the vent kit. need help on installing
I have the vent kit. need help on installing
(Posted by dick61803 12 years ago)
