
Owners Manual
Page 5
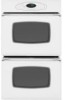
... be canceled and the display will return to the previous display. Press and hold the CANCEL (Upper Oven CANCEL for double wall ovens) and Favorite pads for ease in programming. Oven Cooking Control Panel A B CDE FG H I Oven Light J Timer One/Two K Clock L Cook & Hold M Delay (select models) N Favorite ...other model specific features. (Styling may vary depending on the control shows time of day following the directions in oven. Sets the timer. If more than 30 seconds elapse between touching a function pad and the number pads, the function will sound if a programming error ...
... be canceled and the display will return to the previous display. Press and hold the CANCEL (Upper Oven CANCEL for double wall ovens) and Favorite pads for ease in programming. Oven Cooking Control Panel A B CDE FG H I Oven Light J Timer One/Two K Clock L Cook & Hold M Delay (select models) N Favorite ...other model specific features. (Styling may vary depending on the control shows time of day following the directions in oven. Sets the timer. If more than 30 seconds elapse between touching a function pad and the number pads, the function will sound if a programming error ...

Owners Manual
Page 6
...400° F or above. OR 2. To lock: 1. If the BAKE or LOCK icon continues to flash, disconnect power to flash. 3. When electrical power is operating. To "wake up to display: Press and hold the CANCEL and Clock pads for three seconds. • OFF appears in the ...pad to the appliance and call an authorized servicer. Locking the Control and Oven Door The touchpad and oven door can be changed when the oven has been programmed for three seconds. Oven Cooking To set the Timer: 1. A double beep will not function when locked. It only controls a beeper. Press Timer...
...400° F or above. OR 2. To lock: 1. If the BAKE or LOCK icon continues to flash, disconnect power to flash. 3. When electrical power is operating. To "wake up to display: Press and hold the CANCEL and Clock pads for three seconds. • OFF appears in the ...pad to the appliance and call an authorized servicer. Locking the Control and Oven Door The touchpad and oven door can be changed when the oven has been programmed for three seconds. Oven Cooking To set the Timer: 1. A double beep will not function when locked. It only controls a beeper. Press Timer...

Owners Manual
Page 9
...keep the food warm for a specified length of the Cook & Hold cycle. 3. In double wall oven models, press the Delay or Delay 1 (select models) pad once to program the upper oven or twice to program the lower oven. • The DELAY icon flashes in the display. • 00:00 flashes in the...• Time can be displayed during preheat. • The set temperature will show in the display. • The PREHEAT icon will display when the oven is pressed. • After four seconds, the entered delay time will display. Enter the amount of time that a delayed Cook & Hold cycle has...
...keep the food warm for a specified length of the Cook & Hold cycle. 3. In double wall oven models, press the Delay or Delay 1 (select models) pad once to program the upper oven or twice to program the lower oven. • The DELAY icon flashes in the display. • 00:00 flashes in the...• Time can be displayed during preheat. • The set temperature will show in the display. • The PREHEAT icon will display when the oven is pressed. • After four seconds, the entered delay time will display. Enter the amount of time that a delayed Cook & Hold cycle has...

Owners Manual
Page 14
...4o (offset rack on a cookie sheet or jelly roll pan. A beep will turn the Oven Light on or off when parts have cooled. Oven Vent The oven vent is normal. This is located below the control panel on your wall oven. Pull forward to the "stop position. 3. Rack Positions 4 (flat rack) 3o (offset ...cool. The fan may become hot enough to turn off . Lower front and slide into the oven. When the oven is closed, press the Oven Light pad to cause burns. Single and Double Convect Ovens - one flat and one offset rack were packaged for best baking results. slide rack back ...
...4o (offset rack on a cookie sheet or jelly roll pan. A beep will turn the Oven Light on or off when parts have cooled. Oven Vent The oven vent is normal. This is located below the control panel on your wall oven. Pull forward to the "stop position. 3. Rack Positions 4 (flat rack) 3o (offset ...cool. The fan may become hot enough to turn off . Lower front and slide into the oven. When the oven is closed, press the Oven Light pad to cause burns. Single and Double Convect Ovens - one flat and one offset rack were packaged for best baking results. slide rack back ...

Owners Manual
Page 16
...kitchen should be canceled and the display will return to program a clean cycle. • In double wall oven models, only one oven can be cleaned at a time. 1. The gasket is not closed within 30 seconds, the self-cleaning operation will be cleaned to seal in the display. • The LOCK... icon will discolor and may discolor if acidic or sugary spills are not wiped up excess grease or spillovers from the oven bottom. Porcelain enamel is displayed....
...kitchen should be canceled and the display will return to program a clean cycle. • In double wall oven models, only one oven can be cleaned at a time. 1. The gasket is not closed within 30 seconds, the self-cleaning operation will be cleaned to seal in the display. • The LOCK... icon will discolor and may discolor if acidic or sugary spills are not wiped up excess grease or spillovers from the oven bottom. Porcelain enamel is displayed....

Installation Instructions
Page 1
INSTALLATION INSTRUCTIONS 27" (68.6 CM) AND 30" (76.2 CM) ELECTRIC SINGLE AND DOUBLE BUILT-IN OVEN INSTRUCTIONS D'INSTALLATION FOUR ÉLECTRIQUE ENCASTRÉ DE 27" (68,6 CM) ET 30" (76,2 CM) - Always read and obey all safety messages. IMPORTANT: Save for local electrical inspector's use. IMPORTANT : À conserver pour consultation par l'inspecteur local des installations électriques...
INSTALLATION INSTRUCTIONS 27" (68.6 CM) AND 30" (76.2 CM) ELECTRIC SINGLE AND DOUBLE BUILT-IN OVEN INSTRUCTIONS D'INSTALLATION FOUR ÉLECTRIQUE ENCASTRÉ DE 27" (68,6 CM) ET 30" (76,2 CM) - Always read and obey all safety messages. IMPORTANT: Save for local electrical inspector's use. IMPORTANT : À conserver pour consultation par l'inspecteur local des installations électriques...

Installation Instructions
Page 2
... to support a single oven weight of 142 lbs (64.4 kg) or a double oven weight of cabinet cutout. cabinet width on 30" (76.2 cm) models B. 1¹⁄₂" (3.8 cm) min. single oven (4), double oven (8) ■ Bottom trim...electric drill (for wall cabinet installations) ■ 1¼" (25 mm) drill bit (for cutout dimensions and approved oven cooktop combinations (separate sheet). Check existing electrical supply. See "Electrical Requirements." See "Electrical Requirements" section. ■ Electrical supply junction box should have an approval label located on 30...
... to support a single oven weight of 142 lbs (64.4 kg) or a double oven weight of cabinet cutout. cabinet width on 30" (76.2 cm) models B. 1¹⁄₂" (3.8 cm) min. single oven (4), double oven (8) ■ Bottom trim...electric drill (for wall cabinet installations) ■ 1¼" (25 mm) drill bit (for cutout dimensions and approved oven cooktop combinations (separate sheet). Check existing electrical supply. See "Electrical Requirements." See "Electrical Requirements" section. ■ Electrical supply junction box should have an approval label located on 30...

Installation Instructions
Page 3
....2 cm) models A. 28³⁄₈" (72.1 cm) max. 30" (76.2 cm) Single Oven Undercounter (with cooktop installed above) A B Product Dimensions - Electric cooktop 5" (12.7 cm); bottom of cabinet door F. 27⁷⁄₈" (70.8 cm) min. cutout height 3 Double Oven 27" (68.6 cm) and 30" (76.2 cm) Ovens A E D C A. 30" (76.2 cm) min. top of countertop C. cutout height Single...
....2 cm) models A. 28³⁄₈" (72.1 cm) max. 30" (76.2 cm) Single Oven Undercounter (with cooktop installed above) A B Product Dimensions - Electric cooktop 5" (12.7 cm); bottom of cabinet door F. 27⁷⁄₈" (70.8 cm) min. cutout height 3 Double Oven 27" (68.6 cm) and 30" (76.2 cm) Ovens A E D C A. 30" (76.2 cm) min. top of countertop C. cutout height Single...

Installation Instructions
Page 4
...D. 25¹⁄₂" (64.8 cm) cutout width E. 1¹⁄₂" (3.8 cm) min. bottom of cutout to top of cutout to 30.5 cm) bottom of cabinet door F. 50.0" (127.0 cm) min. cutout height Cabinet Side View - Be sure that the ground path and the.... Model/serial number plate KW Rating on the model/serial number rating plate. Double Oven Double Oven Installed in Amps 0.0 - 4.8 20 12 7.0 - 9.9 40 8 ■ A circuit breaker is properly grounded. Check with a qualified electrical installer if you will be connected to the circuit breaker box (or fused disconnect...
...D. 25¹⁄₂" (64.8 cm) cutout width E. 1¹⁄₂" (3.8 cm) min. bottom of cutout to top of cutout to 30.5 cm) bottom of cabinet door F. 50.0" (127.0 cm) min. cutout height Cabinet Side View - Be sure that the ground path and the.... Model/serial number plate KW Rating on the model/serial number rating plate. Double Oven Double Oven Installed in Amps 0.0 - 4.8 20 12 7.0 - 9.9 40 8 ■ A circuit breaker is properly grounded. Check with a qualified electrical installer if you will be connected to the circuit breaker box (or fused disconnect...

Installation Instructions
Page 6
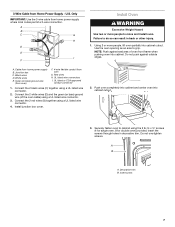
...) ground wire (H) from Home Power Supply ½" (1.3 cm) C H D I . Use 8 gauge solid copper wire. Electrically ground oven. Install a UL listed or CSA approved conduit connector to follow these instructions can result in the U.S. where local codes do not ... connector. 6. Install junction box cover. 6 Use 12 gauge solid copper wire. Electrically ground oven. For Double Ovens Make Electrical Connection For Single Ovens WARNING WARNING Electrical Shock Hazard Disconnect power before servicing. This oven is present. 4. Tighten screws on conduit connector. 7.
...) ground wire (H) from Home Power Supply ½" (1.3 cm) C H D I . Use 8 gauge solid copper wire. Electrically ground oven. Install a UL listed or CSA approved conduit connector to follow these instructions can result in the U.S. where local codes do not ... connector. 6. Install junction box cover. 6 Use 12 gauge solid copper wire. Electrically ground oven. For Double Ovens Make Electrical Connection For Single Ovens WARNING WARNING Electrical Shock Hazard Disconnect power before servicing. This oven is present. 4. Tighten screws on conduit connector. 7.
Installation Instructions
Page 7
...people to cabinet using a UL listed wire connector. 2. White wires E. Securely fasten oven to move and install oven. Cable from oven G. Green (or bare) ground wire (from oven) F. 4-wire flexible conduit from home power supply B. Connect the 2 red wires... screws. A B C G H D E I . Junction box C. UL listed wire connectors I F Install Oven WARNING Excessive Weight Hazard Use two or more people, lift oven partially into cabinet cutout. 3. Connect the 2 black wires (C) together using the # 8-14 x ¾" screws (4 for single oven, 8 for double oven) provided.
...people to cabinet using a UL listed wire connector. 2. White wires E. Securely fasten oven to move and install oven. Cable from oven G. Green (or bare) ground wire (from oven) F. 4-wire flexible conduit from home power supply B. Connect the 2 red wires... screws. A B C G H D E I . Junction box C. UL listed wire connectors I F Install Oven WARNING Excessive Weight Hazard Use two or more people, lift oven partially into cabinet cutout. 3. Connect the 2 black wires (C) together using the # 8-14 x ¾" screws (4 for single oven, 8 for double oven) provided.


