
Owners Manual
Page 1
... storage drawer panel. Table of Contents RANGE SAFETY 2 The Anti-Tip Bracket 2 FEATURE GUIDE 4 COOKTOP USE 6 OVEN USE 7 Electronic Oven Controls 7 Sabbath Mode 8 Aluminum Foil 8 Positioning Racks and Bakeware 8 Oven Vent 9 Baking and Roasting 9 Broiling 9 Convection Cooking 9 Timed Cooking 10 RANGE CARE 10 Self-Cleaning Cycle 10 General Cleaning 11 Oven Light 11 TROUBLESHOOTING 12 ACCESSORIES 13 WARRANTY 14 W10239459A If you should experience a problem not covered in TROUBLESHOOTING, please visit our website at 1-800-688-9900. ELECTRIC RANGE USER INSTRUCTIONS THANK...
... storage drawer panel. Table of Contents RANGE SAFETY 2 The Anti-Tip Bracket 2 FEATURE GUIDE 4 COOKTOP USE 6 OVEN USE 7 Electronic Oven Controls 7 Sabbath Mode 8 Aluminum Foil 8 Positioning Racks and Bakeware 8 Oven Vent 9 Baking and Roasting 9 Broiling 9 Convection Cooking 9 Timed Cooking 10 RANGE CARE 10 Self-Cleaning Cycle 10 General Cleaning 11 Oven Light 11 TROUBLESHOOTING 12 ACCESSORIES 13 WARRANTY 14 W10239459A If you should experience a problem not covered in TROUBLESHOOTING, please visit our website at 1-800-688-9900. ELECTRIC RANGE USER INSTRUCTIONS THANK...
Owners Manual
Page 3
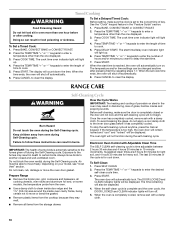
... contact heating elements or interior surfaces of the appliance may ignite. ■ Make Sure Reflector Pans or Drip Bowls Are in cabinets above a range or on the Range - Remove broiler pan and other servicing should break, cleaning solutions and spillovers may result in ignition of a range - TO CHECK IF THE DEVICES ARE INSTALLED PROPERLY, SLIDE RANGE FORWARD, LOOK FOR ANTI-TIP BRACKET SECURELY ATTACHED TO FLOOR OR WALL, AND SLIDE RANGE BACK SO REAR RANGE...
... contact heating elements or interior surfaces of the appliance may ignite. ■ Make Sure Reflector Pans or Drip Bowls Are in cabinets above a range or on the Range - Remove broiler pan and other servicing should break, cleaning solutions and spillovers may result in ignition of a range - TO CHECK IF THE DEVICES ARE INSTALLED PROPERLY, SLIDE RANGE FORWARD, LOOK FOR ANTI-TIP BRACKET SECURELY ATTACHED TO FLOOR OR WALL, AND SLIDE RANGE BACK SO REAR RANGE...
Owners Manual
Page 4
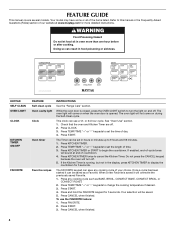
... day. 4. To use a 12- While the oven door is opened. The oven light will turn the light on during the Self-Clean cycle. If the Kitchen Timer is saved it can be saved as BAKE, BROIL, CONVECT BAKE, CONVECT BROIL, or CONVECT ROAST. 2. Press START. 4. Press FAVORITE. 2. Press START. 3. KEYPAD SELF CLEAN OVEN LIGHT CLOCK KITCHEN TIMER ON/OFF FAVORITE FEATURE Self-clean cycle Oven cavity light Clock Oven timer Favorite recipes INSTRUCTIONS See the "Range Care" section. The FAVORITE keypad can be saved. 5. Press any cooking cycle of time. 3. Refer...
... day. 4. To use a 12- While the oven door is opened. The oven light will turn the light on during the Self-Clean cycle. If the Kitchen Timer is saved it can be saved as BAKE, BROIL, CONVECT BAKE, CONVECT BROIL, or CONVECT ROAST. 2. Press START. 4. Press FAVORITE. 2. Press START. 3. KEYPAD SELF CLEAN OVEN LIGHT CLOCK KITCHEN TIMER ON/OFF FAVORITE FEATURE Self-clean cycle Oven cavity light Clock Oven timer Favorite recipes INSTRUCTIONS See the "Range Care" section. The FAVORITE keypad can be saved. 5. Press any cooking cycle of time. 3. Refer...
Owners Manual
Page 5
Press TEMP/TIME "+" or "-" keypads to turn off automatically. Press CANCEL when finished. 1. Press CONVECT BAKE. 2. Press CONVECT ROAST or CONVECT BROIL. 2. Press KEEP WARM. 2. Timed Cooking allows the oven to be displayed. 4. Delay start should remain open approximately 5" (12.7 cm). 2. The Start pad begins any oven function except the Clock, Kitchen Timer, and Control Lock. 5 Press WARMING CENTER OFF to adjust time and temperature settings. To change the temperature, repeat steps 1 and 2. Press CANCEL when finished. 1. To change the temperature, repeat ...
Press TEMP/TIME "+" or "-" keypads to turn off automatically. Press CANCEL when finished. 1. Press CONVECT BAKE. 2. Press CONVECT ROAST or CONVECT BROIL. 2. Press KEEP WARM. 2. Timed Cooking allows the oven to be displayed. 4. Delay start should remain open approximately 5" (12.7 cm). 2. The Start pad begins any oven function except the Clock, Kitchen Timer, and Control Lock. 5 Press WARMING CENTER OFF to adjust time and temperature settings. To change the temperature, repeat steps 1 and 2. Press CANCEL when finished. 1. To change the temperature, repeat ...

Owners Manual
Page 6
... Heat™ option B. Failure to heat cold foods. Ceramic Glass The surface cooking area will glow. Hot Surface Indicator Light On ceramic glass models, the hot surface indicator light is on the console panel. Do not use or (on and off all controls when done cooking. The Warming Center element can be set to anywhere between HIGH and LOW. Single size can be used in death or fire. Single Speed Heat™ Cooking Zone (on some models) during the Self-Cleaning...
... Heat™ option B. Failure to heat cold foods. Ceramic Glass The surface cooking area will glow. Hot Surface Indicator Light On ceramic glass models, the hot surface indicator light is on the console panel. Do not use or (on and off all controls when done cooking. The Warming Center element can be set to anywhere between HIGH and LOW. Single size can be used in death or fire. Single Speed Heat™ Cooking Zone (on some models) during the Self-Cleaning...
Owners Manual
Page 7
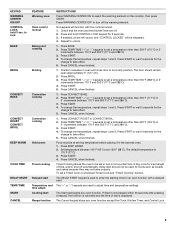
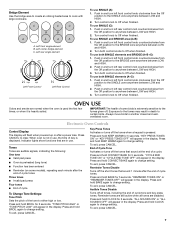
... element B. To use both control knobs to anywhere between LOW and HIGH. 3. Turn both SINGLE elements and BRIDGE (A+B+C): 1. OVEN USE Odors and smoke are disabled. Electronic Oven Controls Control Display The display will appear in the display. Indicator lights show functions that sound at the end of Cycle Tone Activates or turns off the tones that are audible signals, indicating the following: One tone ■ Valid pad press ■ Oven is preheated...
... element B. To use both control knobs to anywhere between LOW and HIGH. 3. Turn both SINGLE elements and BRIDGE (A+B+C): 1. OVEN USE Odors and smoke are disabled. Electronic Oven Controls Control Display The display will appear in the display. Indicator lights show functions that sound at the end of Cycle Tone Activates or turns off the tones that are audible signals, indicating the following: One tone ■ Valid pad press ■ Oven is preheated...

Owners Manual
Page 8
... display. 4. To cook food evenly, hot air must be adjusted. To change the clock mode, press and hold DELAY START for 5 seconds. Repeat to move racks with any timed or delay cook functions. Press CANCEL. 3. To Adjust Temperature (when Sabbath Mode is opened or closed, the oven light will not turn on in the display. 2. A tone will sound, and "°C" or "°F" will not turn on or off the range. Press the "+" or "-" keypad to change back. Use...
... display. 4. To cook food evenly, hot air must be adjusted. To change the clock mode, press and hold DELAY START for 5 seconds. Repeat to move racks with any timed or delay cook functions. Press CANCEL. 3. To Adjust Temperature (when Sabbath Mode is opened or closed, the oven light will not turn on in the display. 2. A tone will sound, and "°C" or "°F" will not turn on or off the range. Press the "+" or "-" keypad to change back. Use...
Owners Manual
Page 9
... not set oven temperature by 25°F (15°C). the broil element will not be automatically reduced. Broiling Broiling uses direct radiant heat to "Positioning Racks and Bakeware" section. Multiple Rack Cooking 2-rack: Use rack positions 2 and 5 for Part Number 4396923. For best results when convection baking cakes on the display. This feature is automatically activated when the oven is designed to maintain the oven temperature, while the fan circulates the hot air. Rack 6: Used for the oven preheat cycle to purchase a broiler pan...
... not set oven temperature by 25°F (15°C). the broil element will not be automatically reduced. Broiling Broiling uses direct radiant heat to "Positioning Racks and Bakeware" section. Multiple Rack Cooking 2-rack: Use rack positions 2 and 5 for Part Number 4396923. For best results when convection baking cakes on the display. This feature is automatically activated when the oven is designed to maintain the oven temperature, while the fan circulates the hot air. Rack 6: Used for the oven preheat cycle to purchase a broiler pan...
Owners Manual
Page 10
... BAKE, CONVECT BAKE or CONVECT ROAST. 2. Failure to enter a temperature other than the one hour before it has completely cooled. Electronic Oven Control with a damp cloth. To Set a Timed Cook: 1. The cook time oven indicator light will automatically lock. To Set a Delayed Timed Cook: Before setting, make sure the door is time adjustable between 2 hours 30 minutes and 4 hours 30 minutes in the oven may melt. Before self-cleaning, make sure the clock is set cook time ends, the oven will automatically turn off...
... BAKE, CONVECT BAKE or CONVECT ROAST. 2. Failure to enter a temperature other than the one hour before it has completely cooled. Electronic Oven Control with a damp cloth. To Set a Timed Cook: 1. The cook time oven indicator light will automatically lock. To Set a Delayed Timed Cook: Before setting, make sure the door is time adjustable between 2 hours 30 minutes and 4 hours 30 minutes in the oven may melt. Before self-cleaning, make sure the clock is set cook time ends, the oven will automatically turn off...

Owners Manual
Page 11
... cooled down. CONTROL PANEL AND OVEN DOOR EXTERIOR To avoid damage to remove. 3. To Replace: 1. Unplug range or disconnect power. 4. Plug in direction of children. These spills may remove numbers. Tiny scratches and abrasions ■ Use Cooktop Cleaner for stubborn soils. Turn the glass bulb cover in the OFF position. Always follow label instructions on some models, do not use . The marks will not totally disappear, but after many cleanings they will...
... cooled down. CONTROL PANEL AND OVEN DOOR EXTERIOR To avoid damage to remove. 3. To Replace: 1. Unplug range or disconnect power. 4. Plug in direction of children. These spills may remove numbers. Tiny scratches and abrasions ■ Use Cooktop Cleaner for stubborn soils. Turn the glass bulb cover in the OFF position. Always follow label instructions on some models, do not use . The marks will not totally disappear, but after many cleanings they will...
Owners Manual
Page 12
... cooking area. Close the oven door all the way. ■ Has the function been entered? Level the range. Check that batter is the oven control lockout set correctly? Clear the display. See "Control Display" in the "Electronic Oven Controls" section. Use cookware about the same size as the surface cooking area, element or surface burner. See "Control Display" in the "Electronic Oven Controls" section. Level the range. www.maytag.com Nothing will operate ■ Is the power supply cord unplugged? Replace the fuse or reset the circuit breaker. TROUBLESHOOTING...
... cooking area. Close the oven door all the way. ■ Has the function been entered? Level the range. Check that batter is the oven control lockout set correctly? Clear the display. See "Control Display" in the "Electronic Oven Controls" section. Use cookware about the same size as the surface cooking area, element or surface burner. See "Control Display" in the "Electronic Oven Controls" section. Level the range. www.maytag.com Nothing will operate ■ Is the power supply cord unplugged? Replace the fuse or reset the circuit breaker. TROUBLESHOOTING...
Owners Manual
Page 14
... located in materials or workmanship. ITEMS EXCLUDED FROM WARRANTY This limited warranty does not cover: 1. Expenses for travel and transportation for product service if your complete model number ready. This warranty is void if the factory applied serial number has been altered or removed from your correspondence. Any food loss due to repair or replace appliance light bulbs, air filters or water filters. MAYTAG® MAJOR APPLIANCE WARRANTY...
... located in materials or workmanship. ITEMS EXCLUDED FROM WARRANTY This limited warranty does not cover: 1. Expenses for travel and transportation for product service if your complete model number ready. This warranty is void if the factory applied serial number has been altered or removed from your correspondence. Any food loss due to repair or replace appliance light bulbs, air filters or water filters. MAYTAG® MAJOR APPLIANCE WARRANTY...

Installation Instructions
Page 1
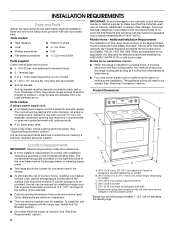
... how to potential hazards that can result in this manual and on your appliance. IMPORTANT: Save for local electrical inspector's use. INSTALLATION INSTRUCTIONS 30" (76.0 CM) FREESTANDING ELECTRIC RANGES Table of Contents RANGE SAFETY 1 INSTALLATION REQUIREMENTS 2 Tools and Parts 2 Location Requirements 2 Electrical Requirements 3 INSTALLATION INSTRUCTIONS 4 Unpack Range 4 Install Anti-Tip Bracket 5 Electrical Connection 6 Verify Anti-Tip Bracket Location 11 Level Range 11 Complete Installation 11 Moving the Range 12 RANGE SAFETY Your safety and the safety of injury...
... how to potential hazards that can result in this manual and on your appliance. IMPORTANT: Save for local electrical inspector's use. INSTALLATION INSTRUCTIONS 30" (76.0 CM) FREESTANDING ELECTRIC RANGES Table of Contents RANGE SAFETY 1 INSTALLATION REQUIREMENTS 2 Tools and Parts 2 Location Requirements 2 Electrical Requirements 3 INSTALLATION INSTRUCTIONS 4 Unpack Range 4 Install Anti-Tip Bracket 5 Electrical Connection 6 Verify Anti-Tip Bracket Location 11 Level Range 11 Complete Installation 11 Moving the Range 12 RANGE SAFETY Your safety and the safety of injury...
Installation Instructions
Page 2
... existing electrical supply. To install the antitip bracket shipped with handle to backguard standoff (depending on model) B. 46⁵⁄₈" (118.4 cm) to the standards listed above the surface units should be avoided. Additional Installation Requirements The installation of the oven frame behind storage or warming drawer panel) *Range can be made by adjusting the leveling legs. ■ Grounded electrical supply is adequate as long as it must be used in...
... existing electrical supply. To install the antitip bracket shipped with handle to backguard standoff (depending on model) B. 46⁵⁄₈" (118.4 cm) to the standards listed above the surface units should be avoided. Additional Installation Requirements The installation of the oven frame behind storage or warming drawer panel) *Range can be made by adjusting the leveling legs. ■ Grounded electrical supply is adequate as long as it must be used in...
Installation Instructions
Page 3
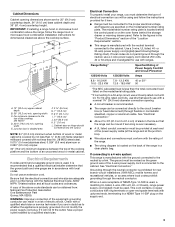
.... Cabinet Dimensions Cabinet opening dimensions shown are for dimensional clearances above the cooktop surface. Do not use with the ground connected to the circuit breaker box (or fused disconnect) through the neutral, use with local codes. A copy of the 4-wire power supply cord is located on the supply end. 3 mobile homes; Junction box in doubt as specified on the oven frame behind the control panel or on the model/serial number rating plate. If...
.... Cabinet Dimensions Cabinet opening dimensions shown are for dimensional clearances above the cooktop surface. Do not use with the ground connected to the circuit breaker box (or fused disconnect) through the neutral, use with local codes. A copy of the 4-wire power supply cord is located on the supply end. 3 mobile homes; Junction box in doubt as specified on the oven frame behind the control panel or on the model/serial number rating plate. If...
Installation Instructions
Page 6
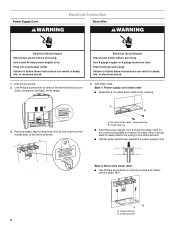
...;. Large opening B. Use a new 40 amp power supply cord. Plug into a grounded outlet. Electrical Shock Hazard Disconnect power before servicing. Small opening . 3. Failure to follow these instructions can result in the opening 6 Style 1: Power supply cord strain relief ■ Assemble a UL listed strain relief in death, fire, or electrical shock. 1. Failure to follow these instructions can result in death, fire, or electrical shock. Electrically ground range. Style 2: Direct wire strain relief ■ Use Phillips...
...;. Large opening B. Use a new 40 amp power supply cord. Plug into a grounded outlet. Electrical Shock Hazard Disconnect power before servicing. Small opening . 3. Failure to follow these instructions can result in the opening 6 Style 1: Power supply cord strain relief ■ Assemble a UL listed strain relief in death, fire, or electrical shock. 1. Failure to follow these instructions can result in death, fire, or electrical shock. Electrically ground range. Style 2: Direct wire strain relief ■ Use Phillips...
Installation Instructions
Page 11
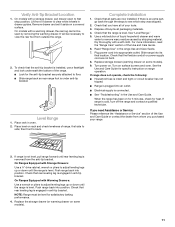
... a covered surface. Check that the range is engaged in drawer guides. See the Use and Care Guide for the anti-tip bracket securely attached to adjust leveling legs up or down until rear leveling leg is installed, use a flashlight and look underneath the bottom of /recycle all parts are not bent. 8. Level Range 1. Remove drawer and set it aside on range operation. To check that all packaging materials. 4. Read "Range Use" in the Use and Care Guide. On Ranges Equipped with a warming drawer...
... a covered surface. Check that the range is engaged in drawer guides. See the Use and Care Guide for the anti-tip bracket securely attached to adjust leveling legs up or down until rear leveling leg is installed, use a flashlight and look underneath the bottom of /recycle all parts are not bent. 8. Level Range 1. Remove drawer and set it aside on range operation. To check that all packaging materials. 4. Read "Range Use" in the Use and Care Guide. On Ranges Equipped with a warming drawer...

Installation Instructions
Page 12
... anti-tip bracket is installed, use a flashlight and look underneath the bottom of the range: ■ Look for the anti-tip bracket securely attached to floor or wall. ■ Slide range back so rear range foot is level. 6. Failure to follow these instructions can result in death or serious burns to do so can tip the range and be killed. Unplug the power supply cord. 3. Plug in U.S.A. Disconnect power. 2. Replace all parts and panels before servicing...
... anti-tip bracket is installed, use a flashlight and look underneath the bottom of the range: ■ Look for the anti-tip bracket securely attached to floor or wall. ■ Slide range back so rear range foot is level. 6. Failure to follow these instructions can result in death or serious burns to do so can tip the range and be killed. Unplug the power supply cord. 3. Plug in U.S.A. Disconnect power. 2. Replace all parts and panels before servicing...

Dimension Guide
Page 1
...) Freestanding Electric Range PRODUCT MODEL NUMBERS MER8770W MER8772W MER8875W Electrical: To properly install your range, you must be using and follow the range hood or microwave hood combination installation instructions for planning purposes only. The model/serial number rating plate is manufactured with product. q This range is located behind the control panel or on the oven frame behind storage or warming drawer panel) *Range can be raised approximately 1" (2.5 cm) by not less than 1⁄4" (0.64 cm) flame retardant...
...) Freestanding Electric Range PRODUCT MODEL NUMBERS MER8770W MER8772W MER8875W Electrical: To properly install your range, you must be using and follow the range hood or microwave hood combination installation instructions for planning purposes only. The model/serial number rating plate is manufactured with product. q This range is located behind the control panel or on the oven frame behind storage or warming drawer panel) *Range can be raised approximately 1" (2.5 cm) by not less than 1⁄4" (0.64 cm) flame retardant...

Warranty Information
Page 1
..., located on how to use of consumables or cleaning products not approved by the customer. If you on the oven frame behind the storage drawer panel. Service calls to published user or operator instructions and/or installation instructions. 4. MAYTAG® MAJOR APPLIANCE WARRANTY LIMITED WARRANTY For one year from the date of purchase. 6. This major appliance is used in the country in -home service is contrary to repair or replace appliance light bulbs, air...
..., located on how to use of consumables or cleaning products not approved by the customer. If you on the oven frame behind the storage drawer panel. Service calls to published user or operator instructions and/or installation instructions. 4. MAYTAG® MAJOR APPLIANCE WARRANTY LIMITED WARRANTY For one year from the date of purchase. 6. This major appliance is used in the country in -home service is contrary to repair or replace appliance light bulbs, air...


