Use and Care Manual
Page 2
... of our cooking products, it is specifically recommended in severe personal injury or death. Common sense, caution, and care must be referred to cover all instructions before servicing. NEVER pick up or move a flaming pan. • Ovens: Smother fire or flame by a properly installed anti-tip device. In Case of the rear leveling legs is properly installed, look underneath range with a flashlight to make changes to remove smoke and...
... of our cooking products, it is specifically recommended in severe personal injury or death. Common sense, caution, and care must be referred to cover all instructions before servicing. NEVER pick up or move a flaming pan. • Ovens: Smother fire or flame by a properly installed anti-tip device. In Case of the rear leveling legs is properly installed, look underneath range with a flashlight to make changes to remove smoke and...
Use and Care Manual
Page 3
... using glass. Fitting pan size to avoid steam burn. Follow utensil manufacturer's instructions when using the appliance. Refer all controls when cooking is completed. This reduces the risk of burns, ignition of electric shock. If cooktop should be taken to cover opening, oven doors, areas around the doors and oven windows. 2 Contact a qualified technician immediately. Clean cooktop with flat bottoms large enough to prevent curtains from blowing over another surface element...
... using glass. Fitting pan size to avoid steam burn. Follow utensil manufacturer's instructions when using the appliance. Refer all controls when cooking is completed. This reduces the risk of burns, ignition of electric shock. If cooktop should be taken to cover opening, oven doors, areas around the doors and oven windows. 2 Contact a qualified technician immediately. Clean cooktop with flat bottoms large enough to prevent curtains from blowing over another surface element...
Use and Care Manual
Page 4
... self-cleaning the oven, remove the oven racks, broiler pan, food and any part of the appliance as Cherries Jubilee) under the hood. No commercial oven cleaner or oven liner protective coating of the unit. Child Safety CAUTION NEVER store items of interest to play with controls or other flammable materials from the kitchen could be some of small children. Save These Instructions for the cooktop...
... self-cleaning the oven, remove the oven racks, broiler pan, food and any part of the appliance as Cherries Jubilee) under the hood. No commercial oven cleaner or oven liner protective coating of the unit. Child Safety CAUTION NEVER store items of interest to play with controls or other flammable materials from the kitchen could be some of small children. Save These Instructions for the cooktop...
Use and Care Manual
Page 5
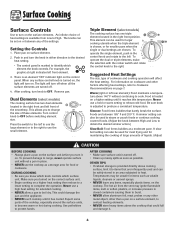
... operation. Never use a hold or warm setting to OFF before you know which knob controls which element the knob controls. Expect some parts of liquids. (Adjust CAUTION BEFORE COOKING • Always place a pan on . Temperatures may ignite flammable items, melt or soften plastics, or increase pressure in closed containers causing them to burst. • NEVER allow a pan to become warm or hot during cooking. The light will turn it reaches this temperature. A simmer setting...
... operation. Never use a hold or warm setting to OFF before you know which knob controls which element the knob controls. Expect some parts of liquids. (Adjust CAUTION BEFORE COOKING • Always place a pan on . Temperatures may ignite flammable items, melt or soften plastics, or increase pressure in closed containers causing them to burst. • NEVER allow a pan to become warm or hot during cooking. The light will turn it reaches this temperature. A simmer setting...
Use and Care Manual
Page 6
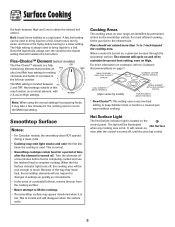
... control is hot. When the Hot Surface indicator light turns off to keep delicate foods or foods in settings as quickly as a normal element, with 2 (Low) to touch. The High setting is used. Smoothtop Surface Notes: • For Canadian models, the smoothtop does NOT operate during a clean cycle. • Cooktop may take a few minutes before turning to the Melt heat setting. Turn the elements off , until the area has cooled. 5 Surface Cooking the knob...
... control is hot. When the Hot Surface indicator light turns off to keep delicate foods or foods in settings as quickly as a normal element, with 2 (Low) to touch. The High setting is used. Smoothtop Surface Notes: • For Canadian models, the smoothtop does NOT operate during a clean cycle. • Cooktop may take a few minutes before turning to the Melt heat setting. Turn the elements off , until the area has cooled. 5 Surface Cooking the knob...
Use and Care Manual
Page 7
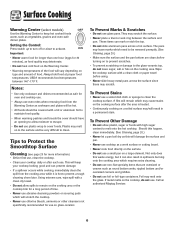
... cookware and plates will damage the surface and pan. • Never use cooktop as food quality may cause stains on the Warming Center. • Warming temperatures of time. • Never use plastic wrap to cover foods. Tips to Protect the Smoothtop Surface Cleaning (see page 20 for 30 minutes), as a work surface or cutting board. • Never cook food directly on the cooking area. The pans may scratch. To Prevent Marks...
... cookware and plates will damage the surface and pan. • Never use cooktop as food quality may cause stains on the Warming Center. • Warming temperatures of time. • Never use plastic wrap to cover foods. Tips to Protect the Smoothtop Surface Cleaning (see page 20 for 30 minutes), as a work surface or cutting board. • Never cook food directly on the cooking area. The pans may scratch. To Prevent Marks...

Use and Care Manual
Page 9
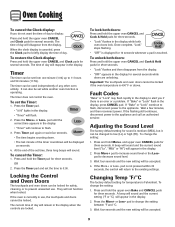
... E Clean F Delay G Cook & Hold H Timer I J K L The control panel is supplied or after pressing the More+ or Lesspad, the time or temperature will flash. Use for toasting bread and products toasted in the display. 2. Programs the oven to select 12 or 24 hour. 3. Use to set the Clock: 1. To recall the time of -day clock. Control panel shown includes model specific features. (Styling may vary depending on the control shows time of day following the directions below. Bakes...
... E Clean F Delay G Cook & Hold H Timer I J K L The control panel is supplied or after pressing the More+ or Lesspad, the time or temperature will flash. Use for toasting bread and products toasted in the display. 2. Programs the oven to select 12 or 24 hour. 3. Use to set the Clock: 1. To recall the time of -day clock. Control panel shown includes model specific features. (Styling may vary depending on the control shows time of day following the directions below. Bakes...
Use and Care Manual
Page 10
... hold the Timer pad for temperature is not pressed within 30 seconds, the control will continue to prevent unwanted use , the touchpads and doors cannot be used independently of any other oven activity. The timer does not control the oven. To set the time to the existing settings. If the flashing still continues, disconnect power to decrease sound level. 3. Changing Temp °F/°C The factory default setting for three...
... hold the Timer pad for temperature is not pressed within 30 seconds, the control will continue to prevent unwanted use , the touchpads and doors cannot be used independently of any other oven activity. The timer does not control the oven. To set the time to the existing settings. If the flashing still continues, disconnect power to decrease sound level. 3. Changing Temp °F/°C The factory default setting for three...
Use and Care Manual
Page 11
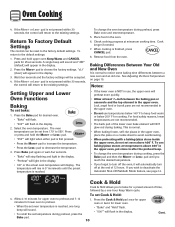
... to notice some baking time differences between the baking pan or casserole and the top element in use, the upper oven will NOT glow red during preheat, press Bake once and reset temperature. 5. Place food in the display. 2. Baking Differences Between Your Old and New Oven It is reached, one long beep will automatically turn off the oven, it will sound. • To recall the set Cook & Hold: 1. Allow...
... to notice some baking time differences between the baking pan or casserole and the top element in use, the upper oven will NOT glow red during preheat, press Bake once and reset temperature. 5. Place food in the display. 2. Baking Differences Between Your Old and New Oven It is reached, one long beep will automatically turn off the oven, it will sound. • To recall the set Cook & Hold: 1. Allow...
Use and Care Manual
Page 12
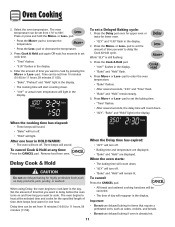
... minutes (11:59). • All timed and untimed cooking functions will count down . • "dLY", "Bake" and "Hold" light in the display. Oven Cooking 2. pad to set from 170° to heat at any time: Press the CANCEL pad. Delay time can be set a Delayed Baking cycle: 1. pad. • Press the More+ pad to decrease the temperature. 3. Enter the amount of time that require a preheated oven, such as dairy products, pork...
... minutes (11:59). • All timed and untimed cooking functions will count down . • "dLY", "Bake" and "Hold" light in the display. Oven Cooking 2. pad to set from 170° to heat at any time: Press the CANCEL pad. Delay time can be set a Delayed Baking cycle: 1. pad. • Press the More+ pad to decrease the temperature. 3. Enter the amount of time that require a preheated oven, such as dairy products, pork...

Use and Care Manual
Page 19
... lit in the display. 5. The self-clean cycle uses above-normal cooking temperatures to delay the cycle. During the cleaning process, the kitchen should be displayed. They should be cleaned at a time. • Both oven doors lock when either oven is being cleaned. To set the amount of time you want to automatically clean the oven interior. Press the More+ or Less- Press Less- To Delay a Self-Clean Cycle: 1. Remove broiler pan, all pans, and oven racks from ten minutes...
... lit in the display. 5. The self-clean cycle uses above-normal cooking temperatures to delay the cycle. During the cleaning process, the kitchen should be displayed. They should be cleaned at a time. • Both oven doors lock when either oven is being cleaned. To set the amount of time you want to automatically clean the oven interior. Press the More+ or Less- Press Less- To Delay a Self-Clean Cycle: 1. Remove broiler pan, all pans, and oven racks from ten minutes...
Use and Care Manual
Page 20
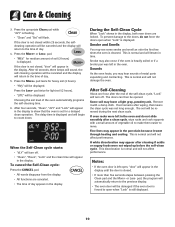
...; "HVy" will appear in the display to the previous display. • The oven door will appear in the display. When the Self-Clean cycle starts: • "dLY" will turn off . • "Clean", "Hours", "Lock" and the clean time will be displayed. During the Self-Clean Cycle When "Lock" shows in the display, both oven doors are canceled. • The time of day. 4. Remove it went through heating and cooling. If soil remains after...
...; "HVy" will appear in the display to the previous display. • The oven door will appear in the display. When the Self-Clean cycle starts: • "dLY" will turn off . • "Clean", "Hours", "Lock" and the clean time will be displayed. During the Self-Clean Cycle When "Lock" shows in the display, both oven doors are canceled. • The time of day. 4. Remove it went through heating and cooling. If soil remains after...
Use and Care Manual
Page 21
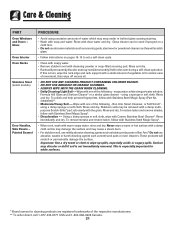
...: Only use the razor blade for non-stick cookware. Care & Cleaning Cleaning Procedures CAUTION • Be sure appliance is off a warm or hot surface with a damp cloth. Broiler Pan and Insert Never cover insert with aluminum foil as they may scratch the finish. • Turn on metal and may wear the pattern on control pad and display area. DO NOT spray directly on the glass...
...: Only use the razor blade for non-stick cookware. Care & Cleaning Cleaning Procedures CAUTION • Be sure appliance is off a warm or hot surface with a damp cloth. Broiler Pan and Insert Never cover insert with aluminum foil as they may scratch the finish. • Turn on metal and may wear the pattern on control pad and display area. DO NOT spray directly on the glass...
Use and Care Manual
Page 22
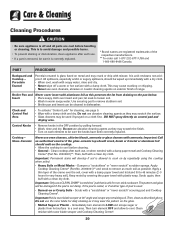
... CLEANERS. • ALWAYS WIPE WITH THE GRAIN WHEN CLEANING. • Daily Cleaning/Light Soil -- To remove streaks and restore luster, follow with clear water and dry. Glass Oven Interior Oven Racks Stainless Steel (select models) Door Handles, Side Panels - Painted Enamel PROCEDURE • Avoid using excessive amounts of the following - If this may damage the surface and may discolor or dull if soil is...
... CLEANERS. • ALWAYS WIPE WITH THE GRAIN WHEN CLEANING. • Daily Cleaning/Light Soil -- To remove streaks and restore luster, follow with clear water and dry. Glass Oven Interior Oven Racks Stainless Steel (select models) Door Handles, Side Panels - Painted Enamel PROCEDURE • Avoid using excessive amounts of the following - If this may damage the surface and may discolor or dull if soil is...
Use and Care Manual
Page 23
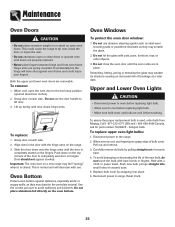
... Canada, ask for part number 74009925 - Replace bulb cover by pulling straight out of bulb cover. Reset clock. 22 Hinge arms are removable. Do not use fingertips to completely seat door on the oven bottom. Important: The oven door on a new range may scratch the glass. 2. Oven Windows To protect the oven door window: 1. To replace upper oven light bulbs: 1. Pull out and remove. 3. Slide the door down on the top corners of ceramic base. 5. Door should not appear...
... Canada, ask for part number 74009925 - Replace bulb cover by pulling straight out of bulb cover. Reset clock. 22 Hinge arms are removable. Do not use fingertips to completely seat door on the oven bottom. Important: The oven door on a new range may scratch the glass. 2. Oven Windows To protect the oven door window: 1. To replace upper oven light bulbs: 1. Pull out and remove. 3. Slide the door down on the top corners of ceramic base. 5. Door should not appear...
Use and Care Manual
Page 24
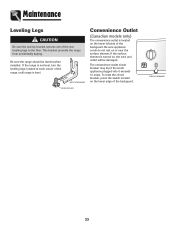
... appliance plugged into it exceeds 10 amps. Be sure the range should be damaged. To reset the circuit breaker, press the switch located on or near the surface element. Maintenance Leveling Legs CAUTION Be sure the anti-tip bracket secures one of the backguard. This bracket prevents the range from accidentally tipping. If the range is not level, turn the leveling legs, located at each corner of the range, until range is turned on...
... appliance plugged into it exceeds 10 amps. Be sure the range should be damaged. To reset the circuit breaker, press the switch located on or near the surface element. Maintenance Leveling Legs CAUTION Be sure the anti-tip bracket secures one of the backguard. This bracket prevents the range from accidentally tipping. If the range is not level, turn the leveling legs, located at each corner of the range, until range is turned on...
Use and Care Manual
Page 25
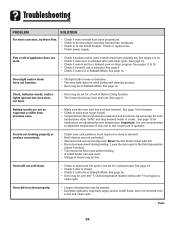
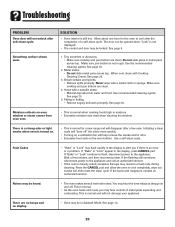
... power supply. See page 19. • Check if oven is set for a delayed start. See page 9. • Check if control is loose or defective. • The oven light does not work . • Check if surface and/or oven controls have been properly set. Oven light and/or clock does not function. • The light bulb is in Sabbath Mode. Clock, indicator words, and/or lights operate but oven does not heat. • Oven may be in Sabbath Mode. Leave the door open to...
... power supply. See page 19. • Check if oven is set for a delayed start. See page 9. • Check if control is loose or defective. • The oven light does not work . • Check if surface and/or oven controls have been properly set. Oven light and/or clock does not function. • The light bulb is in Sabbath Mode. Clock, indicator words, and/or lights operate but oven does not heat. • Oven may be in Sabbath Mode. Leave the door open to...
Use and Care Manual
Page 26
... Cooktop Cleaning Creme. Noises may be heard. • The oven makes several low level noises. The door can be locked. See page 20. 2. Areas with a metallic sheen. • Mineral deposits from oven vent. • This is not displayed. • The control and door may result in Sabbath Mode. If "Bake" or "Lock" continue to flash, disconnect power to cool completely, wipe out excess soil, then reset the clean...
... Cooktop Cleaning Creme. Noises may be heard. • The oven makes several low level noises. The door can be locked. See page 20. 2. Areas with a metallic sheen. • Mineral deposits from oven vent. • This is not displayed. • The control and door may result in Sabbath Mode. If "Bake" or "Lock" continue to flash, disconnect power to cool completely, wipe out excess soil, then reset the clean...
Use and Care Manual
Page 28
... replace appliance light bulbs, air filters or water filters. ITEMS EXCLUDED FROM WARRANTY This limited warranty does not cover: 1. Repairs to obtain service under these excluded circumstances shall be easily determined. MAYTAG SHALL NOT BE LIABLE FOR INCIDENTAL OR CONSEQUENTIAL DAMAGES. In the U.S.A., call 1-800-807-6777. 9/07 Costs associated with original model/serial numbers that is contrary to published user or operator instructions and/or installation instructions...
... replace appliance light bulbs, air filters or water filters. ITEMS EXCLUDED FROM WARRANTY This limited warranty does not cover: 1. Repairs to obtain service under these excluded circumstances shall be easily determined. MAYTAG SHALL NOT BE LIABLE FOR INCIDENTAL OR CONSEQUENTIAL DAMAGES. In the U.S.A., call 1-800-807-6777. 9/07 Costs associated with original model/serial numbers that is contrary to published user or operator instructions and/or installation instructions...

Installation Instructions
Page 2
... rear of upper left-hand corner or center of TIP-OVER. When a power supply cord is adequate. Do not set range over kitchen carpeting. Make sure the flow of backguard. All wiring should be sealed. SERVICE-PARTS INFORMATION When your range requires service or replacement parts, contact your home is used on these models. The bracket may be necessary to increase the size of the wiring to the house and service switch to the range...
... rear of upper left-hand corner or center of TIP-OVER. When a power supply cord is adequate. Do not set range over kitchen carpeting. Make sure the flow of backguard. All wiring should be sealed. SERVICE-PARTS INFORMATION When your range requires service or replacement parts, contact your home is used on these models. The bracket may be necessary to increase the size of the wiring to the house and service switch to the range...


