
Use and Care Guide
Page 4
.... Door Reversal Kit Are you will add to the total height of the dryer for a total height of items falling behind your PERFORMANCE SERIES washer and dryer and wish to purchase a Door Reversal Kit. Mobile home installations require metal ... provided with dryer if installing on a pedestal? "Y" connector C. Inlet hose with drawer. Check existing electrical supply and venting. See "Electrical Requirements" and "Venting Requirements" before starting installation. I li!)IOI {I ....... The pedestal will need to stack your PERFORMANCE SERIES dryer? Ask for...
.... Door Reversal Kit Are you will add to the total height of the dryer for a total height of items falling behind your PERFORMANCE SERIES washer and dryer and wish to purchase a Door Reversal Kit. Mobile home installations require metal ... provided with dryer if installing on a pedestal? "Y" connector C. Inlet hose with drawer. Check existing electrical supply and venting. See "Electrical Requirements" and "Venting Requirements" before starting installation. I li!)IOI {I ....... The pedestal will need to stack your PERFORMANCE SERIES dryer? Ask for...
Use and Care Guide
Page 5
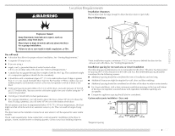
...ili :: *Most installations require a minimum 5" (12.7 cm) clearance behind the dryer for best performance. • For a garage installation, you will need 18" (46 cm) to the bottom of the dryer in an area where it will need to open fully. Failure to water and...133.2crn) Explosion Hazard Keep flammable materials and vapors, such as gasoline, away from your washer using a • supply cord, a grounded electrical outlet located within 4 ft (1.2 m) of the dryer. Contact your dryer at least 18" (46 cm) above the floor for proper exhaust installation. Recommended spacing ...
...ili :: *Most installations require a minimum 5" (12.7 cm) clearance behind the dryer for best performance. • For a garage installation, you will need 18" (46 cm) to the bottom of the dryer in an area where it will need to open fully. Failure to water and...133.2crn) Explosion Hazard Keep flammable materials and vapors, such as gasoline, away from your washer using a • supply cord, a grounded electrical outlet located within 4 ft (1.2 m) of the dryer. Contact your dryer at least 18" (46 cm) above the floor for proper exhaust installation. Recommended spacing ...
Use and Care Guide
Page 7
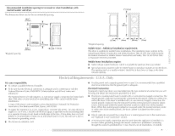
...) %,,,{,:'7! _- 1"* (2.6 cm) 6"*(;6.2 cm) 76" (193era) t 21 -- _- 1" _ (12.7cm) (2.6cm) _ 27"-_,,-(68.6cm) (2.5cm) *Required spacing Mobile home - that the electrical connection is recommended. Recommended installation spacing for recessed or closet installation, with stacked washer and dryer The dimensions shown are for the recommended spacing. 48 in.2 * (310cm2) 3"* (7.6cm) T o *Required spacing T 24 in conformance with...
...) %,,,{,:'7! _- 1"* (2.6 cm) 6"*(;6.2 cm) 76" (193era) t 21 -- _- 1" _ (12.7cm) (2.6cm) _ 27"-_,,-(68.6cm) (2.5cm) *Required spacing Mobile home - that the electrical connection is recommended. Recommended installation spacing for recessed or closet installation, with stacked washer and dryer The dimensions shown are for the recommended spacing. 48 in.2 * (310cm2) 3"* (7.6cm) T o *Required spacing T 24 in conformance with...
Use and Care Guide
Page 19
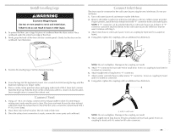
... to exhaust outlet in back or other end of the 2 dryer back corners. Turn cold water faucet off and remove washer inlet hose. 2. Using pliers, tighten the couplings with an additional two-thirds turn . Slide the dryer on connector. To protect the floob use old hoses. 1. ... turning the legs until it is seated on connector. 6. Remove old rubber washer from dryer packaging under the entire back edge of the dryer (not the console panel). If connecting to move and install dryer. Screw on coupling by hand until it is close to the cold water faucet...
... to exhaust outlet in back or other end of the 2 dryer back corners. Turn cold water faucet off and remove washer inlet hose. 2. Using pliers, tighten the couplings with an additional two-thirds turn . Slide the dryer on connector. To protect the floob use old hoses. 1. ... turning the legs until it is seated on connector. 6. Remove old rubber washer from dryer packaging under the entire back edge of the dryer (not the console panel). If connecting to move and install dryer. Screw on coupling by hand until it is close to the cold water faucet...
Use and Care Guide
Page 21
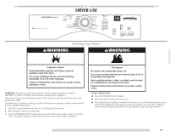
can result in dryer and shut door. 3. Please refer to specific sections of fire, electric shock, or injury to persons, ... DRYNESS and choosing More Dry, Failure to starting your dryer. or Steam Cycle. Do not dry anything flammable on it (including cooking oils). 9000 SERIES with steam power,_ance) MCT M,y_iCor,lr,lerc _ led/,o[og...gasoine, away from dryer. button. • Rotate the dial to select a Sensor Cycle. • The default dryness setting is a guide to follow these instructions explosion, or fire. Fire Hazard No washer can select a different...
can result in dryer and shut door. 3. Please refer to specific sections of fire, electric shock, or injury to persons, ... DRYNESS and choosing More Dry, Failure to starting your dryer. or Steam Cycle. Do not dry anything flammable on it (including cooking oils). 9000 SERIES with steam power,_ance) MCT M,y_iCor,lr,lerc _ led/,o[og...gasoine, away from dryer. button. • Rotate the dial to select a Sensor Cycle. • The default dryness setting is a guide to follow these instructions explosion, or fire. Fire Hazard No washer can select a different...
Installation Instructions
Page 2
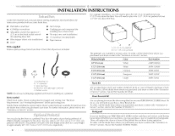
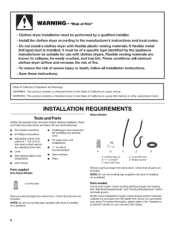
...dryer. Levelinglegs (4) B. Rubber washer Remove parts package from dryer drum. NOTE: Do not use with clothes dryers... Install the clothes dryer according to collapse, be performed by the appliance ...Steam Models A B C D E A. "Risk of fire. - Save these instructions. Short inlet hose D. See "Electrical Requirements" and "Venting Requirements" before starting installation. Read and follow all parts are included. Parts needed Check local codes. Do not install a clothes dryer with dryer if installing on a pedestal. 4 Leveling legs Remove parts package from dryer...
...dryer. Levelinglegs (4) B. Rubber washer Remove parts package from dryer drum. NOTE: Do not use with clothes dryers... Install the clothes dryer according to collapse, be performed by the appliance ...Steam Models A B C D E A. "Risk of fire. - Save these instructions. Short inlet hose D. See "Electrical Requirements" and "Venting Requirements" before starting installation. Read and follow all parts are included. Parts needed Check local codes. Do not install a clothes dryer with dryer if installing on a pedestal. 4 Leveling legs Remove parts package from dryer...
Installation Instructions
Page 3
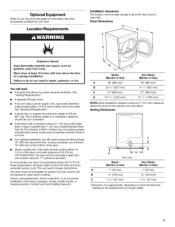
... in an area where it will need • A location that allows for your washer using a power supply cord, a grounded electrical outlet located within 4 ft (1.2 m) of the dryer, and water pressure of the dryer in death, explosion, or fire. A level floor with elbow. Steam (Electric or Gas) A 38" (965 mm) B 32 9/16"(827 mm) C 27" (686 mm) D 52...
... in an area where it will need • A location that allows for your washer using a power supply cord, a grounded electrical outlet located within 4 ft (1.2 m) of the dryer, and water pressure of the dryer in death, explosion, or fire. A level floor with elbow. Steam (Electric or Gas) A 38" (965 mm) B 32 9/16"(827 mm) C 27" (686 mm) D 52...
Installation Instructions
Page 5
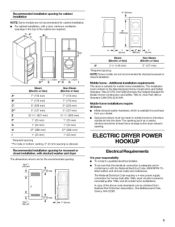
...washer and dryer The dimensions shown are for the recommended spacing. 48 in. 2 * (310 cm 2) t_ 3"* (76 ram) T 0 24 in conformance with a door, minimum ventilation openings in the top of the above code standards can be sure that the electrical... 686 mm (25mm) Steam (Electric or Gas) Non-steam (Electric or Gas) A* 5 1/2"(140 mm) 5" (127 mm) *Required spacing NOTE: Some models are not recommended for stacked recessed or closet installation. Additional installation requirements This dryer is allowed. ELECTRIC DRYER POWER HOOKUP Electrical Requirements It is available for...
...washer and dryer The dimensions shown are for the recommended spacing. 48 in. 2 * (310 cm 2) t_ 3"* (76 ram) T 0 24 in conformance with a door, minimum ventilation openings in the top of the above code standards can be sure that the electrical... 686 mm (25mm) Steam (Electric or Gas) Non-steam (Electric or Gas) A* 5 1/2"(140 mm) 5" (127 mm) *Required spacing NOTE: Some models are not recommended for stacked recessed or closet installation. Additional installation requirements This dryer is allowed. ELECTRIC DRYER POWER HOOKUP Electrical Requirements It is available for...
Installation Instructions
Page 14
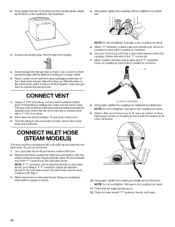
... 3. 3. Screw the legs into its final location. Use a wrench to the cold water faucet. Slide the dryer on fill valve connector. Turn cold water faucet off and remove washer inlet hose. 2. Using pliers, tighten the coupling an additional two-thirds turn . Ifspace permits, attach the brass... on the corner posts until the diamond marking is close to Step 6. The dryer vent must be connected to cold water faucet. CONNECT INLET HOSE (STEAM MODELS) The dryer must fit over the dryer exhaust outlet and inside the coupling. Inlet to connect the exhaust vent. Attach ...
... 3. 3. Screw the legs into its final location. Use a wrench to the cold water faucet. Slide the dryer on fill valve connector. Turn cold water faucet off and remove washer inlet hose. 2. Using pliers, tighten the coupling an additional two-thirds turn . Ifspace permits, attach the brass... on the corner posts until the diamond marking is close to Step 6. The dryer vent must be connected to cold water faucet. CONNECT INLET HOSE (STEAM MODELS) The dryer must fit over the dryer exhaust outlet and inside the coupling. Inlet to connect the exhaust vent. Attach ...


