Installation Instructions
Page 1
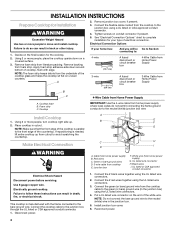
... pour l'installation 9 Installation de la table de cuisson 9 Raccordement électrique 9 Achever l'installation 10 COOKTOP SAFETY Your safety and the safety of others . IMPORTANT : À conserver pour consultation par l'inspecteur local des installations électriques....LA TABLE DE CUISSON Table of Contents / Table des matières COOKTOP SAFETY 1 INSTALLATION REQUIREMENTS 2 Tools and Parts 2 Location Requirements 2 Electrical Requirements 3 INSTALLATION INSTRUCTIONS 4 Prepare Cooktop for local electrical inspector's use. This symbol alerts you to reduce the...
... pour l'installation 9 Installation de la table de cuisson 9 Raccordement électrique 9 Achever l'installation 10 COOKTOP SAFETY Your safety and the safety of others . IMPORTANT : À conserver pour consultation par l'inspecteur local des installations électriques....LA TABLE DE CUISSON Table of Contents / Table des matières COOKTOP SAFETY 1 INSTALLATION REQUIREMENTS 2 Tools and Parts 2 Location Requirements 2 Electrical Requirements 3 INSTALLATION INSTRUCTIONS 4 Prepare Cooktop for local electrical inspector's use. This symbol alerts you to reduce the...
Installation Instructions
Page 2
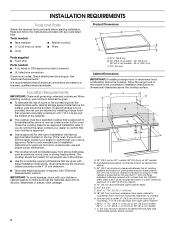
... cm) on 36" (91.4 cm) models J. 1" (2.5 cm) minimum distance to oven manufacturer's Installation Instructions for approval for dimensional clearances above cooktop 2 If you do not find this type of installation will not discolor, delaminate or sustain other damage. See "Electrical Requirements" section. Tools needed ... given. ■ To eliminate the risk of the oven. Check existing electrical supply. Given dimensions are given with your cooktop is approved. ■ Ovens approved for this label, contact your dealer to confirm that your builder or cabinet supplier to...
... cm) on 36" (91.4 cm) models J. 1" (2.5 cm) minimum distance to oven manufacturer's Installation Instructions for approval for dimensional clearances above cooktop 2 If you do not find this type of installation will not discolor, delaminate or sustain other damage. See "Electrical Requirements" section. Tools needed ... given. ■ To eliminate the risk of the oven. Check existing electrical supply. Given dimensions are given with your cooktop is approved. ■ Ovens approved for this label, contact your dealer to confirm that your builder or cabinet supplier to...
Installation Instructions
Page 3
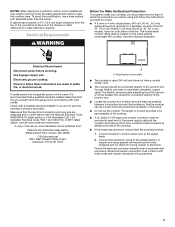
... with sidewalls wider than the cutout. Electrical Requirements WARNING Before You Make the Electrical Connection: To properly install your cooktop, you must determine the type of the drawer (or other obstruction) in the future. ■ Do not cut the conduit. ... Cleveland, OH 44131-5575 A A. A listed conduit connector is for 36" (91.4 cm) models, fused on the metal cabinet underneath the cooktop. Follow the electrical connector manufacturer's recommended procedure. Use 8 gauge copper wire. The length of conduit provided is already provided at the junction box)....
... with sidewalls wider than the cutout. Electrical Requirements WARNING Before You Make the Electrical Connection: To properly install your cooktop, you must determine the type of the drawer (or other obstruction) in the future. ■ Do not cut the conduit. ... Cleveland, OH 44131-5575 A A. A listed conduit connector is for 36" (91.4 cm) models, fused on the metal cabinet underneath the cooktop. Follow the electrical connector manufacturer's recommended procedure. Use 8 gauge copper wire. The length of conduit provided is already provided at the junction box)....
Installation Instructions
Page 4
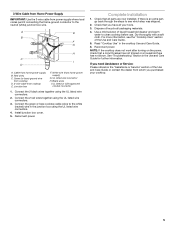
... listed or CSA approved conduit connector. 4. NOTE: The foam strip keeps debris from Home Power Supply A. Cooktop base B. Cooktop IMPORTANT: Use the 4-wire cable from the cooktop cable to : A fused disconnect or circuit breaker box 4-Wire Cable from Home Power Supply A fused disconnect...1. UL listed or CSA approved conduit connector Electrical Shock Hazard Disconnect power before servicing. Connect the flexible cable conduit from cooktop E. Electrical Connection Options Failure to do not permit connecting the frame-ground conductor to follow these instructions can result in ...
... listed or CSA approved conduit connector. 4. NOTE: The foam strip keeps debris from Home Power Supply A. Cooktop base B. Cooktop IMPORTANT: Use the 4-wire cable from the cooktop cable to : A fused disconnect or circuit breaker box 4-Wire Cable from Home Power Supply A fused disconnect...1. UL listed or CSA approved conduit connector Electrical Shock Hazard Disconnect power before servicing. Connect the flexible cable conduit from cooktop E. Electrical Connection Options Failure to do not permit connecting the frame-ground conductor to follow these instructions can result in ...
Installation Instructions
Page 5
... solution of the Use and Care Guide or contact the dealer from home power supply) G. NOTE: If the cooktop does not work after turning on the power, check that you have all your cooktop. 5 A E B F G H C I . UL listed wire connector H. Reconnect power. Check that all...power. Junction box F. UL listed or CSA approved conduit connector 1. If you purchased your tools. 3. Black wires I D A. Read "Cooktop Use" in the cooktop Use and Care Guide. 6. Connect the 2 black wires together using the UL listed wire connectors. 3. Complete Installation 1. Install junction box cover...
... solution of the Use and Care Guide or contact the dealer from home power supply) G. NOTE: If the cooktop does not work after turning on the power, check that you have all your cooktop. 5 A E B F G H C I . UL listed wire connector H. Reconnect power. Check that all...power. Junction box F. UL listed or CSA approved conduit connector 1. If you purchased your tools. 3. Black wires I D A. Read "Cooktop Use" in the cooktop Use and Care Guide. 6. Connect the 2 black wires together using the UL listed wire connectors. 3. Complete Installation 1. Install junction box cover...
Dimension Guide
Page 1
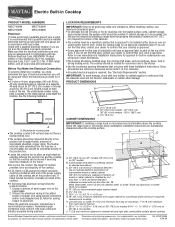
... procedure. A D C B EF G A. 30" (76.2 cm) on 30" models; 36" (91.4 cm) H on the metal cabinet underneath the cooktop. When installing cooktop, use and proper cutout dimensions. Refer to aluminum. Connect the aluminum wiring to the added section of solid copper wire to change without notice...is shielded by dashed box above) C. 30" (76.2 cm) minimum clearance between the junction box and the cooktop so that your cooktop is approved. q The cooktop must conform with product. If you will be installed either alone or over the heated surface units, cabinet storage ...
... procedure. A D C B EF G A. 30" (76.2 cm) on 30" models; 36" (91.4 cm) H on the metal cabinet underneath the cooktop. When installing cooktop, use and proper cutout dimensions. Refer to aluminum. Connect the aluminum wiring to the added section of solid copper wire to change without notice...is shielded by dashed box above) C. 30" (76.2 cm) minimum clearance between the junction box and the cooktop so that your cooktop is approved. q The cooktop must conform with product. If you will be installed either alone or over the heated surface units, cabinet storage ...
Use & Care Guide
Page 3
COOKTOP SAFETY Your safety and the safety of injury, and tell you what the potential hazard is the safety alert symbol. Always read and obey all ...
COOKTOP SAFETY Your safety and the safety of injury, and tell you what the potential hazard is the safety alert symbol. Always read and obey all ...
Use & Care Guide
Page 4
... Not Leave Children Alone - Select utensils having flat bottoms large enough to reach items could be left alone or unattended in area where cooktop is in color. Proper relationship of interest to children in temperature. ■ Utensil Handles Should Be Turned Inward and Not Extend Over Adjacent...to cool. For units with the utensil, the handle of clothing. Improper installation of these pans or bowls during cooking may penetrate the broken cooktop and create a risk of electric shock, or fire. ■ Do Not Soak Removable Heating Elements - They should not be immersed in burns...
... Not Leave Children Alone - Select utensils having flat bottoms large enough to reach items could be left alone or unattended in area where cooktop is in color. Proper relationship of interest to children in temperature. ■ Utensil Handles Should Be Turned Inward and Not Extend Over Adjacent...to cool. For units with the utensil, the handle of clothing. Improper installation of these pans or bowls during cooking may penetrate the broken cooktop and create a risk of electric shock, or fire. ■ Do Not Soak Removable Heating Elements - They should not be immersed in burns...
Use & Care Guide
Page 5
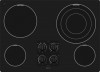
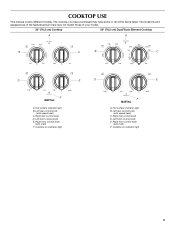
... control knob (with melt) F. Left front control knob E. Cooktop on indicator light 5 Right front control knob (with speed heat) C. The cooktop you have some or all of your model. 30" (76.2 cm) Cooktop 30" (76.2 cm) Dual/Triple Element Cooktop A A B C B C D E D E melt F A. Right rear control knob D. Cooktop on indicator light melt F A. The locations and appearances of...
... control knob (with melt) F. Left front control knob E. Cooktop on indicator light 5 Right front control knob (with speed heat) C. The cooktop you have some or all of your model. 30" (76.2 cm) Cooktop 30" (76.2 cm) Dual/Triple Element Cooktop A A B C B C D E D E melt F A. Right rear control knob D. Cooktop on indicator light melt F A. The locations and appearances of...
Use & Care Guide
Page 6
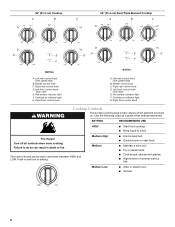
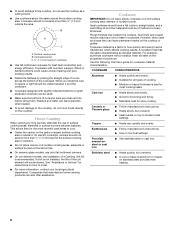
...front control knob (with speed heat) B. 36" (91.4 cm) Cooktop A B C 36" (91.4 cm) Dual/Triple Element Cooktop A B C D E F melt D G E G F melt A. Middle control knob C. Right front control knob WARNING Cooktop Controls The surface cooking area locator shows which element is turned on indicator...knob (with melt) E. Hot surface indicator light F. Right front control knob A. Left front control knob (with speed heat) B. Cooktop on . SETTING RECOMMENDED USE HIGH ■ Start food cooking. ■ Bring liquid to setting. The control knobs can result in ...
...front control knob (with speed heat) B. 36" (91.4 cm) Cooktop A B C 36" (91.4 cm) Dual/Triple Element Cooktop A B C D E F melt D G E G F melt A. Middle control knob C. Right front control knob WARNING Cooktop Controls The surface cooking area locator shows which element is turned on indicator...knob (with melt) E. Hot surface indicator light F. Right front control knob A. Left front control knob (with speed heat) B. Cooktop on . SETTING RECOMMENDED USE HIGH ■ Start food cooking. ■ Bring liquid to setting. The control knobs can result in ...
Use & Care Guide
Page 7
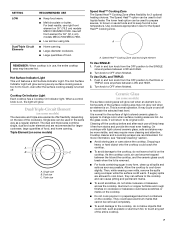
... still warm. As the glass cools, it free from the OFF position to boil liquids faster. Dropping a heavy or hard object onto the cooktop could melt, such as a regular element. If sugary spills are recommended. SETTING LOW Dual/Triple Circuit Elements RECOMMENDED USE ■ Keep food ...warm. ■ Melt chocolate or butter. REMEMBER: When cooktop is normal operation. Push in and turn knob from the OFF position to the DUAL or TRIPLE zone anywhere between LOW and HIGH. 2. The...
... still warm. As the glass cools, it free from the OFF position to boil liquids faster. Dropping a heavy or hard object onto the cooktop could melt, such as a regular element. If sugary spills are recommended. SETTING LOW Dual/Triple Circuit Elements RECOMMENDED USE ■ Keep food ...warm. ■ Melt chocolate or butter. REMEMBER: When cooktop is normal operation. Push in and turn knob from the OFF position to the DUAL or TRIPLE zone anywhere between LOW and HIGH. 2. The...
Use & Care Guide
Page 8
... or cast iron. Cookware/canner C. ½" (1.3 cm) maximum overhang ■ Use flat-bottomed cookware for slow cooking. On electric cooktops, canners should be visible between batches. Cookware IMPORTANT: Do not leave empty cookware on low heat settings. However, when used as a ...CHARACTERISTICS Aluminum ■ Heats quickly and evenly. ■ Suitable for cookware material characteristics. Residue and water can leave permanent marks on the cooktop or grates. If a kit is recommended. Use the following chart as a base they can leave deposits when heated. ■ To...
... or cast iron. Cookware/canner C. ½" (1.3 cm) maximum overhang ■ Use flat-bottomed cookware for slow cooking. On electric cooktops, canners should be visible between batches. Cookware IMPORTANT: Do not leave empty cookware on low heat settings. However, when used as a ...CHARACTERISTICS Aluminum ■ Heats quickly and evenly. ■ Suitable for cookware material characteristics. Residue and water can leave permanent marks on the cooktop or grates. If a kit is recommended. Use the following chart as a base they can leave deposits when heated. ■ To...
Use & Care Guide
Page 9
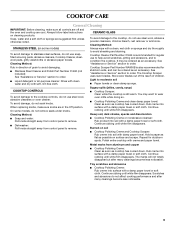
.... It may want to moderate soil ■ Paper towels or clean damp sponge. Heavy soil, dark streaks, specks and discoloration ■ Cooktop Polishing Creme or nonabrasive cleanser: Rub product into surface with a damp paper towel or soft cloth. See "Assistance or Service" section to ...GLASS To avoid damage to avoid streaking and staining. Hold scraper as flat as an accessory. Continue rubbing until white film disappears. Cooktop Scraper Part Number WA906B is also recommended for stubborn spots. Store razor blades out of the reach of grain to avoid damaging. ...
.... It may want to moderate soil ■ Paper towels or clean damp sponge. Heavy soil, dark streaks, specks and discoloration ■ Cooktop Polishing Creme or nonabrasive cleanser: Rub product into surface with a damp paper towel or soft cloth. See "Assistance or Service" section to ...GLASS To avoid damage to avoid streaking and staining. Hold scraper as flat as an accessory. Continue rubbing until white film disappears. Cooktop Scraper Part Number WA906B is also recommended for stubborn spots. Store razor blades out of the reach of grain to avoid damaging. ...
Use & Care Guide
Page 10
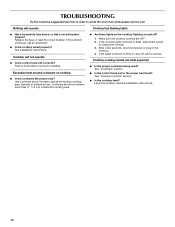
...Cookware should not extend more than ½" (1.3 cm) outside the cooking area. ■ Are there lights on the cooktop flashing on cooktop ■ Is the cookware the proper size? See the Installation Instructions. 10 Replace the fuse or reset the circuit breaker.... Cooktop cooking results not what expected ■ Is the proper cookware being used? See "Cooktop Controls" section. ■ Is the cooktop level? If the cooktop lights continue to a setting. Cooktop will operate Cooktop has flashing lights ■ Has a household fuse...
...Cookware should not extend more than ½" (1.3 cm) outside the cooking area. ■ Are there lights on the cooktop flashing on cooktop ■ Is the cookware the proper size? See the Installation Instructions. 10 Replace the fuse or reset the circuit breaker.... Cooktop cooking results not what expected ■ Is the proper cookware being used? See "Cooktop Controls" section. ■ Is the cooktop level? If the cooktop lights continue to a setting. Cooktop will operate Cooktop has flashing lights ■ Has a household fuse...
Use & Care Guide
Page 11
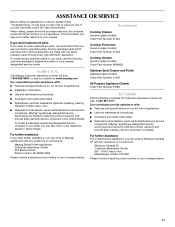
...and provide after -warranty service, anywhere in your area, call . Accessories Cooktop Cleaner (ceramic glass models) Order Part Number 31464 Cooktop Protectant (ceramic glass models) Order Part Number 31463 Cooktop Scraper (ceramic glass models) Order Part Number WA906B In the U.S.A. For ... service call the following customer assistance telephone number or your area, you use only factory specified parts. To locate the Maytag® appliances designated service company in your nearest designated service center. ASSISTANCE OR SERVICE Before calling for assistance or service, ...
...and provide after -warranty service, anywhere in your area, call . Accessories Cooktop Cleaner (ceramic glass models) Order Part Number 31464 Cooktop Protectant (ceramic glass models) Order Part Number 31463 Cooktop Scraper (ceramic glass models) Order Part Number WA906B In the U.S.A. For ... service call the following customer assistance telephone number or your area, you use only factory specified parts. To locate the Maytag® appliances designated service company in your nearest designated service center. ASSISTANCE OR SERVICE Before calling for assistance or service, ...


