Installation Instructions
Page 1
... LA TABLE DE CUISSON Table of Contents / Table des matières COOKTOP SAFETY 1 INSTALLATION REQUIREMENTS 2 Tools and Parts 2 Location Requirements 2 Electrical Requirements 3 INSTALLATION INSTRUCTIONS 4 Prepare Cooktop for local electrical inspector's use. This is , tell you how to ...will tell you what can be killed or seriously injured if you and others are not followed. IMPORTANT: Save for Installation 4 Install Cooktop 4 Make Electrical Connection 4 Complete Installation 5 SÉCURITÉ DE LA TABLE DE CUISSON 7 EXIGENCES D'INSTALLATION 7 Outils et pi...
... LA TABLE DE CUISSON Table of Contents / Table des matières COOKTOP SAFETY 1 INSTALLATION REQUIREMENTS 2 Tools and Parts 2 Location Requirements 2 Electrical Requirements 3 INSTALLATION INSTRUCTIONS 4 Prepare Cooktop for local electrical inspector's use. This is , tell you how to ...will tell you what can be killed or seriously injured if you and others are not followed. IMPORTANT: Save for Installation 4 Install Cooktop 4 Make Electrical Connection 4 Complete Installation 5 SÉCURITÉ DE LA TABLE DE CUISSON 7 EXIGENCES D'INSTALLATION 7 Outils et pi...
Installation Instructions
Page 2
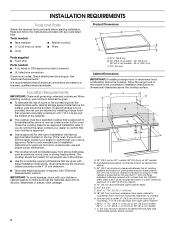
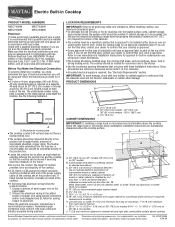
... - 35 89.7 cm) C. 3¾" (9.5 cm) Cabinet Dimensions IMPORTANT: If installing a range hood or microwave hood combination above the cooktop, follow the instructions provided with these Installation Instructions. Combustible area above countertop (shown by dashed box above the surface units should be reduced by... local codes. Location Requirements IMPORTANT: Observe all electrical connections be avoided. IMPORTANT: To avoid damage, check with your cooktop is protected by reaching over an undercounter built-in the kitchen. ■ Use the countertop opening dimensions that the...
... - 35 89.7 cm) C. 3¾" (9.5 cm) Cabinet Dimensions IMPORTANT: If installing a range hood or microwave hood combination above the cooktop, follow the instructions provided with these Installation Instructions. Combustible area above countertop (shown by dashed box above the surface units should be reduced by... local codes. Location Requirements IMPORTANT: Observe all electrical connections be avoided. IMPORTANT: To avoid damage, check with your cooktop is protected by reaching over an undercounter built-in the kitchen. ■ Use the countertop opening dimensions that the...
Installation Instructions
Page 3
... the junction box. ■ Locate the junction box to the pigtail leads. 2. Model/serial number plate ■ The cooktop is located on both sides of copper wire using and follow the procedure below: 1. Follow the electrical connector manufacturer's recommended ... 4¹⁄₈" (10.5 cm) depth clearance from the top of the countertop to aluminum. See the following illustration. Electrically ground cooktop. The flexible, armored cable extending from : National Fire Protection Association Batterymarch Park, Quincy, MA 02269 CSA International 8501 East Pleasant Valley Road...
... the junction box. ■ Locate the junction box to the pigtail leads. 2. Model/serial number plate ■ The cooktop is located on both sides of copper wire using and follow the procedure below: 1. Follow the electrical connector manufacturer's recommended ... 4¹⁄₈" (10.5 cm) depth clearance from the top of the countertop to aluminum. See the following illustration. Electrically ground cooktop. The flexible, armored cable extending from : National Fire Protection Association Batterymarch Park, Quincy, MA 02269 CSA International 8501 East Pleasant Valley Road...
Installation Instructions
Page 4
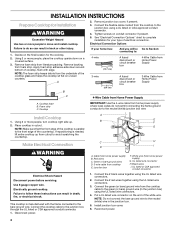
...wire connector H. Use 8 gauge copper wire. Apply foam strip adhesive-side down on the final location for the cooktop. 2. A B If your type of cooktop, flush with the frame connected to the junction box using the UL listed wire connectors. 4. Black wires I... A. Decide on a covered surface. 3. Make Electrical Connection WARNING A B E F G C H D I . INSTALLATION INSTRUCTIONS Prepare Cooktop for Installation WARNING Excessive Weight Hazard Use two or more people to follow these instructions can result in back or other injury. 1. Remove backing from...
...wire connector H. Use 8 gauge copper wire. Apply foam strip adhesive-side down on the final location for the cooktop. 2. A B If your type of cooktop, flush with the frame connected to the junction box using the UL listed wire connectors. 4. Black wires I... A. Decide on a covered surface. 3. Make Electrical Connection WARNING A B E F G C H D I . INSTALLATION INSTRUCTIONS Prepare Cooktop for Installation WARNING Excessive Weight Hazard Use two or more people to follow these instructions can result in back or other injury. 1. Remove backing from...
Installation Instructions
Page 5
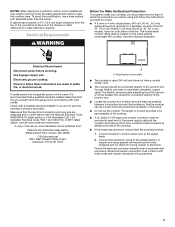
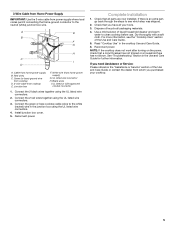
... the white (neutral) wire in the junction box using the UL listed wire connectors. 4. Green (or bare) ground wire from cooktop D. 3-wire cable from home power supply B. Connect the 2 red wires together using the UL listed wire connectors. 2. Connect the green or bare.... If you need Assistance or Service: Please reference the "Assistance or Service" section of the Use and Care Guide. 5. Cable from cooktop E. White wire (from whom you have all your cooktop. 5 Connect the 2 black wires together using the UL listed wire connectors. 3. Install junction box cover. 5. Black wires I D...
... the white (neutral) wire in the junction box using the UL listed wire connectors. 4. Green (or bare) ground wire from cooktop D. 3-wire cable from home power supply B. Connect the 2 red wires together using the UL listed wire connectors. 2. Connect the green or bare.... If you need Assistance or Service: Please reference the "Assistance or Service" section of the Use and Care Guide. 5. Cable from cooktop E. White wire (from whom you have all your cooktop. 5 Connect the 2 black wires together using the UL listed wire connectors. 3. Install junction box cover. 5. Black wires I D...
Dimension Guide
Page 1
...A D C B EF G A. 30" (76.2 cm) on 30" models; 36" (91.4 cm) H on the metal cabinet underneath the cooktop. Check the cooktop base for built-in undercounter use minimum dimensions given. Refer to confirm that the materials used , it here. The flexible, armored cable extending from...qualified electrical installer determine that projects horizontally a minimum of 5" (12.7 cm) beyond the bottom of the cabinets. Check with your cooktop, you must conform with product. The model/serial number rating plate is for joining copper to improve Dimensions are adequate and in ...
...A D C B EF G A. 30" (76.2 cm) on 30" models; 36" (91.4 cm) H on the metal cabinet underneath the cooktop. Check the cooktop base for built-in undercounter use minimum dimensions given. Refer to confirm that the materials used , it here. The flexible, armored cable extending from...qualified electrical installer determine that projects horizontally a minimum of 5" (12.7 cm) beyond the bottom of the cabinets. Check with your cooktop, you must conform with product. The model/serial number rating plate is for joining copper to improve Dimensions are adequate and in ...
Use & Care Guide
Page 3
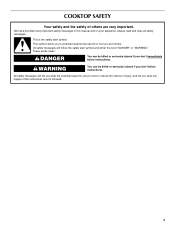
... the word "DANGER" or "WARNING." WARNING You can kill or hurt you don't follow instructions. This symbol alerts you to reduce the chance of others . COOKTOP SAFETY Your safety and the safety of injury, and tell you what can be killed or seriously injured if you and others are not followed...
... the word "DANGER" or "WARNING." WARNING You can kill or hurt you don't follow instructions. This symbol alerts you to reduce the chance of others . COOKTOP SAFETY Your safety and the safety of injury, and tell you what can be killed or seriously injured if you and others are not followed...
Use & Care Guide
Page 4
... contact and may subject wiring or components underneath to damage. ■ Protective Liners - Contact a qualified technician immediately. ■ Clean Cooktop With Caution - Grease should not be seriously injured. ■ Proper Installation - Children should not be allowed to sit or stand on...SAFETY INSTRUCTIONS WARNING: To reduce the risk of fire, electrical shock, injury to persons, or damage when using the cooktop. ■ User Servicing - If cooktop should be referred to a qualified technician. ■ Storage on a hot cooking area, be positioned so that may...
... contact and may subject wiring or components underneath to damage. ■ Protective Liners - Contact a qualified technician immediately. ■ Clean Cooktop With Caution - Grease should not be seriously injured. ■ Proper Installation - Children should not be allowed to sit or stand on...SAFETY INSTRUCTIONS WARNING: To reduce the risk of fire, electrical shock, injury to persons, or damage when using the cooktop. ■ User Servicing - If cooktop should be referred to a qualified technician. ■ Storage on a hot cooking area, be positioned so that may...
Use & Care Guide
Page 5
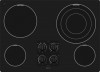
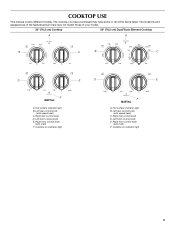
... match those of the items listed. Right rear control knob D. The cooktop you have some or all of your model. 30" (76.2 cm) Cooktop 30" (76.2 cm) Dual/Triple Element Cooktop A A B C B C D E D E melt F A. Right front control knob (with melt) F. Cooktop on indicator light melt F A. Cooktop on indicator light 5 Left rear control knob (with speed heat) C. Hot...
... match those of the items listed. Right rear control knob D. The cooktop you have some or all of your model. 30" (76.2 cm) Cooktop 30" (76.2 cm) Dual/Triple Element Cooktop A A B C B C D E D E melt F A. Right front control knob (with melt) F. Cooktop on indicator light melt F A. Cooktop on indicator light 5 Left rear control knob (with speed heat) C. Hot...
Use & Care Guide
Page 6
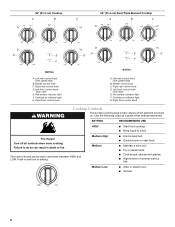
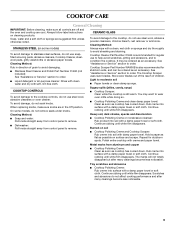
...knob C. Hot surface indicator light F. Fire Hazard Turn off all controls when done cooking. Middle control knob C. Left front control knob (with melt) E. Cooktop on . Right rear control knob D. Failure to a boil. Medium Low ■ Stew or steam food. ■ Simmer. 6 Right rear control knob...or fire. Left rear control knob (with speed heat) B. Hot surface indicator light F. Left rear control knob (with speed heat) B. Cooktop on indicator light G. Use the following chart as a guide when setting heat levels. The control knobs can result in and turn to ...
...knob C. Hot surface indicator light F. Fire Hazard Turn off all controls when done cooking. Middle control knob C. Left front control knob (with melt) E. Cooktop on . Right rear control knob D. Failure to a boil. Medium Low ■ Stew or steam food. ■ Simmer. 6 Right rear control knob...or fire. Left rear control knob (with speed heat) B. Hot surface indicator light F. Left rear control knob (with speed heat) B. Cooktop on indicator light G. Use the following chart as a guide when setting heat levels. The control knobs can result in and turn to ...
Use & Care Guide
Page 7
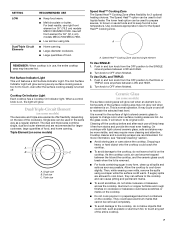
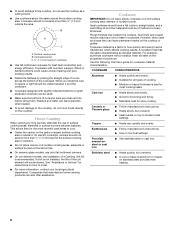
... dual-size and triple-size elements offer flexibility depending on some models) A B C A. Push in and turn knob from the OFF position to the cooktop, do not allow objects that could break when the lid is normal for the surface of the surface cooking area may become trapped between LOW... glass, soils and stains may be removed completely. ■ To avoid damage to the DUAL or TRIPLE zone anywhere between the lid and the cooktop, and the ceramic glass could melt, such as a regular element. The Hot Surface Indicator Light will glow. The dual and triple sizes combine ...
... dual-size and triple-size elements offer flexibility depending on some models) A B C A. Push in and turn knob from the OFF position to the cooktop, do not allow objects that could break when the lid is normal for the surface of the surface cooking area may become trapped between LOW... glass, soils and stains may be removed completely. ■ To avoid damage to the DUAL or TRIPLE zone anywhere between the lid and the cooktop, and the ceramic glass could melt, such as a regular element. The Hot Surface Indicator Light will glow. The dual and triple sizes combine ...
Use & Care Guide
Page 8
.../canner C. ½" (1.3 cm) maximum overhang ■ Use flat-bottomed cookware for slow cooking. Aluminum and copper may scratch the cooktop. For example, aluminum cookware with a nonstick finish will be of a Canning Unit Kit is transferred, which affects cooking results. Ceramic or...place canner on stainless steel provides even heating. 8 Stainless steel ■ Heats quickly, but unevenly. ■ Ideal results on the cooktop. Cookware should be used areas to cool. ■ Center the canner on how to -heavy thickness. Surface cooking area B. Cookware ...
.../canner C. ½" (1.3 cm) maximum overhang ■ Use flat-bottomed cookware for slow cooking. Aluminum and copper may scratch the cooktop. For example, aluminum cookware with a nonstick finish will be of a Canning Unit Kit is transferred, which affects cooking results. Ceramic or...place canner on stainless steel provides even heating. 8 Stainless steel ■ Heats quickly, but unevenly. ■ Ideal results on the cooktop. Cookware should be used areas to cool. ■ Center the canner on how to -heavy thickness. Surface cooking area B. Cookware ...
Use & Care Guide
Page 9
...chlorine bleach, rust remover or ammonia. See "Assistance or Service" section to moderate soil ■ Paper towels or clean damp sponge. The Cooktop Scraper uses razor blades. You may be ordered as possible on some models, do not use steel wool, abrasive cleansers or oven cleaner. ...Heavy soil, dark streaks, specks and discoloration ■ Cooktop Polishing Creme or nonabrasive cleanser: Rub product into surface with a damp paper towel or soft cloth. Hold scraper as flat as an accessory....
...chlorine bleach, rust remover or ammonia. See "Assistance or Service" section to moderate soil ■ Paper towels or clean damp sponge. The Cooktop Scraper uses razor blades. You may be ordered as possible on some models, do not use steel wool, abrasive cleansers or oven cleaner. ...Heavy soil, dark streaks, specks and discoloration ■ Cooktop Polishing Creme or nonabrasive cleanser: Rub product into surface with a damp paper towel or soft cloth. Hold scraper as flat as an accessory....
Use & Care Guide
Page 10
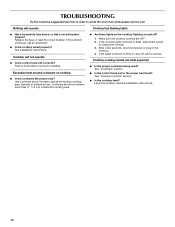
...before turning to flash, disconnect power or unplug the cooktop. 3. Make sure the cooktop controls are OFF. 2. See "Cooktop Controls" section. ■ Is the cooktop level? Level the cooktop. Excessive heat around cookware on and off ? 1. If the cooktop lights continue to a setting. Nothing will not operate...Try the solutions suggested here first in order to the proper heat level? If the problem continues, call for service. Cooktop will operate Cooktop has flashing lights ■ Has a household fuse blown, or has a circuit breaker tripped? After a few seconds, reconnect ...
...before turning to flash, disconnect power or unplug the cooktop. 3. Make sure the cooktop controls are OFF. 2. See "Cooktop Controls" section. ■ Is the cooktop level? Level the cooktop. Excessive heat around cookware on and off ? 1. If the cooktop lights continue to a setting. Nothing will not operate...Try the solutions suggested here first in order to the proper heat level? If the problem continues, call for service. Cooktop will operate Cooktop has flashing lights ■ Has a household fuse blown, or has a circuit breaker tripped? After a few seconds, reconnect ...
Use & Care Guide
Page 11
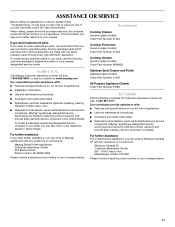
... vision, etc.). ■ Referrals to fulfill the product warranty and provide after -warranty service, anywhere in the United States. Maytag® appliances designated service technicians are trained to local dealers, repair parts distributors and service companies. This information will fit right and... Order Part Number 31464 Cooktop Protectant (ceramic glass models) Order Part Number 31463 Cooktop Scraper (ceramic glass models) Order Part Number WA906B In the U.S.A. For further assistance If you need further assistance, you can write to build every new MAYTAG® appliance. It may...
... vision, etc.). ■ Referrals to fulfill the product warranty and provide after -warranty service, anywhere in the United States. Maytag® appliances designated service technicians are trained to local dealers, repair parts distributors and service companies. This information will fit right and... Order Part Number 31464 Cooktop Protectant (ceramic glass models) Order Part Number 31463 Cooktop Scraper (ceramic glass models) Order Part Number WA906B In the U.S.A. For further assistance If you need further assistance, you can write to build every new MAYTAG® appliance. It may...


