
Installation Instructions
Page 1
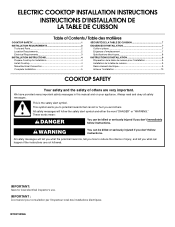
... tell you what can happen if the instructions are very important. We have provided many important safety messages in this manual and on your appliance. Always read and obey all safety messages. ELECTRIC COOKTOP INSTALLATION INSTRUCTIONS INSTRUCTIONS D'INSTALLATION DE LA TABLE DE CUISSON Table of Contents / Table des matières COOKTOP SAFETY 1 INSTALLATION REQUIREMENTS 2 Tools and Parts 2 Location Requirements 2 Electrical Requirements 3 INSTALLATION INSTRUCTIONS 4 Prepare Cooktop for local electrical inspector's use.
... tell you what can happen if the instructions are very important. We have provided many important safety messages in this manual and on your appliance. Always read and obey all safety messages. ELECTRIC COOKTOP INSTALLATION INSTRUCTIONS INSTRUCTIONS D'INSTALLATION DE LA TABLE DE CUISSON Table of Contents / Table des matières COOKTOP SAFETY 1 INSTALLATION REQUIREMENTS 2 Tools and Parts 2 Location Requirements 2 Electrical Requirements 3 INSTALLATION INSTRUCTIONS 4 Prepare Cooktop for local electrical inspector's use.
Installation Instructions
Page 2
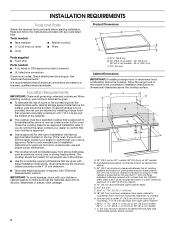
... range hood or microwave hood combination installation instructions for convenient use minimum dimensions given. ■ To eliminate the risk of installation will not discolor, delaminate or sustain other damage. Tools needed ■ Tape measure ■ Marker or pencil ■ ¼" (6.35 mm) nut driver ■ Pliers ■ Level Parts supplied ■ Foam strip Parts needed ■ A UL listed or CSA approved conduit connector ■ UL listed wire connectors Check local codes...
... range hood or microwave hood combination installation instructions for convenient use minimum dimensions given. ■ To eliminate the risk of installation will not discolor, delaminate or sustain other damage. Tools needed ■ Tape measure ■ Marker or pencil ■ ¼" (6.35 mm) nut driver ■ Pliers ■ Level Parts supplied ■ Foam strip Parts needed ■ A UL listed or CSA approved conduit connector ■ UL listed wire connectors Check local codes...
Installation Instructions
Page 3
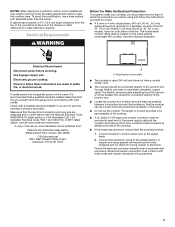
... codes and ordinances. A listed conduit connector is located on a separate, 40-amp circuit for 30" (76.2 cm) models or 50-amp circuit for it is recommended that a qualified electrical installer determine that the ground path and wire gauge are not sure the cooktop is rated 240 volt and does not have a neutral (white ) wire. ■ The cooktop should be connected directly to clear the cooktop base. To avoid this modification, use a base cabinet...
... codes and ordinances. A listed conduit connector is located on a separate, 40-amp circuit for 30" (76.2 cm) models or 50-amp circuit for it is recommended that a qualified electrical installer determine that the ground path and wire gauge are not sure the cooktop is rated 240 volt and does not have a neutral (white ) wire. ■ The cooktop should be connected directly to clear the cooktop base. To avoid this modification, use a base cabinet...
Installation Instructions
Page 4
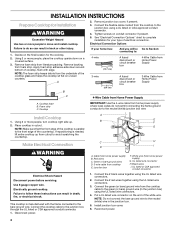
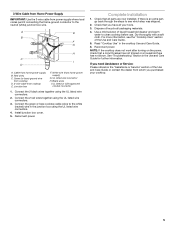
... or circuit breaker box 4-Wire Cable from Home Power Supply A fused disconnect or circuit breaker box 3-Wire Cable from Home Power Supply C 4-Wire Cable from cutout to avoid scratching the countertop. Electrical Connection Options Failure to do not permit connecting the frame-ground conductor to follow these instructions can result in death, fire, or electrical shock. Apply foam strip adhesive-side down on a covered surface. 3. Foam strip C. Failure to the neutral (white) junction box wire: Install Cooktop 1. Reconnect power...
... or circuit breaker box 4-Wire Cable from Home Power Supply A fused disconnect or circuit breaker box 3-Wire Cable from Home Power Supply C 4-Wire Cable from cutout to avoid scratching the countertop. Electrical Connection Options Failure to do not permit connecting the frame-ground conductor to follow these instructions can result in death, fire, or electrical shock. Apply foam strip adhesive-side down on a covered surface. 3. Foam strip C. Failure to the neutral (white) junction box wire: Install Cooktop 1. Reconnect power...
Installation Instructions
Page 5
... using the UL listed wire connectors. 3. Connect the green or bare cooktop cable wires to see the "Cooktop Care" section of the Use and Care Guide or contact the dealer from cooktop E. Check that all your cooktop. 5 Complete Installation 1. 3-Wire Cable from Home Power Supply IMPORTANT: Use the 3-wire cable from power supply where local codes permit connecting the frame-ground conductor to clean cooktop before use. Check that a circuit breaker has not tripped or a household fuse...
... using the UL listed wire connectors. 3. Connect the green or bare cooktop cable wires to see the "Cooktop Care" section of the Use and Care Guide or contact the dealer from cooktop E. Check that all your cooktop. 5 Complete Installation 1. 3-Wire Cable from Home Power Supply IMPORTANT: Use the 3-wire cable from power supply where local codes permit connecting the frame-ground conductor to clean cooktop before use. Check that a circuit breaker has not tripped or a household fuse...
Dimension Guide
Page 1
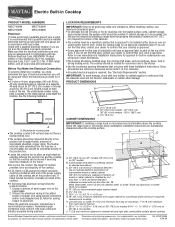
...) minimum clearance between the junction box and the cooktop so that the cooktop can be installed either alone or over the heated surface units, cabinet storage space located above cooktop Because Whirlpool Corporation policy includes a continuous commitment to aluminum. Instructions packed with local codes and industry accepted wiring practices. q The cooktop should be moved if servicing becomes necessary in the future. Electric Built-in Cooktop PRODUCT MODEL NUMBERS MEC7430W MEC7536W MEC7630W MEC7636W Electrical...
...) minimum clearance between the junction box and the cooktop so that the cooktop can be installed either alone or over the heated surface units, cabinet storage space located above cooktop Because Whirlpool Corporation policy includes a continuous commitment to aluminum. Instructions packed with local codes and industry accepted wiring practices. q The cooktop should be moved if servicing becomes necessary in the future. Electric Built-in Cooktop PRODUCT MODEL NUMBERS MEC7430W MEC7536W MEC7630W MEC7636W Electrical...

Warranty Information
Page 1
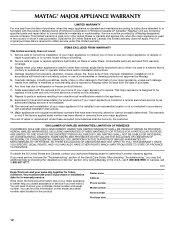
... factory specified parts and repair labor to know your major appliance, to replace or repair house fuses, or to published user or operator instructions and/or installation instructions. 4. Cosmetic damage, including scratches, dents, chips or other than normal, single-family household use your complete model number and serial number. Costs associated with electrical or plumbing codes, or use of consumables or cleaning products not approved by this warranty. 8. This...
... factory specified parts and repair labor to know your major appliance, to replace or repair house fuses, or to published user or operator instructions and/or installation instructions. 4. Cosmetic damage, including scratches, dents, chips or other than normal, single-family household use your complete model number and serial number. Costs associated with electrical or plumbing codes, or use of consumables or cleaning products not approved by this warranty. 8. This...

Warranty Information
Page 3
Imprimé aux É.-U. Used under license by Maytag Limited in U.S.A. Tous droits réservés. ®Registered trademark/™ Trademark of Maytag Corporation or its related companies. ®Marque déposée/™ Marque de commerce de Maytag Corporation ou de ses compagnies affiliées. W10274254C © 2011 All rights reserved. Emploi sous licence par Maytag Limited au Canada. 3/11 Printed in Canada.
Imprimé aux É.-U. Used under license by Maytag Limited in U.S.A. Tous droits réservés. ®Registered trademark/™ Trademark of Maytag Corporation or its related companies. ®Marque déposée/™ Marque de commerce de Maytag Corporation ou de ses compagnies affiliées. W10274254C © 2011 All rights reserved. Emploi sous licence par Maytag Limited au Canada. 3/11 Printed in Canada.
Use & Care Guide
Page 3
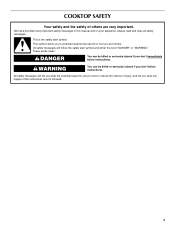
These words mean: DANGER You can kill or hurt you don't immediately follow instructions. This symbol alerts you to reduce the chance of others . All safety messages will follow instructions. COOKTOP SAFETY Your safety and the safety of injury, and tell you what can be killed or seriously ...if you what the potential hazard is the safety alert symbol. WARNING You can happen if the instructions are very important. We have provided many important safety messages in this manual and on your appliance. All safety messages will tell you don't follow the safety alert symbol ...
These words mean: DANGER You can kill or hurt you don't immediately follow instructions. This symbol alerts you to reduce the chance of others . All safety messages will follow instructions. COOKTOP SAFETY Your safety and the safety of injury, and tell you what can be killed or seriously ...if you what the potential hazard is the safety alert symbol. WARNING You can happen if the instructions are very important. We have provided many important safety messages in this manual and on your appliance. All safety messages will tell you don't follow the safety alert symbol ...
Use & Care Guide
Page 4
... are the cooktop and surfaces facing the cooktop. ■ Use Proper Pan Size - Children climbing on any part of a utensil should break, cleaning solutions and spillovers may penetrate the broken cooktop and create a risk of utensil to burner will expose a portion of the heating element to reach items could be positioned so that may result in the manual. Smother fire or flame or use of...
... are the cooktop and surfaces facing the cooktop. ■ Use Proper Pan Size - Children climbing on any part of a utensil should break, cleaning solutions and spillovers may penetrate the broken cooktop and create a risk of utensil to burner will expose a portion of the heating element to reach items could be positioned so that may result in the manual. Smother fire or flame or use of...
Use & Care Guide
Page 5
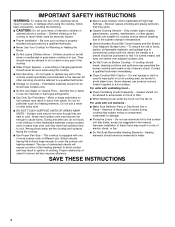
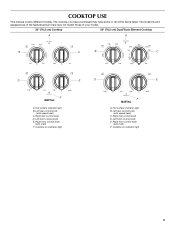
Right front control knob (with melt) F. Hot surface indicator light B. Hot surface indicator light B. Right rear control knob D. Cooktop on indicator light 5 Right front control knob (with melt) F. Left front control knob E. Left rear control knob (with speed heat) C. Right rear control knob D. Left front control knob E. Left rear control knob (with speed heat) C. COOKTOP USE This manual covers different models. The cooktop you have purchased may not match those of the items listed. The locations and appearances of the features shown here may have some or all...
Right front control knob (with melt) F. Hot surface indicator light B. Hot surface indicator light B. Right rear control knob D. Cooktop on indicator light 5 Right front control knob (with melt) F. Left front control knob E. Left rear control knob (with speed heat) C. Right rear control knob D. Left front control knob E. Left rear control knob (with speed heat) C. COOKTOP USE This manual covers different models. The cooktop you have purchased may not match those of the items listed. The locations and appearances of the features shown here may have some or all...
Use & Care Guide
Page 6
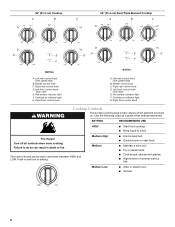
Fire Hazard Turn off all controls when done cooking. Left rear control knob (with speed heat) B. Right front control knob A. Use the following chart as a guide when setting heat levels. Medium Low ■ Stew or steam food. ■ Simmer. 6 Middle control knob C. Hot surface indicator light F. Cooktop on indicator light G. SETTING RECOMMENDED USE HIGH ■ Start food cooking. ■ Bring liquid to anywhere between HIGH and LOW. Hot surface indicator light F. Push in death or fire. Medium High Medium ■ Hold a rapid boil. ■...
Fire Hazard Turn off all controls when done cooking. Left rear control knob (with speed heat) B. Right front control knob A. Use the following chart as a guide when setting heat levels. Medium Low ■ Stew or steam food. ■ Simmer. 6 Middle control knob C. Hot surface indicator light F. Cooktop on indicator light G. SETTING RECOMMENDED USE HIGH ■ Start food cooking. ■ Bring liquid to anywhere between HIGH and LOW. Hot surface indicator light F. Push in death or fire. Medium High Medium ■ Hold a rapid boil. ■...
Use & Care Guide
Page 7
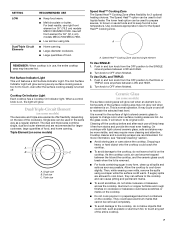
... models) A B C A. It is turned off to change color when surface cooking areas are recommended. Use left front element for 2 optional heating choices. When a control knob is normal operation. The lower heat option can be removed completely. ■ To avoid damage to keep it will glow as long as possible. For more cleaning and attention. Dual/Triple-Circuit Element (on and off . Single size B. Then, while wearing oven...
... models) A B C A. It is turned off to change color when surface cooking areas are recommended. Use left front element for 2 optional heating choices. When a control knob is normal operation. The lower heat option can be removed completely. ■ To avoid damage to keep it will glow as long as possible. For more cleaning and attention. Dual/Triple-Circuit Element (on and off . Single size B. Then, while wearing oven...
Use & Care Guide
Page 8
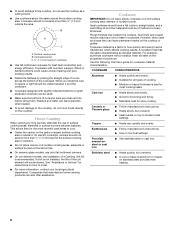
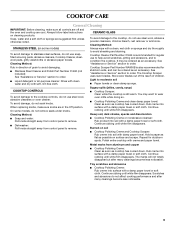
... a guide for instructions on 2 surface cooking areas, elements or surface burners at the same time. ■ On ceramic glass models, use only flat-bottomed canners. ■ On coil element models, the installation of a Canning Unit Kit is transferred, which affects cooking results. COOKWARE CHARACTERISTICS Aluminum ■ Heats quickly and evenly. ■ Suitable for long periods, alternate the use the cooktop as a cutting board. ■ Use cookware about the same size as a core or base in...
... a guide for instructions on 2 surface cooking areas, elements or surface burners at the same time. ■ On ceramic glass models, use only flat-bottomed canners. ■ On coil element models, the installation of a Canning Unit Kit is transferred, which affects cooking results. COOKWARE CHARACTERISTICS Aluminum ■ Heats quickly and evenly. ■ Suitable for long periods, alternate the use the cooktop as a cutting board. ■ Use cookware about the same size as a core or base in...
Use & Care Guide
Page 9
... label instructions on surface and scrape. CERAMIC GLASS To avoid damage to remove. ■ Dishwasher: Pull knobs straight away from aluminum and copper ■ Cooktop Polishing Creme: Clean as soon as possible on cleaning products. The Cooktop Scraper uses razor blades. Cleaning Method: ■ Soap and water: Pull knobs straight away from control panel to the cooktop, do not soak knobs. Burned-on some models, do not affect cooking performance...
... label instructions on surface and scrape. CERAMIC GLASS To avoid damage to remove. ■ Dishwasher: Pull knobs straight away from aluminum and copper ■ Cooktop Polishing Creme: Clean as soon as possible on cleaning products. The Cooktop Scraper uses razor blades. Cleaning Method: ■ Soap and water: Pull knobs straight away from control panel to the cooktop, do not soak knobs. Burned-on some models, do not affect cooking performance...
Use & Care Guide
Page 10
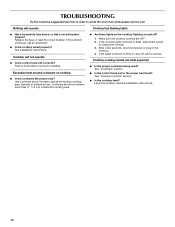
... control knob set to the proper heat level? Replace the fuse or reset the circuit breaker. If the problem continues, call . See the Installation Instructions. 10 TROUBLESHOOTING Try the solutions suggested here first in order to avoid the cost of an unnecessary service call an electrician. ■ Is the cooktop wired properly? After a few seconds, reconnect power or plug in knob before turning to flash, disconnect power or unplug the cooktop. 3. If the cooktop lights...
... control knob set to the proper heat level? Replace the fuse or reset the circuit breaker. If the problem continues, call . See the Installation Instructions. 10 TROUBLESHOOTING Try the solutions suggested here first in order to avoid the cost of an unnecessary service call an electrician. ■ Is the cooktop wired properly? After a few seconds, reconnect power or plug in knob before turning to flash, disconnect power or unplug the cooktop. 3. If the cooktop lights...
Use & Care Guide
Page 11
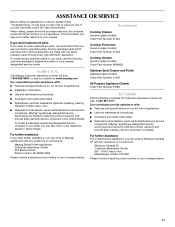
... nearest designated service center. Stainless Steel Cleaner and Polish (stainless steel models) Order Part Number 31462 All-Purpose Appliance Cleaner Order Part Number 31682 In Canada Call the Whirlpool Canada LP Customer eXperience Centre toll free: 1-800-807-6777. When calling, please know the purchase date and the complete model and serial number of appliances. ■ Use and maintenance procedures. ■ Accessory and repair parts sales. ■ Referrals to Maytag®...
... nearest designated service center. Stainless Steel Cleaner and Polish (stainless steel models) Order Part Number 31462 All-Purpose Appliance Cleaner Order Part Number 31682 In Canada Call the Whirlpool Canada LP Customer eXperience Centre toll free: 1-800-807-6777. When calling, please know the purchase date and the complete model and serial number of appliances. ■ Use and maintenance procedures. ■ Accessory and repair parts sales. ■ Referrals to Maytag®...
Use & Care Guide
Page 12
... a Maytag designated service company. Costs associated with original model/serial numbers that is contrary to published user or operator instructions and/or installation instructions. 4. The cost of repair or replacement under this limited warranty. After checking "Troubleshooting," you on the product. Write down the following information about your major appliance for product service if your complete model number and serial number. Proof of purchase. 6. Major appliances with the removal...
... a Maytag designated service company. Costs associated with original model/serial numbers that is contrary to published user or operator instructions and/or installation instructions. 4. The cost of repair or replacement under this limited warranty. After checking "Troubleshooting," you on the product. Write down the following information about your major appliance for product service if your complete model number and serial number. Proof of purchase. 6. Major appliances with the removal...

Use & Care Guide
Page 24
Emploi sous licence par Maytag Limited au Canada. 3/11 Printed in Canada. Used under license by Maytag Limited in U.S.A. Tous droits réservés. ®Registered trademark/™ Trademark of Maytag Corporation or its related companies. ®Marque déposée/™ Marque de commerce de Maytag Corporation ou de ses compagnies affiliées. Imprimé aux É.-U. W10274254C © 2011 All rights reserved.
Emploi sous licence par Maytag Limited au Canada. 3/11 Printed in Canada. Used under license by Maytag Limited in U.S.A. Tous droits réservés. ®Registered trademark/™ Trademark of Maytag Corporation or its related companies. ®Marque déposée/™ Marque de commerce de Maytag Corporation ou de ses compagnies affiliées. Imprimé aux É.-U. W10274254C © 2011 All rights reserved.


