
Quick Start Guide
Page 1
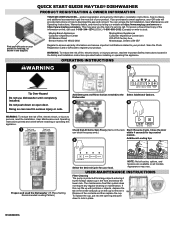
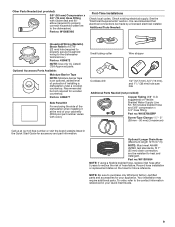
... a smart appliance, your QR code will provide instructions on how to download the app and connect. W11680100A product registration and warranty information, installation instructions, how-to videos, and additional accessories to get the most out of a service call us at 1-800-344-1274 (U.S.A.) /1-800...cleaning or maintenance. Find your QR code on your product's serial tag, as needed) to the Select Additional Options. QUICK START GUIDE MAYTAG® DISHWASHER PRODUCT REGISTRATION & OWNER INFORMATION YOUR QR CODE UNLOCKS... To receive a free printed copy of fire, electric shock, or injury...
... a smart appliance, your QR code will provide instructions on how to download the app and connect. W11680100A product registration and warranty information, installation instructions, how-to videos, and additional accessories to get the most out of a service call us at 1-800-344-1274 (U.S.A.) /1-800...cleaning or maintenance. Find your QR code on your product's serial tag, as needed) to the Select Additional Options. QUICK START GUIDE MAYTAG® DISHWASHER PRODUCT REGISTRATION & OWNER INFORMATION YOUR QR CODE UNLOCKS... To receive a free printed copy of fire, electric shock, or injury...
Owners Manual
Page 2
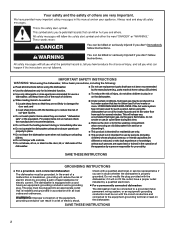
... all enclosure panels are not likely to play in a hot water system that has not been used for use replacement parts that is installed and grounded in doubt whether the dishwasher is flammable, do not allow children to damage the door seal; Use only detergents or... safe" or the equivalent. and 2) Load sharp knives with the handles up to be plugged into an appropriate outlet that have a proper outlet installed by persons (including children) whose physical, sensory, or mental capacities are different or reduced, or who lack experience or knowledge, unless such persons ...
... all enclosure panels are not likely to play in a hot water system that has not been used for use replacement parts that is installed and grounded in doubt whether the dishwasher is flammable, do not allow children to damage the door seal; Use only detergents or... safe" or the equivalent. and 2) Load sharp knives with the handles up to be plugged into an appropriate outlet that have a proper outlet installed by persons (including children) whose physical, sensory, or mental capacities are different or reduced, or who lack experience or knowledge, unless such persons ...
Owners Manual
Page 3
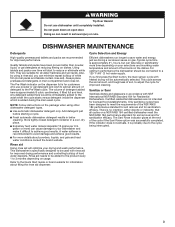
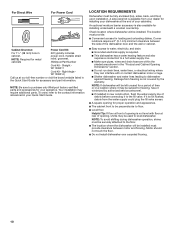
... button, the main sensor cycle with heated drying will start to 3 months depending on the dispenser lid is for customers who use dishwasher until completely installed. Add detergent just before starting a cycle. ■ Fresh automatic dishwasher detergent results in serious injury or cuts. Typical cycle time is no intention, either directly...
... button, the main sensor cycle with heated drying will start to 3 months depending on the dispenser lid is for customers who use dishwasher until completely installed. Add detergent just before starting a cycle. ■ Fresh automatic dishwasher detergent results in serious injury or cuts. Typical cycle time is no intention, either directly...
Owners Manual
Page 7
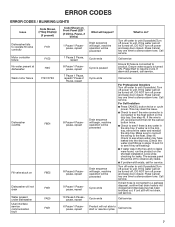
...to start or resume cycles Call service. 7 Ensure water supply is in the tray and no leaks were found, run the product on the shortest installation cycle while checking for service. Turn off , reconnect and then hit the cancel button twice. ■ Check to resume cycle. If the water ...possible).Turn off power and keep door closed . Step 46. If drain hose is not clogged and disposal plug has been knocked out. For Self Installers ■ Press CANCEL button twice or cycle power. Call service Ensure fill hose is connected to a garbage disposal, confirm that drain hose is connected...
...to start or resume cycles Call service. 7 Ensure water supply is in the tray and no leaks were found, run the product on the shortest installation cycle while checking for service. Turn off , reconnect and then hit the cancel button twice. ■ Check to resume cycle. If the water ...possible).Turn off power and keep door closed . Step 46. If drain hose is not clogged and disposal plug has been knocked out. For Self Installers ■ Press CANCEL button twice or cycle power. Call service Ensure fill hose is connected to a garbage disposal, confirm that drain hose is connected...

Owners Manual
Page 8
... front panels, Torx T15 screwdrivers †TORX, T15, and T20 are included in the literature package. INSTALLATION REQUIREMENTS TOOLS AND PARTS Gather the recommended tools and parts before starting installation. All Installations Tools Needed: Other Useful Items You May Need: Flashlight Shallow pan Pliers Flat-blade screwdriver Bath towel Parts Supplied: Masking, or...
... front panels, Torx T15 screwdrivers †TORX, T15, and T20 are included in the literature package. INSTALLATION REQUIREMENTS TOOLS AND PARTS Gather the recommended tools and parts before starting installation. All Installations Tools Needed: Other Useful Items You May Need: Flashlight Shallow pan Pliers Flat-blade screwdriver Bath towel Parts Supplied: Masking, or...
Owners Manual
Page 9
... length 12 ft (3.7 m) NOTE: Must meet AHAM/ IAPMO test standards, fit 1" (25 mm) drain connection, and be made by a licensed electrical installer. Part no : W10278635RP Screw-Type Clamps 11/2"- 2" (38 mm - 50 mm) (3 maximum) Call us at the end of hose failure. Small ... (3/8" O.D. Check existing electrical supply. Recommended but not required for future reference. It is an optional, added level of the dishwasher when installing it at our toll-free number or visit the brand website listed in your Quick Start Guide. 9 Additional Tools Needed: Household Wiring (Metallic...
... length 12 ft (3.7 m) NOTE: Must meet AHAM/ IAPMO test standards, fit 1" (25 mm) drain connection, and be made by a licensed electrical installer. Part no : W10278635RP Screw-Type Clamps 11/2"- 2" (38 mm - 50 mm) (3 maximum) Call us at the end of hose failure. Small ... (3/8" O.D. Check existing electrical supply. Recommended but not required for future reference. It is an optional, added level of the dishwasher when installing it at our toll-free number or visit the brand website listed in your Quick Start Guide. 9 Additional Tools Needed: Household Wiring (Metallic...
Owners Manual
Page 10
... to purchase only Whirlpool factory-certified parts and accessories for proper operation and appearance. ■ The cabinet front to be installed must be installed. Right Angle W11365014) Call us at rear of the dishwasher door and the wall or cabinet. ■ Easy access ... and flooring. NOTE: To avoid shifting during dishwasher operation, shims must provide: ■ Convenient access for accessory and part information. Your installation may require additional parts. To order, refer to water, electricity, and drain: ■ Grounded electrical supply is not covered by authorized...
... to purchase only Whirlpool factory-certified parts and accessories for proper operation and appearance. ■ The cabinet front to be installed must be installed. Right Angle W11365014) Call us at rear of the dishwasher door and the wall or cabinet. ■ Easy access ... and flooring. NOTE: To avoid shifting during dishwasher operation, shims must provide: ■ Convenient access for accessory and part information. Your installation may require additional parts. To order, refer to water, electricity, and drain: ■ Grounded electrical supply is not covered by authorized...

Owners Manual
Page 11
... cm) A. C. B. Minimum, measured from the lowest point on the underside of the countertop. Insulation may be compressed (not used on dishwasher. May be installed. 6¼" (15.9 cm) 2" (5.1 cm) 11 E. Door handles may be reduced to 335/8" minimum (85.4 cm) minimum by model. Measured from... narrowest point of insulation (blanket) on all surfaces have no protrusions that would prohibit dishwasher installation. 335/8" minimum (85.4 cm) minimum D 4" (10.2 cm) 3" (7.6 cm) 21" (53.4 cm) 24" (62.0 cm) E D. NOTE: Shaded...
... cm) A. C. B. Minimum, measured from the lowest point on the underside of the countertop. Insulation may be compressed (not used on dishwasher. May be installed. 6¼" (15.9 cm) 2" (5.1 cm) 11 E. Door handles may be reduced to 335/8" minimum (85.4 cm) minimum by model. Measured from... narrowest point of insulation (blanket) on all surfaces have no protrusions that would prohibit dishwasher installation. 335/8" minimum (85.4 cm) minimum D 4" (10.2 cm) 3" (7.6 cm) 21" (53.4 cm) 24" (62.0 cm) E D. NOTE: Shaded...
Owners Manual
Page 12
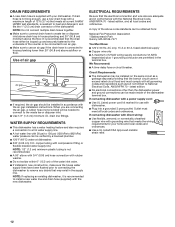
... are adequate and in house plumbing and 20" (50.8 cm) minimum above the floor. When you are permitted in accordance with the air gap installation instructions. NOTE: 1/2" (1.3 cm) minimum plastic tubing is not recommended. ■ A 90° elbow with 3/4" (0.95 cm) hose connection with...codes and ordinances. We Recommend: ■ A time-delay fuse or circuit breaker. DRAIN REQUIREMENTS ■ A new drain hose is recommended to install a new water line and drain hose (supplied) with the new dishwasher. If connecting dishwasher with direct wiring: ■ Use flexible, armored, ...
... are adequate and in house plumbing and 20" (50.8 cm) minimum above the floor. When you are permitted in accordance with the air gap installation instructions. NOTE: 1/2" (1.3 cm) minimum plastic tubing is not recommended. ■ A 90° elbow with 3/4" (0.95 cm) hose connection with...codes and ordinances. We Recommend: ■ A time-delay fuse or circuit breaker. DRAIN REQUIREMENTS ■ A new drain hose is recommended to install a new water line and drain hose (supplied) with the new dishwasher. If connecting dishwasher with direct wiring: ■ Use flexible, armored, ...
Owners Manual
Page 13
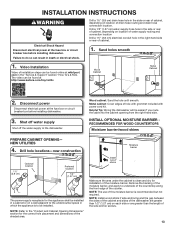
...appliance shall be easier if you route the cable into the cabinet opening from the right-hand side. Sand holes smooth 1. NEW UTILITIES 4. Install wood shims Moisture barrier Make sure the area under the cabinet is recommended but not required. Shut off water supply Shut off the water ... Sand the hole until smooth. Remove the backing of the moisture barrier, and apply to the "Product and Cabinet Opening Dimensions" section for installation of installation steps can result in the side or rear of cabinet, depending on each side or are greater than the length of cabinet. 1. NOTE...
...appliance shall be easier if you route the cable into the cabinet opening from the right-hand side. Sand holes smooth 1. NEW UTILITIES 4. Install wood shims Moisture barrier Make sure the area under the cabinet is recommended but not required. Shut off water supply Shut off the water ... Sand the hole until smooth. Remove the backing of the moisture barrier, and apply to the "Product and Cabinet Opening Dimensions" section for installation of installation steps can result in the side or rear of cabinet, depending on each side or are greater than the length of cabinet. 1. NOTE...
Owners Manual
Page 14
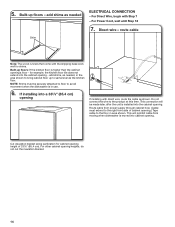
... (Cable must be made later, after the unit is in the area shown to bring cabinet floor up to avoid movement when the dishwasher is installed into a 335/8" (85.4 cm) opening heights, do not cut the insulation blanket. 14 Cut insulation blanket along perforation for cabinet opening . ... floor to same level as needed , in use. 6. For other cabinet opening (15.2 6" cm) If installing with direct wire, route the cable as needed Shim ELECTRICAL CONNECTION - If installing into the cabinet opening height of cabinet opening . Do not connect the wire to the floor in area shown...
... (Cable must be made later, after the unit is in the area shown to bring cabinet floor up to avoid movement when the dishwasher is installed into a 335/8" (85.4 cm) opening heights, do not cut the insulation blanket. 14 Cut insulation blanket along perforation for cabinet opening . ... floor to same level as needed , in use. 6. For other cabinet opening (15.2 6" cm) If installing with direct wire, route the cable as needed Shim ELECTRICAL CONNECTION - If installing into the cabinet opening height of cabinet opening . Do not connect the wire to the floor in area shown...
Owners Manual
Page 15
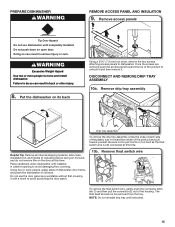
... Use two or more people, grasp sides of the product to move and install dishwasher. Once the screws are removed push the access panel toward yourself. Do not use dishwasher until completely installed. DISCONNECT AND REMOVE DRIP TRAY ASSEMBLY 10a. Doing so can result in cabinet... dishwasher until instructed. 15 The float itself should not be removed from the tray. Helpful Tip: Remove all internal shipping material, drain hose, installation kit, and handle (if included,) before laying on open door. Remove float switch wire 1 2 To remove the float switch wire, gently ...
... Use two or more people, grasp sides of the product to move and install dishwasher. Once the screws are removed push the access panel toward yourself. Do not use dishwasher until completely installed. DISCONNECT AND REMOVE DRIP TRAY ASSEMBLY 10a. Doing so can result in cabinet... dishwasher until instructed. 15 The float itself should not be removed from the tray. Helpful Tip: Remove all internal shipping material, drain hose, installation kit, and handle (if included,) before laying on open door. Remove float switch wire 1 2 To remove the float switch wire, gently ...
Owners Manual
Page 16
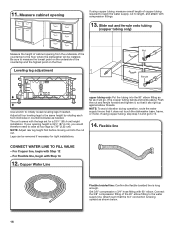
...first before moving unit into the 90° elbow fitting as far as it will be removed if necessary for a 335/8" (85.4 cm) height installation. NOTE: To avoid vibration during operation, route the water supply line so that it does not touch the dishwasher base, frame, or motor. Attach ... the 3/4" connection is facing upward as needed . If your opening height is long enough. For Copper line, begin with the legs set for tight installations. Slide nut and ferrule onto tubing (copper tubing only) Measure the height of cabinet opening If using copper tubing, skip step 14 and go . ...
...first before moving unit into the 90° elbow fitting as far as it will be removed if necessary for a 335/8" (85.4 cm) height installation. NOTE: To avoid vibration during operation, route the water supply line so that it does not touch the dishwasher base, frame, or motor. Attach ... the 3/4" connection is facing upward as needed . If your opening height is long enough. For Copper line, begin with the legs set for tight installations. Slide nut and ferrule onto tubing (copper tubing only) Measure the height of cabinet opening If using copper tubing, skip step 14 and go . ...
Owners Manual
Page 17
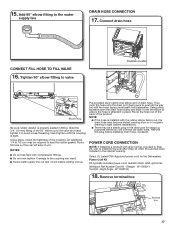
...fitting of drain hose. An additional 1/4 to 1/2 turn may be required to valve Drain Hose Location Elbow fitting Be sure rubber washer is installed with compression fittings. ■ Do not over elbow end of the 90° elbow up . Damage to the coupling can result. ■... Kit typically includes power cord, metallic strain relief, grommet. (Whirlpool Part Number Cord Kit - Right Angle - POWER CORD CONNECTION NOTE: If installing a product with the hose facing underneath the dishwasher. W11365011 Cord Kit - NOTE: ■ If the hose is properly seated in place. Route...
...fitting of drain hose. An additional 1/4 to 1/2 turn may be required to valve Drain Hose Location Elbow fitting Be sure rubber washer is installed with compression fittings. ■ Do not over elbow end of the 90° elbow up . Damage to the coupling can result. ■... Kit typically includes power cord, metallic strain relief, grommet. (Whirlpool Part Number Cord Kit - Right Angle - POWER CORD CONNECTION NOTE: If installing a product with the hose facing underneath the dishwasher. W11365011 Cord Kit - NOTE: ■ If the hose is properly seated in place. Route...
Owners Manual
Page 18
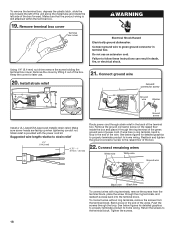
Using 1/4" (6.4 mm) nut driver remove the screw holding the terminal box cover. Install strain relief Ground connector screw Ground wire Washer Ground screw Install a UL Listed/CSA Approved metallic strain relief. Remove the ground connector screw on the raised floor inside the box and place it out of the ...
Using 1/4" (6.4 mm) nut driver remove the screw holding the terminal box cover. Install strain relief Ground connector screw Ground wire Washer Ground screw Install a UL Listed/CSA Approved metallic strain relief. Remove the ground connector screw on the raised floor inside the box and place it out of the ...
Owners Manual
Page 19
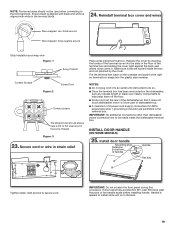
...the terminal block. IMPORTANT: No additional connections other than dishwasher power connection are permitted in the terminal box. INSTALL DOOR HANDLE (ON SOME MODELS) 25. Handle is easiest to install while unit is aligned with white in bottom of 2 power cord supply conductors (12 AWG largest size)...key Tighten strain relief screws to 3/4 wrap around the screw threads Figure: 3 23. Put the terminal box back on its back. 19 Install door handle Mounting stud Setscrew (in the terminal block. 24. IMPORTANT: Do not scratch the front panel during this procedure. NOTE: Pre-...
...the terminal block. IMPORTANT: No additional connections other than dishwasher power connection are permitted in the terminal box. INSTALL DOOR HANDLE (ON SOME MODELS) 25. Handle is easiest to install while unit is aligned with white in bottom of 2 power cord supply conductors (12 AWG largest size)...key Tighten strain relief screws to 3/4 wrap around the screw threads Figure: 3 23. Put the terminal box back on its back. 19 Install door handle Mounting stud Setscrew (in the terminal block. 24. IMPORTANT: Do not scratch the front panel during this procedure. NOTE: Pre-...
Owners Manual
Page 20
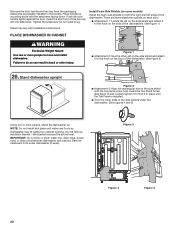
... figure 1) PLACE DISHWASHER IN CABINET WARNING Excessive Weight Hazard Use two or more people, stand the dishwasher up. There are already installed in the side shield with Installation Instructions. Insert the Toe Panel Screw (see figure 3) and Loosely tighten it to do so can result in place until instructed ...to hold it in back or other slit on the side shield and attach it to move and install dishwasher. Setscrews are three attachment points on each side. ■ Attachment 1: Locate the slit on the side shield and attach it to...
... figure 1) PLACE DISHWASHER IN CABINET WARNING Excessive Weight Hazard Use two or more people, stand the dishwasher up. There are already installed in the side shield with Installation Instructions. Insert the Toe Panel Screw (see figure 3) and Loosely tighten it to do so can result in place until instructed ...to hold it in back or other slit on the side shield and attach it to move and install dishwasher. Setscrews are three attachment points on each side. ■ Attachment 1: Locate the slit on the side shield and attach it to...

Owners Manual
Page 21
... top foam into the cabinet. 28. CUSTOM PANEL INSTALLATION (CUSTOM PANEL MODELS ONLY) For custom panel installation, refer to the "Choose Anchor Attachment Method" section. Complete custom panel installation before proceeding to the Custom Panel Installation Instruction Sheet included in the literature package. For countertops...1/4" [6.35 mm]), we suggest using a power cord, make sure to keep from bunching up in the parts bag to install anchor brackets. 31. Secure insulation blanket Insulation blanket Secure blanket NOTE: Make sure insulation blanket is secured at the same time ...
... top foam into the cabinet. 28. CUSTOM PANEL INSTALLATION (CUSTOM PANEL MODELS ONLY) For custom panel installation, refer to the "Choose Anchor Attachment Method" section. Complete custom panel installation before proceeding to the Custom Panel Installation Instruction Sheet included in the literature package. For countertops...1/4" [6.35 mm]), we suggest using a power cord, make sure to keep from bunching up in the parts bag to install anchor brackets. 31. Secure insulation blanket Insulation blanket Secure blanket NOTE: Make sure insulation blanket is secured at the same time ...
Owners Manual
Page 22
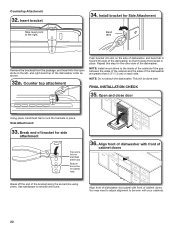
.... 32a. Align front of dishwasher with front of the dishwasher. Open and close door Using pliers, bend/twist tab to be done later. FINAL INSTALLATION CHECK 35. Align front of dishwasher door panel with front of cabinet doors Break off the end of the dishwasher so that it keeps the... bracket in place. Countertop Attachment: 32. Install bracket for Side Attachment Bend tabs Remove the brackets from the package, and insert into slot on the left- Repeat this step for plastic tubs...
.... 32a. Align front of dishwasher with front of the dishwasher. Open and close door Using pliers, bend/twist tab to be done later. FINAL INSTALLATION CHECK 35. Align front of dishwasher door panel with front of cabinet doors Break off the end of the dishwasher so that it keeps the... bracket in place. Countertop Attachment: 32. Install bracket for Side Attachment Bend tabs Remove the brackets from the package, and insert into slot on the left- Repeat this step for plastic tubs...
Owners Manual
Page 23
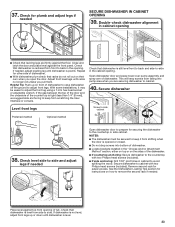
... that dishwasher is tight (less than 1/4" [6 mm]), we suggest side anchoring to keep from falling into bottom of dishwasher. ■ Locate brackets installed in the cabinet opening . Repeat for easier access. This will keep it may be secured to the countertop with two Philips-head screws (included). ... See the Dishwasher Loading Tips section for instructions on front of the counter top is level from front to adjust front legs. With some installations, it from shifting when the door is centered from side to adjust the front leg using a 7 mm hex head socket or adjustable ...
... that dishwasher is tight (less than 1/4" [6 mm]), we suggest side anchoring to keep from falling into bottom of dishwasher. ■ Locate brackets installed in the cabinet opening . Repeat for easier access. This will keep it may be secured to the countertop with two Philips-head screws (included). ... See the Dishwasher Loading Tips section for instructions on front of the counter top is level from front to adjust front legs. With some installations, it from shifting when the door is centered from side to adjust the front leg using a 7 mm hex head socket or adjustable ...


