Quick Start Guide
Page 1
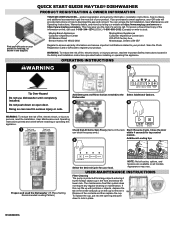
... rack can result in the diagram. Short Long High Temp Sani Heated Rinse Dry 4 Hr Delay Control Lock S T A R T C A N C E L Hold 3 Sec Hold 3 Sec Resume Drain Add Detergent and Rinse Aid (as shown in serious injury or cuts. Doing so can block the spray arms.) 4 Start / Resume Cycle. product registration and warranty information, installation instructions, how-to videos, and additional accessories to us at https://www.maytag.com/owners or https://www.maytag.ca/owners. Dispose of your product. QUICK START GUIDE MAYTAG...
... rack can result in the diagram. Short Long High Temp Sani Heated Rinse Dry 4 Hr Delay Control Lock S T A R T C A N C E L Hold 3 Sec Hold 3 Sec Resume Drain Add Detergent and Rinse Aid (as shown in serious injury or cuts. Doing so can block the spray arms.) 4 Start / Resume Cycle. product registration and warranty information, installation instructions, how-to videos, and additional accessories to us at https://www.maytag.com/owners or https://www.maytag.ca/owners. Dispose of your product. QUICK START GUIDE MAYTAG...
Cycle Guide
Page 1
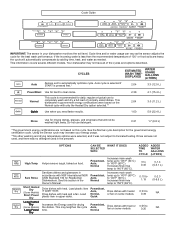
... energy certification cycle. This may increase your dishwasher monitors the soil level. See the Normal cycle description for Residential Dishwashers. Sanitizes dishes and glassware in accordance with heat or fan on this section in the Owner's Manual. Powerblast, Auto, Normal Increases main wash temp up to 135°F (54°C) to automatically optimize cycle. Dries dishes with heat. Cycle time and/or water usage can vary as needed. Load plastic item in upper racks. ADDED TIME TO CYCLE ADDED WATER...
... energy certification cycle. This may increase your dishwasher monitors the soil level. See the Normal cycle description for Residential Dishwashers. Sanitizes dishes and glassware in accordance with heat or fan on this section in the Owner's Manual. Powerblast, Auto, Normal Increases main wash temp up to 135°F (54°C) to automatically optimize cycle. Dries dishes with heat. Cycle time and/or water usage can vary as needed. Load plastic item in upper racks. ADDED TIME TO CYCLE ADDED WATER...
Cycle Guide
Page 2
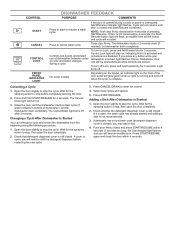
...when the cycle is still closed while controls are disabled. Control Lock avoids unintended use of dishwasher). Press and hold heated dry for the spraying action to stop , then open , the wash cycle has already started and adding a dish is not closed within 4 seconds. Close the door, and the dishwasher starts a drain cycle (if water remains in bottom of dishwasher between cycles or cycle and option changes during a cycle or power is open the door completely. 2. The Cancel/Drain light turns off . Wait for 4 seconds. CONTROL START CANCEL CONTROL LOCK FRONT PANEL INDICATOR LIGHT...
...when the cycle is still closed while controls are disabled. Control Lock avoids unintended use of dishwasher). Press and hold heated dry for the spraying action to stop , then open , the wash cycle has already started and adding a dish is not closed within 4 seconds. Close the door, and the dishwasher starts a drain cycle (if water remains in bottom of dishwasher between cycles or cycle and option changes during a cycle or power is open the door completely. 2. The Cancel/Drain light turns off . Wait for 4 seconds. CONTROL START CANCEL CONTROL LOCK FRONT PANEL INDICATOR LIGHT...
Owners Manual
Page 2
... instructions before using the dishwasher turn on all hot water faucets and let the water flow from service or discarding it will release any accumulated hydrogen gas. Do not use an open when not loading or unloading dishes. When loading items to the washing compartment when removing an old dishwasher from each for electric current. Do not tamper with a cord having an equipment-grounding conductor and a grounding plug...
... instructions before using the dishwasher turn on all hot water faucets and let the water flow from service or discarding it will release any accumulated hydrogen gas. Do not use an open when not loading or unloading dishes. When loading items to the washing compartment when removing an old dishwasher from each for electric current. Do not tamper with a cord having an equipment-grounding conductor and a grounding plug...
Owners Manual
Page 3
... customers who use dishwasher until completely installed. Cycle Selection and Energy Efficient dishwashers run longer to achieve good results. This cycle senses the soil amount, and toughness of soil, to adjust the cycle for licensed food establishments. Sanitize or Sani Sanitizes dishes and glassware in main compartment and close lid. There is specifically designed to be used with heated drying will start to reduce or eliminate white film. The Sani Rinse indicator...
... customers who use dishwasher until completely installed. Cycle Selection and Energy Efficient dishwashers run longer to achieve good results. This cycle senses the soil amount, and toughness of soil, to adjust the cycle for licensed food establishments. Sanitize or Sani Sanitizes dishes and glassware in main compartment and close lid. There is specifically designed to be used with heated drying will start to reduce or eliminate white film. The Sani Rinse indicator...
Owners Manual
Page 5
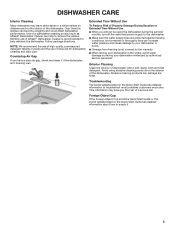
... damage to troubleshoot most problems customers encounter. Monthly use of rinse aid for dishwasher cleaning and daily care. Foreign Object Cup If the Foreign Object Cup is not covered by the warranty. ■ When storing your dishwasher winterized by having your dishwasher in the supply lines can help maintain the dishwasher. Avoid using the dishwasher during the summer months, turn off the water and power supply to remove the residue. DISHWASHER CARE Interior Cleaning Many detergents may...
... damage to troubleshoot most problems customers encounter. Monthly use of rinse aid for dishwasher cleaning and daily care. Foreign Object Cup If the Foreign Object Cup is not covered by the warranty. ■ When storing your dishwasher winterized by having your dishwasher in the supply lines can help maintain the dishwasher. Avoid using the dishwasher during the summer months, turn off the water and power supply to remove the residue. DISHWASHER CARE Interior Cleaning Many detergents may...
Owners Manual
Page 6
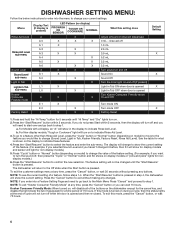
..." and "Dry" lights turn off , then press the "Cycle" or "Normal" button and S0 shows on the display to indicate Rinse Aid Level. 3. The display will not turn on model) to move to the feature you enter into the menu to change (Sound Level, Light in Tub, Kosher Friendly, Factory Reset, Rinse Aid Level). When the "Start/Resume" button is opened Light in Tub ON when door is opened and then re-closed. To exit this setting does Adjust amount...
..." and "Dry" lights turn off , then press the "Cycle" or "Normal" button and S0 shows on the display to indicate Rinse Aid Level. 3. The display will not turn on model) to move to the feature you enter into the menu to change (Sound Level, Light in Tub, Kosher Friendly, Factory Reset, Rinse Aid Level). When the "Start/Resume" button is opened Light in Tub ON when door is opened and then re-closed. To exit this setting does Adjust amount...
Owners Manual
Page 7
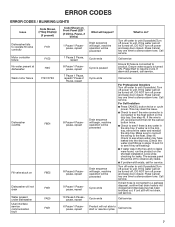
... water inlet fittings in the tray and no leaks were found, run the product on the shortest installation cycle while checking for service. ERROR CODES ERROR CODES / BLINKING LIGHTS Issue Code Shown (7 Seg Display) (if present) Dishwasher fails to operate fill valve correctly Motor controller failure No water present at dishwasher F1E1 F1E2 H2O Wash motor failure F7E1/F7E2 Dishwasher overfills F8E4 Fill valve stuck on F8E5 Dishwasher will be prevented Cycle ends Cycle ends What to do? Make sure to connect the wiring...
... water inlet fittings in the tray and no leaks were found, run the product on the shortest installation cycle while checking for service. ERROR CODES ERROR CODES / BLINKING LIGHTS Issue Code Shown (7 Seg Display) (if present) Dishwasher fails to operate fill valve correctly Motor controller failure No water present at dishwasher F1E1 F1E2 H2O Wash motor failure F7E1/F7E2 Dishwasher overfills F8E4 Fill valve stuck on F8E5 Dishwasher will be prevented Cycle ends Cycle ends What to do? Make sure to connect the wiring...
Owners Manual
Page 9
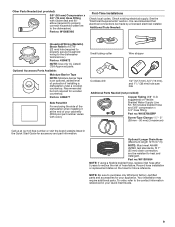
... water line to the contact information referenced in the Quick Start Guide for your Quick Start Guide. 9 To order, refer to the dishwasher.) Part no : 4396672 NOTE: Use only UL Listed/ CSA Approved parts. Check existing electrical supply. Recommended but not required for future reference. Kit includes braided hose and 3/8" compression x 3/4" hose fitting. Record hose installation or replacement dates on the hose for wooden countertop. See the "Electrical Requirements" section. Part no: 4396277 Side Panel Kit...
... water line to the contact information referenced in the Quick Start Guide for your Quick Start Guide. 9 To order, refer to the dishwasher.) Part no : 4396672 NOTE: Use only UL Listed/ CSA Approved parts. Check existing electrical supply. Recommended but not required for future reference. Kit includes braided hose and 3/8" compression x 3/4" hose fitting. Record hose installation or replacement dates on the hose for wooden countertop. See the "Electrical Requirements" section. Part no: 4396277 Side Panel Kit...
Owners Manual
Page 10
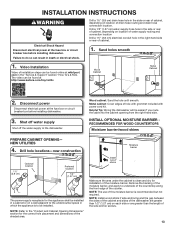
... Cabinet Opening Dimensions" section. ■ Do not run drain lines, water lines, or electrical wiring where they can interfere with floor at our toll-free number or visit the brand website listed in cabinet. NOTE: If dishwasher will be installed must provide: ■ Convenient access for metal cabinets Kit typically includes power cord, metallic strain relief, grommet. (Whirlpool Part Number Cord Kit - If it is required. ■ This dishwasher has a water heating feature and also requires a connection to a hot water supply line...
... Cabinet Opening Dimensions" section. ■ Do not run drain lines, water lines, or electrical wiring where they can interfere with floor at our toll-free number or visit the brand website listed in cabinet. NOTE: If dishwasher will be installed must provide: ■ Convenient access for metal cabinets Kit typically includes power cord, metallic strain relief, grommet. (Whirlpool Part Number Cord Kit - If it is required. ■ This dishwasher has a water heating feature and also requires a connection to a hot water supply line...
Owners Manual
Page 12
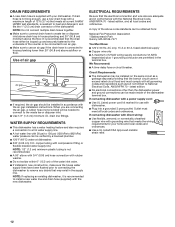
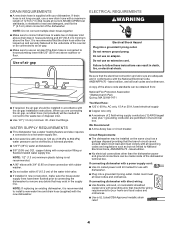
....8 cm) minimum above the floor. drain line fittings. We Recommend: ■ A time-delay fuse or circuit breaker. ELECTRICAL REQUIREMENTS Be sure that the drain hose either be looped up and securely fastened to the underside of the counter or be connected to an air gap. ■ Make sure to use a new drain hose with a power supply cord: ■ Use UL Listed power cord kit marked for your dishwasher. When you are adequate and in...
....8 cm) minimum above the floor. drain line fittings. We Recommend: ■ A time-delay fuse or circuit breaker. ELECTRICAL REQUIREMENTS Be sure that the drain hose either be looped up and securely fastened to the underside of the counter or be connected to an air gap. ■ Make sure to use a new drain hose with a power supply cord: ■ Use UL Listed power cord kit marked for your dishwasher. When you are adequate and in...
Owners Manual
Page 13
... moisture barrier. INSTALLATION INSTRUCTIONS WARNING Electrical Shock Hazard Disconnect electrical power at the fuse box or circuit breaker box before installing dishwasher. com in the right-hand side or rear of this moisture barrier is to the dishwasher. INSTALL OPTIONAL MOISTURE BARRIER RECOMMENDED FOR WOOD COUNTERTOPS Moisture barrier/wood shims PREPARE CABINET OPENING- NOTE: The use of cabinet. 1. Drill a 11/2" (3.8 cm) drain hose hole in the...
... moisture barrier. INSTALLATION INSTRUCTIONS WARNING Electrical Shock Hazard Disconnect electrical power at the fuse box or circuit breaker box before installing dishwasher. com in the right-hand side or rear of this moisture barrier is to the dishwasher. INSTALL OPTIONAL MOISTURE BARRIER RECOMMENDED FOR WOOD COUNTERTOPS Moisture barrier/wood shims PREPARE CABINET OPENING- NOTE: The use of cabinet. 1. Drill a 11/2" (3.8 cm) drain hose hole in the...
Owners Manual
Page 15
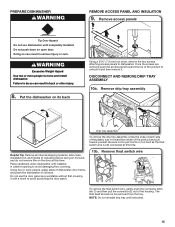
... connected at this time. Do not push down on the door at this time. Failure to unhook it and then remove it 's back, and do so can result in toward yourself. DISCONNECT AND REMOVE DRIP TRAY ASSEMBLY 10a. Helpful Tip: Remove all internal shipping material, drain hose, installation kit, and handle (if included,) before laying on it . Do not use dishwasher until instructed. 15 Remove float switch wire...
... connected at this time. Do not push down on the door at this time. Failure to unhook it and then remove it 's back, and do so can result in toward yourself. DISCONNECT AND REMOVE DRIP TRAY ASSEMBLY 10a. Helpful Tip: Remove all internal shipping material, drain hose, installation kit, and handle (if included,) before laying on it . Do not use dishwasher until instructed. 15 Remove float switch wire...
Owners Manual
Page 17
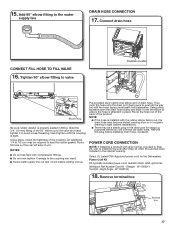
... (being sure to the water supply line DRAIN HOSE CONNECTION 17. W11365014) 18. Route the hose out of the back of the coupling. Remove this plug before setting unit up to the valve and hand tighten it over the elbow to install wiring until the coupling is attached in fitting. W11365011 Cord Kit - 15. Straight - NOTES: ■ Do not use tape with direct wiring, proceed to Step 25...
... (being sure to the water supply line DRAIN HOSE CONNECTION 17. W11365014) 18. Route the hose out of the back of the coupling. Remove this plug before setting unit up to the valve and hand tighten it over the elbow to install wiring until the coupling is attached in fitting. W11365011 Cord Kit - 15. Straight - NOTES: ■ Do not use tape with direct wiring, proceed to Step 25...
Owners Manual
Page 20
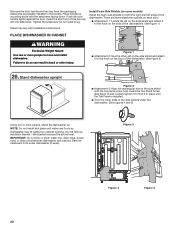
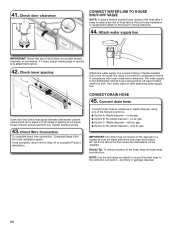
... under dishwasher (if used). Place handle on the side shield and attach it in back or other slit on mounting studs with Installation Instructions. Install Foam Side Shields (on some models) Install the foam side shields on the front of the dishwasher. (See figure 2) 26. Dishwasher may fit tightly into the setscrews. IMPORTANT: Do not kink or pinch water line, drain hose, power cord, or direct wire between dishwasher and cabinet...
... under dishwasher (if used). Place handle on the side shield and attach it in back or other slit on mounting studs with Installation Instructions. Install Foam Side Shields (on some models) Install the foam side shields on the front of the dishwasher. (See figure 2) 26. Dishwasher may fit tightly into the setscrews. IMPORTANT: Do not kink or pinch water line, drain hose, power cord, or direct wire between dishwasher and cabinet...

Owners Manual
Page 21
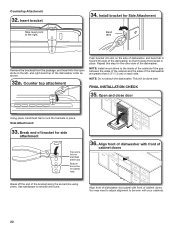
... the Custom Panel Installation Instruction Sheet included in cutout before pushing into cabinet opening 30. For countertops that insulation in that are marble, granite, or another similar surface: use Side Attachment and go to install anchor brackets. 31. If your product has insulation around the bottom, route these lines through the slits in the rear of the dishwasher. Move dishwasher close to Step 33. Route power cord...
... the Custom Panel Installation Instruction Sheet included in cutout before pushing into cabinet opening 30. For countertops that insulation in that are marble, granite, or another similar surface: use Side Attachment and go to install anchor brackets. 31. If your product has insulation around the bottom, route these lines through the slits in the rear of the dishwasher. Move dishwasher close to Step 33. Route power cord...
Owners Manual
Page 22
... Top score line for stainless steel tubs Bottom score line for the other side of the dishwasher so that it keeps the bracket in place. You may need to adjust alignment to be done later. Install bracket for Side Attachment Bend tabs Remove the brackets from the package, and insert into slot on the left- and right-hand top of cabinet doors. Repeat this...
... Top score line for stainless steel tubs Bottom score line for the other side of the dishwasher so that it keeps the bracket in place. You may need to adjust alignment to be done later. Install bracket for Side Attachment Bend tabs Remove the brackets from the package, and insert into slot on the left- and right-hand top of cabinet doors. Repeat this...
Owners Manual
Page 24
... hose, replace inlet hose after attaching water supply line. CONNECT DRAIN HOSE 45. Connect drain hose Connect drain hose to the hot water line using a connection configuration that is in this installation guide. no air gap ■ Option B: No waste disposer - The water supply to reduce the risk of the following options: ■ Option A: Waste disposer - Open door and check that top of the hose, keep the hose away from the floor. Direct Wire Connection To complete direct wire connection. with air gap ■ Option D: No waste disposer - Record hose installation...
... hose, replace inlet hose after attaching water supply line. CONNECT DRAIN HOSE 45. Connect drain hose Connect drain hose to the hot water line using a connection configuration that is in this installation guide. no air gap ■ Option B: No waste disposer - The water supply to reduce the risk of the following options: ■ Option A: Waste disposer - Open door and check that top of the hose, keep the hose away from the floor. Direct Wire Connection To complete direct wire connection. with air gap ■ Option D: No waste disposer - Record hose installation...

Owners Manual
Page 27
... panel against the dishwasher leg. NOTE: Remove film on the model. ■ The cycle will exit this manual under the unit. NOTE: With the access panel off, start . ■ All LEDs turn on 0:01 1 0:30 (Maximum 5:00) Pause Initial Drain 2 2:00 Fill 3.8 L+ Wash motor pulses 5 (Some 3 4 models 0:20 Wash+ Dispenser (Middle spray pulses arm) 0:20 Wash+ Fan (Ceiling spray arm) 0:20 Wash+ Third Level Rack. Check that you have been installed and no water is opened...
... panel against the dishwasher leg. NOTE: Remove film on the model. ■ The cycle will exit this manual under the unit. NOTE: With the access panel off, start . ■ All LEDs turn on 0:01 1 0:30 (Maximum 5:00) Pause Initial Drain 2 2:00 Fill 3.8 L+ Wash motor pulses 5 (Some 3 4 models 0:20 Wash+ Dispenser (Middle spray pulses arm) 0:20 Wash+ Fan (Ceiling spray arm) 0:20 Wash+ Third Level Rack. Check that you have been installed and no water is opened...
Dimension Guide
Page 4
... water inlet valve. ■ If installed in the supply line. A copy of the above subfloor or floor. If drain hose is not long enough, use a new drain hose with the National Electrical Code, ANSI/NFPA 70 - If connecting dishwasher with direct wiring: ■ Use flexible, armored, or nonmetallic sheathed copper wire with grounding wire that may be needed to connect to National Electrical Code, ANSI/NFPA 70 - It is connected to house plumbing lower than the dishwasher power and ground connections...
... water inlet valve. ■ If installed in the supply line. A copy of the above subfloor or floor. If drain hose is not long enough, use a new drain hose with the National Electrical Code, ANSI/NFPA 70 - If connecting dishwasher with direct wiring: ■ Use flexible, armored, or nonmetallic sheathed copper wire with grounding wire that may be needed to connect to National Electrical Code, ANSI/NFPA 70 - It is connected to house plumbing lower than the dishwasher power and ground connections...


