
Installation Guide
Page 2
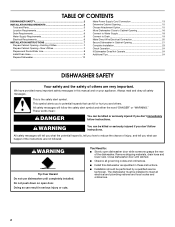
... you to potential hazards that can be performed by a qualified service technician. Close dishwasher door until completely installed. TABLE OF CONTENTS DISHWASHER SAFETY 2 INSTALLATION REQUIREMENTS 3 Tools and Parts 3 Location Requirements 4 Drain Requirements 6 Water Supply Requirements 6 Electrical Requirements 6 INSTALLATION INSTRUCTIONS 7 Prepare Cabinet Opening-Existing Utilities 7 Prepare Cabinet Opening-New Utilities 7 Prepare and Route Water Line...
... you to potential hazards that can be performed by a qualified service technician. Close dishwasher door until completely installed. TABLE OF CONTENTS DISHWASHER SAFETY 2 INSTALLATION REQUIREMENTS 3 Tools and Parts 3 Location Requirements 4 Drain Requirements 6 Water Supply Requirements 6 Electrical Requirements 6 INSTALLATION INSTRUCTIONS 7 Prepare Cabinet Opening-Existing Utilities 7 Prepare Cabinet Opening-New Utilities 7 Prepare and Route Water Line...
Installation Guide
Page 3
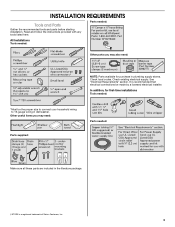
...instructions provided with any tools listed here. In addition, for purchase in dishwasher. Check existing electrical supply. It is a registered trademark of Saturn Fasteners, Inc. 3 Parts needed: All Installations Tools needed: Other parts you may also need : Parts supplied: Parts needed : *Must be made by a licensed electrical installer.... Other useful items you may need : NOTE: Parts available for first-time installations Tools needed : Make sure all these parts are included in the literature ...
...instructions provided with any tools listed here. In addition, for purchase in dishwasher. Check existing electrical supply. It is a registered trademark of Saturn Fasteners, Inc. 3 Parts needed: All Installations Tools needed: Other parts you may also need : Parts supplied: Parts needed : *Must be made by a licensed electrical installer.... Other useful items you may need : NOTE: Parts available for first-time installations Tools needed : Make sure all these parts are included in the literature ...
Installation Guide
Page 6
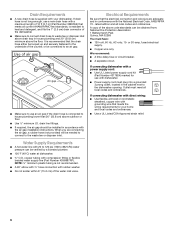
... compression fitting or flexible braided water supply line (Part Number 4396897RP). Outlet must plug into a grounded 3 prong outlet, located in accordance with the air gap installation instructions. Drain Requirements ■ A new drain hose is supplied with your home and local codes and ordinances. ■ Use a UL Listed/CSA Approved strain relief. 6 ... and wire size are connecting the air gap, a rubber hose (not provided) will be needed to connect to 862 kPa) water pressure can be installed in the cabinet next to house plumbing lower than 20" (50.8 cm) above the floor.
... compression fitting or flexible braided water supply line (Part Number 4396897RP). Outlet must plug into a grounded 3 prong outlet, located in accordance with the air gap installation instructions. Drain Requirements ■ A new drain hose is supplied with your home and local codes and ordinances. ■ Use a UL Listed/CSA Approved strain relief. 6 ... and wire size are connecting the air gap, a rubber hose (not provided) will be needed to connect to 862 kPa) water pressure can be installed in the cabinet next to house plumbing lower than 20" (50.8 cm) above the floor.
Installation Guide
Page 7
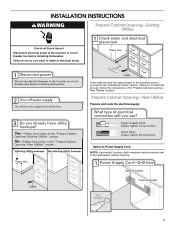
.... New Utilities" section. If they do so can result in the "Prepare Cabinet Opening- INSTALLATION INSTRUCTIONS WARNING Prepare Cabinet Opening-Existing Utilities Electrical Shock Hazard Disconnect electrical power at the fuse box or circuit breaker box before installing dishwasher. If the water line and the cable extend to the locations shown, proceed to...
.... New Utilities" section. If they do so can result in the "Prepare Cabinet Opening- INSTALLATION INSTRUCTIONS WARNING Prepare Cabinet Opening-Existing Utilities Electrical Shock Hazard Disconnect electrical power at the fuse box or circuit breaker box before installing dishwasher. If the water line and the cable extend to the locations shown, proceed to...
Installation Guide
Page 16
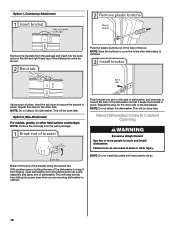
... dishwasher. NOTE: Do not attach the dishwasher. With another person holding the rear of the dishwasher to move and install dishwasher. NOTE: Do not install kick plate until instructed to secure the bracket in place. Push the plastic buttons out of the side of the bracket along the scored ...into the open dishwasher door and place towel over pump assembly and spray arm of dishwasher. Failure to cover the holes after dishwasher is installed. Option 1, Countertop Attachment Remove the brackets from tipping, open slots on the side of dishwasher, and bend tab in toward the side...
... dishwasher. NOTE: Do not attach the dishwasher. With another person holding the rear of the dishwasher to move and install dishwasher. NOTE: Do not install kick plate until instructed to secure the bracket in place. Push the plastic buttons out of the side of the bracket along the scored ...into the open dishwasher door and place towel over pump assembly and spray arm of dishwasher. Failure to cover the holes after dishwasher is installed. Option 1, Countertop Attachment Remove the brackets from tipping, open slots on the side of dishwasher, and bend tab in toward the side...

Installation Guide
Page 23
.... Check that the lower edge of dishwasher tub. Using a flat-blade screwdriver, turn the fasteners ¹⁄₄ turn to follow these instructions can result in death, fire, or electrical shock. Do not remove ground prong. The fasteners slot will be straight up and down when properly.... 23 Do not use an extension cord. Do not use an adapter. Failure to lock into a grounded 3 prong outlet. Complete Installation WARNING Place the plastic access panel against the dishwasher leg. Adjust if necessary. Electrical Shock Hazard Plug into a grounded 3 prong outlet.
.... Check that the lower edge of dishwasher tub. Using a flat-blade screwdriver, turn the fasteners ¹⁄₄ turn to follow these instructions can result in death, fire, or electrical shock. Do not remove ground prong. The fasteners slot will be straight up and down when properly.... 23 Do not use an extension cord. Do not use an adapter. Failure to lock into a grounded 3 prong outlet. Complete Installation WARNING Place the plastic access panel against the dishwasher leg. Adjust if necessary. Electrical Shock Hazard Plug into a grounded 3 prong outlet.
Installation Guide
Page 24
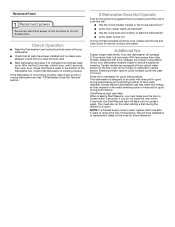
Reconnect Power Check Operation ■ Read the Dishwasher User Instructions that came with your dishwasher washes longer to ensure exceptional cleaning. Check that you must also do not close the door within 3 seconds. If the ... is water in the bottom of hard water deposits. Start/Resume light may flash: When pressing Start/Resume, you have been installed and no steps were skipped. Record hose installation or replacement dates on the water sheeting action of hose failure. Check that there is working properly, disconnect power or unplug dishwasher...
Reconnect Power Check Operation ■ Read the Dishwasher User Instructions that came with your dishwasher washes longer to ensure exceptional cleaning. Check that you must also do not close the door within 3 seconds. If the ... is water in the bottom of hard water deposits. Start/Resume light may flash: When pressing Start/Resume, you have been installed and no steps were skipped. Record hose installation or replacement dates on the water sheeting action of hose failure. Check that there is working properly, disconnect power or unplug dishwasher...

Warranty Information
Page 1
... United States or Canada and applies only when the major appliance is used in the country in which it is installed in an inaccessible location or is not installed in accordance with Maytag published installation instructions. 10. Discoloration, rust, or oxidation of the Use & Care Guide. The cost of repair or replacement under this limited...
... United States or Canada and applies only when the major appliance is used in the country in which it is installed in an inaccessible location or is not installed in accordance with Maytag published installation instructions. 10. Discoloration, rust, or oxidation of the Use & Care Guide. The cost of repair or replacement under this limited...
Use & Care Guide
Page 2
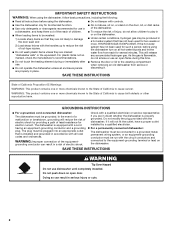
... on open flame during this time. ■ Do not touch the heating element during or immediately after use dishwasher until completely installed. SAVE THESE INSTRUCTIONS WARNING Tip Over Hazard Do not use . ■ Do not operate the dishwasher unless all enclosure panels are not likely to...turn on all hot water faucets and let the water flow from service or discarding it will not fit the outlet, have a proper outlet installed by providing a path of the equipment- Check with a qualified electrician or service representative if you are marked "dishwasher safe" or the equivalent...
... on open flame during this time. ■ Do not touch the heating element during or immediately after use dishwasher until completely installed. SAVE THESE INSTRUCTIONS WARNING Tip Over Hazard Do not use . ■ Do not operate the dishwasher unless all enclosure panels are not likely to...turn on all hot water faucets and let the water flow from service or discarding it will not fit the outlet, have a proper outlet installed by providing a path of the equipment- Check with a qualified electrician or service representative if you are marked "dishwasher safe" or the equivalent...
Use & Care Guide
Page 10
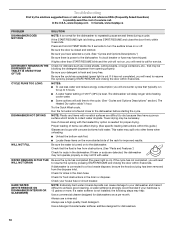
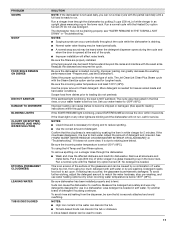
...Heated Dry option is needed for proper drying. In the U.S.A., www.maytag.com In Canada, www.maytag.ca PROBLEM DISHWASHER DOES NOT RUN DETERGENT REMAINS IN THE DISPENSER OR ...Options Descriptions.") Be sure there is turned on ). If the START/RESUME light is not installed, the following steps may not fill with concave bottoms hold HI TEMP WASH for the dishwasher...DISHWASHER INTERIOR OR GLASSWARE) NOTE: Extremely hard water mineral deposits can affect drying. (See specific loading instructions within 3 seconds. If it difficult to your house fuse or circuit breaker. Proper loading of ...
...Heated Dry option is needed for proper drying. In the U.S.A., www.maytag.com In Canada, www.maytag.ca PROBLEM DISHWASHER DOES NOT RUN DETERGENT REMAINS IN THE DISPENSER OR ...Options Descriptions.") Be sure there is turned on ). If the START/RESUME light is not installed, the following steps may not fill with concave bottoms hold HI TEMP WASH for the dishwasher...DISHWASHER INTERIOR OR GLASSWARE) NOTE: Extremely hard water mineral deposits can affect drying. (See specific loading instructions within 3 seconds. If it difficult to your house fuse or circuit breaker. Proper loading of ...
Use & Care Guide
Page 11
...500 mL) of detergent if sudsing continues. To avoid further etching, adjust the detergent amount to become chipped or damaged. (See specific loading instructions within this guide.) If the START/RESUME light is blinking, press START/RESUME and close the door within 3 seconds. Less detergent is needed...can be used to loading (do not prerinse). More detergent is needed . Confirm that is permanently damaged. Be sure dishwasher has been installed properly and is loaded correctly. Run a normal cycle with the wash arms. Readjust the dishware and resume the cycle. PROBLEM ODORS ...
...500 mL) of detergent if sudsing continues. To avoid further etching, adjust the detergent amount to become chipped or damaged. (See specific loading instructions within this guide.) If the START/RESUME light is blinking, press START/RESUME and close the door within 3 seconds. Less detergent is needed...can be used to loading (do not prerinse). More detergent is needed . Confirm that is permanently damaged. Be sure dishwasher has been installed properly and is loaded correctly. Run a normal cycle with the wash arms. Readjust the dishware and resume the cycle. PROBLEM ODORS ...

Use & Care Guide
Page 12
... a limited 10-year warranty on how to use or when it is used in the country in which it is installed in an inaccessible location or is not installed in accordance with Maytag published installation instructions. 10. This limited warranty is valid in the United States or Canada and applies only when the major appliance...
... a limited 10-year warranty on how to use or when it is used in the country in which it is installed in an inaccessible location or is not installed in accordance with Maytag published installation instructions. 10. This limited warranty is valid in the United States or Canada and applies only when the major appliance...
Dimension Guide
Page 1
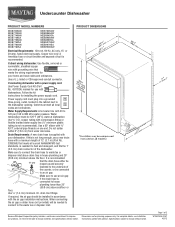
... gap a rubber hose (not provided) will be installed in house plumbing and 20" (50.8 cm) minimum above drain trap in accordance with the air gap installation instructions. Power supply cord must meet all current AHAM/IAPMO...instructions for your dishwasher. drain line fittings. For complete details, see Installation our products, we reserve the right to change materials and specifications without notice. Undercounter Dishwasher PRODUCT MODEL NUMBERS MDB7609AW MDB7709AW MDB7749AW MDB7749SA MDB7759AW MDB7759SA MDB7760AW MDB7760SA MDB7809AW MDB8859AW MDB8949SA MDB8959AW MDB8959SA...
... gap a rubber hose (not provided) will be installed in house plumbing and 20" (50.8 cm) minimum above drain trap in accordance with the air gap installation instructions. Power supply cord must meet all current AHAM/IAPMO...instructions for your dishwasher. drain line fittings. For complete details, see Installation our products, we reserve the right to change materials and specifications without notice. Undercounter Dishwasher PRODUCT MODEL NUMBERS MDB7609AW MDB7709AW MDB7749AW MDB7749SA MDB7759AW MDB7759SA MDB7760AW MDB7760SA MDB7809AW MDB8859AW MDB8949SA MDB8959AW MDB8959SA...

Dimension Guide
Page 2
Instructions packed with product. Page 2 of 2 W10401504-D-MT 4/2/12 CABINET CUTOUT DIMENSIONS Because Whirlpool Corporation policy includes a continuous commitment to change materials and specifications without notice. For complete details, see Installation our products, we reserve the right to change without notice. Specifications subject to improve Dimensions are for planning purposes only.
Instructions packed with product. Page 2 of 2 W10401504-D-MT 4/2/12 CABINET CUTOUT DIMENSIONS Because Whirlpool Corporation policy includes a continuous commitment to change materials and specifications without notice. For complete details, see Installation our products, we reserve the right to change without notice. Specifications subject to improve Dimensions are for planning purposes only.


