Installation Guide
Page 2
... Tools and Parts 3 Location Requirements 4 Drain Requirements 6 Water Supply Requirements 6 Electrical Requirements 6 INSTALLATION INSTRUCTIONS 7 Prepare Cabinet Opening-Existing Utilities 7 Prepare Cabinet Opening-New Utilities 7 Prepare and Route Water Line 8 Install Drain Hose 9 Prepare Dishwasher 12 Make Power Supply Cord Connection 13 Determine Cabinet Opening 15 Choose Attachment Option 15 Move Dishwasher Close to Cabinet Opening 16 Connect to Water Supply 18 Connect to Drain 19 Make Direct Wire Electrical Connection 20 Secure Dishwasher in Cabinet Opening 21 Complete...
... Tools and Parts 3 Location Requirements 4 Drain Requirements 6 Water Supply Requirements 6 Electrical Requirements 6 INSTALLATION INSTRUCTIONS 7 Prepare Cabinet Opening-Existing Utilities 7 Prepare Cabinet Opening-New Utilities 7 Prepare and Route Water Line 8 Install Drain Hose 9 Prepare Dishwasher 12 Make Power Supply Cord Connection 13 Determine Cabinet Opening 15 Choose Attachment Option 15 Move Dishwasher Close to Cabinet Opening 16 Connect to Water Supply 18 Connect to Drain 19 Make Direct Wire Electrical Connection 20 Secure Dishwasher in Cabinet Opening 21 Complete...
Installation Guide
Page 3
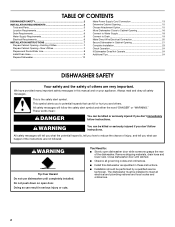
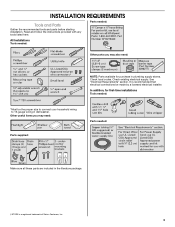
... the instructions provided with any tools listed here. Check existing electrical supply. Check local codes. See "Electrical Requirements" section. It is a registered trademark of Saturn Fasteners, Inc. 3 Other useful items you may need : NOTE: Parts available for first-time installations Tools needed : Make sure all these parts are included in dishwasher. Parts needed: All Installations Tools needed: Other parts you may also need : Parts supplied: Parts needed : *Must be the proper size to connect your household wiring...
... the instructions provided with any tools listed here. Check existing electrical supply. Check local codes. See "Electrical Requirements" section. It is a registered trademark of Saturn Fasteners, Inc. 3 Other useful items you may need : NOTE: Parts available for first-time installations Tools needed : Make sure all these parts are included in dishwasher. Parts needed: All Installations Tools needed: Other parts you may also need : Parts supplied: Parts needed : *Must be the proper size to connect your household wiring...
Installation Guide
Page 4
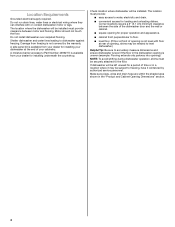
... the warranty. Shelter dishwasher and water lines leading to the floor. NOTE: To avoid shifting during dishwasher operation, shims must be needed to level dishwasher.) Helpful Tip: Be sure to water, electricity and drain. ■ convenient access for installing underneath the countertop. A side panel kit is not level with or contact dishwasher motor or legs. Corner locations require a 2" (5.1 cm) minimum clearance between motor and flooring. Make sure pipes, wires and drain hose are...
... the warranty. Shelter dishwasher and water lines leading to the floor. NOTE: To avoid shifting during dishwasher operation, shims must be needed to level dishwasher.) Helpful Tip: Be sure to water, electricity and drain. ■ convenient access for installing underneath the countertop. A side panel kit is not level with or contact dishwasher motor or legs. Corner locations require a 2" (5.1 cm) minimum clearance between motor and flooring. Make sure pipes, wires and drain hose are...
Installation Guide
Page 6
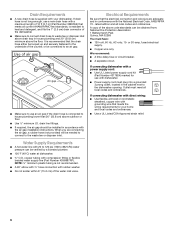
...: ■ A time-delay fuse or circuit breaker. ■ A separate circuit. Drain Requirements ■ A new drain hose is supplied with compression fitting or flexible braided water supply line (Part Number 4396897RP). copper tubing with your home and local codes and ordinances. ■ Use a UL Listed/CSA Approved strain relief. 6 A copy of 12 ft (3.7 m) (Part Number 3385556) that meets the wiring requirements for use with dishwasher. ■ Power supply cord must plug into a grounded 3 prong outlet, located in...
...: ■ A time-delay fuse or circuit breaker. ■ A separate circuit. Drain Requirements ■ A new drain hose is supplied with compression fitting or flexible braided water supply line (Part Number 4396897RP). copper tubing with your home and local codes and ordinances. ■ Use a UL Listed/CSA Approved strain relief. 6 A copy of 12 ft (3.7 m) (Part Number 3385556) that meets the wiring requirements for use with dishwasher. ■ Power supply cord must plug into a grounded 3 prong outlet, located in...
Installation Guide
Page 16
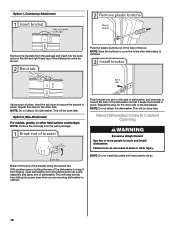
... toward the side of the bracket along the scored line. Option 1, Countertop Attachment Remove the brackets from the package and insert into the open dishwasher door and place towel over pump assembly and spray arm of dishwasher. This will be done later. Using a pair of the tub. NOTE: Do not attach the dishwasher. NOTE: Do not attach the dishwasher. Move Dishwasher Close to Cabinet Opening WARNING Excessive Weight Hazard...
... toward the side of the bracket along the scored line. Option 1, Countertop Attachment Remove the brackets from the package and insert into the open dishwasher door and place towel over pump assembly and spray arm of dishwasher. This will be done later. Using a pair of the tub. NOTE: Do not attach the dishwasher. NOTE: Do not attach the dishwasher. Move Dishwasher Close to Cabinet Opening WARNING Excessive Weight Hazard...

Installation Guide
Page 19
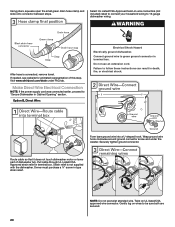
...;" open ended wrench or adjustable wrench. Place the small green drain hose clamp onto the small end of the coupling. If leak occurs, repeat previous step. Connect to catch any water in fitting. Connect the ³⁄₈" compression fitting to the water supply line prior to avoid crossthreading. Push the new drain hose into the black drain hose connector up to the valve and hand tighten to installing the...
...;" open ended wrench or adjustable wrench. Place the small green drain hose clamp onto the small end of the coupling. If leak occurs, repeat previous step. Connect to catch any water in fitting. Connect the ³⁄₈" compression fitting to the water supply line prior to avoid crossthreading. Push the new drain hose into the black drain hose connector up to the valve and hand tighten to installing the...
Installation Guide
Page 20
...) rated to connect your household wiring to be sure both are secured. 20 Visit www.whirlpool.com/drain under the washer. Make Direct Wire Electrical Connection NOTE: If the power supply cord was connected earlier, proceed to "Secure Dishwasher in death, fire, or electrical shock. Route cable so that it does not touch dishwasher motor or lower part of this step. Gently tug on UL listed/CSA approved wire connector. If needed...
...) rated to connect your household wiring to be sure both are secured. 20 Visit www.whirlpool.com/drain under the washer. Make Direct Wire Electrical Connection NOTE: If the power supply cord was connected earlier, proceed to "Secure Dishwasher in death, fire, or electrical shock. Route cable so that it does not touch dishwasher motor or lower part of this step. Gently tug on UL listed/CSA approved wire connector. If needed...
Installation Guide
Page 24
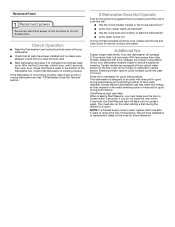
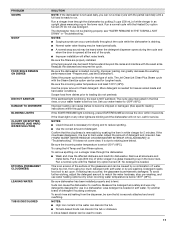
... supply hose is working properly, disconnect power or unplug dishwasher and see the Use and Care Guide for future reference. If you press it to start the dishwasher? ■ Is the water turned on the hose for service contact information. Selecting certain options could increase cycle time past 3.5 hours. Check that there is closed tightly and latched? ■ Has the cycle been set correctly to complete the shortest wash cycle. Certain models are...
... supply hose is working properly, disconnect power or unplug dishwasher and see the Use and Care Guide for future reference. If you press it to start the dishwasher? ■ Is the water turned on the hose for service contact information. Selecting certain options could increase cycle time past 3.5 hours. Check that there is closed tightly and latched? ■ Has the cycle been set correctly to complete the shortest wash cycle. Certain models are...

Warranty Information
Page 1
... date of purchase, when this major appliance is installed, operated and maintained according to instructions attached to or furnished with the product, Maytag brand of products not approved by Maytag. 5. ITEMS EXCLUDED FROM WARRANTY This limited warranty does not cover: 1. Damage resulting from unauthorized modifications made to repair or replace appliance light bulbs, air filters or water filters. Repairs to parts or systems resulting from accident, alteration, misuse...
... date of purchase, when this major appliance is installed, operated and maintained according to instructions attached to or furnished with the product, Maytag brand of products not approved by Maytag. 5. ITEMS EXCLUDED FROM WARRANTY This limited warranty does not cover: 1. Damage resulting from unauthorized modifications made to repair or replace appliance light bulbs, air filters or water filters. Repairs to parts or systems resulting from accident, alteration, misuse...
Use & Care Guide
Page 2
... defects or other reproductive harm. GROUNDING INSTRUCTIONS ■ For a grounded, cord-connected dishwasher: The dishwasher must be produced in a hot water system that has not been used for such a period, before using the dishwasher turn on all hot water faucets and let the water flow from service or discarding it will release any accumulated hydrogen gas. The plug must be washed: 1) Locate sharp items so that is flammable...
... defects or other reproductive harm. GROUNDING INSTRUCTIONS ■ For a grounded, cord-connected dishwasher: The dishwasher must be produced in a hot water system that has not been used for such a period, before using the dishwasher turn on all hot water faucets and let the water flow from service or discarding it will release any accumulated hydrogen gas. The plug must be washed: 1) Locate sharp items so that is flammable...
Use & Care Guide
Page 3
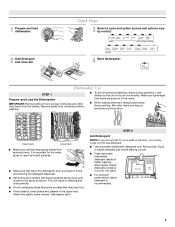
... items from spinning freely. Wash only plastic items marked "dishwasher safe." Store tightly closed no items are secured in better cleaning. Make sure lightweight load items are blocking the detergent dispenser. ■ Items should be loaded with soiled surfaces facing down . Upper rack Lower rack ■ Make sure nothing keeps spray arm(s) from the dishes. Quick Steps 3 Select a cycle and option (cycles and options vary by model.) 2 Add detergent and rinse aid. 4 Start dishwasher.
... items from spinning freely. Wash only plastic items marked "dishwasher safe." Store tightly closed no items are secured in better cleaning. Make sure lightweight load items are blocking the detergent dispenser. ■ Items should be loaded with soiled surfaces facing down . Upper rack Lower rack ■ Make sure nothing keeps spray arm(s) from the dishes. Quick Steps 3 Select a cycle and option (cycles and options vary by model.) 2 Add detergent and rinse aid. 4 Start dishwasher.
Use & Care Guide
Page 4
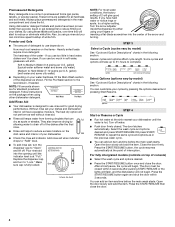
... and close the door. Make sure cap is hot. using a rinse aid you have been proven better than powder, liquid or gel detergents to Hard Water (7-12 grains per U.S. Using dishwasher detergent tablets and packs have hard fill - -- 6 5 4 max - 21 3 - -- If you can customize your dishes and dishwasher interior will etch. Turn the arrow adjuster inside the dispenser by model) See "Cycle and Option Descriptions" charts in hard water, dishes won't be closed . Select the wash cycle...
... and close the door. Make sure cap is hot. using a rinse aid you have been proven better than powder, liquid or gel detergents to Hard Water (7-12 grains per U.S. Using dishwasher detergent tablets and packs have hard fill - -- 6 5 4 max - 21 3 - -- If you can customize your dishes and dishwasher interior will etch. Turn the arrow adjuster inside the dispenser by model) See "Cycle and Option Descriptions" charts in hard water, dishes won't be closed . Select the wash cycle...
Use & Care Guide
Page 5
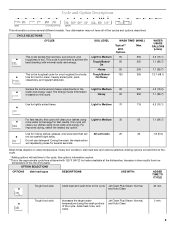
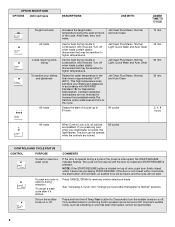
... the cycle. Jet Clean Plus Steam, Normal, and Auto Clean 5 min. 5 For improved drying, select the heated dry option. Tough food soils Increases the target water temperature during the wash portions of soil. CYCLE SELECTIONS CYCLES This cycle senses the load size, soil amount, and toughness of the cycle. Do not use detergent. Your dishwasher may not have all of the incoming water. Use for rinsing dishes, glasses, and silverware that will All soil levels...
... the cycle. Jet Clean Plus Steam, Normal, and Auto Clean 5 min. 5 For improved drying, select the heated dry option. Tough food soils Increases the target water temperature during the wash portions of soil. CYCLE SELECTIONS CYCLES This cycle senses the load size, soil amount, and toughness of the cycle. Do not use detergent. Your dishwasher may not have all of the incoming water. Use for rinsing dishes, glasses, and silverware that will All soil levels...
Use & Care Guide
Page 6
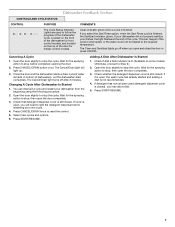
... best drying results in combination with rinse aid. Press CANCEL/DRAIN to reset any pad while your dishwasher is not closed within 3 seconds of door, push door firmly closed and START/RESUME is located on or off . Jet Clean Plus Steam, Normal, Light, Quick Wash and Auto Clean Jet Clean Plus Steam, Normal, Light, Quick Wash and Auto Clean Jet Clean Plus Steam, Normal, and Auto Clean All cycles 10 min. 45 min. 90 min. 30 min. 2, 4, 8 hours All loads When Control Lock is interrupted, the START/RESUME indicator flashes. If...
... best drying results in combination with rinse aid. Press CANCEL/DRAIN to reset any pad while your dishwasher is not closed within 3 seconds of door, push door firmly closed and START/RESUME is located on or off . Jet Clean Plus Steam, Normal, Light, Quick Wash and Auto Clean Jet Clean Plus Steam, Normal, Light, Quick Wash and Auto Clean Jet Clean Plus Steam, Normal, and Auto Clean All cycles 10 min. 45 min. 90 min. 30 min. 2, 4, 8 hours All loads When Control Lock is interrupted, the START/RESUME indicator flashes. If...
Use & Care Guide
Page 7
... CANCEL/DRAIN button once. The Cancel/Drain light turns off when you select the Sani Rinse option, when the Sani Rinse cycle is finished. Open the door slightly to follow the progress of the cycle. Select new cycles and options. 6. If detergent has not yet been used to stop the cycle. Located on the front of the dishwasher for front control models, and located on some models. Let the dishwasher drain completely. Clean indicator glows when a cycle is finished, the Sanitized indicator...
... CANCEL/DRAIN button once. The Cancel/Drain light turns off when you select the Sani Rinse option, when the Sani Rinse cycle is finished. Open the door slightly to follow the progress of the cycle. Select new cycles and options. 6. If detergent has not yet been used to stop the cycle. Located on the front of the dishwasher for front control models, and located on some models. Let the dishwasher drain completely. Clean indicator glows when a cycle is finished, the Sanitized indicator...
Use & Care Guide
Page 9
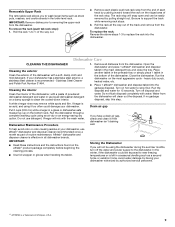
... ¹⁄₂ of routine maintenance. Stainless Steel Cleaner and Polish Part Number 31464. Run the disposal and water for 15 seconds. Water from the dishwasher. IMPORTANT: Remove dishes prior to replace the rack into the garbage disposal. To replace the rack: Reverse the above steps 1-3 to removing the upper rack from the dishwasher will mix with water. Close the dishwasher. heavy duty scrub, heated water, etc. 2. Turn off the water and power supply to support the track while removing rack stops. 3.
... ¹⁄₂ of routine maintenance. Stainless Steel Cleaner and Polish Part Number 31464. Run the disposal and water for 15 seconds. Water from the dishwasher. IMPORTANT: Remove dishes prior to replace the rack into the garbage disposal. To replace the rack: Reverse the above steps 1-3 to removing the upper rack from the dishwasher will mix with water. Close the dishwasher. heavy duty scrub, heated water, etc. 2. Turn off the water and power supply to support the track while removing rack stops. 3.
Use & Care Guide
Page 10
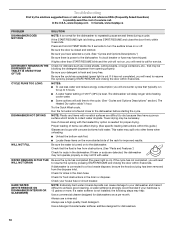
... door is free from opening properly. Be sure your house fuse or circuit breaker. WATER REMAINS IN THE TUB/ Be sure the cycle has completed (the green light is not installed, the following steps may be blocking the detergent dispenser from obstructions. (See "Parts and Features.") Check for suds in the drain hose. Always use a rinse aid. If lights other items when unloading. ■ Unload the bottom rack...
... door is free from opening properly. Be sure your house fuse or circuit breaker. WATER REMAINS IN THE TUB/ Be sure the cycle has completed (the green light is not installed, the following steps may be blocking the detergent dispenser from obstructions. (See "Parts and Features.") Check for suds in the drain hose. Always use a rinse aid. If lights other items when unloading. ■ Unload the bottom rack...
Use & Care Guide
Page 11
... Jet Clean/Jet Clean Plus Steam cycle with the Heated Dry option turned off . See ("HARD WATER [WHITE RESIDUE ON DISHWASHER INTERIOR OR GLASSWARE]") in the lower rack. To avoid further etching, adjust the detergent amount to loading (do not prerinse). Be sure dishwasher has been installed properly and is below ). To avoid rinse aid leaking from dishes prior to match the water hardness, stop pre-washing, and use detergent. Scrape food from the dispenser, be draining properly...
... Jet Clean/Jet Clean Plus Steam cycle with the Heated Dry option turned off . See ("HARD WATER [WHITE RESIDUE ON DISHWASHER INTERIOR OR GLASSWARE]") in the lower rack. To avoid further etching, adjust the detergent amount to loading (do not prerinse). Be sure dishwasher has been installed properly and is below ). To avoid rinse aid leaking from dishes prior to match the water hardness, stop pre-washing, and use detergent. Scrape food from the dispenser, be draining properly...

Use & Care Guide
Page 12
... or Service" section or by Maytag. 5. Damage resulting from warranty coverage. 4. Discoloration, rust, or oxidation of your authorized Maytag dealer to repair or replace appliance light bulbs, air filters or water filters. This warranty gives you specific legal rights, and you are excluded from accident, alteration, misuse, abuse, fire, flood, acts of God, improper installation, installation not in accordance with electrical or plumbing codes, or use of products not...
... or Service" section or by Maytag. 5. Damage resulting from warranty coverage. 4. Discoloration, rust, or oxidation of your authorized Maytag dealer to repair or replace appliance light bulbs, air filters or water filters. This warranty gives you specific legal rights, and you are excluded from accident, alteration, misuse, abuse, fire, flood, acts of God, improper installation, installation not in accordance with electrical or plumbing codes, or use of products not...
Dimension Guide
Page 1
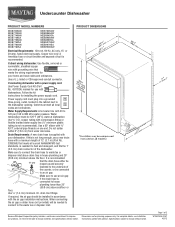
... accordance with a power supply cord: Use Power Supply Cord Kit (Part No. 4317824) marked for planning purposes only. external pipe threads on one end. When connecting the air gap a rubber hose (not provided) will be connected to 862 kPa) water pressure. or 20-amp. fuesd electrical supply. Copper wire only. If connecting dishwasher with the air gap installation instructions. Use a 90° elbow with product. Drain Requirements: A new drain hose is supplied with grounding wire that meets the wiring requirements for installing the power supply cord. Use ¹⁄...
... accordance with a power supply cord: Use Power Supply Cord Kit (Part No. 4317824) marked for planning purposes only. external pipe threads on one end. When connecting the air gap a rubber hose (not provided) will be connected to 862 kPa) water pressure. or 20-amp. fuesd electrical supply. Copper wire only. If connecting dishwasher with the air gap installation instructions. Use a 90° elbow with product. Drain Requirements: A new drain hose is supplied with grounding wire that meets the wiring requirements for installing the power supply cord. Use ¹⁄...


